Got a tip for us?
Let us know
Become a MacRumors Supporter for $50/year with no ads, ability to filter front page stories, and private forums.
2020 Air Heatsink Modification Thread
- Thread starter ilikewhey
- Start date
- Sort by reaction score
You are using an out of date browser. It may not display this or other websites correctly.
You should upgrade or use an alternative browser.
You should upgrade or use an alternative browser.
From what I can tell the only difference between the i5 and the i7 is the i7 has about a 9% increase in base and boost clock speeds over the i5. If I increase my scores by 9% to account for this then I get almost exactly your scores. I doubt I would see any increase but I’m tempted to try the cold gel pack to confirm though.😊I'm very pleased with the .3mm 16X20 Shim mod using MX4 Paste and 1.5mm Arctic thermal Pad. I been getting consistent results since the mod when cool and when warm. I don't drop very much performance even back to back as shown 5X in a row GB5 no waiting.
View attachment 930641View attachment 930644
I thought I'd post an update ( I thought that I had but my post disappeared into the ether!)
I've repurposed an old set of Bathroom scales with a toughened glass platform to act as a laptop stand.
I've run a few GB5 benchmarks this morning and they are all in the mid to high 3000+ with a couple at 1166/3992, 1182/3994. lowest was 1183/3786 with a starting temp of 45C.
Fan speed is about 3k and max temp is briefly 98 before dropping back to mid 90's towards the end of each run.
I'm really pleased with the laptop, it's quiet, fast and cool. I'm tempted to see if adding a thermal pad might nudge the score over the line to 4k.
Looking at some of the other results there seems to be a variation with some of the i5 results being higher than some of the i7 ones.
MacBook Air 2020 i5/16GB/256GB heatpipe mod
Background and acknowledgement
Hi guys. Here is a new Air user from Japan. Thanks to all brilliant challengers from this thread (including srkirt, kinchee87, vyruzreaper, RiaKoobcam, Robotronic and DanSilov). I tried the shim mod which is great. The performance is better and more quiet, but the heat dissipation still worries me. I tried the heat pad mod but the bottom is too warm for me and the mod seems to stress the insulating material at the bottom case too much. So, I tried to transfer the heat from the heatsink to the spinning fan without touching the bottom case.
Process
I read this thread for guys who used metal pipe to transfer the heat to somewhere near the fan. I think the improvement is limited because the heat conduction from the metal pipe is not efficient and most air to the fan does not need to pass through the metal pipe. My plan is to make a metal punching mesh to force the spinning fan to cool it.
Here is the overall idea before installation.
View attachment 921971
I used the remaining 0.3mm copper plate (same as shim mod) to make the copper pipe. And I bought an aluminum punching mesh 0.5mm (I think) because I cannot find a copper mesh on Amazon Japan here.
View attachment 921973View attachment 921974
I used heat insulating double-side adhesive to seal the fan border and brown heat insulating tape to seal the copper plate not to overheat other components. Between the heatsink and copper pipe I used a heated (0.5mm, 6mW only) to hold the pipe in place. On top I used the brown heat insulating tape again to ensure no contact and heating up of bottom case.
Results
I found that the startup CPU temperature with shim mod alone still reaches 100 degree. But with heated mod it was 70 degree. This one is 80 degree but the temperature drops very quickly with fan spinning. I used TG Pro to setup a custom profile (4500 rpm always and maximum 7000 rpm over 90 degree).
I ran Geekbench Multicore CPU test and found that the score is very good
3169 (shim mod)
3595 (shim + heatpipe mod)
View attachment 921976
The heat profile also proves that heat is transferred properly. The frequency (light blue) during early low utilization part of the test caught up the requested one (pink) than shim pad alone. And heavy load part is better also (though heatpad mod is better because the heatpipe and fan speed capacity). You can find the comparison quoted from DanSilov thread below.
View attachment 921978
Conclusion
I am very happy to have this little reversible fix to help my Air performing better. I don't want the touch bar, and this mod helps me to have a comfortable use of my Air for years (at least I think). Thank you all.
Does someone know if there is enough space between the fan and the heatsink to install a 3mm thick heatpipe?
Edit:
I found a 1mm thin one
Qmax at Te (70 °C) 18 W
Sorry no english link available
QuickCool QG-SHP-H1.00-B9.05-100MN Heatpipe abgeflacht 0.5 K/W (L x B x H) 100 x 9 x 1 mm kaufen
Top QuickCool Auswahl ✓ Schnelle & versandkostenfreie Lieferung ab 59,50 € möglich ➥ Jetzt günstig online kaufen: QuickCool QG-SHP-H1.00-B9.05-100MN Heatpipe abgeflacht 0.5 K/W (L x B x H) 100 x 9 x 1 mm
Last edited:
Just ordered all of this. I will do the shim mod, and ontop of that a heatpipe mod from the cpu to the fan. Will report how it goes 
Copper to place around the fan hole conntcted to the heatpipe
Heatpipe
Thermal glue to attach the heatpipe and the copper

Iso tape is for parts of the heatpipe, since it could touch some components.

Copper to place around the fan hole conntcted to the heatpipe
Heatpipe
Thermal glue to attach the heatpipe and the copper
Iso tape is for parts of the heatpipe, since it could touch some components.
You seemingly have done a lot early in this thread, and I thank you for that, but I can't help but ask, why do you continue to post here about a Huawei laptop? It's completely irrelevant to the conversation.I keep playing mine ... hehehehe I've tried a wedge but here the effect is contrary to the MBA. I had to try it !!!
Hi,
i’d like to share my mod. I’ve posted this on my youtube channel.
Basically, I applied highly conductive thermal pad (thermal grizzly carbonaut) between cpu and heatsink, and also thermal pad on the heatsink..
for detailed steps, kindly pls Visit my videos.
Thanks,
i’d like to share my mod. I’ve posted this on my youtube channel.
Basically, I applied highly conductive thermal pad (thermal grizzly carbonaut) between cpu and heatsink, and also thermal pad on the heatsink..
for detailed steps, kindly pls Visit my videos.
Thanks,
Hello again,
This morning curiosity got the better of me and I opened up my i5 Air again and fitted a thermal pad ( Gelid GP Extreme 1.5mm )
After fitting I ran GB5 again a couple of times and noticed the temperature now doesn't reach 100C
Screenshot:

Link to GB5: 2837342
Very pleased to have crept over the line to 4K
The thermal pad is a very straightforward mod which doesn't involve removing the heatsink.
This morning curiosity got the better of me and I opened up my i5 Air again and fitted a thermal pad ( Gelid GP Extreme 1.5mm )
After fitting I ran GB5 again a couple of times and noticed the temperature now doesn't reach 100C
Screenshot:

Link to GB5: 2837342
Very pleased to have crept over the line to 4K
The thermal pad is a very straightforward mod which doesn't involve removing the heatsink.
From what I can tell the only difference between the i5 and the i7 is the i7 has about a 9% increase in base and boost clock speeds over the i5. If I increase my scores by 9% to account for this then I get almost exactly your scores. I doubt I would see any increase but I’m tempted to try the cold gel pack to confirm though.😊
The i7 also has 2 MB more L3 cache over the i5.
What are typical usage temps? I've been running around 50c while running messages and about 4-6 Safari tabs. Am I still running hot?
Yeah I guess I am running hot. I guess I'll try to re-paste.I've done both the Shim and thermal pad mod and I'm running iMessage with 8 Safari tabs open. Current ambient room temperature is 22C with Macs fan control showing fan speed 0 processor temperature 35C
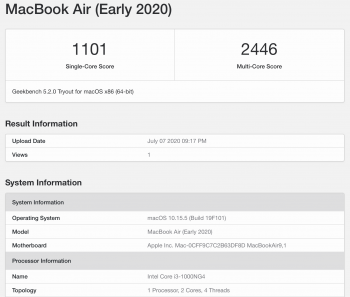
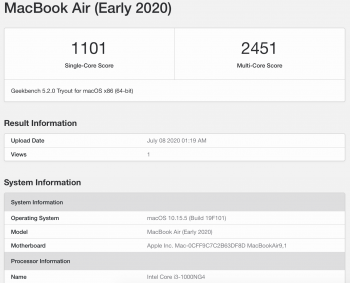
I'm still debating the thermal pad perhaps just for fun. Another data point for Geekbench on the little power sipping i3.
2020 MBA i3 GB5 Results
2020 MBA i3 GB5 Results
Attachments
Debating didn't last long. I cracked open the MBA again and I believe I have reach the limits of my set up. I tried 3 different configurations of arctic thermal pad (1.5mm) placement and material.
First was covering the whole heat sink. Cinebench R20 results 826.
I then sectioned out a middle strip, so I had a thick strips on top and bottom. Cinebench R20 results 826.
Finally removed more where I have thinner strips. Cinebench R20 results 826.
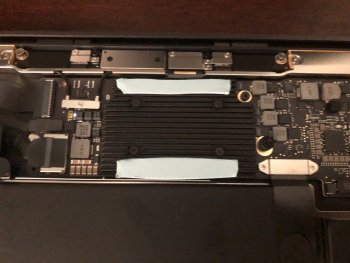
So basically all I had left on the table was 20 points (806 with the shim) and using minimal pad to create a wind tunnel over the cpu (picture) got me there. This is good as the bottom does not feel any hotter because there is not much contact.
On zoom with 20+ participates on a one hour call, with turbo boost on and projecting on air play. The temp does not go over 62C and no fans. Very happy.
Attachments
Debating didn't last long. I cracked open the MBA again and I believe I have reach the limits of my set up. I tried 3 different configurations of arctic thermal pad (1.5mm) placement and material.
First was covering the whole heat sink. Cinebench R20 results 826.
I then sectioned out a middle strip, so I had a thick strips on top and bottom. Cinebench R20 results 826.
Finally removed more where I have thinner strips. Cinebench R20 results 826.
So basically all I had left on the table was 20 points (806 with the shim) and using minimal pad to create a wind tunnel over the cpu (picture) got me there. This is good as the bottom does not feel any hotter because there is not much contact.
On zoom with 20+ participates on a one hour call, with turbo boost on and projecting on air play. The temp does not go over 62C and no fans. Very happy.
That looks to be a good mod, directing the airflow through the central channels. I'm not sure if I'm correct but did you notice if your i3 heatsink was Aluminium? My i5 is copper ( coloured) where it sits on the processor. I did weigh it when I took it off to do my shim mod ( 14g ) That got me wondering if using the heatsink from an i5 on an i3 might make a difference? ( an expensive experiment, but you'd end up with two MacBook Airs
I still see room for a company to create heat sink replacements for these laptops with certainly better fit on the CPU die, perhaps be a bit larger for heat dispersion. I would certainly consider a drop in heat sink-heat pipe-fan-exhaust heat sink, created for my i5.
I see that the i5 processor is 1.1ghz + turbo boost as required. Following on from my shim / pad upgrades it is noticeable that now when I run Cinebench the processor request matches the output. This stays in the region of 1.8Ghz for the duration of the test which leads me to believe that with the mods the processor has achieved the maximum possible ( without going into the esoteric area of trying to unlock the processor )
Debating didn't last long. I cracked open the MBA again and I believe I have reach the limits of my set up. I tried 3 different configurations of arctic thermal pad (1.5mm) placement and material.
First was covering the whole heat sink. Cinebench R20 results 826.
I then sectioned out a middle strip, so I had a thick strips on top and bottom. Cinebench R20 results 826.
Finally removed more where I have thinner strips. Cinebench R20 results 826.
So basically all I had left on the table was 20 points (806 with the shim) and using minimal pad to create a wind tunnel over the cpu (picture) got me there. This is good as the bottom does not feel any hotter because there is not much contact.
On zoom with 20+ participates on a one hour call, with turbo boost on and projecting on air play. The temp does not go over 62C and no fans. Very happy.
Hi Supra Mac - I am about to pull the trigger on an 2020 i3 MBA, could you comment/link what brand Slim and Pad you ended up using?
That looks to be a good mod, directing the airflow through the central channels. I'm not sure if I'm correct but did you notice if your i3 heatsink was Aluminium? My i5 is copper ( coloured) where it sits on the processor. I did weigh it when I took it off to do my shim mod ( 14g ) That got me wondering if using the heatsink from an i5 on an i3 might make a difference? ( an expensive experiment, but you'd end up with two MacBook Airs
Its Aluminum. Would be nice to have copper, would help the give the cpu better ability to transfer heat. But like you mentioned the parameters set with power input limit the max performance (got the same high score as in the video posted above) and not the cooling system. Stock heat sink with shim mod works great for day to day, quiet machine.
[automerge]1594223672[/automerge]
Hi Supra Mac - I am about to pull the trigger on an 2020 i3 MBA, could you comment/link what brand Slim and Pad you ended up using?
Here you go. I used the below, did not use cleaner or sanded. If I did it again I would probably use 1.0mm pad, the 1.5mm gets sort of sandwiched in there but I didn't use much. There is discussion on which bit to use for the heat sink. T4 worked for me but you may want to see if T3 fits better.
Steps and Parts List
Last edited:
I've recently received new and shiny MBA 2020 i7/16GB/1TB to replace my much loved and trusted MBA 2015 i7. But I was very disappointed to find out the extent of the throttling issue — my single-core Geekbench scores varied between 1100s and 900s after multiple runs, which is a big difference, considering that my old MBA 2015 consistently pulled ~850 on the single core. Soon I found this thread and decided to try the copper shim mod.
Modification process
After I've removed the back cover and the heatsink, I've discovered the familiar blob of the black paste that everyone here has seen already.
View attachment 915469
From the looks of it the paste started to dry out already and cracked a bit. I don't think this will be a good heat conductor in the long run.
View attachment 915470
Removing the paste I've noticed what some have mentioned here — it is very thick.
View attachment 915471
Then I've applied some Arctic Silver on both dies in a thin layer (half a grain of rice). Initially I wanted to test just the thermal paste replacement, without the copper mod. But below you can see the result of placing the heatsink on top of the CPU that has been covered with Arctic Silver.
View attachment 915472
The gap is so big that it doesn't even touch the CPU! And here I am thinking that heatsink has to touch the CPU die.
So I've added copper shims to the mix. I've had some 15x15x0.3mm, and it turned out to be more than enough. As soon as I've placed the heatsink with the shims, it immediately stuck to the Arctic Silver.
Testing
I wanted to be thorough, so I made a lot of tests before and after the mod, under similar conditions. My macOS is fully fresh, I didn't migrate to it just yet, so there are no apps, nothing.
I've idled before every Cinebench run and before the first Geekbench run until temperatures reached low values. I've also tested with the maximum fan speed (8k) with TG Pro to see how that affects the results, because the system usually increases the fan speed quite slowly.
Here are a lot of screenshots for those of you who'd like to see some context. All results are summarized in a table below.
Before
Idle
View attachment 915478
Geekbench 1st run
View attachment 915473 View attachment 915474
After
Idle
View attachment 915481
Geekbench 1st run
View attachment 915479 View attachment 915480
Results
Single-Core
(before)Multi-Core
(before)Single-Core
(after)Multi-Core
(after)Geekbench
(1st run)1169 2621 1265 (+8%) 3397 (+30%) Geekbench
(2nd run)1006 2473 1174 (+17%) 3046 (+23%) Geekbench
(3rd run)1078 2606 1176 (+9%) 3022 (+16%) Geekbench
(max fan)1238 3212 1264 (+2%) 3765 (+17%) Cinebench - 903 - 1056 (+17%) Cinebench
(max fan)- 1029 - 1141 (+11%)
Single-core results are significant, but multi-core results are dramatic! What's more, during the tests I could clearly see that the CPU temperature doesn't jump to 100°C instantly with the copper shim added (I'll attach some extra screenshots in the post below).
Single-core performance is practically maxed with the copper shim, and the temperature doesn't reach full 100°C during the first half of the Geekbench test anymore.
I don't know, if this is an oversight on Apple's part or a simple way to save a few extra bucks during the assembly — putting some think paste and screwing the heatsink that doesn't touch the CPU is faster and safer, of course — but it just shows that that CPU in MBA 2020 can behave much better even without the complete redesign of the cooling system.
[automerge]1589581897[/automerge]
And here are a couple more screenshots showing the temperature charts during the Cinebench testing. It's obvious that with the copper shim installed the temperature doesn't rises so dramatically, which in the real life scenarios might keep the CPU cooler for much longer.
Before the shim mod
View attachment 915487
After the mod
View attachment 915486
Hello Dan, I saw your comment from youtube and I’m wondering if you can make a step by step video for it? There are people like me who’s a simpleton and know absolutely nothing on doing modifications on computers. It‘s a bit scary for a newb like me but i feel that your mod is really necessary. You discovered something very important that would benefit a lot of people. So I hope you consider doing a video...
That's a very interesting mod. I wonder how the two folded Carbonaut compares with the copper shim. The two folded Carbonaut is much easier to apply, no messy thermal paste, no shim to lap and it lasts basically forever.Hi,
i’d like to share my mod. I’ve posted this on my youtube channel.
Basically, I applied highly conductive thermal pad (thermal grizzly carbonaut) between cpu and heatsink, and also thermal pad on the heatsink..
for detailed steps, kindly pls Visit my videos.
Thanks,
I had to stop my mod early since i noticed i don't have a screwdriver for the heatsink screws.. so i just placed the heatpipe on the heatsink and beside the fan. Already got 500 point more in geekbench and the temps are 15° lower on avarage.
I will report the full benchmarks when i finished the whole mod.
I will report the full benchmarks when i finished the whole mod.
Just ordered all of this. I will do the shim mod, and ontop of that a heatpipe mod from the cpu to the fan. Will report how it goes
Copper to place around the fan hole conntcted to the heatpipe
Heatpipe
Thermal glue to attach the heatpipe and the copper
View attachment 931217
Iso tape is for parts of the heatpipe, since it could touch some components.
View attachment 931216
Last edited:
I had to stop my mod early since i noticed i don't have a screwdriver for the heatsink screws.. so i just placed the heatpipe on the heatsink and beside the fan. Already got 500 point more in geekbench and the temps are 15° lower on avarage.
I will report the full benchmarks when i finished the whole mod.
Takes some pics for us! Good luck.
Register on MacRumors! This sidebar will go away, and you'll see fewer ads.


