Become a MacRumors Supporter for $50/year with no ads, ability to filter front page stories, and private forums.

excelsior.ink

macrumors regular
Apr 15, 2020
134
78
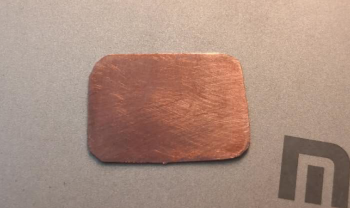
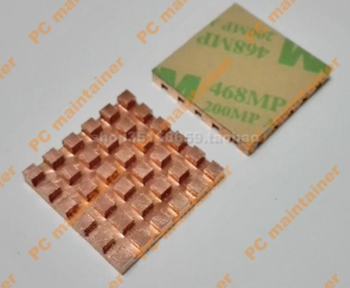
So which of the heatpipes from here:
have you ordered?
 

nidar

macrumors newbie
Jul 5, 2020
8
29
So which of the heatpipes from here:
have you ordered?


Here you can see everything. Its the "QY-SHP-H1.0-B12.10-150MN " I wuld not go over 1mm. Mine is already touching the backplate.
But one could cut out the heatsink and parts of the fan case to use a thicker one.
 

Mochi_D

macrumors newbie
May 21, 2020
16
14
Want to add to the pile of results with some developments I've had with my 2018 MBA here. I've applied Arctic MX-4 thermal paste to the die replacing the Arctic Silver 5 I've applied prior (marginal temps/performance differences with the changes and maybe an extra 100 - 150 points at most on GB5 tests on hard flat surfaces). and temps remained similar to stock with idle temps around 45 - 55C with the usual 100c dumpster fire it usually is.

NOTE: these general results and experiences are in a room with an ambient temperature of around 65F - 68F. I like it cold and will specify if the ambient temp is different as my office at work is a higher temp and comes into play at the end. Each paragraph is a slightly different mod and the experience that followed.

Insulator removal
The next change was the removal of the thermal insulator on the bottom cover, with the insulator removed there was less heat transferred to the bottom case and the temps seemed to drop much faster when they did spike due to usage demands. Slight increase in scores over in GB5 and during sustained loads (parallels Win10 (idling on the desktop), Safari 4 - 7 tabs) temps never stayed at 100C very long and once normalized sat around 88C give or take a few degrees.

Thermal pad (unique size/placement) no insulator
Following the above I decided to apply a thermal pad to the heatsink to form a connection to the bottom cover. I purchased a 6W/m.k ADWIT thermal pad. 1.5mm seemed to be just a hair over the thickness of the original insulator and fit perfectly. I cut a piece to fit perfectly square between the heatsink's mounting screws themselves to leave room for airflow over the edge fins. Temps never exceeded 81C with Safari (4 tabs), and Win10 in parallels with two moderately intensive Unity games (for a MBA) running.

At this point the i5 seems to level out at 1.5/1.6GHz after a sustained load is, well, sustained for more than about 4min. Fans never ramp up, at all. They sit at 3k or below maintaining these temps and clock speeds (these clock speeds appear to be hard coded limits on my machine). Now the downside. With this direct contact, AND the thermal pad being directly over the relative center of both dies under the heatsink, the bottom gets very, very hot after a sustained load at 80C for about 5min. So hot that it smells like heated aluminum and WILL cause a burn over a relatively short amount of time. Ramping to 8k on the fans doesn't lower temps beyond 77C.

Thermal pad (unique size/placement) no insulator (ALTERED)
Way, too hot for me. My next idea was this. Combine the benefits of the removed insulator and thermal pad to fully utilize both approaches in a more, elegant way. So I cut two narrow strips of thermal pad the length of the heatsink and the width of the edge of the heatsink to the outer edge of the mounting screws. I laid these pieces along the longest sides of the heatsink to maximize contact between the heatsink and bottom cover, while maximizing airflow over the hottest areas, i.e. directly above the locations of the die.

Final results
With the above, I've gained the best temp/comfort levels I think are possible, with the least invasive approach on this model. I have at this moment 3 tabs in safari, 19 chrome tabs (note that 6 of these tabs are in a wrapper via Wavebox), Notes, stocks, and Discord. My temps with the machine in an office with the ambient temp around 72F, sitting on my legs (bottom of the case is closer to tepid if I had to describe it now.) for the time it took to write this is 35 - 40C (short spikes to 50C when changing windows), zero rpm. It has not hit over 72C today that I've noticed and when it has spiked to near said temps it lowers immediately. Fans haven't come on once today, even while watching videos 720p - 1080p. All the while the machine is sitting on the velour/felt style sleeve I use, not the hard wood of my desk.

Final max temp I've seen, 81C under heavy use that wouldn't be normal for a MBA (see above). Highest temps on a benchmark (GB5), 100C for very, very short periods of time, averages around 95 - 99C when running intensive benchmarks. The final temps I've achieved seem oddly, consistent regardless of the surface the laptop is used on. Wooden desk, on a pillow/thick blankets/bedsheets....still sits at the final temps I've obtained with no fans needed.

/wall I'll rewrite this later to be more eloquent...
 
Last edited:

Loog

macrumors regular
Apr 14, 2020
164
167
Want to add to the pile of results with some developments I've had with my 2018 MBA here. I've applied Arctic MX-4 thermal paste to the die replacing the Arctic Silver 5 I've applied prior (marginal temps/performance differences with the changes and maybe an extra 100 - 150 points at most on GB5 tests on hard flat surfaces). and temps remained similar to stock with idle temps around 45 - 55C with the usual 100c dumpster fire it usually is.

NOTE: these general results and experiences are in a room with an ambient temperature of around 65F - 68F. I like it cold and will specify if the ambient temp is different as my office at work is a higher temp and comes into play at the end. Each paragraph is a slightly different mod and the experience that followed.

Insulator removal
The next change was the removal of the thermal insulator on the bottom cover, with the insulator removed there was less heat transferred to the bottom case and the temps seemed to drop much faster when they did spike due to usage demands. Slight increase in scores over in GB5 and during sustained loads (parallels Win10 (idling on the desktop), Safari 4 - 7 tabs) temps never stayed at 100C very long and once normalized sat around 88C give or take a few degrees.

Thermal pad (unique size/placement) no insulator
Following the above I decided to apply a thermal pad to the heatsink to form a connection to the bottom cover. I purchased a 6W/m.k ADWIT thermal pad. 1.5mm seemed to be just a hair over the thickness of the original insulator and fit perfectly. I cut a piece to fit perfectly square between the heatsink's mounting screws themselves to leave room for airflow over the edge fins. Temps never exceeded 81C with Safari (4 tabs), and Win10 in parallels with two moderately intensive Unity games running.

At this point the i5 seems to level out at 1.5/1.6GHz after a sustained load is, well, sustained for more than about 4min. Fans never ramp up, at all. They sit at 3k or below maintaining these temps and clock speeds (these clock speeds appear to be hard coded limits on my machine). Now the downside. With this direct contact, AND the thermal pad being directly over the relative center of both dies under the heatsink, the bottom gets very, very hot after a sustained load at 80C for about 5min. So hot that it smells like heated aluminum and WILL cause a burn over a relatively short amount of time. Ramping to 8k on the fans doesn't lower temps beyond 77C.

Thermal pad (unique size/placement) no insulator (ALTERED)
Way, too hot for me. My next idea was this. Combine the benefits of the removed insulator and thermal pad to fully utilize both approaches in a more, elegant way. So I cut two narrow strips of thermal pad the length of the heatsink and the width of the edge of the heatsink to the outer edge of the mounting screws. I laid these pieces along the longest sides of the heatsink to maximize contact between the heatsink and bottom cover, while maximizing airflow over the hottest areas, i.e. directly above the locations of the die.

Final results
With the above, I've gained the best temp/comfort levels I think are possible, with the least invasive approach on this model. I have at this moment 3 tabs in safari, 19 chrome tabs (note that 6 of these tabs are in a wrapper via Wavebox), Notes, stocks, and Discord. My temps with the machine in an office with the ambient temp around 72F, sitting on my legs (bottom of the case is closer to tepid if I had to describe it now.) for the time it took to write this is 35 - 40C (short spikes to 50C when changing windows), zero rpm. It has not hit over 72C today that I've noticed and when it has spiked to near said temps it lowers immediately. Fans haven't come on once today, even while watching videos 720p - 1080p. All the while the machine is sitting on the velour/felt style sleeve I use, not the hard wood of my desk.

Final max temp I've seen, 81C under heavy use that wouldn't be normal for a MBA (see above). Highest temps on a benchmark, 100C for very, very short periods of time, averages around 95 - 99C when running intensive benchmarks.

/wall I'll rewrite this later to be more eloquent...
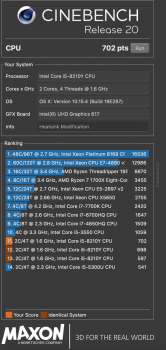
Nice write up. I did both the 0.5mm shim mod with MX4 on my MBA 2018 as well as the heat pad. Stock figures beforehand reached 597 in Cinebench R20, with the shim 698 and heatpad this increased to 702.

I found the heatpad kept the overall temperatures lower when the machine is under load on video conferencing, however the heat transfer when using this on your lap was just uncomfortable to painful in shorts. I quickly removed the thermal pad and just stuck with the shim mod which provided the best compromise in thermals and performance

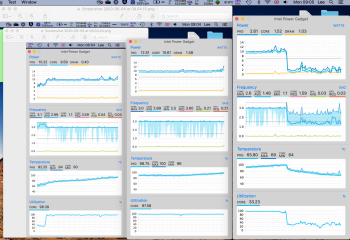
You can see in this test I did here using intel power gadget to stress the CPU for for 10 mins that you get 3k Mhz constant but the CPU is at 100 deg, but this is still comfortable (but warm) to use on your lap. Recovery and cool down thereafter is also quick.
 

Attachments

  • Screenshot 2020-05-17 at 16.04.37 copy.png
    Screenshot 2020-05-17 at 16.04.37 copy.png
    257.3 KB · Views: 201
  • Screenshot 2020-06-08 at 09.05.37 copy.png
    Screenshot 2020-06-08 at 09.05.37 copy.png
    1.7 MB · Views: 157
Last edited:
  • Like
Reactions: adrianlondon

nidar

macrumors newbie
Jul 5, 2020
8
29
I just ran a 2h test on my machine on how much impact the fan speed has.
I didn't record any data since it started out to be just a quick test ;)

My conclusion is that this machine is basically cooled by throttling.
I tried every possible Scenario I could come up with
  • CPU Turbo on / off
  • Fan on max before load
  • Fan never on
  • Let the system handle the fan
  • GPU/CPU only load
  • and more
I could see some throttling as soon as cpu/gpu reached 100°c and often then a drop to 80s°c (even without the fan on)
If I sustained a temperature and then did turn the fan from 2k to 8k, it took up to 4 min to reduce just 3°c

The only thing I noticed the fan does is enable the cpu/gpu to throttle a bit less around 95-100°c
Besides from that it could be turned off, or only used if a sustained high load is expected.
 

Mochi_D

macrumors newbie
May 21, 2020
16
14
I found the heatpad kept the overall temperatures lower when the machine is under load on video conferencing, however the heat transfer when using this on your lap was just uncomfortable to painful in shorts. I quickly removed the thermal pad and just stuck with the shim mod which provided the best compromise in thermals and performance

Agreed. Though I didn't do the shim mod I had to remove the central pad after a few hours of pushing the machine as the bottom just got too hot with the pad directly over the die on the heatsink. Hot enough that it started to smell like aluminum that was being heated with a propane torch for me. Once I altered the placement, the bottom still gets warm but the most direct heat source is left to the air (what little their is) and the indirect edges of the heatsink are connected to the cover. Seems to be a good balance so far and while it cost me about 4C in temps the case is comfortable on bare skin and still won't exceed 80C under what I'd call, abusive load for a MBA.

You can see in this test I did here using intel power gadget to stress the CPU for for 10 mins that you get 3k Mhz constant but the CPU is at 100 deg, but this is still comfortable (but warm) to use on your lap. Recovery and cool down thereafter is also quick.

Does it clock down to 1.6 for you after those 10min? Mine always normalizes at 1.5/1.6 after a few minutes of a sustained load. I can force it to boost up by introducing more workload surprisingly but it'd be awesome to get it to sustain that higher clock speed or really 2Ghz at the very least. >.>
 
  • Like
Reactions: Loog

skriatok

macrumors newbie
Jul 13, 2020
3
4
I just ran a 2h test on my machine on how much impact the fan speed has.
I didn't record any data since it started out to be just a quick test ;)

My conclusion is that this machine is basically cooled by throttling.
I tried every possible Scenario I could come up with
  • CPU Turbo on / off
  • Fan on max before load
  • Fan never on
  • Let the system handle the fan
  • GPU/CPU only load
  • and more
I could see some throttling as soon as cpu/gpu reached 100°c and often then a drop to 80s°c (even without the fan on)
If I sustained a temperature and then did turn the fan from 2k to 8k, it took up to 4 min to reduce just 3°c

The only thing I noticed the fan does is enable the cpu/gpu to throttle a bit less around 95-100°c
Besides from that it could be turned off, or only used if a sustained high load is expected.
That kind of explains the watercooled experiment, where with 40degrees thermal headroom it did not use the potential. If I remember correctly it kept 1,8GIGA sustained load. Im not sure how would you create this scenario in CPU. It almost seems like the time lenght of load related*. So if we go back to the begining, the fan does improve preformance around 15% give or take if connected to the heatsink by pipe. I dont see reason to mod it, if we cannot tweak the headroom behavior. The only gain is less noise and not so great under the load performance gain.

*Or some kind of deltaT adjustment. Maximum sustained load is related to actual temperature and the headroom is deltaT. That would make sense. Because the flexibility and speed of cooldown must be balanced to the temperature spike. The only thing I can immagine to improve this scenario is better heatsink design. That actually does rise the price significantly.

I like my macbook air i5 2020.
 
Last edited:

Loog

macrumors regular
Apr 14, 2020
164
167
Agreed. Though I didn't do the shim mod I had to remove the central pad after a few hours of pushing the machine as the bottom just got too hot with the pad directly over the die on the heatsink. Hot enough that it started to smell like aluminum that was being heated with a propane torch for me. Once I altered the placement, the bottom still gets warm but the most direct heat source is left to the air (what little their is) and the indirect edges of the heatsink are connected to the cover. Seems to be a good balance so far and while it cost me about 4C in temps the case is comfortable on bare skin and still won't exceed 80C under what I'd call, abusive load for a MBA.


Does it clock down to 1.6 for you after those 10min? Mine always normalizes at 1.5/1.6 after a few minutes of a sustained load. I can force it to boost up by introducing more workload surprisingly but it'd be awesome to get it to sustain that higher clock speed or really 2Ghz at the very least. >.>
@Mochi_D No, it just keeps on static at at 3Ghz, which is awesome, the shims are certainly the way to go. The drop off is where I stopped the test to show how the device recovers and how quickly this happens. I used MX4 so if you use Artic silver be sure that you don't get any overspill, others have used kryonaut which has better thermal transfer qualities and is non conductive. If you want a shim drop me a PM with your address and I'll get one popped out into the post free of charge (if you undertake a review), I still have a couple 0.5mm left over from my custom run around page 47 of the thread. There's quite a few modded devices out there with custom shims and plenty of reviews on the forum in both generations of MBA Retina.

 
Last edited:
  • Like
Reactions: Tenkaykev

thekryz

macrumors newbie
Aug 16, 2008
9
1
View attachment 933525
The heatpipe has some small non conductive tape parts where it could touch some contacts underneath.

I really like your heatpipe mod, thank you! It seems the copper shim, your heatsink and maybe a thermal pad (if one doesn't use the machine on their laps) is the best combination of mods so far, right?

I was wondering though if the heat of the heatpipe has the potential to damage any components it's close to, since it must get pretty hot. What do you think? Should/could a heat insulation be applied under the heatpipe, towards the logic board?

What would happen if the thermal pad was added to the heatsink, around the pipe? It should dissipate the heat to the pipe AND the bottom cover - would that be beneficial or detrimental to the work of the pipe/fan?

Also, I'm still thinking about how to mod my brandnew machine (should arrive in the next weeks) without losing warranty. The fan seems to be available at iFixit - maybe a fan-heatpipe-mod can be done which can later be undone, using thermal paste instead of thermal glue on the heatpad? The fan could then be replaced if there is another warranty issue... unfortunately I'm afraid that installing a copper shim could void warranty. So the best mod kit would probably include a fan-heatpipe-heatsink unit which could be replaced completely...

EDIT: I was wondering if Kapton tape could be used to connect the heatsink and the heatpipe, since I read that Kapton (especially Kapton MT+) has good thermally conductive properties and would be easily removable and electrically nonconductive / insulating. How easily can the thermal glue be removed? Does it leave residual traces?

EDIT 2: How about building a heatpipe with Kapton tape along the case and connecting it to the heatsink and fan respectively with (parts of) a thermal pad? I'm sure copper would conduct heat better, but maybe it could still provide a cheap, easy and removable thermal/performance improvement?
I guess I confused a heatpipe with plain copper...

EDIT 3 (2020-07-18): Found some cheap heatpipes here: https://www.aliexpress.com/item/4000058889078.html. As far as I can see on nidar's pictures, 9cm might be a better option than the 10cm used by nidar.
 
Last edited:

petermeng

macrumors newbie
Jul 16, 2020
7
12
MacBook Air 2020: i7/16GB/1TB with wind channel and heat sink mod

Here are more benchmark results to supplement my previous ones. I always ran the benchmarks with the MacBook Air fully charged and plugged in, and always waited for the CPU to cool down to around 42 ℃ before running the next benchmark. Each benchmark was executed at least three times and I averaged the results.


Geekbench 5
The single-core and graphics performance are only slightly better. I think it's because thermal throttling didn't happen much for those tests with the original heat sink. Multi-core performance, however, is about 20% higher. Click on a Mod result to view the best that I got.

Test TypeOriginal (Points)Mod (Points)Improvement
CPU (Single-core)
1,214​
4.8%​
CPU (Multi-core)
2,992​
22.5%​
Compute (OpenCL)
3,825​
3.1%​
Compute (Metal)
4,285​
4.8%​


Cinebench R20
Single-core and multi-core performance both improved by about the same amount, unlike the large performance improvement gap seen with Geekbench.

Test TypeOriginal (Points)Mod (Points)Improvement
CPU (Multi-core)
979​
1,110​
13.5%​
CPU (Single-core)
353​
390​
10.5%​
MP Ratio
2.77​
2.84​
2.7%​

View attachment 910875


Intel Power Gadget 3.7.0
Lastly, I did some plain-old stress tests, which show about 20% improvement in sustained CPU and GPU performance.

Test TypeOriginal (GHz)Mod (GHz)Improvement
CPU (All Thread Frequency, Scalar)
2.25​
2.70​
20.0%​
CPU (All Thread Frequency, AVX-256)
2.12​
2.59​
22.2%​
CPU (All Thread Frequency, AVX-512)
2.00​
2.40​
20.0%​
Intel Graphics Test (Max Frequency)
0.90​
1.10​
22.2%​

View attachment 910904 View attachment 910905 View attachment 910906 View attachment 910907

I don't remember if my MacBook Air was originally able to sustain max Turbo Boost for single-core.
View attachment 910927
I am new joiner to MacRumers. After read many of reviews here. I just do a simple actions that replace the silicon grease between CPU die and Heat sink. Intel PG result looks improved already compare to your original i7. item 1~4 are 24.G, 2.2G, 2.1G and 0.93G. Test on Air 2020 I5 and sorry I forgot to do testing before replace the grease. I am plan for step by step testing while my purchased materials come.
 
  • Like
Reactions: kinchee87

Mochi_D

macrumors newbie
May 21, 2020
16
14
If you want a shim drop me a PM with your address and I'll get one popped out into the post free of charge (if you undertake a review), I still have a couple 0.5mm left over from my custom run around page 47 of the thread. There's quite a few modded devices out there with custom shims and plenty of reviews on the forum in both generations of MBA Retina.

I'll keep the offer in mind and appreciate the desire to get more results from users to add to the pool for the curious who pop into this thread. This is my only laptop atm so I'm trying to be as non-invasive as possible, and while I'm not unfamiliar with mods like this, my heatsink seems to be close enough to the die that any thermal compound I apply is being spread properly. More copper wouldn't hurt (probably) but I don't feel the need to go much further with my use case being what it is.
 
  • Like
Reactions: Loog

thekryz

macrumors newbie
Aug 16, 2008
9
1
I've got a few DM's from people asking about the modifications. To make it easier for people contemplating the paste/shim/pad modifications, I've put a how-to guide online with pictures and test results. Hope you find it useful.

Awesome overview, thank you! Is there a theory as to why a thicker heat pad would make the MBA hotter while the thinner one seems to provide the same performance boost? Shouldn't the same amount of (heat) energy be at play here?
 

fcracer

macrumors regular
Jun 15, 2017
134
277
Awesome overview, thank you! Is there a theory as to why a thicker heat pad would make the MBA hotter while the thinner one seems to provide the same performance boost? Shouldn't the same amount of (heat) energy be at play here?

Thanks for the kind feedback, I appreciate it.

The performance is not exactly the same. The thicker pad does have a higher Geekbench score by ~100 when its run back to back several times.

The 1MM pad will achieve ~3950 on MC when run back to back multiple times, whereas people on this forum like IngerMan are getting I believe ~4050 using the thicker pad in back to back runs.

When the benchmarks are run once only, the performance is the same with both thicknesses. They can both achieve ~1300 SC and ~4150 MC, with some lucky runs like the one I got which produced 1304 and 4194.

The same story unfolds on Cinebench, with the thicker pad producing results consistently ~1220, whereas the thinner pad comes in a bit lower at ~1180.

I personally feel the 3% performance that you give up is a worthwhile tradeoff for having a bottom cover that won't induce burns when the computer is used for long periods of time, when in contact with skin.
 
Last edited:

kinchee87

macrumors 6502
Jan 9, 2007
289
212
New Zealand
I am new joiner to MacRumers. After read many of reviews here. I just do a simple actions that replace the silicon grease between CPU die and Heat sink. Intel PG result looks improved already compare to your original i7. item 1~4 are 24.G, 2.2G, 2.1G and 0.93G. Test on Air 2020 I5 and sorry I forgot to do testing before replace the grease. I am plan for step by step testing while my purchased materials come.
Nice to hear that you're getting good results by simply reapplying the thermal grease! I think the original thermal grease in my i7 was badly applied by Apple, because my original scores were very low compared to others' i7s.

I've got a few DM's from people asking about the modifications. To make it easier for people contemplating the paste/shim/pad modifications, I've put a how-to guide online with pictures and test results. Hope you find it useful.
Your guide should definitely be featured in the first post of this thread!
 

Stage12

macrumors newbie
Jul 14, 2020
1
0
So after reading this whole thread, I'm not sure if i should go with a shimmed i3/16gb or an shimmed i5/16gb. This will usually be used on my lap and not a table. So the heat issue is the determining factor. Any thoughts guys? thanks
 

Supra Mac

macrumors 6502
Jan 5, 2012
302
143
Texas
If you are requiring 16GB of ram then I can assume your needs are more than basic. The quad may be the way to go. Plus its heat sink design looks to be better transferring heat to the air so that will help with heat in your lap.

You can also use something like turbo boost switcher or Volta to dial it back to cooler levels.
 
  • Like
Reactions: Stage12

fcracer

macrumors regular
Jun 15, 2017
134
277
So after reading this whole thread, I'm not sure if i should go with a shimmed i3/16gb or an shimmed i5/16gb. This will usually be used on my lap and not a table. So the heat issue is the determining factor. Any thoughts guys? thanks

Definitely the i5. If heat is a concern, just do the paste and shim. That will get you cold geekbench scores at ~4000 and sustained at ~3400. And since you’re not transferring any heat to the bottom cover, it stays cool just like Apple intended.

Only downside to going paste/shim only is that the fan will still spin up frequently under heavy workloads.
 
  • Like
Reactions: Stage12

petermeng

macrumors newbie
Jul 16, 2020
7
12
I mean geekbench scores are not far from the MBP. I wonder though why Cinebench scores are so much worse in comparison to the MBP.
GB more reflect short time Turbo Boost performance, the TDP can up to 30W. CB more stress the CPU limitation which running with the stable at TDP 10~13W.
[automerge]1595040554[/automerge]
Last test of for now. It was my 7th run while running a 4k video on YT and a few tabs open on Opera. Fans hit 3.3k RPM. Temps were about 95C. Performance went down a bit, but I'm ok with this. If I needed more, I would have gotten a MBP.


What I love about the shim+pad mod (SPM for short :p) is that single core perf always stays around the 1100-1200 range. Multicore seems to fluctuate between 3500-4000 (has anyone hit 4k MC GB5 results?). Temps quickly cool and take longer to heat up. And fans stay below 4k RPM.

VERY VERY HAPPY. For those on the fence -> took me about 1 hour and well worth it. You do not need any EE expertise. Just take your time and follow instructions :)

View attachment 916547
Hi vyruzreaper, looks very good. Just wonder if you can share the temp of bottom case? Thanks
 
Last edited:

petermeng

macrumors newbie
Jul 16, 2020
7
12
Song long thread. I just catch up to page 56 now. Till now I have two questions, since mostly like people talking about 0.3/0.5 copper for heat sink and thermal pad.
(1) why we don't just drill 4 x screw holes on heat sink a bit to make it more close to CPU die, instead of add 0.3/0.5 copper? It looks more effective and more directly transfer heat. Is that due to warranty?
(2) Actually I don't like much on thermal pad, since it's clearly will made the backplate hot. I am very satisfied with original temp even under 100 degree CPU temp during VC. So I am just wonder why no one here think about using a real heat pipe put on heat sink and connect fan? Just use one 1mmx9mmx20mm heat pipe. There are two benefits: a) distribute the heat more widely to backplate, since no direct touch the temp will be just slightly transfer. But consider wide backplate used, it transfer more of total heat. b) make the heat pipe touch the fan will easy bring out more hot wind.

Just remind here what I am saying is real heat pipe not copper made, that's totally different. I will take time to start my mod start from next weekend and update you.
 

petermeng

macrumors newbie
Jul 16, 2020
7
12
Just share what I am prepared / ordered.

1) hand made copper 22mm x 16mm x 0.3mm - previously buy for my MacBook 12 mod, 100mmx100mmx0.3mm cost 1.5 USD.
2) 22mm x 22mm x 3mm heat sink (Standard), cost 0.7 USD
3) Custom 56mm x 36mm x 3mm heat sink, cost 4 USD
4) 180mm x 9mm x 1mm heat pipe, cost 3 USD
5) Other purchased:
- Shin ETSU 7921 (3gx2) cost 3.2 USD, previously buy for MacBook 12 mod
- Screw driver tools, cost 13.5 USD
- Laird thermal pad, 40mmx80mmx0.5, cost 4.9 USD

Total about 30 USD, not cost much. I am enjoy it. haha.

Testing plan:
1) item 1 is the basic testing as all doing here. also item 1+4 testing.
2) item 2 just purely for assessment purpose, I want to know if it worked for just using a small 22x22 copper heat sink.
3) item 3 used to replace the stock heat sink. I want see if there's a big improvement compare to stock one. same item 3+4 testing and later make decision.

I am still not make decision how about just simple drill on screw holes instead of add a 0.3mm copper.
One 65W PD power also on the way, I want to see if any changes while power by 20V x 3A.
 

Attachments

  • Screen Shot 2020-07-18 at 18.00.06.png
    Screen Shot 2020-07-18 at 18.00.06.png
    498.6 KB · Views: 162
  • Screen Shot 2020-07-18 at 17.56.24.png
    Screen Shot 2020-07-18 at 17.56.24.png
    670.1 KB · Views: 150
  • Screen Shot 2020-07-18 at 17.57.09.png
    Screen Shot 2020-07-18 at 17.57.09.png
    895.6 KB · Views: 157
  • Screen Shot 2020-07-18 at 17.58.20.png
    Screen Shot 2020-07-18 at 17.58.20.png
    405.1 KB · Views: 146
  • Screen Shot 2020-07-18 at 18.18.53.png
    Screen Shot 2020-07-18 at 18.18.53.png
    1.5 MB · Views: 182
  • Screen Shot 2020-07-18 at 18.26.23.png
    Screen Shot 2020-07-18 at 18.26.23.png
    989.8 KB · Views: 124
Last edited:
  • Like
Reactions: ilikewhey

agaskew

macrumors 6502
Dec 3, 2009
416
253
Song long thread. I just catch up to page 56 now. Till now I have two questions, since mostly like people talking about 0.3/0.5 copper for heat sink and thermal pad.
(1) why we don't just drill 4 x screw holes on heat sink a bit to make it more close to CPU die, instead of add 0.3/0.5 copper? It looks more effective and more directly transfer heat. Is that due to warranty?
(2) Actually I don't like much on thermal pad, since it's clearly will made the backplate hot. I am very satisfied with original temp even under 100 degree CPU temp during VC. So I am just wonder why no one here think about using a real heat pipe put on heat sink and connect fan? Just use one 1mmx9mmx20mm heat pipe. There are two benefits: a) distribute the heat more widely to backplate, since no direct touch the temp will be just slightly transfer. But consider wide backplate used, it transfer more of total heat. b) make the heat pipe touch the fan will easy bring out more hot wind.

Just remind here what I am saying is real heat pipe not copper made, that's totally different. I will take time to start my mod start from next weekend and update you.

  1. If you watch the video from Linus Tech Tips, they did this. I think the verdict was that even drilling more/bigger/better holes was not ideal because it reduced the amount of metal in the heat sink.
  2. Check out nidar's mods
 

petermeng

macrumors newbie
Jul 16, 2020
7
12
  1. If you watch the video from Linus Tech Tips, they did this. I think the verdict was that even drilling more/bigger/better holes was not ideal because it reduced the amount of metal in the heat sink.
  2. Check out nidar's mods
1)Yes, but not sure why no one try here. Also the heat transfer more rely to metal surface but not metal volume. So I can't agree. to drill the hole purpose just directly touch CPU and avoid using copper shim.
2)Yes, I see. Since it's too long, I am just finished 56 pages. haha
 
Last edited:
  • Like
Reactions: agaskew

ilikewhey

macrumors 68040
Original poster
May 14, 2014
3,616
4,680
nyc upper east
just updated 1st post, so apparently there is another mod with an actual heatpipe, if you guys want me to put that in 1st post, someone gotta write up the step by step :D
 
Register on MacRumors! This sidebar will go away, and you'll see fewer ads.