Become a MacRumors Supporter for $50/year with no ads, ability to filter front page stories, and private forums.
Status
The first post of this thread is a WikiPost and can be edited by anyone with the appropiate permissions. Your edits will be public.
Thank you!
I don't have any more powerful PSU, but I have ordered a 10A one arriving later this week.
I also ordered a power usage meter.
I'll do some experimentation and report back.

Previously I have tested the Macbook power draw with a USB power meter, with the following results (when the Macbook battery is on low charge):
  • Only plugging in USB-C: Macbook draws ~80W.
  • Plugging in both Displayport and USB-C: Macbook draws ~40W. The USB-C connection still dies if I put the display on high brightness in this scenario.
  • Plugging in Displayport and then USB-C through a dongle: Macbook draws ~20W. This was stable with high brightness if I recall correctly.
I can confirm that the problem seemed to be that the 6A PSU was too weak. With 8A and 10A PSUs it worked fine.

I did some measurements to check the power draw from the outlet, the peak I saw with USB-C charging on low battery + 100% display brightness was around 165W. So if you want to use the 90W charging over USB-C you need at least an 8A / 24V PSU.

On full battery charge the draw over USB-C was around 30W with 0% brightness, and 75W with 100% brightness.

With Displayport (meaning the display is not powering the computer) the draw was around 20W with 0% brightness, and 65W with 100% brightness.

Maybe this can help someone else too!
 
@8megabits
"With Displayport (meaning the display is not powering the computer) the draw was around 20W with 0% brightness, and 65W with 100% brightness."

Thank you for giving details of the power consumption of the JRY-W9RQQHD-SA1.

For comparison here are the same figures for my R1811 HDMI 2.0 board:
Backlight 0%: 22.5W.
Backlight 50%: 33W.
Backlight 100%: 52.5W.
Sleeping: <1W.

For the Haijing T18 board, which was tested here:
Display on (0% backlight brightness, which is still "on" and visible, just low): 25W
Display on (50% backlight brightness, the default value): 72W
Display on (100% backlight brightness): 82W
Display connected but in sleep (no backlight, red LED lit on the button board): <1W

For comparison, the Apple Studio Display is listed as only using 21.2 watts in use.
 
Last edited:
  • Like
Reactions: 8megabits
I just finished my build, using the Dalee crossovers and I find the sound more than decent. At least to watch a Youtube video. I could make a video if you like.

It's actually quite simple.
- Find the cable from the strip that is the power button on the control panel. For the SA1 it's actually written , it's the one at the bottom when looking the panel
- Find the one for GND, same it's the fifth from the top.
- Wire one of the power button cable to Power
- The other one to GND (you have to split this cable, you still need ground for the other buttons of the control panel)
- 'order' doesn't matter

cc @ItsAShaunParty
Hey! Just saw this!

I am interested in a video. How does it compare to the iMac sound?

I'm always blown away when I play music through the iMac. It sure beats the built-in Mac Mini
 
I finished my DIY 5k Monitor build. Thanks to all who have contributed to this great thread!

I used the following hardware:
  • A fully functioning 2019 5k iMac with an LM270QQ1 (SD) (E1) panel
  • An R1811 v4 driver board from StoneTaskin which came with:
    • an LCD cable
    • a backlight cable
    • an OSD keypad
    • a 24V, 5A power supply
    • and a remote
  • A set of crossover boards to utilize the iMac speakers purchased from StoneTaskin
  • A Cable Matters unidirectional usb-c to DP 1.4 cable capable of 8k resolution (1m long)
  • A Cable Matters USB4 8k video and 240W charging cable (1m long)
  • (2) Cable Matters DP 90 degree adapters
  • A Cable Matters usb-c 90 degree adapter
  • Uppercase brand silver palm rest skin to cover iMac ports
  • Apple OEM iMac Pro adhesive strips
Notes:
  1. This build is to be used primarily with a Mac mini (currently using with the M4 version).
  2. Ordered the HDMI 2.0 board since I decided that I didn’t need the HDMI 2.1 version.
  3. Used ESD tape, Scotch Extreme double sided tape, and Scotch Extreme velcro for most of the build. The Scotch branded tape and velcro are made by 3M and have slightly lower high temperature limits than the 3M branded products. I used them because I could find them locally.
  4. Mounted the R1811 v4 on the LCD assembly so that its fan can blow out the exhaust grill. The fan on my R1811 v4 is almost completely silent. Cut a ~3mm thick piece of acrylic which I mounted using double sided tape. Mounted the R1811 v4 to the acrylic using velcro. This configuration allows the acrylic to act as a heat shield between the board and the LCD, and provide airflow between the acrylic and the board.
  5. Mounting the R1811 v4 in this position also allows for 90 degree elbows to point out the ram door. This is pretty convenient for connecting short cables (which is recommended).
  6. Used anti-static tape around the outside of the LCD assembly to help prevent dust ingress which can affect these displays. There is currently no dust in the LCD, and I want to keep it that way.
  7. Connected the iMac power button to the OSD keypad and mounted the keypad internally down by where the chinstrap would go. If I need to use the OSD, I can reach the remote around the back of the computer and it works fine.
  8. Cut the power supply cord and wired it up internally to the iMac AC input, so that I can make use of the original iMac power cord. It is convenient to be able to remove the original iMac power cord if I need to move the display.
  9. Used the 5A power supply for convenience and the fact that I do not currently use a MacBook that could make use of the usb-c charging functionality. If I start using it with a MacBook, the MacBook will just charge more slowly. If that becomes a problem, I will open the display back up to install an 8A supply.
  10. Decided not to use an internal webcam as this setup works great with my iPhone and continuity camera.
  11. Covered the camera hole with black electrical tape on the inside of the assembly in order to prevent light from coming out through the front of the display.
  12. Covered the iMac ports with an Uppercase brand silver palm rest skin.
  13. Used Apple OEM adhesive strips from an eBay vendor I have used many times in the past. They were out of the 2019 strips, so I used the iMac Pro strips. The side strips are exactly the same parts. The top strips are identical as far as I can tell. The bottom strips are different, but only due to the fact that they cover the microphone holes on the 2019 which I don’t care about since I am not using the microphone.
  14. The speakers work fine. When compared to another 2019 5k iMac I have sitting 6 feet away, they sound much worse. The iMac logic board does a better job of driving the speakers and getting good sound out of them.
  15. Getting 5k/60/10 output using each DP and the usb-c port (no issues).
  16. Kind of disappointed that I did not get the newer firmware that the HDMI 2.1 board gets, even though I ordered the newer R1811 v4 HDMI 2.0 board directly from StoneTaskin.
  17. This display is now rock solid.
  18. Thanks again to everyone on this thread for contributing to the community knowledge regarding DIY 5k monitor builds, especially to PaulD-UK whose posts are particularly helpful!
This is a beautiful build.

What did you end up spending?

How does it sound?

Would it have killed you to make an instructional video? ;)

I think if I had a good video to follow, I'd feel confident enough to purchase an expensive board.

Maybe I could make a. video of me trying to figure it out. It would be a 12-hour dark comedy featuring a very frustrated, stereotypical Apple enthusiast who occasionally breaks down in tears from frustration. And when I finally finish, I drop the screen. Fin.
 
  • Haha
Reactions: d0od
This is a beautiful build.

What did you end up spending?

How does it sound?

Would it have killed you to make an instructional video? ;)

I think if I had a good video to follow, I'd feel confident enough to purchase an expensive board.

Maybe I could make a. video of me trying to figure it out. It would be a 12-hour dark comedy featuring a very frustrated, stereotypical Apple enthusiast who occasionally breaks down in tears from frustration. And when I finally finish, I drop the screen. Fin.
Thank you! It was a fun project. The sound from the speakers can go very loud, which is a benefit of using the R1811 v4 board. The quality of the sound is fine if you don't compare it to another 2019 iMac. I assume that the iMac logic board just does a better job of driving the speakers and producing higher quality sound. Overall, the sound is just fine.

As for the cost, I am glad you asked. I think that it is important to estimate the cost of a project like this in order to determine whether or not it is worth doing. I continue to keep a running total cost for the project and it will continue to drop if I am able to sell more of the unused parts:

2019 5k iMac$150.00Fully working computer keyboard and mouse purchased from local recycler - LM270QQ1 (SD)(E1) display assembly
Controller Board$269.24R1811 V4 HDMI 2.0 newer version, w/cables, keyboard, power supply, crossover boards, and remote
Sold Keyboard-$30.00Apple Wired Keyboard
USB-C to DP cable$17.99Cable Matters unidirectional
DP 90 Degree Adapter x2$17.98Cable Matters 1.4
USB4 Cable$14.99Cable Matters USB4 - Video & Charging
USB-C 90 Degree Adapter$8.99Cable Matters
Adhesive Strips$9.99Apple OEM iMac Pro strips
Silver Cover For iMac Ports$9.95Uppercase GhostShield Palm Rest Skin
Sold HDD-$30.001TB Apple OEM / Seagate
Total$439.13

So, the current total is $439.13. If you were to buy a Studio Display today at the Apple Store it would cost $1599. So my cost was about 27% of the cost of the Studio Display. Not bad!
 
Last edited:
Thank you! It was a fun project. The sound from the speakers can go very loud, which is a benefit of using the R1811 v4 board. The quality of the sound is fine if you don't compare it to another 2019 iMac. I assume that the iMac logic board just does a better job of driving the speakers and producing higher quality sound. Overall, the sound is just fine.

As for the cost, I am glad you asked. I think that it is important to estimate the cost of a project like this in order to determine whether or not it is worth doing. I continue to keep a running total cost for the project and it will continue to drop if I am able to sell more of the unused parts:

2019 5k iMac$150.00Fully working computer keyboard and mouse purchased from local recycler - LM270QQ1 (SD)(E1) display assembly
Controller Board$269.24R1811 V4 HDMI 2.0 newer version, w/cables, keyboard, power supply, crossover boards, and remote
Sold Keyboard-$30.00Apple Wired Keyboard
USB-C to DP cable$17.99Cable Matters unidirectional
DP 90 Degree Adapter x2$17.98Cable Matters 1.4
USB4 Cable$14.99Cable Matters USB4 - Video & Charging
USB-C 90 Degree Adapter$8.99Cable Matters
Adhesive Strips$9.99Apple OEM iMac Pro strips
Silver Cover For iMac Ports$9.95Uppercase GhostShield Palm Rest Skin
Sold HDD-$30.001TB Apple OEM / Seagate
Total$439.13

So, the current total is $439.13. If you were to buy a Studio Display today at the Apple Store it would cost $1599. So my cost was about 27% of the cost of the Studio Display. Not bad!
Thanks for sharing this!

Where did you get the board/crossovers, etc? That seems very affordable.

This may have been a dream.... are the iMac speakers adjusted/optimized to work with the standard iMac internals to produce optimal sound? If so, that could explain why they don't sound as great.

I'm also working with a 2019 iMac 27". I removed the HDD, but I haven't done anything else yet. It makes me wonder if it's better to try to keep this stuff in place. and not remove the speakers. I guess I'd be pretty pressed for space.
 
@ItsAShaunParty
"Where did you get the board/crossovers, etc? That seems very affordable."

@VegetarianNachos posted this in his build description:
  • 'An R1811 v4 driver board from StoneTaskin which came with:
    • an LCD cable
    • a backlight cable
    • an OSD keypad
    • a 24V, 5A power supply
    • and a remote
  • A set of crossover boards to utilize the iMac speakers purchased from StoneTaskin'
Links to StoneTaskin's website. Prices include delivery charges:
R1811 older version (5K with DP/USB-C and HDMI 2.0 4K) and original 04 firmware.
R1811 newer version? with HDMI 2.0 (5K with DP/USB-C and HDMI 4K).
R1811 latest version HDMI 2.1 (5K with DP/USB-C and HDMI 5K) with new firmware.

[All AliExpress and eBay vendors of the R1811 seem to be selling the older version.]

StoneTaskin also sells the JRY-W9RQUHD-SA1 board:

Crossover kit YLY-2088x2:

There is a revised version of the YLY-2088 pcb which no longer has A,B,C,D markings, but which works the same.
This page describes the differences.

"are the iMac speakers adjusted/optimized to work with the standard iMac internals to produce optimal sound? If so, that could explain why they don't sound as great."

Apple redesigned the iMac 5K speakers for 2015, and then slightly changed them for 2019+.
They are very carefully designed to give very good audio quality, with the iMac Pro giving the best possible sound.

However there are limitations caused by the case design, and Apple corrects this by digitally processing the sound to correct any faults you might hear.

These DIY conversions can't do this, so the audio will not be quite as good, BUT the YLY-2088 crossovers that are sold are NOT a good match for the 4 ohm iMac speakers. The YLY-2088 is best used for 8 ohm car audio use... 😯

The kits sold with Balee 2.1 crossovers will be better, but you have to buy these direct from AliExpress.

I've found the best crossovers to be very simple DIY ones,
with a 10 microFarad bipolar audio film capacitor
and a 0.15 milliHenry aircored inductor for each crossover.
Also there is a small pcb (which would need to be slightly modified) to mount the capacitor/inductor to, if you want to keep things neat!

To plug into the existing speaker cables you need JST ZH 6 way socket and a wired plug to match it.
To connect to the R1811 or JRY--SA1 boards you need a JST PH 4 way wired plug.

Looking at the JST PH picture for a R1811, the
Black wire would be Left +
Red wire Left –
White wire Right –
Green wire Right +

The iMac speaker connections, both are the same:

iMacSpeakerPinConectionCU.jpg
 
Last edited:
  • Like
Reactions: fhall1
FWIW I was able to to add this 8MP camera to my SA1-based setup very easily: its USB-A cable connects to the SA1 board, and its video signal is then visible on the Mac connected to the SA1 via USB-C. The only minor challenge was aligning the camera with the cutout in the iMac case before fixing it with double-sided tape (the new camera was too big for the part which attached the original camera).

The quality is clearly inferior to the Apple Studio Display webcam, but quite usable. (I didn't bother with a microphone because I always make video calls through Airpods.)

All in all, this was a cheap (€22) and easy addition to an SA1-based monitor conversion.

[EDIT 20/5/25 – I've had the display refuse to come on a couple of times, and not respond to on/off or menu buttons, requiring a disconnect from power to return to operation. It's not clear whether this is related to the camera, but I've not experienced this on my other iMac conversion, which used the same SA1 but has no camera. I'd be interested to hear others' experiences, also with other cameras.]

I'm starting on another conversion, which will be my third. I was just wondering if anyone has found a better camera solution than this 8MP camera, which has worked fine since I installed it in May. Also, is there a viable microphone solution?

Customized 4K 8MP HD IMX179 USB Camera Module High Speed AF/FF 75° 15FPS 3264 x 2448 UVC-compliant, Plug and Play – https://a.aliexpress.com/_EHTzlJE
 
@RDCh
There are adverts for Sony IMX766 webcams that seem to have better specs - 30fps at up to 4K etc.
The lens element is 13x13x7.6mm so might fit?
But they get very expensive from most vendors - £79++.

As to a microphone - Apple feels the need to have multiple microphones and s SoC CPU running complex software to get proper performance at a distance.
All of which is probably impossible in a DIY situation.
 
Last edited:
@RDCh
There are adverts for Sony IMX766 webcams that seem to have better specs - 30fps at up to 4K etc.
The lens element is 13x13x7.6mm so might fit?
But they get very expensive - £75++...

As to a microphone - Apple feels the need to have multiple microphones and s SoC CPU running complex software to get proper performance at a distance.
All of which is probably impossible in a DIY situation.
Very interesting, thank you! The IMX179 I used seems to be 8.5x8.5x5.5mm. I suspect the 7.6mm height of the Sony IMX766 may be an issue, but I suppose there's only one way to find out :)

Also, would this draw too much power? It's listed as 610mA vs. 250mA for the IMX179.

[Forget this] The module seems to be cheaper on AliExpress (€ 46) – https://a.aliexpress.com/_EIMDkN6
 
Last edited:
@RDCh Check the full price (€124.60) on that link - €46 doesn't include the controller pcb...

EDIT. "would this draw too much power?"
You could probably take the power from another 5V source taken from the monitor's PSU.
 
Last edited:
I'm starting on another conversion, which will be my third. I was just wondering if anyone has found a better camera solution than this 8MP camera, which has worked fine since I installed it in May. Also, is there a viable microphone solution?

Customized 4K 8MP HD IMX179 USB Camera Module High Speed AF/FF 75° 15FPS 3264 x 2448 UVC-compliant, Plug and Play – https://a.aliexpress.com/_EHTzlJE
You should film it! That would be great with the camera and stuff!

No pressure.

JK, lots of pressure!
 
@RDCh Check the full price (€124.60) on that link - €46 doesn't include the controller pcb...

EDIT. "would this draw too much power?"
You could probably take the power from another 5V source taken from the monitor's PSU.
Urgh, now I feel dumb. I've ordered the SA1 board with a 24V 5A power adapter, which connects straight to the SA1 board. How do I find/create "another 5V source" to take power from?

In my previous build, I connected the IMX179 camera module to one of the USB-A ports on the SA1 board. The IMX766 module looks like it comes with USB-C, but I will be using the USB-C port on the SA1 to connect the monitor to my Mac. So if I get the IMX766, I would be hoping to connect it to one of the USB-A ports on the SA1 using a USB-C to USB-A cable. The alternative would be to add a USB-C hub, which would presumably need power – bringing me back to the question in the previous paragraph of how to create an additional power source.
 
Well since my 1st DIY 5k display was completed last week, I have decided to start my 2nd this week :).

My goals with this build are the same as the first time (which are essentially):

1. Single cable from Mac supporting 5k/60/10 output (usb-c to DP1.4 and usb-c to usb-c video + PD)
2. Making use of the internal stereo speakers
3. Using iMac power button and AC power connector

Additionally, my goal is to complete it more quickly and for less money. I have been looking at potentially using the JRY-W9RQUHD-SA1 Driver Board for this build. I bought a high end 2017 5k iMac because I couldn't find a suitable 2019, and I thought I could sell some of the higher end components from it. I have some questions about this build.

1. Is the 2017 panel a good choice for this build, or should I wait for a 2019?
2. If I choose the SA1 board, it looks like I will need to use a constant current board (DZ-LP0818) which would add $27 to the build. Is it true that I would need this board if I go with the SA1 board?
3. Would I need a power supply capable of supplying more than 5A in this configuration (SA1 + DZ-LP0818)?
4. With the constant current board, the SA1 would only save me about $53 and I wouldn't have a remote so I would have to mount the OSD keypad near the bottom of the ram door. The SA1 build would be a little more complex and might not provide any cost savings if I have to buy a more capable power supply. The lack of a fan on the SA1 is a minor positive for using it. Other than the lack of a fan, and perhaps a small cost savings, are there other benefits to the SA1 board over the R1811 v4 board that I should be thinking about? Should I be thinking about a different board?

Thanks!
 
@RDCh The IMX766 pcb has both USB-C and USB-A outputs, but the USB-A is a 4 pin JST connector.
You could use that for power input to the camera, taking 5V from one of the SA1's USB-A ports, and take the data stream from the USB-C port off the camera, to the other USB-A port input on the SA1...
 
  • Like
Reactions: RDCh
@VegetarianNachos
1. The 2017 screen panel is a good panel. I doubt if there is any real difference between a late 2018 2017-panel and an early 2019 2019-panel.

2/3. As far as I know the DZ-LP0818 backlight board doesn't work with the SA1 board, as the SA1 has different backlight control outputs.

3. If you are taking USB PD power, a bigger PSU would be advised, as the SA1 board is rated to supply up to 90W of PD power.

4. "are there other benefits to the SA1 board over the R1811 v4"
The only 'benefit' is that the chip in the SA1 board is a more recent design..
In practice that's not really an advantage, as the firmware is more basic, only partially supports DDC for Mac keyboard control, doesn't support IR remote control, and has less audio power for speakers.

With fully featured firmware the SA1 might give a better picture than the R1811, but the R1811 seems to have a more active developer, so gives more fully featured performance.
The SA1 has had its firmware updated since it was introduced, but no one seems to be actively developing the better firmware that it really needs... :(
 
  • Like
Reactions: VegetarianNachos
@VegetarianNachos
The SA1 has 5 backlight control lines, and the R1811 only has 2 (plus ++–– power).
Backlight-controlCU.jpg

Connecting the two DZ-LP0818's control input lines to the correct two pins (ENable and ADJust or PWM?) on the SA1 to pins 3 BLO on/off and 4 ADJ (Backlight ADJ) 0-5V on the DZ-LP0818 'might' work fine...

But it would need someone with proper test gear to do the tests to find if it would work safely, and increase backlight power...

Also the backlight cables to the screen panel for the SA1 are different than the ones the DZ-LP0818/R1811/R9A18 use.
 
Last edited:
@VegetarianNachos
The SA1 has 5 backlight control lines, and the R1811 only has 2 (plus ++–– power).
View attachment 2576512
Connecting the two DZ-LP0818's control input lines to the correct two pins (ENable and PWM?) on the SA1 to pins 3 BLO on/off and 4 ADJ (Backlight ADJ) 0-5V 'might' work fine...

But it would need someone with proper test gear to do the tests to find if it would work safely, and increase backlight power...
Okay, thanks. So I assume that a constant current board is not necessary with the SA1? Will the panel not get as bright if driven by the SA1 vs. the R1811 board? Is that a potential problem? Is the picture quality noticeably worse with the SA1 vs. R1811?
 
Hey all,

I have successfully "hacked" a 2015 iMac with the SA1 board. Its a bit of a janky setup right now until I get my all my parts but so far so good. I think the hardest part was actually removing the old motherboard as there was a screw not documented in the iFixit teardown which had me stuck.

I'm planning to do the power button mod, get some 3d printed parts and also install a caged PSU (will let you know how I get on with those).

Some of my observations so far though:
  • Brightness is great, even at 50% its actually more than enough for me
  • The board runs really hot even after a few minutes, I'm currently using USB C video and using PD at 90W. I've used the screen for about 4-5 hours without any issues so far. I'm wondering whether I need to install a fan or not (id prefer not to because of the sound)
  • I've installed BetterDisplayPro on Mac OS and from the looks of it, aside from the power button I can set and select all the other options I need. If I do the power mod, I might just bury the remote into the enclosure.
  • I did try using HDMI as the board is supposed to support 5k on it, but I couldn't achieve it, not sure if its my cable or not.
  • I can see the dreaded imagine retention issue that people have been talking about, from my research I can see someone people have said this doesn't occur on windows connected screens. If true, I wonder if there is a software fix in that case?
  • When my connected machine is sleeping, the screen will also go into a sleep state (backlight off), but then a minute later turn back on (backlight is on, and status LED goes Green from Red) and then it just cycles through this every minute. I have to press the power button to turn it off completely to stop it.
Some questions for my fellow modders.
  1. I want to to install a caged PSU and reuse the existing power inlet inside the case. The live and neutral wires wont reach where the PSU is so I'm going to use some wago clips and some cable to extend to the PSU. What I'm not sure about is, is the ground cable. Right now its anchored to the case screw point, if I put the PSU in, should that be connected to the ground point on there instead?
  2. For the power button mod, I'm a little worried about soldering as I've never done it before. I've seen some people strip off 1-2 cables from the ribbon cable and soldier / wago those cables to the power cables, is there a standard wire layout on these ribbons cables so I know which ones to strip?
 
Last edited:
  • Like
Reactions: PaulD-UK
I want to to install a caged PSU and reuse the existing power inlet inside the case. The live and neutral wires wont reach where the PSU is so I'm going to use some wago clips and some cable to extend to the PSU. What I'm not sure about is, is the ground cable. Right now its anchored to the case screw point, if I put the PSU in, should that be connected to the ground point on there instead?
Connect both (the one from the original imac, and your psu neutral) to the case.

For the power button mod, I'm a little worried about soldering as I've never done it before. I've seen some people strip off 1-2 cables from the ribbon cable and soldier / wago those cables to the power cables, is there a standard wire layout on these ribbons cables so I know which ones to strip?
I posted my wiring for SA1 here https://forums.macrumors.com/thread....2253100/page-127?post=34249782#post-34249782
You have to use GND and power for the power button but you have to also keep GND for the other button on the control panel so you will have to split this one (wago or solder)
 
  • Like
Reactions: PaulD-UK
Okay, thanks. So I assume that a constant current board is not necessary with the SA1? Will the panel not get as bright if driven by the SA1 vs. the R1811 board? Is that a potential problem? Is the picture quality noticeably worse with the SA1 vs. R1811?
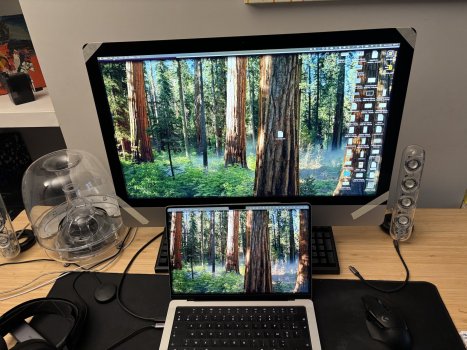
Can't compare with R1811 but brighness on SA1 without any current board is more than enough for me.
Comparison attached with a MBPro, both full brightness
 

Attachments

  • IMG_4045.JPG
    IMG_4045.JPG
    633 KB · Views: 14
Connect both (the one from the original imac, and your psu neutral) to the case.


I posted my wiring for SA1 here https://forums.macrumors.com/thread....2253100/page-127?post=34249782#post-34249782
You have to use GND and power for the power button but you have to also keep GND for the other button on the control panel so you will have to split this one (wago or solder)
Thanks for your response.

Can I double check for the PSU grounding do you mean connect the ground pin on the PSU to case or the neutral?
 
Register on MacRumors! This sidebar will go away, and you'll see fewer ads.