Become a MacRumors Supporter for $50/year with no ads, ability to filter front page stories, and private forums.
Like you my beloved MBPro, mid 2010, began panicking only recently. It became unusable essentially. Also, like you, I knew nothing about the recall program and Apple would not grant an exception. After about six months of backwards and forwards and being passed through many hands Apple agreed to refund the cost of a new logic board I had installed in 2014 when it failed. The replacement logic board had the same fault but was within the recall period. So Apple paid me $1200.

I bought a new iMac and downgraded the MBPro to the original Snow Leopard (10.6). Since then it's been steady as a rock. Whatever was in subsequent releases was obviously driving the GPU too hard. Apple could fix that with a patch, perhaps, and make a lot of loyal users very happy. I saw threads where someone was trying to get a petition or something together. there would be many 1000's of users affected by this bug. Apple isn't Apple anymore though so the chance of that happening are slim,.

Good luck finding a cure although I can recommend the downgrade. Snow Leopard is a fine OS (IMHO)

Pete

I sent my MBP to Louis Rossmann to repair and it's been perfect since. :)
 
Damn... just got this in a report... after replacing the cap... :(

*** Panic Report ***
panic(cpu 2 caller 0xffffff7f853f980b): "GPU Panic: mux-regs 5 3 7f 0 0 0 severity 3 switch-state 0 EG power-state 0 3D 0 HDA 0 : \n"@/Library/Caches/com.apple.xbs/Sources/AppleGraphicsControl/AppleGraphicsControl-3.14.41/src/AppleMuxControl/kext/GPUPanic.cpp:143

Another update... just redid the fix again... it goes a lot faster the second time... I bought 3 capacitors so I had a couple of spares. It's possible I may not have cleaned up the flux well enough the first time. Made sure the clean the area well. I just ran cinebench 4 times in a row and it completed successfully each time between 15 and 16 fps. Hopefully this is a final fix this time... I hope it's not some secondary component near the capacitor that's getting heated up and starts working.

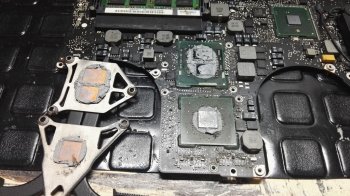
So happy to hear that- but if you do happen to open your MBP again, change the thermal paste on the heatsink :D will cool everything down a lot more. Sadly Apple's application of the paste was terrible.
 
So happy to hear that- but if you do happen to open your MBP again, change the thermal paste on the heatsink :D will cool everything down a lot more. Sadly Apple's application of the paste was terrible.

I might just do it anyways... tinkering is fun for me... more fun when I actually fix the problem. What was wrong with Apple's application of the thermal paste? Too much? Not enough?
 
I might just do it anyways... tinkering is fun for me... more fun when I actually fix the problem. What was wrong with Apple's application of the thermal paste? Too much? Not enough?

This was from an earlier page, judge for yourself ;)
It's more terrible than terrible.
 

Attachments

  • IMG_20161208_222434_zpsfe6w7ute.jpg
    IMG_20161208_222434_zpsfe6w7ute.jpg
    351.5 KB · Views: 453
Hi Fabio,

What do you mean with step 1: Where can I find those?
  • ACPI_SMC_PlatformPlugin.kext (IOPlatformPluginFamily.kext)
  • AppleGraphicsPowerManagement.kext

Which apple graphics power management Kext do I need to install? 10.11, 10.12.1 ... ?


I'm struggling with this error about 7 years now. I'm a noob at doing this. So I'm sorry if these are stupid questions!

I really hope this thing will work.

Thanks in advance!

T.

The ACPI_SMC_PlatformPlugin.kext is inside the IOPlatformPluginFamily.kext. Just to make sure it's the original, some hacks can be edited this file (as decrease the cpu usage by the windowserver process).


Which apple graphics power management Kext do I need to install? 10.11, 10.12.1 ... ?

The same as the OSX (or macOS) installed version. (About This Mac or System Profile -> Software)

To disable SIP of the macOS Sierra (only), you need this step:
Download macOS from AppStore
Use this for create: https://macdaddy.io/install-disk-creator/
After created, boot into USB Installer (Hold down the Option key immediately after turning on or restarting your Mac. Release the Option key when you see the Startup Manager window. Select your startup disk, then click the arrow or press Return)
Run terminal, disable the SIP.

Install the edited kext using the app (as my first post)
Reboot
Test using Cinebenech app

Read the old posts, will help you.

(The capacitor replacement is necessary to use one external monitor)

Good luck
 
Olá Fabio!
Obrigado por realizar esse post incrível! está ajudando muitas pessoas!
Tenho uma pequena dúvida, como não obtive sucesso com o kext vou trocar o capacitor, mas qual o capacitor ideal para isso? quais as especificações?
 
Olá Fabio!
Obrigado por realizar esse post incrível! está ajudando muitas pessoas!
Tenho uma pequena dúvida, como não obtive sucesso com o kext vou trocar o capacitor, mas qual o capacitor ideal para isso? quais as especificações?
Qual foi o problema com o kext?
Para a troca do capacitor, dê preferencia para o de alumínio (smd) (330UF, 2V [ou maior voltagem, tipo 2.5v], 20%, ESR). Evite ao máximo utilizar o de tântalo, pois em pouco tempo o problema retornará.
 
Hi everyone!

6 pages after I'm back... I did the hardware fix using the ceramic capacitor mentioned here

https://www.digikey.com/products/en?keywords=587-3976-1-ND

Worked perfectly for a while, passed cinebench test without a problem. But recently I have a vertical line showing up on the screen... it comes and goes (sometimes several times within seconds), almost feels like a bad contact. Tried cinebench and it failed almost as soon as it started!

Has this happened to someone else? You reckon it's a faulty capacitor (but why should it work well in the beginning if thats the case?) or an issue with the soldering? I didn't do it myself, found some great guys that did it for me within minutes and free of charge (though I did contribute as I was about to buy a soldering machine.) Someone mentioned earlier that it may be an issue with not properly cleaning the old soldering?

Thanks!

This has happened to a couple of other people in this thread... and I'm one of them. Truth be told I really didn't clean the area after I soldered the first time and it lasted a week. I did the fix a second time with the same type of capacitor (although it was a different capacitor... I ordered 3) and I'm about a week and a half in now with no issues. I'm keeping my fingers crossed... I run cinebench every couple of days and haven't had a kernel panic yet. I'm starting to wonder if there's better choice than this ceramic capacitor or maybe cleaning the board after the fact is very very important.
 
This has happened to a couple of other people in this thread... and I'm one of them. Truth be told I really didn't clean the area after I soldered the first time and it lasted a week. I did the fix a second time with the same type of capacitor (although it was a different capacitor... I ordered 3) and I'm about a week and a half in now with no issues. I'm keeping my fingers crossed... I run cinebench every couple of days and haven't had a kernel panic yet. I'm starting to wonder if there's better choice than this ceramic capacitor or maybe cleaning the board after the fact is very very important.
Hi everyone!

6 pages after I'm back... I did the hardware fix using the ceramic capacitor mentioned here

https://www.digikey.com/products/en?keywords=587-3976-1-ND

Worked perfectly for a while, passed cinebench test without a problem. But recently I have a vertical line showing up on the screen... it comes and goes (sometimes several times within seconds), almost feels like a bad contact. Tried cinebench and it failed almost as soon as it started!

Has this happened to someone else? You reckon it's a faulty capacitor (but why should it work well in the beginning if thats the case?) or an issue with the soldering? I didn't do it myself, found some great guys that did it for me within minutes and free of charge (though I did contribute as I was about to buy a soldering machine.) Someone mentioned earlier that it may be an issue with not properly cleaning the old soldering?

Thanks!


Try this one if the issue persists :
https://www.digikey.com/product-det...ica/GRM32EC80E337ME05L/490-13972-1-ND/6155802

Just few things to keep in mind:

-Lots of flux when removing the original capacitor.
-Braid to make sure all random solder is removed.
-Isopropyl Alcohol to completely purify the area.
-If solder isn't working, try solder paste.
-Make sure that the capacitor isn't slipping from the pads upon placing heat when setting.
-Lots of Isopropyl after the job is done to avoid possibility of future contamination.


Hope it helps :D
 
  • Like
Reactions: stewy
My 2010 is doing the same shut down and restart. How difficult is the capacitor swap? I've done HDD - SSD swaps, memory installs, fan swaps, replacement battery. All of that was easy - mechanically anyway. The software part of the SSD install was not seamless. Rossman quoted $325 or so to fix the logic board - I use this primarily for surfing while watching the idiot box. For $325 it's probably better to just retire it, but a couple hours and a couple bucks for a capacitor is more reasonable.

I have not tried the github fix.

It's a very easy fix once you familiarise yourself with a surface mount capacitor. Check out the post above for some capacitors and many lovely people have added pictures of their process.

Good luck buddy
 
Thanks. Ordered 3 capacitors from digi-key.

Will have to investigate soldering tools. I have a small pencil type soldering iron around here somewhere. Not sure if it's precise enough for this.
 
Try this one if the issue persists :
https://www.digikey.com/product-det...ica/GRM32EC80E337ME05L/490-13972-1-ND/6155802

Just few things to keep in mind:

-Lots of flux when removing the original capacitor.
-Braid to make sure all random solder is removed.
-Isopropyl Alcohol to completely purify the area.
-If solder isn't working, try solder paste.
-Make sure that the capacitor isn't slipping from the pads upon placing heat when setting.
-Lots of Isopropyl after the job is done to avoid possibility of future contamination.


Hope it helps :D

Thanks for the hints, I'm waiting for a reply from the same guys that fixed it once and will try again with a new capacitor (same model, i also bought a few as the shipping costs of digikey to here are 10 times the price of the capacitors). Will pass on the tips and let you know how it went in the end.


I'm about a week and a half in now with no issues. I'm keeping my fingers crossed... I run cinebench every couple of days and haven't had a kernel panic yet.

Mine worked good for a few months without an issue. I was wondering if it may be related to having the mac always plugged in? First time I notice the vertical line was after a few days the mac was "sleeping" as I had forgotten to shut it down... but then again, it may just be speculation, I know nothing about it.

Hopefully will be a faulty capacitor and/or a rushed job (it literally took the guy less than 5 minutes to replace the old one).
 
Try this one if the issue persists :
https://www.digikey.com/product-det...ica/GRM32EC80E337ME05L/490-13972-1-ND/6155802

Just few things to keep in mind:

-Lots of flux when removing the original capacitor.
-Braid to make sure all random solder is removed.
-Isopropyl Alcohol to completely purify the area.
-If solder isn't working, try solder paste.
-Make sure that the capacitor isn't slipping from the pads upon placing heat when setting.
-Lots of Isopropyl after the job is done to avoid possibility of future contamination.


Hope it helps :D
Hello,
what is the difference of this capacitor compared to https://www.digikey.com/products/en?keywords=587-3976-1-ND
I'm thinking about making this hardware replacement, so which one to get?
 
Yep, just got another kernel panic after doing the fix a second time. Ran cinebench and it crashed near the end. I suspect this capacitor is not a good replacement option. The second time I did the fix I made sure to clean the area extensively with alcohol. Not sure why it would work for 7-10 days just fine and then suddenly quit. Sigh... guess I'm ordering a different capacitor!

Just ran CB a second time and it passed...

Thu May 4 07:35:49 2017

*** Panic Report ***
panic(cpu 2 caller 0xffffff7f95fd080b): "GPU Panic: mux-regs 5 3 7f 0 0 0 severity 3 switch-state 0 EG power-state 0 3D 0 HDA 0 : \n"@/Library/Caches/com.apple.xbs/Sources/AppleGraphicsControl/AppleGraphicsControl-3.14.41/src/AppleMuxControl/kext/
 
Last edited:
  • Like
Reactions: Dewdman42 and stewy
Aluminum Polymer Capacitor (polarized), it is a better choice.
(330µF 2V (or 2.5v), 20% tolerance, -55°C ~ 105°C, ESR)
Like this: https://www.digikey.com/product-det...components/EEF-SX0E331ER/PCE4827TR-ND/1731685

If the problem is the size, use one other model, like the LT Series. This model has two negative points.
https://industrial.panasonic.com/cdbs/www-data/pdf/ABE0000/ABE0000C57.pdf

Thanks Fabio for the links. Both seem to be same size, 7,3 x 4,3mm ?

Sidney
 
  • Like
Reactions: stewy
Não consegui realizar o procedimento de uma forma eficaz, realizei todos os passos mas não consegui checar se o kext realmente funcionou. Consegue me explicar como fazer funcionar de uma forma detalhada em um sierra 10.12?
 
Não consegui realizar o procedimento de uma forma eficaz, realizei todos os passos mas não consegui checar se o kext realmente funcionou. Consegue me explicar como fazer funcionar de uma forma detalhada em um sierra 10.12?
Existe agora uma ferramenta que automaticamente aplica o fix no kext sem necessidade de alterar os valores manualmente ou instalar o kext editado.
Para usa-la, tenha certeza que o kext original está carregado (pode checar em Sobre este Mac -> Relatório do Sistema -> Software -> Extensões), desabilite o SIP e rode o app. É simples de usar. Está disponível para download na primeira pagina no meu primeiro post. Esta com certeza é a maneira mais fácil de aplicar o fix.
Para ter certeza se está tudo bem, após aplicar o fix e reiniciar o MBP, verifique se o kext foi carregado com sucesso (mesmo passo citado acima), e use o software Cinebench no teste de GPU. Se tudo correu bem, o teste terminará com sucesso e com fps em torno de 10. Lembrando que, para usar um monitor externo é necessário a troca do capacitor.
 
So, I did this fix again this morning with a different style capacitor. The EEF-CX0D331R. It was definitely more of a challenge than with the smaller ceramic "no scape" capacitor but not impossible to do with a standard pencil type soldering iron. I also took the time to redo the thermal paste on the CPU and GPU. I ran the ASD hardware test and it passed... hopefully for good this time (fingers crossed).

I posted a few pictures in an album if anyone is interested: Link
 
Last edited:
  • Like
Reactions: fabioroberto
So, I did this fix again this morning with a different style capacitor. The EEF-CX0D331R. It was definitely more of a challenge than with the smaller ceramic "no scape" capacitor but not impossible to do with a standard pencil type soldering iron. I also took the time to redo the thermal paste on the CPU and GPU. I ran the ASD hardware test and it passed... hopefully for good this time (fingers crossed).

I posted a few pictures in an album if anyone is interested: Link
Fantastic photos :) Thanks for your story and process
 
Register on MacRumors! This sidebar will go away, and you'll see fewer ads.