Become a MacRumors Supporter for $50/year with no ads, ability to filter front page stories, and private forums.
Status
The first post of this thread is a WikiPost and can be edited by anyone with the appropiate permissions. Your edits will be public.

G3llings

macrumors regular
Original poster
Dec 22, 2020
156
89
This is a Wiki post with information collected from the entire thread. Before you post, please read this first.

This thread is for supporting Maxwell and Pascal cards on the 2009-2011 iMac. All these iMac models use internally eDP to control the internal display regardless which internal cabling is used to connect the display.

Maxwell and Pascal cards will not work with acceleration on MacOS beyond High Sierra due to lack of driver support, but will work perfectly fine on Windows and Linux.

For hardware installation instructions please refer to the 2009-2011 iMac Graphics Card Upgrade thread, as it is the same procedure as for other large MXM-B cards.

All currently supported MXM-B cards require the 27’’ iMac with 3 pipe heatsink modded (grinded) properly.


All Maxwell and Pascal cards require vbios flashing to work on the iMac.
On Maxwell cards this can be done from windows or linux using a patched nvflash.
On Pascal cards a hardware programmer is required to clip the eeprom chip on the card for flashing at 1.8v. You can use a simple ch341a based programmer with voltage adapter and a patched flashrom on linux or AsProgrammer/NeoProgrammer on windows.

Cards will work on MacOS up to High Sierra (using Nvidia Web Drivers), and are fully supported on Windows and Linux. Wake, sleep and brightness control all work fine.

You will need a properly configured Opencore/OCLP in order to enable the screen on boot, have brightness control on MacOS, have an emulated boot picker and to enable internal speakers output on UEFI Windows.

Brightness control in Windows requires a regedit patch after installing Nvidia drivers.


Currently supported models:

Card Modelbios1bios2Time Spy (DX12)FireStrike (DX11)Vulkan (Geekbench 5)
M2000M (MXM-A)BiosBios1371477513381
M2200M (MXM-A)Bios15948
M4000MBiosBios2640
M5000MBios27509080
GeForce GTX 980MBios2957
P3000BiosBios35421053031313
P4000BiosBios4779
P5000Bios1600047000
P3200 *Bios4507
P4200 *Bios566751000
P5200Bios60501734955819
Geforce GTX 1070Bios56001650053000
HP T1000 **Bios3500

Benchmark scores are approximate, and show only the "Graphics score" on 3DMark tests. For reference a Kepler GTX 780M scores around 1600 on Time Spy.

Some cards have more than one vbios available, usually with an overclocked version. The overclocked Pascal versions are very safe, as "gpu boost" avoids overheating reducing clocks and power as needed.

* P3200/P4200 card on iMac 12,2 needs smbus isolation trick to work properly. Also most cards come without eeprom chip soldered onboard (you have to solder one or ask seller to do it for you).

** HP Turing T1000 needs hardware back-light mod to enable backlight and there are no macOS drivers for it.

Other cards of interest that should work: HP Turing RTX 3000 and RTX 4000.


-----------------------------------------------------------------------------------------------------------------------------------------------------
Original post by @G3llings

Hello everyone, per some request I started this thread as a spin off of the 2011 iMac GPU upgrade thread. It is more specific to getting Maxwell cards working, not so much the upgrade process.

I had a 2011 iMac that I upgraded with Quadro M4000M, here is what I noted:

1. No boot screen (known issue)
2. Required modified .Inf to install public drivers due to being HP card
3. Stuck at maximum performance P5, would idle (fixed this issue by modifying vbios to run P5 core clock @ 1015mhz and memory @ 1350mhz)
4 . Benchmark performance on par with 1050 ti desktop performance and around 78w and 61c under load
5. M3000M has same P5 performance issue according to @jay508

IMG_20210202_194758.jpg


Let's get Maxwell working on these iMacs!

@m0bil @Ausdauersportler
 
Last edited:
@G3llings :
Thank you for your sharing.
Can you describe the process step by step? So a novice like me can also understand.
Something like the following. (Please add/correct)

A. Parts:
1. A working iMac 2011 (with stock GPU)
2. a Quadro M4000m MXM card (PC card)

B. Process
1. Install Windows on the iMac (old GPU), on a single SSD. Remove Mac OS volume. Do we also install neccessary driver from BootCamp, too (mostly for sound and bluetooth, IR receiver, iSight webcam to be correctly recognized)
2. Modify the .inf (Which file? Using which application?)
3. Then swap the old GPU with quadro M4000m. And reboot to Windows 10, let Windows install the driver automatically?
4. Modifying vBIOS? (Using GPUZ to extract the bios, the using which application to modify it? Flash it back to the card by nvdiaflash?)

The result is an iMac 2011 with powerful GPU, but only can run Windows, and no boot screen?
And by no boot screen, how long does it take from pressing the power button, until the login-screen/desktop of Windows?
I was not able to figure out the inf myself, but it is a text document. There is a process documented very well here. To modify the gpu vbios I used the Maxwell II Bios Tweaker. I also downloaded the correct vbios to match my card from Techpowerup.

1. Remove all other drivers and install windows using the old gpu.
2. Install vpn software since you will have no video output with new GPU (I prefer TeamViewer)
3. Install new GPU and boot
4. Flash vbios over VPN and reboot
5. Install modified driver over VPN
6. You should have working display, may require reboot

If you go the way of editing the gpu device id then the driver may install automatically.

Boot time was approximately 1:30 on ssd, so very slow. I have the same issue on my flashed 780m, it goes to the windows loading screen and then goes black for approx 30 seconds so that seems common. With M4000M you have no loading screen either, just login screen.
 
  • Like
Reactions: Nguyen Duc Hieu
I was not able to figure out the inf myself, but it is a text document. There is a process documented very well here. To modify the gpu vbios I used the Maxwell II Bios Tweaker. I also downloaded the correct vbios to match my card from Techpowerup.

1. Remove all other drivers and install windows using the old gpu.
2. Install vpn software since you will have no video output with new GPU (I prefer TeamViewer)
3. Install new GPU and boot
4. Flash vbios over VPN and reboot
5. Install modified driver over VPN
6. You should have working display, may require reboot

If you go the way of editing the gpu device id then the driver may install automatically.

Boot time was approximately 1:30 on ssd, so very slow. I have the same issue on my flashed 780m, it goes to the windows loading screen and then goes black for approx 30 seconds so that seems common. With M4000M you have no loading screen either, just login screen.

For the vBIOS, can't we extract the vBIOS from the M4000m card at hand, instead of downloading it from Techpowerup?

Also, if I have another Windows PC, with a MXM slot, or MXM to PCIe 1x adapter, can I do like below without having to SSH to the iMac?

A. On the Windows PC

1. Install Windows on the PC's SSD, The PC is still controllable, as it is using Intel iGPU to display image.

2. Install M4000m driver on the PC. This will fail, but all the files are extracted to a folder on the SSD. (Correct?). Or this will still working, as the system is still using iGPU to display image, while drivers are install for M4000m.

3. Extract the M4000m vBIOS (with GPU-Z)

4. Modify the vBIOS with Maxwell II Bios Tweaker (What to modify? Screenshot available?)
- Core clock =1015Mhz
- Memory clock = 1350mHz
- Boost limit =?
- Power limit = 90W?

5. Save the modded vBIOS. Flash the modded vBIOS back to the M4000m. Or use the vBIOS rom file in post #5 below by Jay508

(The 6. & 7. steps are not necessary if the driver in installed normally to Windows. Driver can be downloaded from nVidia website.)


6. Modify the correct .inf file in nVidia drivers' folder
- Navigate to C:\NVIDIA\DisplayDriver\[VERSION]\[OS]\[LANG] and open the Display.Driver folder which is inside this directory.
- Open the nvaoi.inf (for Apple device), normally a text editor like Notepad can do this.
- Press CTRL+F on your keyboard and search for NVIDIA_SetA_Devices There will be one of these groups for every operating system supported by the driver, make sure you are modifying the group specific to your operating system, if your not sure you can do all of them. If you can not find it try searching for NVIDIA_Devices or something similar instead
- Insert the line to describe hardware ID (GPU model code/PC model code/PC manufacturer code/Section number)
=> Can you share the line you added for iMac 2011? (it's not specific to your personal device, so I assume it's safe to disclose it here, isn't it?)
- Save the file.

7. Disable Driver Signature Enforcement
- Open Command Prompt as Admin (Windows + X) then select run Command Prompt as admin.
- Type bcdedit /set testsigning on. You should receive the “The operation completed successfully” message.
Or 2 commands like below:
bcdedit.exe -set loadoptions DDISABLE_INTEGRITY_CHECKS
bcdedit.exe -set TESTSIGNING ON


8. Now install nVidia driver to Windows
9. Turn off the PC and remove both the SSD and the M4000m


B. On the iMac

10. Install both the SSD and video card M4000m to the iMac 2011. The SSD should be the only storage in the iMac.
11. Power on the iMac
12. After a long time waiting (including driver adjustment for the iMac), it should get you to the Windows desktop on the iMac, or not?
 
Last edited:
This VBiOS direct refresh M4000M does not require any modification direct installation NVIDIA official website search M4000M public driver can be installed does not require any modification driver direct installation can


This VBiOS does not require 6 7 two-step operation, directly Nvidia official website search M4000M model public driver download and installation can have can display the internal screen.
 

Attachments

  • M4000M.Windows.zip
    139.6 KB · Views: 415
For the vBIOS, can't we extract the vBIOS from the M4000m card at hand, instead of downloading it from Techpowerup?

Also, if I have another Windows PC, with a MXM slot, or MXM to PCIe 1x adapter, can I do like below without having to SSH to the iMac?

A. On the Windows PC

1. Install Windows on the PC's SSD, The PC is still controllable, as it is using Intel iGPU to display image.

2. Install M4000m driver on the PC. This will fail, but all the files are extracted to a folder on the SSD. (Correct?). Or this will still working, as the system is still using iGPU to display image, while drivers are install for M4000m.

3. Extract the M4000m vBIOS (with GPU-Z)

4. Modify the vBIOS with Maxwell II Bios Tweaker (What to modify? Screenshot available?)
- Core clock =1015Mhz
- Memory clock = 1350mHz
- Boost limit =?
- Power limit = 90W?

5. Save the modded vBIOS. Flash the modded vBIOS back to the M4000m

6. Modify the correct .inf file in nVidia drivers' folder
- Navigate to C:\NVIDIA\DisplayDriver\[VERSION]\[OS]\[LANG] and open the Display.Driver folder which is inside this directory.
- Open the nvaoi.inf (for Apple device), normally a text editor like Notepad can do this.
- Press CTRL+F on your keyboard and search for NVIDIA_SetA_Devices There will be one of these groups for every operating system supported by the driver, make sure you are modifying the group specific to your operating system, if your not sure you can do all of them. If you can not find it try searching for NVIDIA_Devices or something similar instead
- Insert the line to describe hardware ID (GPU model code/PC model code/PC manufacturer code/Section number)
=> Can you share the line you added for iMac 2011? (it's not specific to your personal device, so I assume it's safe to disclose it here, isn't it?)
- Save the file.

7. Disable Driver Signature Enforcement
- Open Command Prompt as Admin (Windows + X) then select run Command Prompt as admin.
- Type bcdedit /set testsigning on. You should receive the “The operation completed successfully” message.
Or 2 commands like below:
bcdedit.exe -set loadoptions DDISABLE_INTEGRITY_CHECKS
bcdedit.exe -set TESTSIGNING ON


8. Now install nVidia driver to Windows
9. Turn off the PC and remove both the SSD and the M4000m


B. On the iMac

10. Install both the SSD and video card M4000m to the iMac 2011. The SSD should be the only storage in the iMac.
11. Power on the iMac
12. After a long time waiting (including driver adjustment for the iMac), it should get you to the Windows desktop on the iMac, or not?
Yes in theory this should work. I don't have a windows PC with MXM so it was easier to just download the matching vBIOS and modify, then copy to usb.

Or as @jay508 mentioned he modified my m4000m vBIOS with a new ID to allow installation of the public drivers and skip the whole test signing process, which should also allow for future updates more easily. It also includes the higher clock speed for P5 state.
 
I owe @jay508 an m3000m vbios with updated clock speeds that he will modify to run public drivers as well.
 
A few more questions:

- Does brightness control work with the M4000M on windows ?

- Have you tried external monitor ? One big problem would be windows recovery... I'm thinking about some windows update problem or driver update that requires recovery / troubleshooting access

1623772885324.png
 
Last edited:
As of the stuck P state... maybe it has something to do with the driver and/or changed board id. Have you tried forcing it with NVIDIA Inspector ? I heard it has some limitations on latest drivers, but maybe it's worth a shot

Also, another way of getting a compatible signed driver without changing board id may be NVCleanstall. I used it to get latest drivers on the 780M and worked quite well.
 
Last edited:
  • Like
Reactions: G3llings


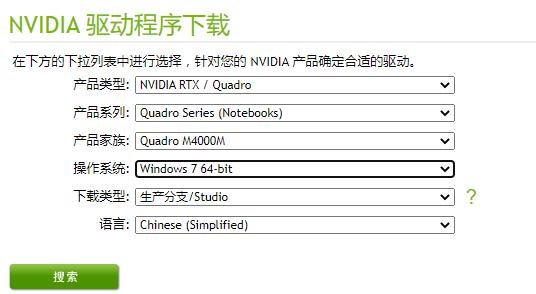
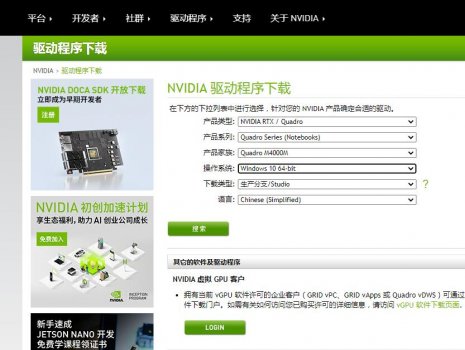
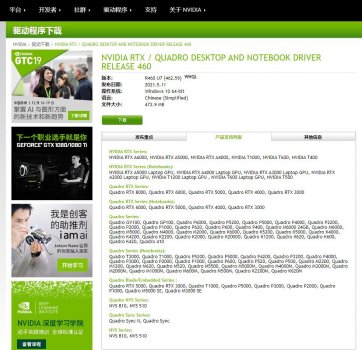
In Windows 10 system linked to the Internet, wait a while to take time Windows 10 will also automatically adapt to install updated drivers for the M4000M graphics card, do not need to install their own.

You can also manually download the driver and install it yourself
 

Attachments

  • Windows 7  20210616001556.jpg
    Windows 7 20210616001556.jpg
    22.3 KB · Views: 382
  • Windows 10 20210616001622.jpg
    Windows 10 20210616001622.jpg
    65.7 KB · Views: 378
  • 20210616001705.jpg
    20210616001705.jpg
    149.1 KB · Views: 371
Last edited:
  • Like
Reactions: m0bil and G3llings
As of the stuck P state... maybe it has something to do with the driver and/or changed board id. Have you tried forcing it with NVIDIA Inspector ? I heard it has some limitations on latest drivers, but maybe it's worth a shot

Also, another way of getting a compatible signed driver without changing board id may be NVCleanstall. I used it to get latest drivers on the 780M and worked quite well.
I did try Nvidia inspector, everything was locked down except ram speed from what I remember
 
  • Like
Reactions: m0bil
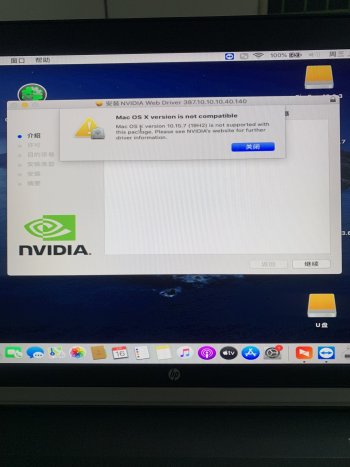
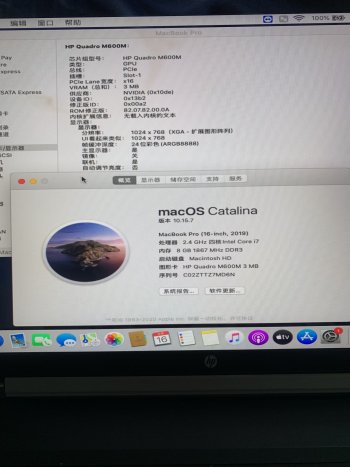
I installed Black Apple 10.15.7 on HP 8770W to test Maxwell M600M graphics card indeed can not drive memory 3M WEB driver can not be installed, I will continue to install 10.13.6 to test Maxwell in macOS system compatibility
 

Attachments

  • IMG_8616.JPG
    IMG_8616.JPG
    826.2 KB · Views: 721
  • IMG_8617.JPG
    IMG_8617.JPG
    1,006.4 KB · Views: 707
I installed Black Apple 10.15.7 on HP 8770W to test Maxwell M600M graphics card indeed can not drive memory 3M WEB driver can not be installed, I will continue to install 10.13.6 to test Maxwell in macOS system compatibility
Yes, Maxwell is not supported after High Sierra. I am wondering if boot camp "restart in macOS" will work with High Sierra and Windows on separate SSDs in the iMac. Then boot screen would not be necessary, but you could still run both MacOS and Windows. That would be ideal for me. I really only keep a Mac around to fix other Macs, so I don't need the latest software.
 
I also never tested the m4000m in macOS, so I'm not sure if it's compatible like the 970m should be
 
I also never tested the m4000m in macOS, so I'm not sure if it's compatible like the 970m should be
I don't know how M4000M M3000M on iMac I have not once successfully run in macOS system, there is no startup screen I don't know how the macOS startup status. windows also has no brightness adjustment maximum brightness running very harsh screen heat is also very huge, M3000M VBiOS clock frequency to help modify the adjustment Thank you. Check the private message I sent you.
 
I don't know how M4000M M3000M on iMac I have not once successfully run in macOS system, there is no startup screen I don't know how the macOS startup status. windows also has no brightness adjustment maximum brightness running very harsh screen heat is also very huge, M3000M VBiOS clock frequency to help modify the adjustment Thank you. Check the private message I sent you.
Sorry I have not had a chance to modify the m3000m yet. Have you tried Catalina patcher or OpenCore for the backlight issue?
 
Catalina patcher or OpenCore how to configure can not see, how your configuration it, if you can solve the package upload to share your EFI folder.
 
Catalina patcher or OpenCore how to configure can not see, how your configuration it, if you can solve the package upload to share your EFI folder.
Please refer to the other iMac GPU upgrade thread, the first post has instructions of how to install.
 
For example, I'm having an iMac 2009 with Quadro K1100m, High Sierra.
Is it safe to do like this:

1. Install Windows to the iMac
2. Install nVidia webdriver to Windows (still using K1100m)
3. Remove the SSD, install M4000m and Xanderon Linux USB (with vBIOS rom from jay508)
4. Boot the iMac with Xanderon Linux
5. Remote control the iMac from another machine (SSH) and do the flash from Command Prompt (Terminal)
6. Power-off the iMac and install back the Windows SSD
7. Power-on the iMac, it will boot to Windows as nVidia driver has been installed.
Yes this should work, it may or may not need to sit and let Windows reinstall the driver automatically.
 
So you mean with a Catalina loader as first boot device, customized for Quadro card like K1100m, Windows should be able to control the brightness of the LCD of the iMac?
It worked for me with the m4000m. I have a spare 2010 iMac I will install it into and test with @jay508 vBIOS and Catalina loader. I just need to do the heatsink mod first. I should mention that the 61c I was getting under load was on a 2 pipe heatsink, not a 3 pipe.
 
  • Like
Reactions: Nguyen Duc Hieu
Register on MacRumors! This sidebar will go away, and you'll see fewer ads.