Become a MacRumors Supporter for $50/year with no ads, ability to filter front page stories, and private forums.
Question for everyone. Do we know which themal size thickness is better 1.5mm or 1.0mm I havent been able to find a single person compare the two thicknesses with benchmarks to determain which is 100% better. Does anyone have evidence that one is better then the other and if not can someone test it?

I believe someone tested this in the heatsink thread and came to the conclusion that both returned the same results. I tested the 1.5 and it was on the thick side, was compressed when putting the cover back on, I would go with the 1.0mm.
 
Those results are excellent. You even have some thermal headroom left as it is just hovering at 80c. It's too bad that the CPU is limited to 10W. Otherwise, you can achieve even higher clock speeds than 2.6Ghz (possibly over 3Ghz).

But I doubt if you can get the same results with the i5/i7 versions, as they run much hotter than the i3.
 
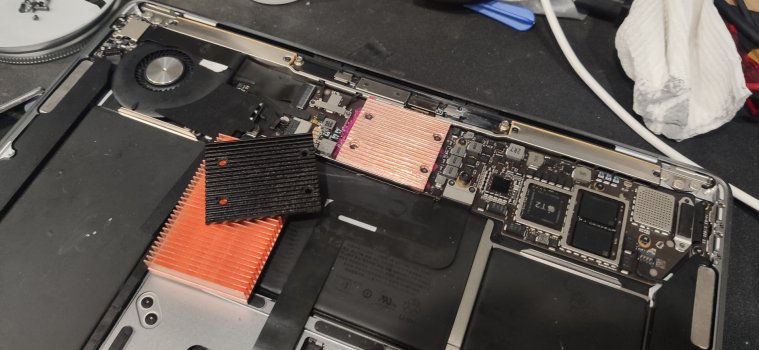
So, I've removed the heatsink, and instead of a shim, just CPU -> thermal pad -> heatsink -> thermal pad to chassis. Cleaned off the Apple TIM first. Didn't use anything other than thermal pads.

much, much improved.

can actually run games and the fan will come on, but won't be screaming louder than the audio.

I used 0.5mm thermal pads.

I'm tempted to try a shim, but even with just thermal pads which are easy, no mess install there's a dramatic improvement.

edit:
this is on an i7. thermal pad under heatsink = better than the lack of contact from the factory. Apple really screwed up on the heatsink.
 
Last edited:
I've just completed this mod on my 2020 i5/8gb. I used a 20x20x0.5mm shim, arctic mx4 paste, and 1.0mm arctic thermal pad. The Geekbench 5 results were definitely improved substantially.

Stock configuration:
Single Core: 1067
Multi Core: 2447

After shim and thermal pad:
Single Core: 1166
Multi Core: 3946

Overall, it took me about an hour to complete and it wasn't too bad of a modification to do at all. Main thing I was worried about was not stripping any screws.

Edit: thanks @fcracer for the great write up / tutorial on your website.
 
So, I've removed the heatsink, and instead of a shim, just CPU -> thermal pad -> heatsink -> thermal pad to chassis. Cleaned off the Apple TIM first. Didn't use anything other than thermal pads.

That's interesting.. just thermal pads? That's definitely a little easier of a mod. Do you have any benchmarks with that configuration?
 
That's interesting.. just thermal pads? That's definitely a little easier of a mod. Do you have any benchmarks with that configuration?

Yup, just thermal pads only.

I know its not "ideal" but a friend did it and told me it worked well and it does.

The big thing as I understand it is that out of the box the heatsink doesn't even really touch the processor properly (and the Apple applied TIM is garbage), so a thermal pad is better than nothing.

He's got a shim he's going to fit later but hasn't got around to it. I'm not sure I'm going to bother or not.

I did very nearly make a shim (after 4-5 beers) out of a beer can - again aluminium isn't ideal but its better than a thermal pad :D but thought that might be just a little bit too ghetto for a 2020 machine :D

Either way, thermal pad works way better than stock! No benchmarks yet, my machine was busy running time machine backup as I hadn't plugged in at home for a while, maybe this evening when I get back home from work and the machine has settled down a bit.

But... gaming, the fan is much less loud and during "normal" operation the fan is inaudible now.


edit:
just tried a benchmark and got this:


However... photoanalysisd was running in the background using 100% cpu of one core (which would explain the single core being decent and the multi-core being slow - one core was busy with something else).

I'll try again when the machine is settled down a bit. Fan did not become audible during the benchmark.


Also, I'm curious as to whether the thermal pad to case is responsible for transferring heat to the chassis and improving that way, or rather ensuring a better air seal to help air flow THROUGH the heatsink when it essentially blocks off another path for the air between the heatsink and the case.
 
Last edited:
The big thing as I understand it is that out of the box the heatsink doesn't even really touch the processor properly (and the Apple applied TIM is garbage), so a thermal pad is better than nothing.

Yeah that's right. The underside of the heatsink has a machined out section and it results in about a half mm gap between it and the cpu / gpu dye.

I did very nearly make a shim (after 4-5 beers) out of a beer can - again aluminium isn't ideal but its better than a thermal pad :D but thought that might be just a little bit too ghetto for a 2020 machine :D

Haha yeah probably better to grab a pack of copper ones on Amazon. They're pretty cheap.

But... gaming, the fan is much less loud and during "normal" operation the fan is inaudible now.

I was on a Webex teams video call for work before the mod and within about 5 minutes, the fan kicked on pretty fierce. I'm hoping with the mod, this will improve drastically. I'm going to give it a try tomorrow on one of my calls and we'll see.

Also, I'm curious as to whether the thermal pad to case is responsible for transferring heat to the chassis and improving that way, or rather ensuring a better air seal to help air flow THROUGH the heatsink when it essentially blocks off another path for the air between the heatsink and the case.

I believe it's more that the heat is transferred to the chassis which then acts like a large heat sink.
 
Question for everyone. Do we know which themal size thickness is better 1.5mm or 1.0mm I havent been able to find a single person compare the two thicknesses with benchmarks to determain which is 100% better. Does anyone have evidence that one is better then the other and if not can someone test it?

The thermal pads I used were 0.5mm and it works as described above using pads only for both under and on top of the heatsink.
 
Edit: thanks @fcracer for the great write up / tutorial on your website.
You’re very welcome, glad to hear it’s working well for you. My little i7 MBA 2020 continues to work perfectly with the shim and pad modification. It’ll consistently blast out a 4,000+ GeekBench and runs great. It’s definitely holding me over until the Apple Silicon MacBooks arrive.

Here’s the link to the how-to for others contemplating the modification.
 
  • Like
Reactions: Fravin and throAU
Will the removal of heatsink void warranty?

I don't see any warranty void if removed stickers. Modern CPUs are thermally protected and will shut down if they get too hot so you could argue your case. Either way, if this has to go back for something else under AppleCare it will be returned to stock.

edit:
I've bought some shims because I think multi-core will benefit from it. I definitely get less fan noise but I'm hitting nowhere near 4k Geekbench. but hey, I had plenty of thermal pads handy and its definitely an improvement until the shims arrive. 0.5mm thermal pads only is definitely "easy mode" and still way better than stock.
 
  • Like
Reactions: Fravin
I am very interesTed trying this. Is there anyone who had succeed can post the step by step video / picture for non-technical user like me? Or, is this procedure considered as high risk / has to be done by professional? Thank you very much!
 
I am very interesTed trying this. Is there anyone who had succeed can post the step by step video / picture for non-technical user like me? Or, is this procedure considered as high risk / has to be done by professional? Thank you very much!

If you look a few posts up, fcracer posted a link to his webpage that has a really nice write up of the procedure. That's what I looked at before I did the mod. It definitely doesn't require a professional to do. Just make sure you have the two proper screwdrivers (Torx T3 and Pentalobe P5) and the materials before you get started.
 
I am very interesTed trying this. Is there anyone who had succeed can post the step by step video / picture for non-technical user like me? Or, is this procedure considered as high risk / has to be done by professional? Thank you very much!

The only complications/risks are
  • you will need some pentalobe and TORX screwdrivers that are fairly small
    • the heatsink screws are TINY
  • you MUST be careful with the screws. they are small screws, and thus will be easy to strip and probably easy to over-torque and ruin the threads on
So

  • make sure you have the correct screwdriver bits
  • make 100% sure you don't over-tighten things
  • be sure not to lose any parts
If you're careful, have the correct tools, and DO NOT OVER TIGHTEN the small screws you'll be fine. But if you're prone to stripping out screws, losing parts or over-torquing stuff, this is NOT the mod to do yourself. I can't overstate just how small these screws are; I've been building PCs, etc. for decades and these are the smallest screws I've dealt with.
 
  • Like
Reactions: Queen6
Hello, may be a little late to the conversation but does anyone know how tight or firm the thermal pad stays (1.5mm)? Was worried it would move around since I don't plan to take apart my mac too often
 
Just modded this 2018 i got on the weekend. What do you think?
 

Attachments

  • IMG_20220412_091856.jpg
    IMG_20220412_091856.jpg
    282.7 KB · Views: 297
  • Like
Reactions: Jack Neill
This is my first time posting here, but I've been a longtime Mac user and hardware enthusiast.

I bought the 2020 MacBook Air as I was curious about the ice lake chips and keen to see if a MacBook Air could satisfy me for travelling about. But as I feared, thermal solution meant that trying to play a game of League or anything with a sustained load where consistency was important was just too difficult as the CPU pretty much stayed at 100C and would stutter/throttle for a few 100ms when playing anything. Sadly, my old 2015 MacBook Air handled this casual game of League or other trivial game a lot better, so I felt a little bit sour about it.

So to re-iterate, I know these machines aren't suited for that kind of workload (but could be), but I love everything about the laptop so I thought, maybe if I just put a thermal pad on the CPU heatsink so that it touches the bottom of the chassis, it might give it a drop more total wattage to play with. I didn't expect my results to be so great.

I literally just bought an arctic thermal pad from amazon, cut a small strip and placed it on the lower half of the CPU heatsink towards the battery, I only covered maybe a third of the heatsink so there's still some airflow going across the CPU. I ran a Cinebench R20 run, and never did my temps exceed 100C, the bottom of the macbook gets warm, but not frighteningly so, and it seems by doing this, the fan has more of a beneficial impact when it actually spins up.

I went from scoring anywhere between 650 to 720 at a stretch in R20, to scoring pretty consistently 760-780, all whilst never really touching 100C. So, in the interests of sharing my findings and showing what the i3 in the 2020 air would perform like if the cooling were just a drop better, I've attached the CB result and power gadget screenshot and would be happy to run any other tests.
I'm quite late to this but I recently did the copper shim + thermal pad mod and my cinebench score is now 879/1903
I'm quite happy with this as the temps never did exceed 94 during the multi-core.The thermal paste I'm using is thermal grizzly kryonaut.
 
Did the same using 0,5 cm pad below the heatsink and 1,5 cm pad on the heatsink. Results are great, no fan sound anymore, the i3 air keeps always quite cool. I'm really happy with this solution.
 
I tried the CPU -> Thermal pad -> Heatsink -> Thermal pad and unfortunately it didn't change anything. My temp is still 100C... while idling.

I used 0.5mm Thermal Grizzly pads.

Maybe I did something wrong? Maybe try thicker pads? Maybe I overtightened the screws? I don't know exactly what that means, but I stopped tightening as soon as they stopped turning.
if its 100c while idling then there is something wrong with that thing lol. Ive been on my air for the last hour with a half dozen sites open, YouTube, messenger etc and its at 37c right now, no thermal pad mods etc
 
if its 100c while idling then there is something wrong with that thing lol. Ive been on my air for the last hour with a half dozen sites open, YouTube, messenger etc and its at 37c right now, no thermal pad mods etc
Most definitely something wrong. I thought it was the poor stock thermal performance, but now it's becoming clear that it's not. It actually idles at around 70C, if I don't do anything at all. As soon as I click or open something, anything, it goes to 100C.

Any suggestions as to what I should check? I'm more of a Windows/PC guy, not that familiar with Macs. I've always had some MacBook or other, but they just... worked. As Macs usually do. Now this one may prove to be a challenge.
check out this thread i made awhile back, alot of information about what to do and what not to do.
 
  • Like
Reactions: julianomnunes
Register on MacRumors! This sidebar will go away, and you'll see fewer ads.