Become a MacRumors Supporter for $50/year with no ads, ability to filter front page stories, and private forums.
Status
The first post of this thread is a WikiPost and can be edited by anyone with the appropiate permissions. Your edits will be public.
I'm attempting to update my wife's early 2011 unibody, 17" MacBook Pro from High Sierra to Mojave.

She has several pieces of software used in her business that will either need to be updated or replaced. I want to get the whole system up to at least Sonoma, but I need to do it a step at a time so that she can verify that each step works.

I bought a 2 Tb Thunderbolt PCIe / NVMe SSD drive to back up her computer first. It required an OWC port to take the load off the Thunderbolt circuit in the computer. Without the port, the computer disconnected the drive to protect the computer's circuit.

With the port in the external system, the backup was successfully made.

I have a bootable copy of Mojave on a USB drive - it also has about 12 other macOS's.

I copied Mojave installer into the applications folder on the computer.

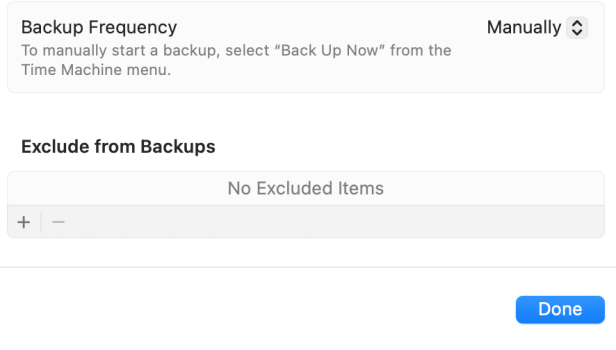
I have been trying to use OCLP. Since they seem to have gone away from Mojave, I select to make the installer for OCLP from the Mojave Installer in the applications folder. Two things happen: 1.) almost immediately Time Machine tries to start - interrupting the process of making the installer. 2.) At some point about halfway through making the installer, I get a message that says the Installer is "broken" and the process has ceased.

Would I be better off to try to do a manual install of OpenCore? Is there something that I do not know about trying to do this (upgrading to Mojave) that I do not know (I am assuming that there is something that I don't know)?

Thanks for any help or suggestions.
 
A USB external drive could also be used with Time Machine. I have always used USB externals to back up MacBook models from 2010 to 2015.

Try this: download a version of OCLP that will work with the installed OS, patch the system, use OCLP to download and create the Mojave installer, boot the machine holding down the option key, select the EFI partition from the internal drive, boot the Mojave installer, after installing Mojave, open OCLP to install root patches.
 
  • Like
Reactions: wnlewis
A USB external drive could also be used with Time Machine. I have always used USB externals to back up MacBook models from 2010 to 2015.

Try this: download a version of OCLP that will work with the installed OS, patch the system, use OCLP to download and create the Mojave installer, boot the machine holding down the option key, select the EFI partition from the internal drive, boot the Mojave installer, after installing Mojave, open OCLP to install root patches.
I have a USB with macOS's on it from Lion up through Sonoma.

The first step was to set the computer's clock back to 2019, lock that and disconnect outside connections; then install the Mojave installer in the applications folder.

Next, I backed up the entire drive to a Thunderbolt connected external 2Tb SSD drive using CarbonCopyCloner.

After that, I downloaded the latest version of OCLP and ran the patcher. It completed successfully and presented the OCLP control panel.

I clicked on the OCLP control panel to "build an installer" to install the new OS on the patched computer.

The OCLP software goes to the internet (Apple) and gives about four choices for the OS plus a couple of older unsupported OS's and some beta versions - Mojave is not one of the available options for download.

That OCLP installer window will let you select an OS installer app in the applications folder, which is what I did - selecting the Mojave installer in the applications folder.

I started the process where OCLP is supposed to build an installer to install Mojave on the patched computer.

At that point, Time Machine started up and wanted to back up the internal SSD of the computer to the external SSD.

Having already made a bootable copy of the whole computer drive, I have been turning off Time Machine as soon as it starts. The "make installer" routine continues until, Time Machine interrupts the process, putting the "make installer" on pause. This has happened several times on the two or three times that I tried to run the "make installer".

At about 60% to 70% of the "make installer" process, the software reports that the "build installer process" has failed and will quit. If I could get past this operation, I could finish, install root patches and be done.

Since there is enough room (on the external SSD) to make a backup of the internal SSD, should I let Time Machine make a backup midway through the "make installer" process?

OCLP is supposed to be able to update an early 2011 unibody MacBook Pro to Ventura and newer.

However, I need to go just one step at a time - update to Mojave and find out if the apps still work, or need to be updated, or need to be replaced, before I go to the next OS.

Thanks for your help.
 
Are you able to disable time machine's auto backup function? I have mine set to manual.

You can also try mist to create the installer instead of OCLP.
I did not find the option to disable Time Machine. I will look again.

I think the installer will work if it does not get interrupted. If not I will try Mist.
 
I did not find the option to disable Time Machine. I will look again.

I think the installer will work if it does not get interrupted. If not I will try Mist.
I've seen the "manual" Time Machine option in each macOS from High Sierra to Sequoia.
 

Attachments

  • Screenshot 2024-11-20 at 9.07.25 AM.png
    Screenshot 2024-11-20 at 9.07.25 AM.png
    44.9 KB · Views: 35
  • Like
Reactions: wnlewis
I've seen the "manual" Time Machine option in each macOS from High Sierra to Sequoia.
I didn't find that option to turn off the Time Machine in the application, however I did find the necessary command in Terminal: sudo tmutil disable. When everything is done then I will turn it back on again.
 
Are you able to disable time machine's auto backup function? I have mine set to manual.

You can also try mist to create the installer instead of OCLP.
I will try Mist. That requires a computer running a newer OS than High Sierra. So I will get a USB stick and do that on the other MacBook Pro that we purchased, that already has Sonoma on it.
 
  • Like
Reactions: Audit13
My old MBP early 2011 is now on Mojave. The nail in the coffin for Sierra was that OneDrive ceased to work completely two days ago, probably a change in the OneDrive protocol?

A couple of small visual glitches sometimes with some applications. My Firewire enclosure didn’t like the update (drive has to be mounted manually) but I made an Automator script to do it at login.

Apart from this, the 14 years old MBP is quite functionnal. Thanks @dosdude1 !
IMO, Sonoma runs even better on MBP'2011, so I'd like to recommend you to installl it.
 
  • Like
Reactions: Patrice Brousseau
My old MBP early 2011 is now on Mojave.
What kind of hard-drive is in this? (If it's a spinner drive, you'll want Mojave running from an HFS+ rather than APFS file-system; this can be accomplished by cloning, via CCC5, the installation from one to other.) Aside from that, rigourous debloating: say "no" to everything during installation, and disable SIP, MRT, Spotlight indexing, and Report Crash via Terminal commands afterwards. (Getting Mojave to run comfortably off a rotational-drive in only 4gb or ram on pre-2012 systems is a goal of mine. It is, after all only a slightly slicked-up variant of High Sierra, so this should be possible.)
Apart from this, the 14 years old MBP is quite functionnal.
It will still be running when the last HID soldered-on SSD in an M-series laptop fails and bricks the machine.
 
  • Like
Reactions: Patrice Brousseau
What kind of hard-drive is in this? (If it's a spinner drive, you'll want Mojave running from an HFS+ rather than APFS file-system; this can be accomplished by cloning, via CCC5, the installation from one to other.) Aside from that, rigourous debloating: say "no" to everything during installation, and disable SIP, MRT, Spotlight indexing, and Report Crash via Terminal commands afterwards. (Getting Mojave to run comfortably off a rotational-drive in only 4gb or ram on pre-2012 systems is a goal of mine. It is, after all only a slightly slicked-up variant of High Sierra, so this should be possible.)It will still be running when the last HID soldered-on SSD in an M-series laptop fails and bricks the machine.
SATA SSD Samsung, 16 GB of RAM. APFS and Bootcamp (Windows 10) still works!
 
SATA SSD Samsung, 16 GB of RAM. APFS and Bootcamp (Windows 10) still works!
With that much ram and drive speed, you could install Windows as a VM in Parallels, and save yourself the headaches of partitioning, bootcamp, drivers, etc, as well as share common spaces (e.g., download folders). It's very slick (It's even better for SSDs, because Windows' NTFS file-system isn't as "nice" in terms of wear-leveling as APFS.)
 
  • Like
Reactions: Patrice Brousseau
With that much ram and drive speed, you could install Windows as a VM in Parallels, and save yourself the headaches of partitioning, bootcamp, drivers, etc, as well as share common spaces (e.g., download folders). It's very slick (It's even better for SSDs, because Windows' NTFS file-system isn't as "nice" in terms of wear-leveling as APFS.)
I thought about it. VirtualBox free could do it, you're right. I know there is a way to clone my existing BootCamp in a VM image with Terabyte Image for Windows...

For now, it's the usual BootCamp small partition...
 
Reinstalled VirtualBox for Mojave: I was able to boot my "test" Windows 7 saved Virtual Machine (done this summer with VirtualBox on Sierra).

There is indeed a script to copy physical disk (BootCamp) to a VirtualBox image with Terabyte Image for Windows, a software that I already own.

However, Thunderbolt support is not great with my Win7 Virtual Machine so...
 
Done! BootCamp partition transferred as VHD... but it's slooooow! Being on a traditionnal hard disk, it could explain the slowness though. The VHD resides on an external Firewire drive.
"Firewire" is Apple connection (i.e., USB-C) protocol; it has no bearing on the connected device itself.

(Didn't this machine have 16gb of ram? That is far more than enough to run Parallels with a Win7 VM in 2gb or less.)
 
Last edited:
  • Like
Reactions: Patrice Brousseau
Register on MacRumors! This sidebar will go away, and you'll see fewer ads.