Become a MacRumors Supporter for $50/year with no ads, ability to filter front page stories, and private forums.

trifero

macrumors 68030
May 21, 2009
2,964
2,806
Thanx dosdude1

your solution works... I applied it to 4 MacBook Pros allready.
The first one had graphic artefacts due to bad RAM slot.
There is a russian version on Youtube which is slightly different and also works.
I maneged to merge both of them to make it as simple as possible without the need to take out the logicboard.


Can you share it with us?
 

DeanPSN

macrumors 6502
May 21, 2018
284
215
Dublin, Ireland
I used the method from realmacmods with the command lines and then removing one small resistor to completely shut down the dGPU so no more heat and better battery. Very pleased with the results.
 

Matejh

macrumors newbie
Jul 5, 2014
17
11
Here is my version... No need to take out the logicboard.
Don't forget to remove R8911. I prefer rotating it 90˚ on one of the pins (see picture).
Tested with El Capitan, Sierra and High Sierra (clean install from USB on actual modified MacBook Pro 15).
Same limitations apply:
• External video not working
• Brightness not working
 

Attachments

  • MBPro15_820-2915_NoGPU.jpg
    MBPro15_820-2915_NoGPU.jpg
    1.4 MB · Views: 5,486

DeanPSN

macrumors 6502
May 21, 2018
284
215
Dublin, Ireland
Here is my version... No need to take out the logicboard.
Don't forget to remove R8911. I prefer rotating it 90˚ on one of the pins (see picture).
Tested with El Capitan, Sierra and High Sierra (clean install from USB on actual modified MacBook Pro 15).
Same limitations apply:
• External video not working
• Brightness not working

Did you do any of the wire soldering?
The method i used from realmacmods, was just removing the R8911 and the command lines they provided.

Sierra and all previous versions working 100% without any further modifications, High Sierra has no brightness control and if the mac goes to sleep the screen won't wake up (without a restart), unless you do the extra step they included to solder 1 wire.
 

trifero

macrumors 68030
May 21, 2009
2,964
2,806
Did you do any of the wire soldering?
The method i used from realmacmods, was just removing the R8911 and the command lines they provided.

Sierra and all previous versions working 100% without any further modifications, High Sierra has no brightness control and if the mac goes to sleep the screen won't wake up (without a restart), unless you do the extra step they included to solder 1 wire.


So no Brightness control in both methods? And no display out?
 

Matejh

macrumors newbie
Jul 5, 2014
17
11
Did you do any of the wire soldering?
The method i used from realmacmods, was just removing the R8911 and the command lines they provided.

Sierra and all previous versions working 100% without any further modifications, High Sierra has no brightness control and if the mac goes to sleep the screen won't wake up (without a restart), unless you do the extra step they included to solder 1 wire.

Yes I did the wiring on 5 MacBook Pros so far. I do this for customers who want to use their computer a little bit longer.
Before this solution surfaced I did the GRUB method but few of the customers were returning after applying updates or reseting PRAM (even if we told them not to). I see this hardware solution as more bulletproof for customers then software methods.
 

Attachments

  • IMG_2885.jpg
    IMG_2885.jpg
    2 MB · Views: 4,143

ibrahim monem

macrumors newbie
Sep 9, 2018
13
0
Egypt
thank you for sharing

Take a look at this.

Say in this way ,

We are fix all VGA of Macbook A1398 2012 - 2015 by Hardware to Intel VGA card. Not Edit EFI and can Reset PRAM. It very easy with 3 Jumper.


Matejh

macrumors newbie
Jul 5, 2014
17
11
thank you for sharing

Take a look at this.

Say in this way ,

We are fix all VGA of Macbook A1398 2012 - 2015 by Hardware to Intel VGA card. Not Edit EFI and can Reset PRAM. It very easy with 3 Jumper.


This thread is about MacBook Pro 15 2011.
But if you are willing to explain how to do it on MacBook Pro 15" 2010 and 15" Retina 2012-2015 please go ahead.
 

trifero

macrumors 68030
May 21, 2009
2,964
2,806
This thread is about MacBook Pro 15 2011.
But if you are willing to explain how to do it on MacBook Pro 15" 2010 and 15" Retina 2012-2015 please go ahead.


Sorry… what about the owners of a Macbook Pro 17 2011??? :D
 

dosdude1

macrumors 68030
Original poster
Feb 16, 2012
2,779
7,413
This thread is about MacBook Pro 15 2011.
But if you are willing to explain how to do it on MacBook Pro 15" 2010 and 15" Retina 2012-2015 please go ahead.
The Retina MacBook Pro has a completely different gMux circuit, as it uses eDP instead of LVDS. It is actually pretty easy to tell the system to use only Intel HD Graphics on one of these systems, however it is unnecessary as the GPUs in Retinas never fail. The method I've posted in this thread will also work on 2010 15"/17" models, however it is also unnecessary on those machines, as the GPUs in them never fail either.
 
  • Like
Reactions: godman and Matejh

slimmy18222

macrumors member
Feb 13, 2017
52
12
Italy
Recently, I figured out a very good solution to PERMANENTLY disable the dedicated AMD video card on a 2011 15"/17" MacBook Pro (MacBookPro8,2/8,3)! For those of you who don't know, MacBook Pros that utilize dynamic GPU switching between a dedicated GPU and integrated GPU use an IC known as the "gMux" chip. This is simply an off-the-shelf micro-controller, programmed with special firmware that switches active GPUs on-the-fly in a MacBook Pro system. This IC has 3 sets of LVDS lines connecting to it: The LVDS output lines from the dedicated GPU, the LVDS output lines from the integrated GPU, and the LVDS lines connecting to the connector for the display. In order to accomplish dynamic GPU switching, all this IC does is, when told to by the system, routes the correct set of LVDS lines to the display's LVDS output on the logic board.

In order to permanently keep the dedicated GPU disabled, there are 2 options:

- Option A, which will be detailed below, is to hard-wire the LVDS output lines from the integrated graphics straight to the lines connecting to the display.
- Option B would be to re-program the gMux IC (which is simply a Lattice LFXP2 micro-controller), with a custom firmware to disable the GPU switching functionality. I may experiment with this in the future, but doing so requires special hardware that I don't have. This would, of course, be the optimal solution, though.

Performing the Modification ("Option A")

Before I get started with the explanation, I just want to make it clear this this is a VERY tedious modification, and requires precision soldering equipment. Use of a microscope is recommended.

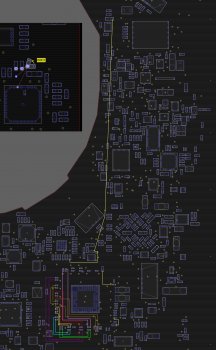
To begin, here is a brief look at the schematic, and the main premise of this mod. In the following pictures, you can see how the LVDS data lines appear for both the integrated graphics output, dedicated graphics output, and the LVDS output for the display (EG for dedicated GPU, IG for integrated GPU, and CONN of course for connector). You can see how this data line corresponds with each set of LVDS lines. There are 12 total LVDS lines (6 pairs).

View attachment 777903 View attachment 777904 View attachment 777905

In order to perform this modification, the first thing that needs to be done is to remove the gMux IC. EDIT: Do NOT remove the gMux IC. After further experimentation, I found that leaving it in place will allow you to achieve full graphics acceleration WITHOUT flashing the system firmware at all. Simply proceed with the wiring, with the gMux IC in place.

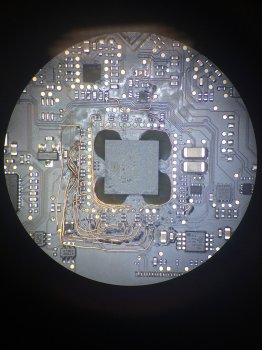
Once the chip is removed and the pads are cleaned, each LVDS data line from the LVDS_IG side needs to be connected to its corresponding data line on the LVDS_CONN side. Of course, to do this, the use of small bodge wires is required. I used 0.1MM jumper wire (which can be purchased here). A wire needs to be used to connect each IG data line to its respective point on the CONN side.

Here is a wiring diagram that will help you do this very easily. This one is for a 15" machine, but I will update this post with the 17" one once I make it.

View attachment 779000

Once all the data lines are soldered properly, there are still a couple more lines that need to be soldered. We'll start with the clock lines. If you look on the schematic, you will notice that there is one set of clock lines on the LVDS_IG side (LVDS_IG_A_CLK), but 2 sets on the LVDS_CONN side (LVDS_CONN_A_CLK and LVDS_CONN_B_CLK). All you need to do in this instance is connect the A_CLK pair from the IG side to the A_CLK resistor pair on the CONN side. Then, simply connect the A_CLK pair to the B_CLK pair on the CONN side as well.

The next thing we need to do is pull the LVDS_DDC_SEL_IG rail high. To do this, all you need to do is connect the high side of this rail's pulldown resistor (R6982) to the PP3V3_S0 rail. I connected it to a capacitor near the backlight IC (C9711), as it was the easiest and closest source of PP3V3_S0 to that point of the board. This routes the necessary LVDS DDC clock lines to the integrated GPU.

The last few things we need to wire up are the enable rails for the LCD backlight and LCD panel power, as well as the PWM signal for the backlight. The first wire simply needs to bridge the following rails: LCD_PWR_EN, LVDS_IG_PANEL_PWR, and LCD_BKLT_EN.

The last wire will be used to wire the backlight PWM signal. The purpose of this signal is to control the backlight brightness level. Now, normally, the PWM signal is generated by the gMux IC. However, since the gMux IC is no longer in place, it cannot provide this signal (and even if you were to leave it in place, it still would not be able to provide this signal. I may be wrong on this, but feel free to test if you want.) As such, we will simply be wiring this rail to the LVDS_IG_BKL_ON rail. Unfortunately, what this means is that the backlight will remain at a fixed brightness, and be uncontrollable from the OS.

Finally, once all that is wired up, the system should be good to go! The final product will look something like this:

View attachment 777906

Last Step

After all your wiring is complete, you will need to cut power to the dedicated GPU, otherwise it will simply produce waste heat. To do so, all you need to do is remove the resistor that supplies power to the GPU VCORE regulator IC, R8911.

At last, once all that is complete, you are now done! You will now have a fully working 2011 15" or 17" MacBook Pro, running off ONLY integrated graphics! No OS X modifications are necessary, and it is not reliant on any NVRAM variable (obviously). This, short of making custom firmware for the gMux chip, is the BEST solution for rectifying the defective AMD GPU issue on these machines. The only issues are the lack of brightness control as mentioned earlier, and the external display port will not work. Other than that, though, everything works perfectly!

I have a video showing the mod in detail here.

View attachment 777910


Thank you for the amazing job dude. I was guessing if same problem of brightness, and also external display, would happen in Mojave, but as i see from beta i could say yes unfortunately. Maybe it's a stupid question, but remove the dGPU and start log board without is wouldn't solve the problem?
So far wich is best method to have a working mac? Now I got a 17" early 2011MBP and i would like to bring it to alive.

Now I remember that i had a late 2008mbp 15'' wich have discrete and integrated.. well, believe me, I really don't know what i've done while i was using multimeter on it to check voltage bud i'd short something ( really good smell of burn). Result is that the dGPU was not even detected anymore, like it's not there! And the Mac was running perfectly with no issues with dosdude1 Sierra patch! Only in High Sierra and Mojave there was problem with brightness not adjustable and backlight won't turn on after close and re-open lid (like those 2011 problem!) but external display port was working perfectly.

I see that you had not try this in 17'' model. Would you like to use my logic board?
 

dosdude1

macrumors 68030
Original poster
Feb 16, 2012
2,779
7,413
Thank you for the amazing job dude. I was guessing if same problem of brightness, and also external display, would happen in Mojave, but as i see from beta i could say yes unfortunately. Maybe it's a stupid question, but remove the dGPU and start log board without is wouldn't solve the problem?
So far wich is best method to have a working mac? Now I got a 17" early 2011MBP and i would like to bring it to alive.

Now I remember that i had a late 2008mbp 15'' wich have discrete and integrated.. well, believe me, I really don't know what i've done while i was using multimeter on it to check voltage bud i'd short something ( really good smell of burn). Result is that the dGPU was not even detected anymore, like it's not there! And the Mac was running perfectly with no issues with dosdude1 Sierra patch! Only in High Sierra and Mojave there was problem with brightness not adjustable and backlight won't turn on after close and re-open lid (like those 2011 problem!) but external display port was working perfectly.

I see that you had not try this in 17'' model. Would you like to use my logic board?
The '08/'09 MCP79-based boards are very different from the newer ones, which is why the display port works even with the dGPU not working. I have actually done this mod on a couple 17" 2011 boards recently, and it works fine on them too. I still need to make a wiring diagram for that board. As for the brightness, I am actually working on a custom microcontroller that will restore brightness control functionality, by generating a PWM signal for the backlight IC. I'm not sure how well it will work at this point, but my goal is to get it to be fully integrated with the system, and work with the native backlight control drivers in OS X.
 

slimmy18222

macrumors member
Feb 13, 2017
52
12
Italy
The '08/'09 MCP79-based boards are very different from the newer ones, which is why the display port works even with the dGPU not working. I have actually done this mod on a couple 17" 2011 boards recently, and it works fine on them too. I still need to make a wiring diagram for that board. As for the brightness, I am actually working on a custom microcontroller that will restore brightness control functionality, by generating a PWM signal for the backlight IC. I'm not sure how well it will work at this point, but my goal is to get it to be fully integrated with the system, and work with the native backlight control drivers in OS X.

Thank you DosDude1, I was suspecting that they were different. The only common behaviour that i notice is the lack of PMW signal in both machine from High Sierra, no fortune using Sierra kext in both High and Mojave. So maybe the problem that lead to this situation of non adjustable brightness is the same! Could be fixed via software maybe rather than hardware?
I've got no experience in soldering, but if you will share the wiring diagram for 17'' model i'll give a try for sure, and would be really nice to have back brightness control if your solution goes on whit the micro controller :) I think there is less chance for display out :( That is a big limitation in my opinion.
Just one last question, yours 2011 tool to launch after the refi variable fix, what exactly do? Remove kext? Tanks and keep on the great job on mac's world
 

dosdude1

macrumors 68030
Original poster
Feb 16, 2012
2,779
7,413
HUGE UPDATE: For the past couple weeks, I've been working on a custom microcontroller implementation to add software backlight control back to systems that have had this modification performed! Currently, it's in a somewhat early prototyping phase, but within the next few weeks, I should have some PCBs made and the driver fully implemented! You can see a video of the device and preliminary driver in action here. Once complete, I will have some for sale for people who have used this mod on their system.
 

gsboris

macrumors newbie
Sep 25, 2018
2
0
HUGE UPDATE: For the past couple weeks, I've been working on a custom microcontroller implementation to add software backlight control back to systems that have had this modification performed! Currently, it's in a somewhat early prototyping phase, but within the next few weeks, I should have some PCBs made and the driver fully implemented! You can see a video of the device and preliminary driver in action here. Once complete, I will have some for sale for people who have used this mod on their system.
Cool stuff. Any luck on enabling HDMI out with this mod? Is it even plausible?
 

iMacC2D

macrumors 6502a
Jun 24, 2010
621
292
HUGE UPDATE: For the past couple weeks, I've been working on a custom microcontroller implementation to add software backlight control back to systems that have had this modification performed! Currently, it's in a somewhat early prototyping phase, but within the next few weeks, I should have some PCBs made and the driver fully implemented! You can see a video of the device and preliminary driver in action here. Once complete, I will have some for sale for people who have used this mod on their system.

This is nothing short of brilliant. The 2011 machines were incredibly powerful and capable units, and would continue to be excellent machines if not for the dGPU. The software and firmware fixes are never permanent, macOS does an automatic update in the background or the customer updates to a new version of macOS and the issue occurs again.

A hardware fix is much more resilient, and with backlight control, even better.

I have some otherwise useless 2011s sitting around, so I'm looking forward to testing this out.
 
  • Like
Reactions: bitshovler and olad

dosdude1

macrumors 68030
Original poster
Feb 16, 2012
2,779
7,413
Another update: PCBs for the custom backlight controller implementation have arrived, and they look great! Within the next week, we will get the boards all soldered and ready to go. You can read more about the project on my friend's webpage, who I am working with on this project. Once the PCBs have been soldered, we will be selling the remaining ones of the 17 that we have.

IMG_20180928_144703.jpg Image uploaded from iOS.jpg Image uploaded from iOS(1).jpg
 
Last edited:

dosdude1

macrumors 68030
Original poster
Feb 16, 2012
2,779
7,413
UPDATE: DyingLight boards are now available for purchase! You can find the eBay listing here; they are available world-wide. Info and installation instructions can be found on my friend's webpage.
 

dosdude1

macrumors 68030
Original poster
Feb 16, 2012
2,779
7,413
For those of you wanting to see it in action, here is a demo video of my custom backlight controller module for 2011 15"/17" MBPs with hardware disabled dedicated GPUs, fully installed and working in a machine!

More info and links to purchase one can be found here.


zackkmac

macrumors 6502a
Jul 7, 2008
880
129
Denver
Hey, @dosdude1, quick question. I found your "easy" method on your website here and was just wondering, how does one reverse that if we get the logic board physically repaired and wish to use the new dedicated GPU? Would it just need a PRAM reset?

Sorry if this has been asked before, I searched but did not see anything.
 

dosdude1

macrumors 68030
Original poster
Feb 16, 2012
2,779
7,413
Hey, @dosdude1, quick question. I found your "easy" method on your website here and was just wondering, how does one reverse that if we get the logic board physically repaired and wish to use the new dedicated GPU? Would it just need a PRAM reset?

Sorry if this has been asked before, I searched but did not see anything.
Yes, you just need to reset the PRAM. HOWEVER, I would HIGHLY advise that you NEVER get one of these GPUs replaced, as AMD, being trash as usual, never actually fixed the issue with those Radeon HD 6xxx series chipsets. Therefore, any new GPU you were to install on these systems would be the same defective garbage, and just fail again in the future. The ONLY good solution is the one detailed in the OP of this thread, completely disabling the crappy AMD GPU.
 

JMVB

macrumors regular
May 16, 2016
186
51
Hey, @dosdude1, quick question. I found your "easy" method on your website here and was just wondering, how does one reverse that if we get the logic board physically repaired and wish to use the new dedicated GPU? Would it just need a PRAM reset?

Sorry if this has been asked before, I searched but did not see anything.


@dosdude1 the downloadable software contained in your website, what it does?
 
Last edited:

zackkmac

macrumors 6502a
Jul 7, 2008
880
129
Denver
Yes, you just need to reset the PRAM. HOWEVER, I would HIGHLY advise that you NEVER get one of these GPUs replaced, as AMD, being trash as usual, never actually fixed the issue with those Radeon HD 6xxx series chipsets. Therefore, any new GPU you were to install on these systems would be the same defective garbage, and just fail again in the future. The ONLY good solution is the one detailed in the OP of this thread, completely disabling the crappy AMD GPU.


Gotcha, thanks for the clarification. I think I had gotten it mixed up with the 2008ish Nvidia chips which are the ones that are replaceable with better-made units.
 
Register on MacRumors! This sidebar will go away, and you'll see fewer ads.