How to have a cooler 4870
Not only is a seond card completely 100% unnecessary, by using an ATi anything, you greatly increase the odds of incorrectly saving from or flashing to wrong card.
I agree. Having a second card (X1900 in my case) also made it more of a headache for me in that my X1900 has a Thermalright HR-03 GT cooler on it, leaving no room for any other PCI cards, necessitating the need for the GT to be replaced with the stock cooler, making an extra power cable to pull power from the optical bay, and adding quite a bit of time to the whole flashing process.
I had one big issue I wanted to settle before I ran the 4870 card on the OS X side of my Mac Pro, and that was cooling. These 48xx cards run HOT. Most temperature reports on many forums that I visited mentioned that the 4870 ran 70C+,
at idle. ATI reduced the fan speed to keep it quiet, but at the expense of added heat. While a modern GPU was made to run fine at higher temperatures such as 80-100C (176-212F), all that heat has to go somewhere. A good part of it goes out the back of the computer, but some of it is transferred down the card into the motherboard, and in a Mac Pro, also radiates upward towards the hard drive trays.
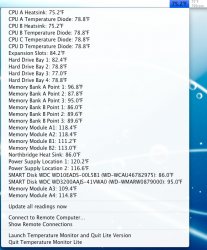
I had no knowledge of how hot the 4870 would run in a MP. After flashing my XFX 4870 (ZDFC model) via swissmann's tutorial, I fired up the Catalyst Control Center in Boot Camp to check on the temp, which was 71C. Granted, I have four hard drives, but the factory ATI 4870 fan control keeps the card cool in passive mode (no fan) until the GPU reaches 58C, and then it slowly ramps the fan up to 100% at 101C.

Heat is the enemy of electronics, and who wants a graphics card that idles at 160F in their MP? Definitely not me.
Like the
great poet, I had two choices:
1) Transfer my HR-03 GT from the dead X1900, as well as purchase a Thermalright HR-09 S Type 2 MOSFET cooler for the VPMs (which put out a tremendous amount of heat), as the HR-03 GT cools the GPU and RAM chips only. This would mean I would loose all my extra PCI slots again (no big deal as I have no other PCI cards), would be out more $, and would have to wait 5-6 days until I received the VPM heat sink.
2) Modify the BIOS to ramp up the fan speed at lower temperatures. No aftermarket coolers, no waiting, and
definitely the road less traveled. You can guess which one I set out to do.
How to have a cooler ATI 4870
If you are thinking about flashing a 4870, read this. If you have already flashed a 4870, you will still want to modify your ROM.
I've never flashed until today. So, consider me a "novice".
The following “tutorial” has more background information than most step-by-step tutorials, but I felt that this is very important and necessitates a thorough explanation. If you want to skip all the reading, you can find two modified ROMs for the XFX 4870 ZDFC series cards here:
-
55C ROM (recommended); card will run at approximately 57C (135F), fan speed 28% at idle, with an ambient temp of 80F (according to iStat). Under full load it runs at 61-62C (142-144F) at 38%. This is the ROM I am using.
-
50C ROM (slightly cooler ROM); card will run at approximately 53C (127F), fan speed 30% at idle. There’s an audible difference between fan speeds of 28% & 30%, but choose this ROM if you want the card to run a little cooler with a more aggressive fan speed.
I followed
swissmann's tutorial, except for using a second video card. Install the 4870 drivers (make sure you choose to do a "Custom Install" and uncheck the natit file, as it only needed on Hackintoshes), select Windows as the startup disk, and shut down the MP. Take out your current gfx card (X1900 in my case), plug in the 4870, and restart. After inserting the XFX driver disc and installing the drivers, reboot into Windows to get support for the 4870.
DO NOT burn your boot CD yet.
Find the optimal temperature for your configuration
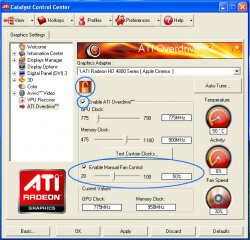
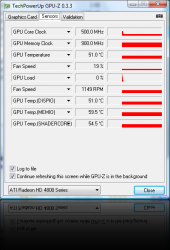
Open the Catalyst Control Center (CCC), select "Advanced" mode, then go to the "ATI Overdrive" tab, and click the unlock box so that you can see the GPU temp and adjust the clock and fan speeds.

You will need to check the "Enable ATI Overdrive"
and "Enable Manual Fan Control" checkboxes in order for the fan speed to be applied. The CCC doesn’t modify your card; it is a system-level override that changes the card’s parameters and works only when CCC is running. (Note: The default GPU and Memory clocks are 775MHz & 950MHz, respectively. Somehow my memory clock was moved to 900MHz for the screenshot.)
Note: Enabling manual fan control will override the input from the graphics card BIOS and tell the fan to stay at a specific speed. If you set your fan speed too low (keep it at the baseline 20% for example) and load the card you could eventually run the risk of the card overheating due to the fan staying at a constant speed and not ramping up.
I found that with my configuration, a minimum of 30% was needed to keep the card in the 54C range. This is with all four drive bays full. Noise increases exponentially, and you can hear the difference between a small increase in fan speed. Try setting the fan at 100%, and you will see dust blowing from behind your MP that you never knew was there... the fan can move an incredible amount of air at a tremendous amount of noise.
Modify the stock ROM
Download
Radeon BIOS Editor (RBE). This software is used to modify the BIOS of your graphics card. Once you have made your Mac ROM according to
pipomolo42’s instructions (or use
rhildinger’s ROM for a XFX 4870 ZDFC card), then load this ROM into RBE.
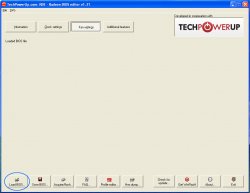
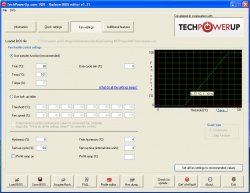
Open RBE and click on Fan settings.
Click on Load BIOS.
Here are the fan parameters for stock 4870 ATI reference design ROM. RBE has extensive documentation, so we won’t get into everything here. Two values are of interest to us; Tmin, and Tmax.
Tmin is the temperature (in Celcius) at which the fan is switched on 1%. For the stock ROM, we see that Tmin is 58C (136F). The fan will not even reach 30% until at least 71C (160F).
Tmax is the temperature at which the fan is at 100%. A few other notable parameters include Duty cycle min and Tmin hysteresis (but don't change these).
Duty cycle min is the minimum speed at which the fan will turn on. If this were to be set to 10%, the baseline (horizontal green line on the left side of the graph) would change to 10%. Initially I thought this meant that the fan would be at a constant 10% (and hence no passive cooling mode) until the parameters say otherwise. However, the fan is off until a certain temperature (Tmin), at which point the fan will immediately power on at 10% (no 0-10% ramp) and go up from there, so I decided to leave this value set at 0%.
Tmin hysteresis is the sensitivity threshold of the fan. Default is 4C, which means that the fan speed won’t change until there is a 4C change in threshold. Hysteresis adjusts the amount that the fan speed varies; you don’t want the speed (and thus the noise) to change constantly, otherwise it will drive you nuts. Leave hysteresis at 4, the default.
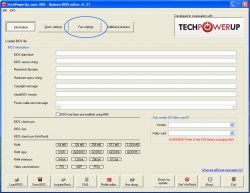
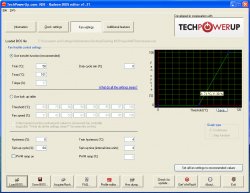
From CCC, I picked 30% as a good reference noise level for the fan, and the card temp was 53C at that speed. For the modified 55C ROM, the Tmin value was adjusted to 38C so that fan speed would be 30% at 57C. This would mean that the fan would run a couple % lower at 54-55C, which would lower the noise by a noticeable amount. Also notice that the slope changed to 25 from 37 on the stock ROM, which yields a more gradual increase in fan speed.

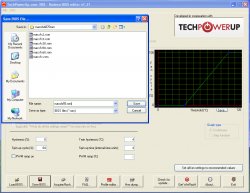
Save the modified ROM (add the .rom extension at the end); in our case the name is "macxfx55.rom" and add it to your ISO image.
I have spent 5-6 hours (plus a couple more writing this tutorial) creating 15+ ROMs with various Tmin, Tmax, hysteresis, etc. settings, flashing them, and then measuring temps in Windows so that I could produce the best noise-to-temperature configuration that would keep your card cool, but yet not be that noticeable in the MP. My 4870 card has a good 20 flashes on it, and it’s holding up fine.
The ROMs in the above save dialog box are only a few of what I created over this whole process, so ignore them.
Flash the modified ROM
Now that you have made your modified ROM, continue the steps in swissmann’s tutorial and burn a CD with your stock card ROM, unmodified Mac ROM, and temperature-modified ROM(s). This way you will only need to burn one CD, and you’ll have several ROMs to choose from when flashing.
Select the burned CD as your startup disk via the Boot Camp control panel and continue on to swissmann’s tutorial to burn your modified ROM (change the ROM file name as appropriate) so that your card will work in OS X.
Congratulations, you now have a relatively quiet & cooler 4870 that won’t require you to keep the A/C on in your house.