Become a MacRumors Supporter for $50/year with no ads, ability to filter front page stories, and private forums.

Ganoninc

macrumors member
Original poster
Nov 25, 2015
47
24
Lille, France.
Hey all,

I've modified the passive thermal system to improve the cooling of the CPU of my 2015 Retina MacBook following these instructions: https://www.reddit.com/r/macbookrepair/comments/ldbye3 .

As this original reddit post lacks of photos, I've decided to share there how it went for me:

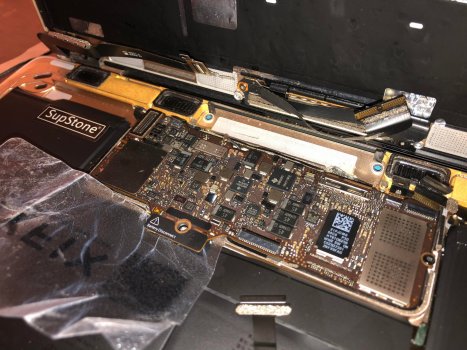
Here's the MacBook open with a plastic card to disconnect the battery. The button to power it off, next to the battery connector didn't work for me.

272896530_541103363682051_2701101603810187109_n.jpg


Here's the extracted logic board:

259037005_1319709028465452_5271555611390607843_n.jpg


Let's remove the CPU heatsink

260532876_598863401224969_2263514572534643735_n.jpg


and clean the old thermal past

260532672_3146443528910617_2054312992947787655_n.jpg


Then apply some new one

259612516_260048459437629_5087087987294854601_n.jpg


After that, I placed the two thin copper plates on the top of the CPU, and applied thermal past on the back of the heatsink as well

260424030_424872689318305_288723685449654416_n.jpg


Here is the heatsink back in place

273054732_979082692747975_60096876457997059_n.jpg


260009783_3051781545090925_6122366756757428464_n.jpg


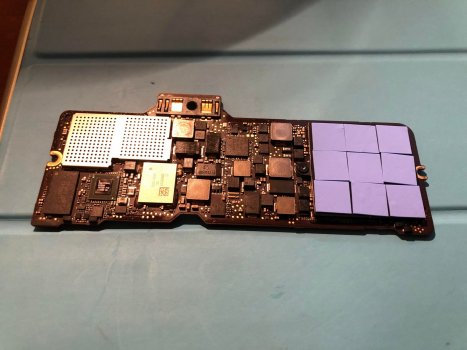
Now, we can put thermal pads on the top of the heatsink

260055097_475181044175135_4297164639863959461_n.jpg


Eventually, here's the MacBook working again:

260829223_253337133449855_1064283796793568489_n.jpg


Conclusion: the MacBook case is now warmer, but the CPU is way cooler, so its frequency remains high.

It should prevent CPU and SSD failings. However, the battery may die sooner as it doesn't like heat. But it's (way) cheaper to replace the battery than the logic board.
 

Attachments

  • 261101800_431788564981776_7832304793674958349_n.jpg
    261101800_431788564981776_7832304793674958349_n.jpg
    367.1 KB · Views: 683
  • 272821476_1099697453904727_308034943202874297_n.jpg
    272821476_1099697453904727_308034943202874297_n.jpg
    588.7 KB · Views: 756

SandroV

macrumors newbie
Oct 29, 2020
4
0
Hey there - this is amazing. I love the 12" rMB and recently upgraded from a Core i5/8GB 2017 model to a Core i7/16B one for travel, only to find that all benchmarks on the higher end one are either equal or actually lower. Seems like the higher end one I got throttles even more (!) than the i5.

At any rate, I'm quite new to taking apart MacBooks (I do build gaming PCs so I suppose I can somewhat manage). Would you be able to tell me what tools, pads and thermal paste you used?
 

T'hain Esh Kelch

macrumors 603
Aug 5, 2001
6,446
7,365
Denmark
Uh, I am definitely going to try that! Is it a strained fit with those two additions of cooling elements, as they add some height? And what size copper plates did you use, as they seem a perfect fit?
 

Ganoninc

macrumors member
Original poster
Nov 25, 2015
47
24
Lille, France.
Hey there - this is amazing. I love the 12" rMB and recently upgraded from a Core i5/8GB 2017 model to a Core i7/16B one for travel, only to find that all benchmarks on the higher end one are either equal or actually lower. Seems like the higher end one I got throttles even more (!) than the i5.

At any rate, I'm quite new to taking apart MacBooks (I do build gaming PCs so I suppose I can somewhat manage). Would you be able to tell me what tools, pads and thermal paste you used?

To open the MacBook and manipulate the copper plates and thermal pads, without touching them (you don't want to make them greasy with your fingers), I've bought this kit : https://fr.aliexpress.com/item/4000103365480.html?gatewayAdapt=glo2fra&spm=a2g0o.9042311.0.0.27426c374wMXAu

Then, I've used two 0.3mm thick 15x15mm large copper plates (these ones https://fr.aliexpress.com/item/3286...=glo2fra&spm=a2g0o.9042311.0.0.27426c37wKT3oc).

For the thermal pads, they come from here: https://fr.aliexpress.com/item/1005...=glo2fra&spm=a2g0o.9042311.0.0.27426c37n6xDFL
The size is "10x10x0.5mm Sliced"

I've also used some nail polish remover to clean the old thermal past and then some 70% alcohol. The idea is to take your time and make sure there is nothing left on the board before continuing.

For the opening instructions, I've followed carefully the iFixit guide : https://fr.ifixit.com/Tutoriel/Retina+MacBook+2015+Logic+Board+Replacement/44095?lang=en


Uh, I am definitely going to try that! Is it a strained fit with those two additions of cooling elements, as they add some height? And what size copper plates did you use, as they seem a perfect fit?

As you can see on some pictures, I fits quite good, the heatsink doesnt' seat so much higher than before the mod.

Adding the thermal pads on its top didn't make placing the logic board back in place harder.

So yeah, I'd say it works pretty well.


In conclusion, it's "difficult" but not impossible to do. And whatever you do your 2015 Macbook, always have this in mind :

To avoid logic board damage, when your MacBook repair is complete but before powering it on, connect it to low-voltage power using a 5-Watt iPhone charger and a USB-C to USB-A cable. These accessories are not included with your MacBook, so make sure you have them ready before you begin.

Personally, each time I open my MacBook, I hide its power charger away to be sure I won't use it before this step.
 
  • Like
Reactions: T'hain Esh Kelch

Ganoninc

macrumors member
Original poster
Nov 25, 2015
47
24
Lille, France.
Bonus content:

Here are some screenshots I took right after the modification.

You can see on the right corners the clock and the CPU temperature.

The temperature is the result of a cold boot + Spotify + Spotlight indexation (mds_stores) for several minutes (very high CPU usage).

As you can see, the temperature stayed pretty low (under 40 Celsius degrees) at full charge, and went back to 32 after that.

Screen Shot 2021-11-30 at 17.22.29.png


Screen Shot 2021-11-30 at 17.23.54.png


Screen Shot 2021-11-30 at 17.25.28.png


Screen Shot 2021-11-30 at 17.27.17.png


And here is the bonus content of the bonus content:

Here is the temperature of the MacBook during the redaction of this post:

Screen Shot 2022-02-18 at 09.31.33.png
 

jema68

macrumors newbie
Feb 15, 2014
9
0
Hey all,

I've modified the passive thermal system to improve the cooling of the CPU of my 2015 Retina MacBook following these instructions: https://www.reddit.com/r/macbookrepair/comments/ldbye3 .

As this original reddit post lacks of photos, I've decided to share there how it went for me:

Here's the MacBook open with a plastic card to disconnect the battery. The button to power it off, next to the battery connector didn't work for me.

View attachment 1959876


Here's the extracted logic board:

View attachment 1959880


Let's remove the CPU heatsink

View attachment 1959881

and clean the old thermal past

View attachment 1959882


Then apply some new one

View attachment 1959885


After that, I placed the two thin copper plates on the top of the CPU, and applied thermal past on the back of the heatsink as well

View attachment 1959886


Here is the heatsink back in place

View attachment 1959887


View attachment 1959888


Now, we can put thermal pads on the top of the heatsink

View attachment 1959889


Eventually, here's the MacBook working again:

View attachment 1959893


Conclusion: the MacBook case is now warmer, but the CPU is way cooler, so its frequency remains high.

It should prevent CPU and SSD failings. However, the battery may die sooner as it doesn't like heat. But it's (way) cheaper to replace the battery than the logic board.
Hi many thanks for this awesome post with all the details. How is the long time experience with the mod? Many thanks.
 

SandroV

macrumors newbie
Oct 29, 2020
4
0
Has anyone tried this on a 2017 MacBook 12"? I've ordered all the parts, but haven't gotten around to it yet. I also read somewhere that the cooling improved with the 2016 model?
 

Ganoninc

macrumors member
Original poster
Nov 25, 2015
47
24
Lille, France.
Hi many thanks for this awesome post with all the details. How is the long time experience with the mod? Many thanks.
Still running solid!

The only issue I have is related to OpenCore Legacy Patcher. Sometimes, the Macbook (2015, doesn't officially support Monterey) crashes when waking up from sleep.
 

unphased

macrumors member
May 29, 2013
53
13
Same question here re: 2017 model. I've got the i7 that boosts to 3.1 and would like to squeeze a bit more perf out of it. Also have a 16 inch M1 Max but nothing beating the portability of this yet. Maybe soon though we'll get a 12" with the Apple Silicon treatment.
 

NazgulRR

macrumors 6502
Oct 4, 2010
423
83
Very cool. Have a 2016 model upgraded to 2017 that sees 99C during cinebench 23. Very tempted to do the mod, parts ordered already :p

@Ganoninc, which thermal paste did you use please? Also what max temps were you seeing previously vs now?

@SandroV, have you gotten around to doing the mod yet perhaps? If yes, what temps are you seeing?
 

Ganoninc

macrumors member
Original poster
Nov 25, 2015
47
24
Lille, France.
Very cool. Have a 2016 model upgraded to 2017 that sees 99C during cinebench 23. Very tempted to do the mod, parts ordered already :p

@Ganoninc, which thermal paste did you use please? Also what max temps were you seeing previously vs now?

@SandroV, have you gotten around to doing the mod yet perhaps? If yes, what temps are you seeing?

I used some cheap unbranded thermal past from AliExpress. I don't mind losing 2-3 degrees because I didn't used a professional thermal past.

For the max temps, I stopped monitoring them quickly after the screenshots of post #5. It's a MacBook, the spirit is "it just works". I can only tell that it's still working fine today, even when running a virtualized Windows 7. Only the USB-C port would need to be fixed someday.

I wonder how it feels to use a 2017 one, I wish sometimes the 2015 was more responsive.
 
  • Like
Reactions: NazgulRR

NazgulRR

macrumors 6502
Oct 4, 2010
423
83
I’ve finally taken some time over the weekend to do this mod. Literally ordered from the same links that are posted above and followed the same exact steps and used the MX-4 thermal paste.

I’m absolutely amazed at the results I got on this 2017 m3 chip. Running Intel Power Gadget all CPU core to 100% benchmark for 5min, the max CPU dropped from 94C before the mod to 71C post-mod, whilst the GPU benchmark on the same tool for 5min showing a drop in GPU temp from 80C to 58C. Watching a 4K video on YouTube, I could see max temps of 62C / 61C across CPU and GPU respectively and smooth playback.

This is all on a fresh clean install of Monterey 12.5.1 (no iCloud / user data yet).
 
  • Like
Reactions: Ganoninc

SandroV

macrumors newbie
Oct 29, 2020
4
0
Hey there - tha's a great update! I still haven't gotten around to doing mine, but I have experienced a lot of thermal / high temperature warnings especially working outside during this summers heat wave (I live in Germany). Did you do any photos by any chance and were the steps described above identical on your 2017 (compared to the 2015 model)? Thanks!
 

NazgulRR

macrumors 6502
Oct 4, 2010
423
83
Yes, I took photos, but the steps are essentially the same. The heatsink is slightly smaller on the 2017 do I had to cut down one of the copper pads (thin enough for kitchen scissors to do the job):


A0A59253-4646-4BA1-B411-9FC1C3A2C960.jpeg
I think you should go ahead with the mod. I definitely wish I had done this with my 2016 before it died (likely from overheating…) and needed replacing with this 2017 (the logic board is a direct replacement)
 
  • Like
Reactions: Ganoninc

Ganoninc

macrumors member
Original poster
Nov 25, 2015
47
24
Lille, France.
I’ve finally taken some time over the weekend to do this mod. Literally ordered from the same links that are posted above and followed the same exact steps and used the MX-4 thermal paste.

I’m absolutely amazed at the results I got on this 2017 m3 chip. Running Intel Power Gadget all CPU core to 100% benchmark for 5min, the max CPU dropped from 94C before the mod to 71C post-mod, whilst the GPU benchmark on the same tool for 5min showing a drop in GPU temp from 80C to 58C. Watching a 4K video on YouTube, I could see max temps of 62C / 61C across CPU and GPU respectively and smooth playback.

This is all on a fresh clean install of Monterey 12.5.1 (no iCloud / user data yet).

Congratulations for your successful mod and thanks for sharing your story!

How is the m3 performing in term of responsiveness?

My 2015 running Monterey is sluggish. I think the GPU has difficulties to handle the UI. I thought of downgrading but there is no reason for older UI to run better since Apple use blur everywhere since 2015.
 

NazgulRR

macrumors 6502
Oct 4, 2010
423
83
Congratulations for your successful mod and thanks for sharing your story!

How is the m3 performing in term of responsiveness?

My 2015 running Monterey is sluggish. I think the GPU has difficulties to handle the UI. I thought of downgrading but there is no reason for older UI to run better since Apple use blur everywhere since 2015.

Thanks!

I’ll write back in terms of responsiveness in few weeks’ time incl on how it performs when connected to a 4k screen. It’s waiting in my drawer in a blank state to be given to my sister for now. I probably expect a small performance hit from once the iCloud account is set up and is constantly syncing various services in the background.

I did notice that the 4k youtube video (i set it to 4k) played smoothly now, which it didn’t before the mod (probably due to throttling). I’d say that the UI animations were maybe 99% smooth, whilst my M1 MBA is 100% smooth. And from memory, the 2016 m3 I had in there before it died on Big Sur, it couldn’t play 4k youtube video at all.
 
  • Like
Reactions: Ganoninc

aespana

macrumors regular
Feb 21, 2020
131
112
Man! This looks amazing!

I have a rMB 2017 with the basic intel M3 and 8GB/256GB. Is worth it for this model with that processor?

I will check the temps and see if is need it.
 

unphased

macrumors member
May 29, 2013
53
13
I like the idea of doing this mod on my 2017 12" macbook that has the i7 in it. But I've been spoiled rotten by Apple Silicon... I just don't get why Apple won't make an M1 12" macbook. It would be such a slam dunk. It's just hilarious that my m1 iPad with the keyboard cover is way bulkier and heavier than this macbook!!!

I would spend the time to do this and then probably still never use the computer. It would be sad. But I might still do it just because it does look pretty fun. I've finished assembling my Velka 7 SFF PC. I used liquid metal to cool the CPU on that, and also got a copper ram shims installed in the GPU for that. I'll do this if I run out of little projects to do.
 
  • Like
Reactions: NazgulRR

NazgulRR

macrumors 6502
Oct 4, 2010
423
83
Man! This looks amazing!

I have a rMB 2017 with the basic intel M3 and 8GB/256GB. Is worth it for this model with that processor?

I will check the temps and see if is need it.

I agree with ganonic that this should be applied to every still living MacBook.

My 2016 died suddenly (last thing I saw was scrambled/distorted image on the screen) making me think the thermals must have killed the chip as I drove it hard for 4 years. I guess it can take only so much before the factory thermal compound loses its efficacy.
 

mt2017rmb

macrumors newbie
Oct 10, 2022
4
7
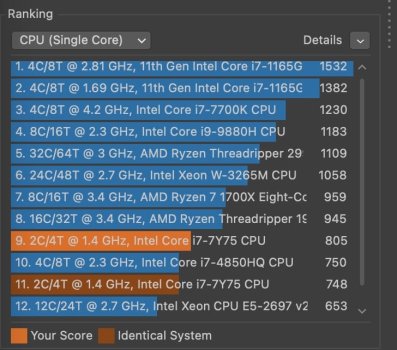
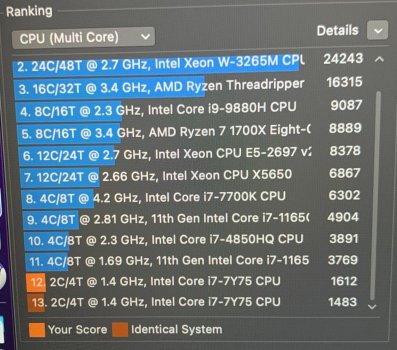
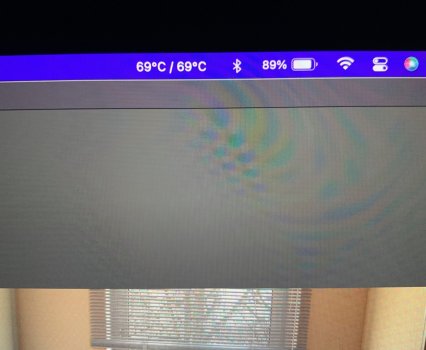
Just did this mod on my rMB 2017 i7/16gb. Took about half an hour (I've replaced the battery before so knew the inner workings already). Gained 7-8% in Cinebench under the exact identical running conditions pre/post mod. Max temp 69c on 2nd pass of the multicore after the mod and the battery temp never went over 40c. This mod WORKS. Totally recommend.
 

Attachments

  • single_core.jpg
    single_core.jpg
    65.8 KB · Views: 220
  • IMG_6015.jpeg
    IMG_6015.jpeg
    759 KB · Views: 212
  • IMG_6014.jpeg
    IMG_6014.jpeg
    625.7 KB · Views: 219

mt2017rmb

macrumors newbie
Oct 10, 2022
4
7
About a week later I'm happy to report my daily driver 2017 rMB has never been happier. I run Debian under UTM (very CPU intensive) for work sometimes and temps have stayed in the 60s and the virtual client is noticeably snappier because of less throttling. The bottom case does indeed get muuuuuch hotter, but it's easy to adjust for (I mean... just spread your legs a bit lol). I have yet to see a battery temp higher than about 40c also even after an hour in the VM, which is great. Two thumbs up.
 

aespana

macrumors regular
Feb 21, 2020
131
112
I'm getting excited higher and higher. Alrready wating for the parts from Aliexpress but it takes lake 1.5 and 2 months to arrive. A little worry about the opening process and all but i have some experience opening thing so i expect that every thing will be ok.

One the work is done, i will post the results!
 
  • Like
Reactions: Ganoninc
Register on MacRumors! This sidebar will go away, and you'll see fewer ads.