Become a MacRumors Supporter for $50/year with no ads, ability to filter front page stories, and private forums.
I used the sfott install method and I got 10.10.1 runnign on my Macpro 1,1 thats flashed to a 2,1. When I try to do the update to 10.10.3 it won't boot afterward. Everything runs great until I do the update. Any suggestions?

Did you install the PikeYoseFix package? 10.10.2 overwrites the boot.efi so it won't boot until you replace the script. Use the SFOTT usb you made to revert back to 10.10.1 and then install the package. Reboot twice and then update to 10.10.3.
 
I used the sfott install method and I got 10.10.1 runnign on my Macpro 1,1 thats flashed to a 2,1. When I try to do the update to 10.10.3 it won't boot afterward. Everything runs great until I do the update. Any suggestions?

You should have done some more research. It's been stated many times in this thread and a few posts up that you need the Yosemite fix before doing system updates. You can manually replace the boot efi. Info is on the first page. Once 10.10.1 boots use the Yosemite fix and apply combo system update to get to 10.10.3
 
ok, i got it back up and running on 10.10 now. I will look for the pikeyosefix and patch it. Thanks guys. It was a long thread to dig all the way through. I thought I saw that somewhere but couldn't remember where
 
I used the sfott install method and I got 10.10.1 runnign on my Macpro 1,1 thats flashed to a 2,1. When I try to do the update to 10.10.3 it won't boot afterward. Everything runs great until I do the update. Any suggestions?

See post #3283
 
Is there a Pike Black .efi that would work for a Macbook 4.1? I have tried the one on this thread with no luck, i guess this is because it is meant for old Mac Pro's.
 
Correct. It changes the boot.efi right before the computer restarts or shuts down every time. So updates will not break it anymore.

hello Hennesie
I wanted to know must decompress the boot.efi and after I drag to place two (system / library / CoreServices and usr / standalone / i386 ) or does it do something else.
but the usr folder is not visible on the ssd or instaler elcapitan . thank you to tell me if this is good I tell you a big thank you

usr / standalone / i386 ) is invisible. There's an app I use called invisibles and it makes hidden files visible. You need to be booted into another HD then make all invisible files visible and replace the boot EFI'S. Then boot back into the drive you replaced the EFI's for.

http://www.macupdate.com/app/mac/12194/invisibles

It's not invisible. Just open a finder window and press shift+command+g then type in /usr and press enter.
 
Is there a Pike Black .efi that would work for a Macbook 4.1? I have tried the one on this thread with no luck, i guess this is because it is meant for old Mac Pro's.
Tiamo and Pike's versions of boot.efi aren't per se thought of as working exclusively for old Mac Pros running Mountain Lion/Mavericks (Tiamo's) or Yosemite/El Capitan (Pike's), but as general boot.efi replacements that masquerade as being 64-bit capable. They translate between a 64-bit kernel and a 32-bit EFI, and vice versa. The problem is that, in addition to requiring a 64-bit EFI, these versions of OS X also require 64-bit drivers for the graphics card on the computer, but no-one has actually created such drivers for many of the older cards. Solving this is reasonably easy to accomplish on a Mac Pro: you simply get a newer, supported graphics card and you are done. The problem is, How do you do that on a MacBook? You would need a new motherboard; in other words, a new computer.
 
Correct. It changes the boot.efi right before the computer restarts or shuts down every time. So updates will not break it anymore.

hello
I managed to make the file visible with the command sudo chflags nouchg /Volumes/Installer/System/Library/CoreServices/boot.e but I wanted to know I drag directly in the pkg location or I have the opens with pacifist and I slide the two files extracted .
thank you for your help

hello
I deceive the command is: defaults write com.apple.finder AppleShowAllFiles YES
killall Finder veiled excuse me error edit
 
Last edited by a moderator:
Thanks to the expert help I received on this forum, I got Yosemite installed and running well on my Mac Pro 2,1. Now, I would like to install Windows 7 Ultimate 64 bit on this same machine, on a 2nd internal drive, via Bootcamp 5. (Currently, I have Windows 7 Ultimate 32 bit installed on a 3rd internal drive, originally installed using Bootcamp 4 under Lion. Lion is installed on a 4th internal drive.)

I realize my Mac Pro is unsupported to run Windows 64 bit, as well as Bootcamp 5, but I was hoping for a workaround. Also, would installing the rEFIt bootloader program help in this process? Would it conflict in any way with Pike's bootloader for Yosemite? Thanks in advance for any ideas.
 
@Rocketman83:

If I were you, I wouldn't touch rEFIt. I have a Mac Pro 1,1 and one of my internal hard disks contains Windows 7 Ultimate, 64-bit edition. It never had any problems with Boot Camp (although I installed that way before Boot Camp 5). In any case, if I remember correctly, I didn't use the Boot Camp installer (an executable file, I think), but one of the secondary installers in the folder named "64 bit" or something like that. It installs just fine. In case the Boot Camp Assistant were not to work for you, you can achieve the same effect via Disk Utility (you might need to format your Windows drive as FAT32, if you don't have Paragon NTFS for OS X or the like, and then, when you actually install Windows by booting from its install DVD, reformat as NTFS). There's nothing to it.
Thanks for the feedback. If I can't get Bootcamp 5 to work, I may have to try installing Windows 7 64 bit with either Bootcamp 4 or an alternative method. I would prefer to use Bootcamp, though, as I want to use Windows in a virtual machine using VMWare Fusion 7. I'm not sure if Fusion would even detect the Windows installation if it weren't installed via Bootcamp. Yes, I could probably install Windows directly through Fusion, but I prefer having Bootcamp as well, should I need to run Windows at true native speed.
 
I can't tell you right now which version of Boot Camp or the exact procedure I used, since that happened years ago, when Windows 7 first came out. In any case, I haven't booted into Windows 7 for months now. I think in the last year or so I've only booted into Windows 7 a couple of times just for a few minutes. Whenever I need to run a Windows application, I just use a Fusion Windows 8.1 virtual machine in Yosemite.
 
Thanks for the feedback. If I can't get Bootcamp 5 to work, I may have to try installing Windows 7 64 bit with either Bootcamp 4 or an alternative method. I would prefer to use Bootcamp, though, as I want to use Windows in a virtual machine using VMWare Fusion 7. I'm not sure if Fusion would even detect the Windows installation if it weren't installed via Bootcamp. Yes, I could probably install Windows directly through Fusion, but I prefer having Bootcamp as well, should I need to run Windows at true native speed.

You do not need refit and I would NOT use it.

Install windows natively and then download the latest version of bootcamp. Look up how to install .msi files with elevated permissions so you can bypass the system check and install bootcamp on "unsupported" systems.
 
Tiamo and Pike's versions of boot.efi aren't per se thought of as working exclusively for old Mac Pros running Mountain Lion/Mavericks (Tiamo's) or Yosemite/El Capitan (Pike's), but as general boot.efi replacements that masquerade as being 64-bit capable. They translate between a 64-bit kernel and a 32-bit EFI, and vice versa. The problem is that, in addition to requiring a 64-bit EFI, these versions of OS X also require 64-bit drivers for the graphics card on the computer, but no-one has actually created such drivers for many of the older cards. Solving this is reasonably easy to accomplish on a Mac Pro: you simply get a newer, supported graphics card and you are done. The problem is, How do you do that on a MacBook? You would need a new motherboard; in other words, a new computer.

Ok so in short, i cannot replace my Macbook 4.1 EFIs with Pikes Black EFI because my GMAX3100 was not designed for it?

I currently use the standard boot.efi 584kb that comes with Yosemite 10.10.3 and the only thing i have to change when i make the USB installer is the plists,add the kernel and edit the distribution file in OSINSTALL.mkpg.
 
Ok so in short, i cannot replace my Macbook 4.1 EFIs with Pikes Black EFI because my GMAX3100 was not designed for it?

That Pike's boot.efi displays a grey or a black screen is irrelevant. You can probably use either flavour of Pike's boot.efi on your Macbook 4,1, but chances are your GMAX3100 was not designed not for Pike's boot.efi, but for Yosemite! In other words, you can probably boot into Yosemite using Pike's boot.efi, but without graphics acceleration, lots of artifacts, et cetera, unless you somehow manage to get 64-bit drivers for that card.
 
Last edited:
Hi guys I have MacBook 4,1 I like to update to Yosemite or Mavericks I download SFOTT but no luck when restarrt and boot on USB I get a circle with line across I download the image with the pre fix but when boot i get a folder with question mark pls help
 
So do i put the black boot.efi in CoreServices and lock, then install the PikeYose Fix, and rename the one boot.efi.pike to boot.eif and get rid of the original in the i386 folder?

In my experience, whether you use Pike's grey or black boot.efi is irrelevant. If you have the grey one but want the black one instead, make sure you replace the former with the latter and leave the rights and locks exactly as they are in the two relevant folders. In addition, if you have set in place the replacement routine that copies Pike's boot.efi over a possibly new version installed by Software Update, make sure you also set the black boot.efi as the source of that copying process. Otherwise, your black boot.efi would only last for one boot.

Edit: If you already have the replacement routine in place, simply copy the black boot.efi on top of the current grey source, and the routine itself will see to it that, upon your next reboot, the black boot.efi will be used.
 
Last edited:
This first post is usually updated with recent summarized information.


Simply looking to download the Piker-Alpha macosxbootloader? Links:
________________________________________________________________

  • Another simplified installation approach is to use a second Yosemite-supported Mac and install Yosemite to the 2006/2007 Mac Pro's drive. This may be done either by attaching the 2006/2007 Mac Pro's drive as an external drive by placing the 2006/2007 Mac Pro in target disk mode or otherwise mounting the 2006/2007 Mac Pro's drive to a Yosemite-supported Mac. Then, after installation, copy Pike's EFI32 boot.efi to that drive's /usr/standalone/i386 and /System/Library/CoreServices/ directories overwriting the stock Apple EFI64 boot.efi and repair permissions. That drive should now be bootable on a 2006/2007 Mac Pro, although sometimes it still may need to be blessed in the 2006/2007 Mac Pro.

I want to give much thanks and credit to Mr. Zarniwoop's suggestion to Install Yosemite using an supported mac and installing Yosemite's OS to the hard drive of a unsupported 2007 Mac Pro 1,1 using an External Enclosure Drive Device. I already had a External Enclosure Dual Disk Device that allows you to plug in external SATA 3.5 and 2.5 Hard Drives. I tried many approaches and Mr. Zarniwoop's suggestion was the only solution and most fastest way that worked! Below is what I tried that didn't work and what I tried that did work. Hopefully this will save some time for someone else out there that is trying to use Yosemite 10.10.3 on their unsupported 2007 Mac Pro 1,1 and pulling their hair out. I Took me many days and hours of research with trial and error to get to a working method this working method that Mr. Zarniwoop Posted as an Alternative suggestion.

Here is what I tried that didn't work...
* SOFTT Approcah didnt work!
* Tried the Chemelon
* Tried the 3 Partition Approach on another drive

Here is what did work...
1. Formatted Mac OS Journaled Drive 2.0TB Inside of my Mac OS Lion 10.7.5
2. Turned off My old Mac Pro, Removed Drive Bay 1 and Removed the formatted Drive Bay 2.
3. Inserted the newly formatted disk in SATA External Enclosure
4. Plugged External Enclosure it into My Mac Book Air (Running Yosemite 10.10.3)
5. Downloaded latest copy of Yosemite from App Store
6. Ran the Yosemite Installer and chose my External Enclosure Hard Drive as the Target.
7. Latop rebooted into installer - Finished Install, Installer Rebooted into External Drive
8. Went thru set up - Added my Wifi Network. Skipped login to icloud. Created Local Account
9. Logged into Local Account, Shut Down my Mac Book Air
10. Turned of Power to Enclosure & Unplugged USB cord and booted into Mac Book Air
11. Plugged External Enclosure Drive Back In, and Powered on External Enclosure Drive
12. Executed in Command in Terminal to view hidden files: defaults write com.apple.finder AppleShowAllFiles YES
13. Downloaded Pikes Boot.efi from Here: http://zip.gy/pikesboot
14. I navigated to External Enclosure Hard Drive and Deleted boot.efi in the places Zarniwoop specified /usr/standalone/i386 and /System/Library/CoreServices/ directories DELETING the stock Apple EFI64 boot.efi
15. After deleting Boot.efi in the directories specified above, I then COPIED Pikes Boot.efi to the same directories.
16. I unmounted the External Enclosure Disk & Powered Off. Removed Hard Drive from my External Enclosure.
17. I inserted the newly installed Yosemite External Disk into Drive Bay 1 and Turned on my Mac Pro 1,1 waited for 3 to 4 minutes. And Whala! There it was working perfectly!

My Mac Pro Specs with Yosemite 10.10.3 Installed.....
Mac Pro 1,1 Early 2007
2 x 2.66Mhz Dual Core
16GB DDR2 RAM DIMMS
2TB HARD DRIVE
ATI 5770 RADEON 1GB DISPLAY CARD

My Mac Pro is running super fast with Yosemite 10.3 - NO GLITCHES! I Installed Final Cut Pro 10.2.1 and the works super fast! I feel the installing on external drive is the best route!
 
Last edited:
@Rocketman83:

If I were you, I wouldn't touch rEFIt. I have a Mac Pro 1,1 and one of my internal hard disks contains Windows 7 Ultimate, 64-bit edition. It never had any problems with Boot Camp (although I installed that way before Boot Camp 5). In any case, if I remember correctly, I didn't use the Boot Camp installer (an executable file, I think), but one of the secondary installers in the folder named "64 bit" or something like that. It installs just fine. In case the Boot Camp Assistant were not to work for you, you can achieve the same effect via Disk Utility (you might need to format your Windows drive as FAT32, if you don't have Paragon NTFS for OS X or the like, and then, when you actually install Windows by booting from its install DVD, reformat as NTFS). There's nothing to it.
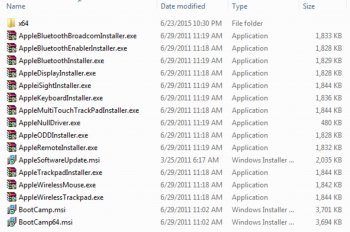
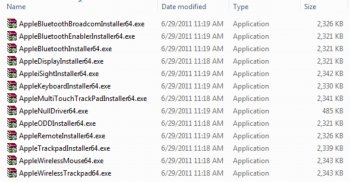
I've attached an image of the file list in the /Apple/x64 folder, included in the Bootcamp 4 program I downloaded. I assume this is the "64 bit" folder you were referring to. Do you recall what file you used to start the Windows 7 Ultimate installation? As I may have said in another post, I'm working within a Windows 7 Ultimate 32 bit environment, installed via Bootcamp 4. I want to install Windows 7 Ultimate 64 bit on another drive in my Mac Pro 2,1. I also tried installing via the BootCamp64.msi file in the /Apple folder, using the command "msiexec /i BootCamp.msi", but that only produced the error message "msiexec is not recognized as an internal or external command, operable program or batch file". I'm stumped. :(
 

Attachments

  • Apple_folder.jpg
    Apple_folder.jpg
    215.5 KB · Views: 151
  • x64_Drivers_Apple_folder.jpg
    x64_Drivers_Apple_folder.jpg
    179.9 KB · Views: 157
@Rocketman83:

Yes, that was the folder I meant, but I probably made a mistake when I said the general Boot Camp installer was there. I think the installer you want (not for installing Windows 7, mind you; just for installing the 64-bit drivers for Apple hardware in Windows) is BootCamp64.msi. I think (remember this was done years ago) I simply right-clicked the file and chose to run it with administrative privileges; I don't recall needing to explicitly invoke msiexec /i myself. If you have a problem in that area, it may be due to the fact your Windows\System32 folder isn't in your PATH. Short of modifying the PATH definition, I suppose you can enter something like "C:\Windows\System32\msiexec /i BootCamp64.msi", supposing you run this command from the folder where BootCamp64.msi is located.

In any case, before you run that, you need to install the 64-bit version of Windows 7 Ultimate. To do that, naturally, you need the Windows DVD installer. Once the installation is finished, you'll have a basic Windows 7 system, but probably with no sound, no iSight, no network, etcetera. After you install BootCamp64.msi, you'll have all those goodies.
 
Register on MacRumors! This sidebar will go away, and you'll see fewer ads.