Become a MacRumors Supporter for $50/year with no ads, ability to filter front page stories, and private forums.
Status
The first post of this thread is a WikiPost and can be edited by anyone with the appropiate permissions. Your edits will be public.
Thanks @highvoltage12v !
this is what I'm looking for. But, I think the tonymacx86's hackintool download link is broken, can you please check?
Since the Kext Utility does not work with Catalina (32 bit App) one should rewrite this guide to use terminal commands only. It is four lines only, one to mount / write and read and three to manage the newly copied kext packages ... or did I miss a working Kext Utility Version for Catalina?
 
Last edited:
Since the Kext Utility does not work with Catalina (32 bit App) one should rewrite this guide to use terminal commands only. It is four lines only, one to mount / write and read and three to manage the newly copied kext packages after copying... or did I miss a working Kext Utility Version for Catalina?
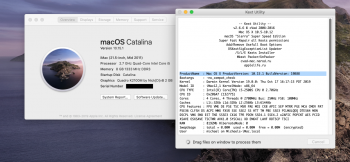
Kext Utility works fine in 10.15 and is not a 32bit app. I also wrote my guides using Catalina. Make sure you are using version 2.6.6
 

Attachments

  • Screen Shot 2020-01-07 at 6.01.27 PM.png
    Screen Shot 2020-01-07 at 6.01.27 PM.png
    560.5 KB · Views: 465
Last edited:
Kext Utility works fine in 10.15 and is not a 32bit app. I also wrote my guides using Catalina. Make sure you are using version 2.6.6
Sorry, I read only version Sierra and did not the download. The terminal commands worked well and since you need them too to fix owner and group it may be an alternative ... which will confuse other people then. Thanks for all the work you did!
 
  • Like
Reactions: highvoltage12v
Sorry, I read only version Sierra and did not the download. The terminal commands worked well and since you need them too to fix owner and group it may be an alternative ... which will confuse other people then. Thanks for all the work you did!
There have been people here in the past not capable of executing terminal commands. Since in some cases I have up to 10 Kexts to be installed, I just like the k.i.s.s method. Just throw it into a program and let it handle everything.
 
Last edited:
Hi all, has anyone tried the FirePro M4000 or FirePro M5100 MXM-A cards? I saw a post by Nick [D]vB
mentioning that the FirePro M6100 was a no go, but what about these older cards? VBios mod possible?

Thanks.
 
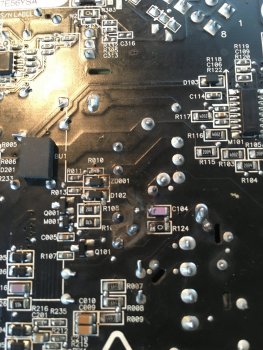
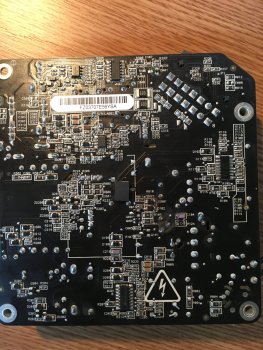
Slightly off-topic. I was playing around with the HDD temp sensor and accidentally touched one wire to the PSU... now its dead. I replaced it, machine working fine. What do you think, this PSU should be fixable? All i can see as physical damage is two little resistors. The other side seems fine, nothing is burnt.
 

Attachments

  • IMG_1530.JPG
    IMG_1530.JPG
    521.6 KB · Views: 228
  • IMG_1529.JPG
    IMG_1529.JPG
    629.9 KB · Views: 279
Slightly off-topic. I was playing around with the HDD temp sensor and accidentally touched one wire to the PSU... now its dead. I replaced it, machine working fine. What do you think, this PSU should be fixable? All i can see as physical damage is two little resistors. The other side seems fine, nothing is burnt.

Looks like 1 blown resistor and 1 blown capacitor. Provided you can source them and are handy soldering I'd give it a try. Worst case, you short circuited a bunch of stuff, best case replacing those two smd's fixes it....
 
Looks like 1 blown resistor and 1 blown capacitor. Provided you can source them and are handy soldering I'd give it a try. Worst case, you short circuited a bunch of stuff, best case replacing those two smd's fixes it....

The resistor is fine, but no idea about the capacitor, no identification visible at all. Not sure how to measure it, i think theres one identical resistor on it which should work. I have a friend who can do this kind of soldering job, i will try :)
 
Hello all
im new, from France
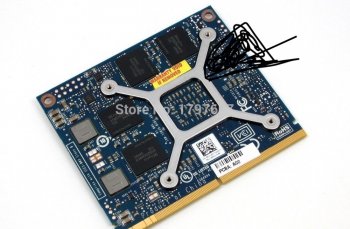
need some help about the flashing for bios for a Quadro K1100M
i have a iMac 21,5 Mid 2011 A1311 EMC : 2428 with a Radeon HD 6750M 512MB stock
other question the bracket on the gpu pcb is the same dimension than the original stock radeon gpu ?
Thanks 😀
 

Attachments

  • 051Y08-For-Dell-Precision-M4800-2GB-NVIDIA-Quadro-K1100M-N15P-Q1-A2-51Y08-Laptop-Video-card.jpg
    051Y08-For-Dell-Precision-M4800-2GB-NVIDIA-Quadro-K1100M-N15P-Q1-A2-51Y08-Laptop-Video-card.jpg
    155 KB · Views: 266
  • Like
Reactions: monofase
Hello all
im new, from France
need some help about the flashing for bios for a Quadro K1100M
i have a iMac 21,5 Mid 2011 A1311 EMC : 2428 with a Radeon HD 6750M 512MB stock
other question the bracket on the gpu pcb is the same dimension than the original stock radeon gpu ?
Thanks 😀
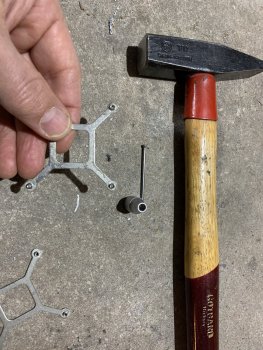
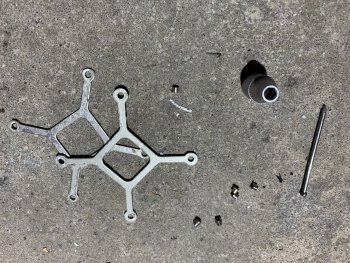
Probably the 67xx bracket has a different larger rectangle in the middle. Just use the one on the K1100M. Disconnect it carefully completely from the card saving the black isolator strip and drive the rivets out using a hammer and a nail bigger than the holes to drive. It is far more easy then drilling. Carefully, of course...put a round small fitting tool nut below. Takes me less than a minute and it is clean. Drive direction should be obvious. You have to go the long way, first just hammer them trough on the other non glue side an then use the nail to drive them out.

I use a small Torx TX6 to lift the bracket at each hole and cut the glue strings between the isolator strip and the bracket with a sharp knife.

Hot air help here, too. Same situation when getting a battery from an iPhone.

This is not about flashing, isn’t it :)
 

Attachments

  • BEF7AEC9-E52B-4759-A782-20A191BAF589.jpeg
    BEF7AEC9-E52B-4759-A782-20A191BAF589.jpeg
    695.7 KB · Views: 302
  • 3EACAC89-708E-49D8-9216-264D98CD05F9.jpeg
    3EACAC89-708E-49D8-9216-264D98CD05F9.jpeg
    856.3 KB · Views: 268
Last edited:
thanks for your fast reply
I will try this method soon as I can
Yes I have understand that is not about flashing lol thanks again 😉

The bracket is glued to the board and i was unable to remove it, so i had to drill it out, that works too. If you drill it out, you still need to remove the small part from the hole, because you won't be able to sink the screws deep enough to fit the card in the mxm slot.
 
  • Like
Reactions: NOE43100
Hi There,
yes the programmer clip wont work with your eeprom chip.
But tools like nvflash should work fine, I think..

Of course always backup your original vbios, multiple times.. ;)

you can use my premade win7 winclone image, i posted here above.
you can restore this using winclone, you only must have a working MacOS on your iMac to start restoring the winclone image.
Within bootcamp, you can use nvflash..

Hi Floris,
today I tried your winclone image on a 2011 27 inch iMac.
I installed a Quadro K1100M and works good under macOS. But on Windows with your winclone image I have a very strange issue.
The iMac boots into Windows (w/o boot Screen) and the screen stays Black. If I press the power button the machine will go in standby. After that I press another time the button and the Windows screen comes out! It's so strange!
I also tried to update the nVidia drivers, but no way! I can use Windows only after sending the iMac in standby and resuming it.
After I can get in Windows I see that the internal display is correctly recognized but it will turn on ONLY after resuming the machine from the standby State!

Do you have an idea?
[automerge]1578602560[/automerge]
The bracket is glued to the board and i was unable to remove it, so i had to drill it out, that works too. If you drill it out, you still need to remove the small part from the hole, because you won't be able to sink the screws deep enough to fit the card in the mxm slot.
I also drill the rivets out with the X-bracket still glued to the board, because these boards have a very strong glue and is difficult to remove it.
 
Last edited:
The bracket is glued to the board and i was unable to remove it, so i had to drill it out, that works too. If you drill it out, you still need to remove the small part from the hole, because you won't be able to sink the screws deep enough to fit the card in the mxm slot.

okay thanks for this additional information but with hot air can I pulled out the bracket of the board ?
 
@thinkingbrain
congrats on the install. Regarding the backlight. If I'm not mistaken, even if you use software based ways to lower the brightness, the output to the backlight is still @ 100%. I'd be interested to know if in the next few days when you use your computer, if you notice the fans spin up more often and get noiser, because the backlight will undoubtedly gets hot.

Hi @nikey22
after some day of use, my iMac 27 + K1100 works very well and stable, for now: no problem, no crash... all works smooth and fine!

For your question: i set the fan for working steadily, the noise of the fans is continuous but not at all annoying, but before fixing them I never had sudden fan accelerations.


Schermata 2020-01-10 alle 00.31.45.png
 
  • Like
Reactions: nikey22
my external DP Signal is still not working on 770m with nicks bios. Any ideas y?
every information would be helpful.
 
my external DP Signal is still not working on 770m with nicks bios. Any ideas y?
every information would be helpful.
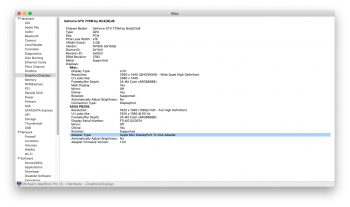
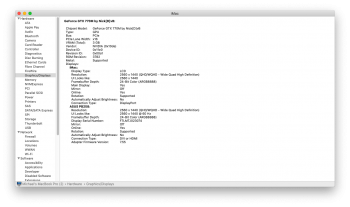
are you using any adapters to accomplish this? From my testing, NON-Active adapters and don't work. I have to use this adapter to accomplish output https://www.amazon.com/gp/product/B00S0BWR2K and its the port closest to the firewire 800 port.

For an adapter to be active it needs to show a Firmware in Graphics/Displays.
 

Attachments

  • Screen Shot 2020-01-10 at 1.14.01 PM.png
    Screen Shot 2020-01-10 at 1.14.01 PM.png
    201.3 KB · Views: 215
  • Screen Shot 2020-01-10 at 1.14.53 PM.png
    Screen Shot 2020-01-10 at 1.14.53 PM.png
    199.6 KB · Views: 216
Last edited:
As an Amazon Associate, MacRumors earns a commission from qualifying purchases made through links in this post.
I just received the K2100m that I ordered, as well as a CH341a programmer... I’ll admit that I havent read as carefully as I perhaps should have... but was I correct when just reading the chip a couple of times and comparing the files and finding them identical I proceeded to flash the (from the first post) linked k2100 rom..? I also read the chip again after flashing and it is also identical... or was I supposed to alter the rom file in some way before flashing it?

Also, to remove the bracket from the gpu/mxm card I just used a screw (a couple of turns on it) and then applied some pressure from the front while holding it steady, repeating the same procedure in all four mounting holes, and it gave up quite gracefully :)
Just make sure you are using the correct eeprom definition, otherwise it will appear to flash correctly, but won't. The k2100m uses an MXIC 25l2006e but if using the CH341a software that definition doesn't show up. Instead you have to use MXIC 25L2005. Which will flash fine. Make sure you click verify after erase to verify its blank. And then click verify after flash to make sure it flashed fine.
 
  • Like
Reactions: nikey22
Just make sure you are using the correct eeprom definition, otherwise it will appear to flash correctly, but won't. The k2100m uses an MXIC 25l2006e but if using the CH341a software that definition doesn't show up. Instead you have to use MXIC 25L2005. Which will flash fine. Make sure you click verify after erase to verify its blank. And then click verify after flash to make sure it flashed fine.

I used Ubuntu live and flashrom, does the log below look ok to you? If you dont mind me asking (;

root@ubuntu:~# flashrom --programmer ch341a_spi -w K2100.rom
flashrom v0.9.9-r1954 on Linux 4.15.0-20-generic (x86_64)
flashrom is free software, get the source code at https://flashrom.org

Calibrating delay loop... OK.
Found Macronix flash chip "MX25L2005(C)/MX25L2006E" (256 kB, SPI) on ch341a_spi.
Reading old flash chip contents... done.
Erasing and writing flash chip... Erase/write done.
Verifying flash... VERIFIED.
 
are you using any adapters to accomplish this? From my testing, NON-Active adapters and don't work. I have to use this adapter to accomplish output https://www.amazon.com/gp/product/B00S0BWR2K and its the port closest to the firewire 800 port.

For an adapter to be active it needs to show a Firmware in Graphics/Displays.

Finally an answer I can work with! Thank you.i will try the adapter.

Before I flashed with nicks bios I had it showing a picture with a dp to hdmi Adapter, but nothing fancy so I think it’s not active.
 
As an Amazon Associate, MacRumors earns a commission from qualifying purchases made through links in this post.
I used Ubuntu live and flashrom, does the log below look ok to you? If you dont mind me asking (;

root@ubuntu:~# flashrom --programmer ch341a_spi -w K2100.rom
flashrom v0.9.9-r1954 on Linux 4.15.0-20-generic (x86_64)
flashrom is free software, get the source code at https://flashrom.org

Calibrating delay loop... OK.
Found Macronix flash chip "MX25L2005(C)/MX25L2006E" (256 kB, SPI) on ch341a_spi.
Reading old flash chip contents... done.
Erasing and writing flash chip... Erase/write done.
Verifying flash... VERIFIED.
Perfect, I used flash ROM a while ago when modding the iMacs EFI. Everything looks fine.
 
  • Like
Reactions: spwnrpe
Perfect, I used flash ROM a while ago when modding the iMacs EFI. Everything looks fine.

Awesome, just the installation left then :)

Since its birth it has been enhanced with an i7 2600s, 16gb ram, anda solid state drive along side the original (mechanical) drive... and now for some (heavy) metal (;

I hope to be reporting back with good news in a couple of days!
 
Awesome, just the installation left then :)

Since its birth it has been enhanced with an i7 2600s, 16gb ram, anda solid state drive along side the original (mechanical) drive... and now for some (heavy) metal (;

I hope to be reporting back with good news in a couple of days!
You will have to modify your X bracket. I like to use a small Torx Screw drivers to push on one of the 4 rivet nuts from the front of the card to free the x bracket. Then drill out the rivet nuts from the back of the X-bracket.
Yeah one of my 21.5" 2011 iMacs also have been upgraded to a 2600s and a k2100m. The machine performs great, better than it ever did. I have 2 SSDs by buying a cheap cable off Amazon that accesses the 2nd 6GB/s Sata connector, for Windows 10.

That... is an interesting idea... my other stationary workstation is a triple booting (ssd) clover uefi (macOS/hackintosh, win10, linux)... having this iMac running both macOS and win10... the mechanical (2nd drive in the iMac) is just holding our ”photos” anyways (;

But... I have to modify the x-bracket from the original iMac cooler (currently installed, with the ootb ati/amd gpu) to make it fit the k2100m? Damn, I missed that part ): anyone got pictures of what needs to be done?
 
Register on MacRumors! This sidebar will go away, and you'll see fewer ads.