Become a MacRumors Supporter for $50/year with no ads, ability to filter front page stories, and private forums.
Status
The first post of this thread is a WikiPost and can be edited by anyone with the appropiate permissions. Your edits will be public.
I set up the system ok, but for some reason after reloading, the video card settings are messed up, one time it says: Amd Fire Pro m5100 and the next time Amd hd 77xx, do you know the solution to this?)
Imac 2011 21,5)
Amd fire pro m5100
Macos big sur
 
Last edited:
Hi all. I ran into a problem when updating iMac 21 2011 to BIG SUR, during installation, the sound in the built-in speakers disappears and the headphone output is shown, although nothing is inserted in the slot, if I roll back to high siera, the problem disappears. How can this be fixed
Revert to OLCP 0.4.11 - known but and please consult the Big Sur thread in future with OLCP/macOS issues.
I set up the system ok, but for some reason after reloading, the video card settings are messed up, one time it says: Amd Fire Pro m5100 and the next time Amd hd 77xx, do you know the solution to this?)
Let me guess, you are using an iMac12,x ? Read the posts about the well known issues running GCN1-3 cards in this system. The solution will be removing this card from your iMac.

Please add a signature to your profile showing your hardware , if you do not provide information about your system I will not answer in future. I am so tired to ask again and again and again.
 
Revert to OLCP 0.4.11 - known but and please consult the Big Sur thread in future with OLCP/macOS issues.

Let me guess, you are using an iMac12,x ? Read the posts about the well known issues running GCN1-3 cards in this system. The solution will be removing this card from your iMac.

Please add a signature to your profile showing your hardware , if you do not provide information about your system I will not answer in future. I am so tired to ask again and again and again.
sorry for not writing right away (
imac mid 2011 21,5
i5-2400s
Ssd samsung evo 870 250gb
amd fire pro m5100 2gb GCN1
macos big sur 11.7.1
oc 0.4.6 version tui
after restarting the video card is made AMD Radeon HD 7XXX 2 I also noticed that the ability to change the brightness of the display disappears in the dock bar)
 
Last edited:
  • Like
Reactions: Ausdauersportler
sorry for not writing right away (
imac mid 2011 21,5
i5-2400s
Ssd samsung evo 870 250gb
amd fire pro m5100 2gb GCN1
macos big sur 11.7.1
oc 0.4.6 version tui
after restarting the video card is made AMD Radeon HD 7XXX 2 I also noticed that the ability to change the brightness of the display disappears in the dock bar)
These are all known issues. All these 2012-2015 AMD GCN1-3 cards installed in iMac12,x need a PRAM reset on boot to work properly, even than sleep/wake will be broken.

Shall I can put another warning onto the first post in big red friendly letters?
 
  • Like
Reactions: rodolfo.araujo
Dear @Ausdauersportler , there have been significant changes in your signature! It looks like mid2011 will live forever! Maybe show how RX5500XT started on it?
Thanks for the heads-up and your experience!
 
Hi, @Ausdauersportler sometimes the system restarts on its own, giving this error; panic(cpu 2 caller 0xffffff8014c9db56): [kext.kalloc.512]: element modified after free (off:368, val:0x000005f27e169d92, sz:512, ptr:0xffffff935a4c5a00, prot:zero)
Why might it be caused? thank you for your answers.
I flashed the vBIOS of the video card from M6100-Hynix-BFR-GOP.rom in NOVEMBER RAIN.dmg
I attached added the bios that came with the video card.
 

Attachments

  • error-1.txt
    4.3 KB · Views: 96
  • vga_orginal.bin.zip
    93.5 KB · Views: 109
Last edited:
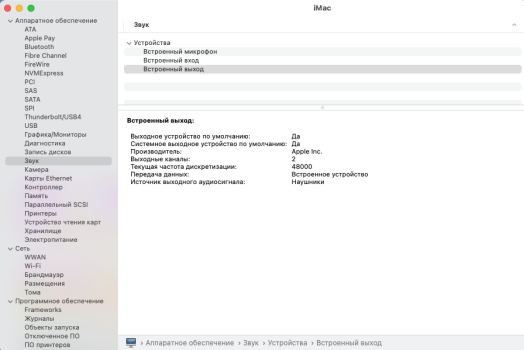
Hello. I have a 2011 imac through opencore installed Big Sur sound does not work. in the settings, the output shows only headphones. Built-in output: Default Output Device: Yes Default System Output Device: Yes Manufacturer: Apple Inc. Output channels: 2 Current sampling rate: 48000 Data transmission: Built-in device Audio output source: Headphones please help
 

Attachments

  • Снимок экрана 2022-12-10 в 21.30.00.png
    Снимок экрана 2022-12-10 в 21.30.00.png
    106.9 KB · Views: 73
  • Снимок экрана 2022-12-10 в 21.30.18.png
    Снимок экрана 2022-12-10 в 21.30.18.png
    46.1 KB · Views: 71
Hello. I have a 2011 imac through opencore installed Big Sur sound does not work. in the settings, the output shows only headphones. Built-in output: Default Output Device: Yes Default System Output Device: Yes Manufacturer: Apple Inc. Output channels: 2 Current sampling rate: 48000 Data transmission: Built-in device Audio output source: Headphones please help
Please post your problems on the Big Sur thread in future. This is off topic here.

And please before posting the same question again and again and again just read the last few posts before clogging up the thread with another copy.
 
  • Like
Reactions: LegoNickD
Dear users. Yesterday I read awhole lot of information on this website and the possibility to upgrade to a newer Mac OS X version.

At this moment I work on a 12,1 iMac, mid 2011 with 8GB RAM. Today I upgraded my iMac with an SSD. Its working good. A lot faster. I am happy that I did this upgrade.

Just to be sure: If I update this machine to High Sierra with Opencore Legacy Patcher.. do I need to change my GPU for a metal GPU one?

At this moment I do not have the courage and money to buy another GPU. Thats why I want to stick with my stock GPU.
Your iMac is natively supported with High Sierra and you do not need OCLP and should not use it for High Sierra.

Before starting with OCLP to install Mojave or later please update your iMac to High Sierra latest and apply all updates Apple is still offering online.

It is absolutely worth to buy a metal GPU and do the upgrade - or the other way around, it is a bad idea to use OLCP and more recent macOS version without a metal GPU.
 
Last edited:
Hi! I installed a pre flashed 780m on a 2010 iMac running High Sierra.

At first everything seemed to work fine but after it warms up the computer screen starts flashing. If I turn Mac fan control on full blast it stops.

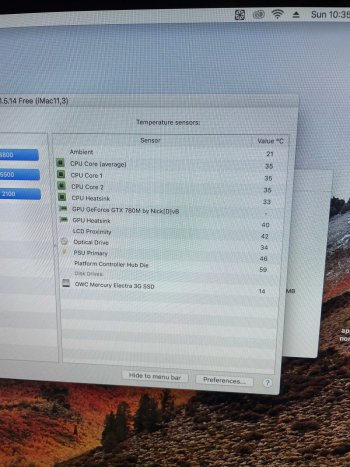
The strange thing is that the temperatures all seem normal except for the actual graphics card temperature is not showing any reading. I installed the Nvidia black screen patch installer, but that didn't help.

The brightness control is not working either.

I would appreciate any suggestions!


Attached is a video of the problem.


Attachments

  • IMG_8746.jpg
    IMG_8746.jpg
    974 KB · Views: 97
Already done the upgrade of bcm94360cd bcm943602cs on iMac 12,1 12,2 without lossy installation and direct plug and play upgrade.
1.jpg


mini pcie adapter card are their own welding usb bluetooth data holder with ipx4-ipx1 adapter antenna.
3.jpg


4.jpg


5.jpg


Big Sur 11.7.1 and the previous version can see the Bluetooth parameters in detail, Monterey 12.6.1 and Ventura 13 system can not view the Bluetooth details is this normal? The Bluetooth function is normal.
Big Sur 11.7.1.png


Monterey 12.6.1.png


This item from iBoff

main.iboff@gmail.com
MXM X-GPU:
IMAC A1311 / A1312
nvmex nvme project
I'm interested, do you have any details about this project?
This will enable nvme boot in iMac to improve performance speed which is critical
1.jpg


2.jpg


3.jpg


4.jpg


5.jpg


For example, the wiring diagram information needed for EDA pcb typing, the electronic components ic parameters that need to be soldered
So that I can make it.
There are a lot of companies in China that can type pcb boards very easily.
6.jpg


Translated with www.DeepL.com/Translator (free version)
 
Hi! I installed a pre flashed 780m on a 2010 iMac running High Sierra.

At first everything seemed to work fine but after it warms up the computer screen starts flashing. If I turn Mac fan control on full blast it stops.

The strange thing is that the temperatures all seem normal except for the actual graphics card temperature is not showing any reading. I installed the Nvidia black screen patch installer, but that didn't help.

The brightness control is not working either.

I would appreciate any suggestions!


Attached is a video of the problem.

View attachment 2127000
That sounds like a faulty graphics card OR you didn't properly installed it, so the GPU temps are skyrocketing. Also, the temps not showing up is a known issue. You need to base the GPU temps off the GPU heatsink
 
My imac 21.5 2011 has a wx3200 graphics card and a xeon e3-1260l processor, two ssds. Tell me, is there enough power supply resource to replace the processor with an i7-2600S?
 
That sounds like a faulty graphics card OR you didn't properly installed it, so the GPU temps are skyrocketing. Also, the temps not showing up is a known issue. You need to base the GPU temps off the GPU heatsink
I just ran unigen valley and it showed very high gpu temperature of 127c in unigen valley but low gpu heatsink temp in Mac fans control. Does unigen read the correct temperature or is this some glitch? Does the 780m need a sheet of copper between the heat sync to make proper contact? Its the model with the 2 copper lines. It seemed to make good contact after grinding down the two corners on the heat sync but I should probably double check.
 
iBoff" PCIE splitting should be used hardware Asmedia chip automatically splitting
Reference
IMG_8293.JPG


IMG_8294.JPG


www.bilibili.com


Intel Alder Lake 12代酷睿CPU PCIe拆分实现方法

写在最前面:以下仅适用于intel平台12代酷睿处理器(12th Gen Core CPU, or Alder Lake)操作,且只能在Z690主板上实现。参考了andyc36大神的文章,在此感谢~ 产生该想法的缘由是:能实现CPU直通PCIe x16通道拆分的均为旗舰级Z690主板,且均为DDR5版本。主板昂贵不说,DDR5带来的内存成本也不菲,再加上DDR5现阶段的提升确实有限,因此本人思考通过自己DIY来实现PCIe拆分 (PCIe bi-furcation)。=======
www.bilibili.com
www.bilibili.com


intel部分桌面级CPU的pcie通道拆分另类低成本实现

点击进入查看全文>
www.bilibili.com


Finally this is the pcie split pdf document file is relatively large forum restrictions on uploading, uploaded to Google Play.
drive.google.com


Intel 115x PEG PCIe 硬改拆分概述-Release.pdf


drive.google.com

drive.google.com
 
My imac 21.5 2011 has a wx3200 graphics card and a xeon e3-1260l processor, two ssds. Tell me, is there enough power supply resource to replace the processor with an i7-2600S?
i7 2600 are available non-i7 2600s
5.jpg
4.jpg
 
That sounds like a faulty graphics card OR you didn't properly installed it, so the GPU temps are skyrocketing. Also, the temps not showing up is a known issue. You need to base the GPU temps off the GPU heatsink
I’m not to sure about that, seems more like a failing backlight board or power supply, I had one refurb Mac comeback with a similar situation and backlight board didn’t fix it but swapping the PSU did.
OP you should use a external display and see if it goes black when the internal lcd does. If the external is unaffected then you know it’s not the GPU.
NOTE: mostly defective GPU will result in no Boot or graphic artifact. Intermittent Black screen is rarely faulty GPU related.
 
@
Your iMac is natively supported with High Sierra and you do not need OCLP and should not use it for High Sierra.

Before starting with OCLP to install Mojave or later please update your iMac to High Sierra latest and apply all updates Apple is still offering online.

It is absolutely worth to buy a metal GPU and do the upgrade - or the other way around, it is a bad idea to use OLCP and more recent macOS version without a metal GPU.

Thank you very much. I updated my stock iMac 12,1 (21,5 inch) to High Sierra and did apply al Apple updates.

Is it a good choice to buy the Nvidea Quadro K2100M of K1100M? I am really worried about the fact, that I need to flash the bios. I don't think that I can do that.. So if you or somebody knows a GPU that works almost flawlessly out of the box, that would be great.....

For me this is really one big of an adventure.
 
Last edited:
@


Thank you very much. I updated my stock iMac 12,1 (21,5 inch) to High Sierra and did apply al Apple updates.

Is it a good choice to buy the Nvidea Quadro K2100M of K1100M? I am really worried about the fact, that I need to flash the bios. I don't think that I can do that.. So if you or somebody knows a GPU that works almost flawlessly out of the box, that would be great.....

For me this is really one big of an adventure.
Time to read the docs on this thread - first post is your friend. Flashing is easy, especially because you have a working iMac and can prepare and test all tools in advance.
 
Hello, I'm trying to follow the forum topic, but I have a couple of questions.
Wanted to change my iMac 27 (2009) to iMac 27 (2011)
and as I understand the maximum card will be GTX 880M/Quadro K5100M which will work fine in MacOS.
But I need good support for MacOS Monterey, and that can only be provided by AMD cards that do not work properly on the 2011 model, so I have no choice and continue to use 2009 with an AMD card (w7170m / WX7100) Or just buy an iMac 5K, I understood everything correctly?
 
Hello everyone!

I will use this post to document my experience upgrading the video card in my iMac 27-inch mid 2010 2.8GHz Intel Core i5 (iMac11,3). This is a "stock" configuration purchased from new by me. The original graphics card is/was an ATI Radeon HD 5750. The replacement card is an HP W6150M 4Gb card.

TL;DR The unmodified VBIOS file for the HP W6150M 4Gb card is attached. I will update this post if I manage to modify the VBIOS and the iMac firmware, (and possibly implement the hardware mod) so that boot screens become visible...
The GOP-enabled VBIOS file is also attached (credit goes to @Ausdauersportler)...


If you are interested, read the voyage I went through as a series of steps...

Step 1. Read this thread (especially post #1), and then I read it again.

Step 2. Read through a number of the posts in this thread to get an idea of the process.

Step 3. I decided to hunt down a suitable graphics card on Ebay. Using the known good AMD list of post #1. This was harder than I thought. The GCN4 cards are really difficult to source, and they are VERY expensive when you do find one. In the end I settled on purchasing a Hewlett Packard W6150M 4Gb MXM-B card, this at least was a local vendor (UK-based) and was not too expensive.

Step 4. Buy a 3-pipe heat sink. This was another Ebay purchase and was inexpensive.

Step 5. Buy some K5-Pro Thermal compound. This I sourced from Amazon.

Step 6. Wait for my purchases to arrive!.... Whilst waiting, I used the time to install the OpenCore Legacy Patcher and to run it. The OCLP will build a suitable configuration of the excellent OpenCore boot loader and install it onto the system...

Step 7. Fit the W6150M to the 3-pipe heat sink. Trying a dry fit first, it becomes apparent that this card will require some of the heat sink plate to be ground away. I won't detail it here, there are already a number of posts that show how and where. Looking at my heat sink plate (with the pipes rising vertically), I needed to grind away a small square in the top-right. Check the fit (dry) again. The goal is to allow the mounting holes to align easily without any twist, and that all components fit flush to the plate.

Step 8. Use the K5-Pro paste on the GPU, the RAM chips, and the other obvious contact points. Basically, anywhere that the plate profiles are close to the graphics card components. Again I won't detail it here, there are plenty of posts showing this process. Some posts suggest that the GPU-to-heat sink should use a different compound, but I'm happy to use the K5-Pro all round. K5-Pro is a "thick paste" but has excellent thermal properties. I ended up using Thermal Grizly paste on the GPU die, this is a thinner paste and it appears to have helped because the GPU die temperatures appear to be significantly lower (compared to using K5-Pro on the GPU die). Also, some posts say that the GPU might be a significant distance (fractions of mm) away from the heat sink plate, and therefore recommend using a copper "shim" (a small thin rectangular plate of copper). For my combination of HP W6150M card and the 3-pipe heat sink, I found that the GPU was a close fit to the plate and therefore did not need the shim. When the graphics card is assembled to the heatsink you will use the X-bracket. I used the X-bracket that came with the 3-pipe heat sink. A quick visual inspection should show no obvious gaps between the plate and the components, and that the K5-Pro compound has squeezed out a little around each of the component tops. It is a bit of a black art estimating how much compound to put onto each component. If you are unsure, you can always take the plate off the card a have a look at the "squish pattern". Avoid doing this if you can, but if you do pull them apart then you will need to clean the compound off the plate and the components, then start again. If you don't clean/re-apply, you could end up with air-pockets in the compound (which would be very bad!).

Step 9. Remove the stock graphics card and replace it with the W6150M. Again, I will not document the process here. There is plenty of reference material out there. I recommend the iFixit repair guides, and YouTube videos.

Step 10. Attach an external monitor to the mini DisplayPort outlets of the iMac, just to be certain that at least one of the displays will show "something"...

Step 11. Power on the iMac and cross my fingers. I am expecting to loose the EFI boot screens (for now), then see the login screen when the Mac OS kernel takes over from the EFI.

DISASTER! The iMac wouldn't boot, well actually it partially booted, but then the kernel would crash. I have got the kernel crash log. If anyone is interested I will attach it.

I decided to "investigate". What follows here is my debugging procedure...

Debug step 1. Uninstall the W6150M graphics card, then re-install the stock 5750.

Debug step 2. I used a memory stick and put the latest Ubuntu installer onto it. I attached a USB external hard drive to my iMac. I booted from the memory stick, and then installed Ubuntu onto the external hard drive.

Debug step 3. You will recall that I installed OpenCore earlier... The install is missing one important EFI driver, the ext4 filesystem driver. I downloaded the matching version of the OpenCore boot loader package from the Acidanthera GitHub repo. I copied the ext4 driver to the EFI partition and edited the config.plist to load it. (Start a private conversation with me if you want a step-by-step procedure to follow)! This now means on reboot OpenCore will show both Mac OS and Ubuntu as options.

Debug step 4. Set Ubuntu as the default boot option. Confirm that I can boot into into Ubuntu. At this point I am still using the stock 5750 graphics card because it is a known good configuration.

Debug step 5. Whilst booted into Ubuntu, I installed a few tools to help me diagnose the issue, notably amdvbflash and ssh, and made sure that I could use Secure Shell from another computer to connect to the iMac.

sudo apt install -y amdvbflash
sudo apt install -y ssh


Debug step 6. Shutdown. Remove the stock 5750 and fit the problematic W6150M. Restart (into Ubuntu). Ubuntu does not initialise the display(s) either.

Debug step 7. SSH to the iMac from another computer. We're in the terminal now, time to start debugging...

Debug step 8. Firstly, use lspci command to check if the card is visible to the iMac (confirms that the card is not totally "dead on arrival").

lspci

01:00.0 VGA compatible controller: Advanced Micro Devices, Inc. [AMD/ATI] Bonaire XT [Radeon R9 M280X] (rev 80)


Debug step 9. Okay, that's a relief, the card is alive! Now use the amdvbflash command to get some information from the card.

sudo amdvbflash -ai

AMDVBFLASH version 4.71, Copyright (c) 2020 Advanced Micro Devices, Inc.

Adapter 0 SEG=0000, BN=01, DN=00, PCIID=66461002, SSID=00000000)
Asic Family : Bonaire
Flash Type : W25X10 (128 KB)

No VBIOS


Ah ha! "No VBIOS". This stacks up with the kernel crash in Mac OS (which implied the crash occurred when the kernel was trying to configure based on the VBIOS).

Debug step 10. Okay. No BIOS, so go find one. That turns out to not be easy either. I looked on the TechPowerUp databases, it's not there. I Googled a lot. Still nothing!

Debug step 11. At this point I contacted @Ausdauersportler to ask a few questions. @Ausdauersportler has a GitHub repo with VBIOS ROM files, but the W6150M was conspicuously absent. It turns out that it's a card that was expected to work, but no-one has yet worked on the ROM. @Ausdauersportler got back to me with a few suggestions. From his knowledge, and/or from information gleaned from his contacts, it was discovered that HP cards often ship with the VBIOS blank. The VBIOS is apparently embedded in the main BIOS distributions. @Ausdauersportler also told me that somewhere on GitHub there was a tool to extract the VBIOS. Great! I'll go looking. What follows is the step-by-step procedure to find and extract the VBIOS for an HP laptop card...

Getting the VBIOS step 1. Google search for the card to find out which HP laptop used that card. For me this was the "HP ZBook 17 G3 Mobile Workstation".

Getting the VBIOS step 2. Go to the HP Support web site and search for the W6150M VBIOS. This fails for me. Okay, now search for the "HP ZBook 17 G3 Mobile Workstation".

Getting the VBIOS step 3. Click on the Software, Drivers and Firmware section. The web site then asks for an OS and a version, I chose the most recent which was Windows 10, and Windows 10 (64-bit). There should be a BIOS section listed, if not try a different OS. Open the BIOS section, right-click on the download link and copy the address. Save the address for use later... Or download the BIOS file and put it in a network accessible location.

Getting the VBIOS step 4. What follows are the steps to extract the VBIOS....

Extracting the VBIOS step 1. We're going to need a Linux OS to use the tools that will extract the VBIOS. I chose to use a Raspberry Pi, but I guess any distro will do. Using the RPi, perform the following commands to download the VBiosFinder from GitHub. VBiosFinder uses Ruby and some additions we will need to prepare it...

cd ~
git clone https://github.com/coderobe/VBiosFinder
cd VBiosFinder
sudo apt install -y ruby-dev
sudo gem install posix-spawn -v '0.3.13' --source 'https://rubygems.org/'
sudo gem install bundler:1.17.3
bundle install --path=vendor/bundle


Extracting the VBIOS step 2. We're going to be compiling some of the dependencies, so let us make sure the RPi is ready...

sudo apt install -y cmake
sudo apt install -y gcc
sudo apt-get install build-essential -y


Extracting the VBIOS step 3. Some of the dependencies for VBiosFinder are available in the RPi standard repos. Let's install them...

sudo apt install -y p7zip-full
sudo apt install -y innoextract
sudo apt install -y upx-ucl


Extracting the VBIOS step 4. We need to compile the rom-parser tool...

cd ~
git clone https://github.com/awilliam/rom-parser
cd rom-parser/
make
cp rom-parser ../VBiosFinder/3rdparty/


Extracting the VBIOS step 5. We need to compile the UEFIExtract tool...

cd ~
git clone https://github.com/LongSoft/UEFITool
cd UEFITool
mkdir build-UEFIExtract
cd build-UEFIExtract
cmake ../UEFIExtract/
make
cp UEFIExtract ../../VBiosFinder/3rdparty/


Extracting the VBIOS step 6. We need to get the BIOS Service Pack from HP (see "Getting the VBIOS" earlier in this post). For me the service pack is sp141664.exe...

cd ~
mkdir HP-BIOS
cd HP-BIOS
wget https://ftp.hp.com/pub/softpaq/sp141501-142000/sp141664.exe
7z x sp141664.exe


Extracting the VBIOS step 7. The 7zip extraction from step 6 should result in a number of files and folders being extracted from the service pack exe file. One of the files is a binary file with a .bin extension which contains the Zbook BIOS. For me the file is named N81_0157.bin. If you cannot figure out which file to use, you can simply try to extract each file using vbiosfinder...

cd ~/VBiosFinder/
./vbiosfinder extract /home/pi/HP-BIOS/N81_0157.bin


Extracting the VBIOS step 8. If all goes well you will see an output similar to this...

finding vbios
11 possible candidates
checking for rom-parser... yes
Found VBIOS for device 8086:0406!
Found VBIOS for device 10de:13fa!
Found VBIOS for device 10de:13f9!
Found VBIOS for device 10de:13f8!
Found VBIOS for device 10de:13b1!
Found VBIOS for device 10de:13b0!
Found VBIOS for device 10de:13b2!
Found VBIOS for device 10de:13b6!
Found VBIOS for device 10de:1436!
Found VBIOS for device 1002:6646!
Found VBIOS for device 1002:6820!

Job done. Extracted files can be found in /home/pi/VBiosFinder/tmp-vbiosfinder/../output

Extracting the VBIOS step 8. From the debug step 9 we know our PCI ID is 66461002. Typically this is shown as a concatenation of the device ID and the vendor ID. We can split this then as 1002 (AMD/ATI) and 6646 (Device), and yes, we can match that to our extracted VBIOS file. These files are found in the /home/pi/VBiosFinder/output folder...

vbios_1002_6646_1.rom

Flashing the HP VBIOS to the card step 1. Assuming the iMac has the W6150M installed, is booted into Ubuntu, and a secure shell (ssh) session is still running, copy the vbios_1002_6646_1.rom file from the RPi to the iMac. I used scp from the iMac to "pull" the file from the RPi ...

cd ~
scp pi@<ip.address.of.RPi>:VBiosFinder/output/vbios_1002_6646_1.rom .


Flashing the HP VBIOS to the card step 2. Now force the content of the VBIOS rom file to be flashed onto the card using the amdvbflash tool...

cd ~
sudo amdvbflash -f -p 0 vbios_1002_6646_1.rom


Flashing the HP VBIOS to the card step 3. Reboot into Ubuntu with the internal and external monitors connected. For me it works!

Flashing the HP VBIOS to the card step 4. Reboot into Mac OS. For me it works!
View attachment 2109599

There are at least two methods of showing a boot selector. The traditional Apple method of holding down the ALT key just after you hear the chime at power-on or restart, and using an alternative boot loader such as OpenCore.

The Apple method is "baked in" to the Mac's EFI firmware (the firmware chip located on the motherboard).

The OpenCore method uses EFI modules to extend the Apple functionality.

Interestingly, AMD presented an overview at the 2011 UEFI Summer Plugfest, the slide deck is online at the uefi.org web site...

A unmodified VBIOS (sometimes also described as legacy, sometimes described as PC VGA BIOS) typically lacks an EFI Option ROM part (abbr. Opt Rom). In simple terms, the VBIOS can contain a legacy (PC) style VGA BIOS block which is the "old style" method of describing the hardware capabilities to the low-level boot loader and later on to the operating system. The VBIOS can also contain an EFI Opt ROM block which serves the same purpose. In some cases the VBIOS can contain both the legacy PC VGA BIOS block and the EFI Opt ROM block.

The machine that is booting will "look" for the block corresponding to the method used to boot and initialise the computer. Older computers typically use the legacy PC VGA BIOS code block. Newer computers use the UEFI Opt ROM code block. Most operating systems will "fall back" to the PC VGA BIOS block even if they are booted using UEFI. This is why a Mac will boot without showing the early boot screens/selector, and then later in the sequence when the OS kernel takes over from EFI it can initialise the graphics.

In some cases, where Apple have shipped a Apple branded card with the same architecture, then it is possible to extract the Apple EFI Opt ROM part from the Apple card, and then to "graft" that Opt ROM into the VBIOS of our legacy cards. This approach relies on the similarity between the graphics card hardware (there may be more modification required to the EFI Opt ROM code to ensure the logical video path routing is correct, but that is a whole different conversation). If successful, this addition of the Apple EFI Opt ROM part will allow the card to initialise under the low level EFI boot sequence, hence it will typically enable the backlight and then the boot screens/selector.

If there is no suitable Apple EFI Opt ROM part, or if there is too much incompatibility between the EFI Opt ROM and the actual hardware, the EFI Opt ROM may not provide the desired outcome. In which case we can try to use OpenCore. Simply installing OpenCore on its own will not solve the lack of boot screens/selector. More modification needs to be done.

The OpenCore team effectively "chain load" an alternative EFI boot loader. Once the OpenCore boot loader has control, it can use the UEFI Graphics Output Protocol (aka GOP). This is a UEFI standard. The GOP provides access to a hardware frame buffer and allows UEFI apps to draw directly to the graphics output device. In order for for OpenCore to draw to the screen via our cards it will need the GOP extensions in the card VBIOS. Forum user @Ausdauersportler has collated instructions and modified VBIOS files on his GitHub repo.

In summary. Adding UEFI GOP extensions to a legacy VGA BIOS file is relatively well understood and relatively "easy" to achieve (although it needs practice and patience if you are going to attempt it yourself). Forum members who already have the skill may offer to help!

The combination of legacy VGA BIOS + UEFI GOP extensions + OpenCore boot loader will provide an Apple-like boot picker each time the Mac starts up or reboots.

If you're lucky, the combination of legacy VGA BIOS + Apple Opt ROM will give you native Apple boot screens/picker.

If you're even more adventurous, the Apple EFI firmware might need modification too to provide the native Apple boot screens/picker with back-light control.

If you're unlucky you might need a hardware mod to provide a pulse-width-modulated (PWM) signal to the LCD panel until the OS gains control of the graphics card. Forum user @dfranetic has posted details of such a hardware modification.

I was lucky, forum user @Ausdauersportler offered to add the GOP extensions to the HP VBIOS. I have tested this GOP-based VBIOS and with OpenCore I see the boot picker :).

The GOP-based VBIOS is also attached to this post...

Are there any issues? Yes! NO! 😁
1. No boot screen/selector. Solved by modifying the VBIOS to include GOP. See the Spoiler above for a very long explanation!

2. Spontaneous power off under load. I'm still investigating. Some possibilities include thermal expansion causing a short against the cooler plate, or PowerPlayInfo tables causing too much current draw (The PSU will have over-current protection). I'll update if I solve it... Solved by removing the graphics card from the cooler plate, cleaning off all of the paste, applying some thin transparent tape to the areas of the heatsink plate where the metal-bodied inductors could possibly short out to the heatsink plate, re-applying paste, re-assemble, and finally re-fit.
View attachment 2110157
Hello everyone!

I will use this post to document my experience upgrading the video card in my iMac 27-inch mid 2010 2.8GHz Intel Core i5 (iMac11,3). This is a "stock" configuration purchased from new by me. The original graphics card is/was an ATI Radeon HD 5750. The replacement card is an HP W6150M 4Gb card.

TL;DR The unmodified VBIOS file for the HP W6150M 4Gb card is attached. I will update this post if I manage to modify the VBIOS and the iMac firmware, (and possibly implement the hardware mod) so that boot screens become visible...
The GOP-enabled VBIOS file is also attached (credit goes to @Ausdauersportler)...


If you are interested, read the voyage I went through as a series of steps...

Step 1. Read this thread (especially post #1), and then I read it again.

Step 2. Read through a number of the posts in this thread to get an idea of the process.

Step 3. I decided to hunt down a suitable graphics card on Ebay. Using the known good AMD list of post #1. This was harder than I thought. The GCN4 cards are really difficult to source, and they are VERY expensive when you do find one. In the end I settled on purchasing a Hewlett Packard W6150M 4Gb MXM-B card, this at least was a local vendor (UK-based) and was not too expensive.

Step 4. Buy a 3-pipe heat sink. This was another Ebay purchase and was inexpensive.

Step 5. Buy some K5-Pro Thermal compound. This I sourced from Amazon.

Step 6. Wait for my purchases to arrive!.... Whilst waiting, I used the time to install the OpenCore Legacy Patcher and to run it. The OCLP will build a suitable configuration of the excellent OpenCore boot loader and install it onto the system...

Step 7. Fit the W6150M to the 3-pipe heat sink. Trying a dry fit first, it becomes apparent that this card will require some of the heat sink plate to be ground away. I won't detail it here, there are already a number of posts that show how and where. Looking at my heat sink plate (with the pipes rising vertically), I needed to grind away a small square in the top-right. Check the fit (dry) again. The goal is to allow the mounting holes to align easily without any twist, and that all components fit flush to the plate.

Step 8. Use the K5-Pro paste on the GPU, the RAM chips, and the other obvious contact points. Basically, anywhere that the plate profiles are close to the graphics card components. Again I won't detail it here, there are plenty of posts showing this process. Some posts suggest that the GPU-to-heat sink should use a different compound, but I'm happy to use the K5-Pro all round. K5-Pro is a "thick paste" but has excellent thermal properties. I ended up using Thermal Grizly paste on the GPU die, this is a thinner paste and it appears to have helped because the GPU die temperatures appear to be significantly lower (compared to using K5-Pro on the GPU die). Also, some posts say that the GPU might be a significant distance (fractions of mm) away from the heat sink plate, and therefore recommend using a copper "shim" (a small thin rectangular plate of copper). For my combination of HP W6150M card and the 3-pipe heat sink, I found that the GPU was a close fit to the plate and therefore did not need the shim. When the graphics card is assembled to the heatsink you will use the X-bracket. I used the X-bracket that came with the 3-pipe heat sink. A quick visual inspection should show no obvious gaps between the plate and the components, and that the K5-Pro compound has squeezed out a little around each of the component tops. It is a bit of a black art estimating how much compound to put onto each component. If you are unsure, you can always take the plate off the card a have a look at the "squish pattern". Avoid doing this if you can, but if you do pull them apart then you will need to clean the compound off the plate and the components, then start again. If you don't clean/re-apply, you could end up with air-pockets in the compound (which would be very bad!).

Step 9. Remove the stock graphics card and replace it with the W6150M. Again, I will not document the process here. There is plenty of reference material out there. I recommend the iFixit repair guides, and YouTube videos.

Step 10. Attach an external monitor to the mini DisplayPort outlets of the iMac, just to be certain that at least one of the displays will show "something"...

Step 11. Power on the iMac and cross my fingers. I am expecting to loose the EFI boot screens (for now), then see the login screen when the Mac OS kernel takes over from the EFI.

DISASTER! The iMac wouldn't boot, well actually it partially booted, but then the kernel would crash. I have got the kernel crash log. If anyone is interested I will attach it.

I decided to "investigate". What follows here is my debugging procedure...

Debug step 1. Uninstall the W6150M graphics card, then re-install the stock 5750.

Debug step 2. I used a memory stick and put the latest Ubuntu installer onto it. I attached a USB external hard drive to my iMac. I booted from the memory stick, and then installed Ubuntu onto the external hard drive.

Debug step 3. You will recall that I installed OpenCore earlier... The install is missing one important EFI driver, the ext4 filesystem driver. I downloaded the matching version of the OpenCore boot loader package from the Acidanthera GitHub repo. I copied the ext4 driver to the EFI partition and edited the config.plist to load it. (Start a private conversation with me if you want a step-by-step procedure to follow)! This now means on reboot OpenCore will show both Mac OS and Ubuntu as options.

Debug step 4. Set Ubuntu as the default boot option. Confirm that I can boot into into Ubuntu. At this point I am still using the stock 5750 graphics card because it is a known good configuration.

Debug step 5. Whilst booted into Ubuntu, I installed a few tools to help me diagnose the issue, notably amdvbflash and ssh, and made sure that I could use Secure Shell from another computer to connect to the iMac.

sudo apt install -y amdvbflash
sudo apt install -y ssh


Debug step 6. Shutdown. Remove the stock 5750 and fit the problematic W6150M. Restart (into Ubuntu). Ubuntu does not initialise the display(s) either.

Debug step 7. SSH to the iMac from another computer. We're in the terminal now, time to start debugging...

Debug step 8. Firstly, use lspci command to check if the card is visible to the iMac (confirms that the card is not totally "dead on arrival").

lspci

01:00.0 VGA compatible controller: Advanced Micro Devices, Inc. [AMD/ATI] Bonaire XT [Radeon R9 M280X] (rev 80)


Debug step 9. Okay, that's a relief, the card is alive! Now use the amdvbflash command to get some information from the card.

sudo amdvbflash -ai

AMDVBFLASH version 4.71, Copyright (c) 2020 Advanced Micro Devices, Inc.

Adapter 0 SEG=0000, BN=01, DN=00, PCIID=66461002, SSID=00000000)
Asic Family : Bonaire
Flash Type : W25X10 (128 KB)

No VBIOS


Ah ha! "No VBIOS". This stacks up with the kernel crash in Mac OS (which implied the crash occurred when the kernel was trying to configure based on the VBIOS).

Debug step 10. Okay. No BIOS, so go find one. That turns out to not be easy either. I looked on the TechPowerUp databases, it's not there. I Googled a lot. Still nothing!

Debug step 11. At this point I contacted @Ausdauersportler to ask a few questions. @Ausdauersportler has a GitHub repo with VBIOS ROM files, but the W6150M was conspicuously absent. It turns out that it's a card that was expected to work, but no-one has yet worked on the ROM. @Ausdauersportler got back to me with a few suggestions. From his knowledge, and/or from information gleaned from his contacts, it was discovered that HP cards often ship with the VBIOS blank. The VBIOS is apparently embedded in the main BIOS distributions. @Ausdauersportler also told me that somewhere on GitHub there was a tool to extract the VBIOS. Great! I'll go looking. What follows is the step-by-step procedure to find and extract the VBIOS for an HP laptop card...

Getting the VBIOS step 1. Google search for the card to find out which HP laptop used that card. For me this was the "HP ZBook 17 G3 Mobile Workstation".

Getting the VBIOS step 2. Go to the HP Support web site and search for the W6150M VBIOS. This fails for me. Okay, now search for the "HP ZBook 17 G3 Mobile Workstation".

Getting the VBIOS step 3. Click on the Software, Drivers and Firmware section. The web site then asks for an OS and a version, I chose the most recent which was Windows 10, and Windows 10 (64-bit). There should be a BIOS section listed, if not try a different OS. Open the BIOS section, right-click on the download link and copy the address. Save the address for use later... Or download the BIOS file and put it in a network accessible location.

Getting the VBIOS step 4. What follows are the steps to extract the VBIOS....

Extracting the VBIOS step 1. We're going to need a Linux OS to use the tools that will extract the VBIOS. I chose to use a Raspberry Pi, but I guess any distro will do. Using the RPi, perform the following commands to download the VBiosFinder from GitHub. VBiosFinder uses Ruby and some additions we will need to prepare it...

cd ~
git clone https://github.com/coderobe/VBiosFinder
cd VBiosFinder
sudo apt install -y ruby-dev
sudo gem install posix-spawn -v '0.3.13' --source 'https://rubygems.org/'
sudo gem install bundler:1.17.3
bundle install --path=vendor/bundle


Extracting the VBIOS step 2. We're going to be compiling some of the dependencies, so let us make sure the RPi is ready...

sudo apt install -y cmake
sudo apt install -y gcc
sudo apt-get install build-essential -y


Extracting the VBIOS step 3. Some of the dependencies for VBiosFinder are available in the RPi standard repos. Let's install them...

sudo apt install -y p7zip-full
sudo apt install -y innoextract
sudo apt install -y upx-ucl


Extracting the VBIOS step 4. We need to compile the rom-parser tool...

cd ~
git clone https://github.com/awilliam/rom-parser
cd rom-parser/
make
cp rom-parser ../VBiosFinder/3rdparty/


Extracting the VBIOS step 5. We need to compile the UEFIExtract tool...

cd ~
git clone https://github.com/LongSoft/UEFITool
cd UEFITool
mkdir build-UEFIExtract
cd build-UEFIExtract
cmake ../UEFIExtract/
make
cp UEFIExtract ../../VBiosFinder/3rdparty/


Extracting the VBIOS step 6. We need to get the BIOS Service Pack from HP (see "Getting the VBIOS" earlier in this post). For me the service pack is sp141664.exe...

cd ~
mkdir HP-BIOS
cd HP-BIOS
wget https://ftp.hp.com/pub/softpaq/sp141501-142000/sp141664.exe
7z x sp141664.exe


Extracting the VBIOS step 7. The 7zip extraction from step 6 should result in a number of files and folders being extracted from the service pack exe file. One of the files is a binary file with a .bin extension which contains the Zbook BIOS. For me the file is named N81_0157.bin. If you cannot figure out which file to use, you can simply try to extract each file using vbiosfinder...

cd ~/VBiosFinder/
./vbiosfinder extract /home/pi/HP-BIOS/N81_0157.bin


Extracting the VBIOS step 8. If all goes well you will see an output similar to this...

finding vbios
11 possible candidates
checking for rom-parser... yes
Found VBIOS for device 8086:0406!
Found VBIOS for device 10de:13fa!
Found VBIOS for device 10de:13f9!
Found VBIOS for device 10de:13f8!
Found VBIOS for device 10de:13b1!
Found VBIOS for device 10de:13b0!
Found VBIOS for device 10de:13b2!
Found VBIOS for device 10de:13b6!
Found VBIOS for device 10de:1436!
Found VBIOS for device 1002:6646!
Found VBIOS for device 1002:6820!

Job done. Extracted files can be found in /home/pi/VBiosFinder/tmp-vbiosfinder/../output

Extracting the VBIOS step 8. From the debug step 9 we know our PCI ID is 66461002. Typically this is shown as a concatenation of the device ID and the vendor ID. We can split this then as 1002 (AMD/ATI) and 6646 (Device), and yes, we can match that to our extracted VBIOS file. These files are found in the /home/pi/VBiosFinder/output folder...

vbios_1002_6646_1.rom

Flashing the HP VBIOS to the card step 1. Assuming the iMac has the W6150M installed, is booted into Ubuntu, and a secure shell (ssh) session is still running, copy the vbios_1002_6646_1.rom file from the RPi to the iMac. I used scp from the iMac to "pull" the file from the RPi ...

cd ~
scp pi@<ip.address.of.RPi>:VBiosFinder/output/vbios_1002_6646_1.rom .


Flashing the HP VBIOS to the card step 2. Now force the content of the VBIOS rom file to be flashed onto the card using the amdvbflash tool...

cd ~
sudo amdvbflash -f -p 0 vbios_1002_6646_1.rom


Flashing the HP VBIOS to the card step 3. Reboot into Ubuntu with the internal and external monitors connected. For me it works!

Flashing the HP VBIOS to the card step 4. Reboot into Mac OS. For me it works!
View attachment 2109599

There are at least two methods of showing a boot selector. The traditional Apple method of holding down the ALT key just after you hear the chime at power-on or restart, and using an alternative boot loader such as OpenCore.

The Apple method is "baked in" to the Mac's EFI firmware (the firmware chip located on the motherboard).

The OpenCore method uses EFI modules to extend the Apple functionality.

Interestingly, AMD presented an overview at the 2011 UEFI Summer Plugfest, the slide deck is online at the uefi.org web site...

A unmodified VBIOS (sometimes also described as legacy, sometimes described as PC VGA BIOS) typically lacks an EFI Option ROM part (abbr. Opt Rom). In simple terms, the VBIOS can contain a legacy (PC) style VGA BIOS block which is the "old style" method of describing the hardware capabilities to the low-level boot loader and later on to the operating system. The VBIOS can also contain an EFI Opt ROM block which serves the same purpose. In some cases the VBIOS can contain both the legacy PC VGA BIOS block and the EFI Opt ROM block.

The machine that is booting will "look" for the block corresponding to the method used to boot and initialise the computer. Older computers typically use the legacy PC VGA BIOS code block. Newer computers use the UEFI Opt ROM code block. Most operating systems will "fall back" to the PC VGA BIOS block even if they are booted using UEFI. This is why a Mac will boot without showing the early boot screens/selector, and then later in the sequence when the OS kernel takes over from EFI it can initialise the graphics.

In some cases, where Apple have shipped a Apple branded card with the same architecture, then it is possible to extract the Apple EFI Opt ROM part from the Apple card, and then to "graft" that Opt ROM into the VBIOS of our legacy cards. This approach relies on the similarity between the graphics card hardware (there may be more modification required to the EFI Opt ROM code to ensure the logical video path routing is correct, but that is a whole different conversation). If successful, this addition of the Apple EFI Opt ROM part will allow the card to initialise under the low level EFI boot sequence, hence it will typically enable the backlight and then the boot screens/selector.

If there is no suitable Apple EFI Opt ROM part, or if there is too much incompatibility between the EFI Opt ROM and the actual hardware, the EFI Opt ROM may not provide the desired outcome. In which case we can try to use OpenCore. Simply installing OpenCore on its own will not solve the lack of boot screens/selector. More modification needs to be done.

The OpenCore team effectively "chain load" an alternative EFI boot loader. Once the OpenCore boot loader has control, it can use the UEFI Graphics Output Protocol (aka GOP). This is a UEFI standard. The GOP provides access to a hardware frame buffer and allows UEFI apps to draw directly to the graphics output device. In order for for OpenCore to draw to the screen via our cards it will need the GOP extensions in the card VBIOS. Forum user @Ausdauersportler has collated instructions and modified VBIOS files on his GitHub repo.

In summary. Adding UEFI GOP extensions to a legacy VGA BIOS file is relatively well understood and relatively "easy" to achieve (although it needs practice and patience if you are going to attempt it yourself). Forum members who already have the skill may offer to help!

The combination of legacy VGA BIOS + UEFI GOP extensions + OpenCore boot loader will provide an Apple-like boot picker each time the Mac starts up or reboots.

If you're lucky, the combination of legacy VGA BIOS + Apple Opt ROM will give you native Apple boot screens/picker.

If you're even more adventurous, the Apple EFI firmware might need modification too to provide the native Apple boot screens/picker with back-light control.

If you're unlucky you might need a hardware mod to provide a pulse-width-modulated (PWM) signal to the LCD panel until the OS gains control of the graphics card. Forum user @dfranetic has posted details of such a hardware modification.

I was lucky, forum user @Ausdauersportler offered to add the GOP extensions to the HP VBIOS. I have tested this GOP-based VBIOS and with OpenCore I see the boot picker :).

The GOP-based VBIOS is also attached to this post...

Are there any issues? Yes! NO! 😁
1. No boot screen/selector. Solved by modifying the VBIOS to include GOP. See the Spoiler above for a very long explanation!

2. Spontaneous power off under load. I'm still investigating. Some possibilities include thermal expansion causing a short against the cooler plate, or PowerPlayInfo tables causing too much current draw (The PSU will have over-current protection). I'll update if I solve it... Solved by removing the graphics card from the cooler plate, cleaning off all of the paste, applying some thin transparent tape to the areas of the heatsink plate where the metal-bodied inductors could possibly short out to the heatsink plate, re-applying paste, re-assemble, and finally re-fit.
View attachment 2110157
Hello, do you have information on working on imac 12.2?
 
Repairing a broken iMac LCD panel (permutation game)

From my endless experiments I have three half broken 27 displays lying around eating my nerves. Two mid 2010 have a broken backlight each on the left side (my solder skills are even worse than my motivation to touch the panels), a third one from a C2D late 2009 with a broken panel electronics (ghost pictures), but with a bright sun tan needing backlight. Had already tried to change the iMac facing part of the electronic, but it did not solve the issue.

So using this guide to remove the iMac facing part of the electronics and this guide to completely disassemble the panel and an additional step I was able to repair at least one panel without soldering! Before disassembling the panel I removed also the cover of the panel facing electronics (it is only connected using some aluminium tape and the four screws).

Finally I separated and lifted (using a hair-dryer) the PCB from the backside, it was glued with small strip.

tempImageiFkIBC.png

Like the iMac facing part of the electronics these two boards are glued to the metal frame.

This way you can remove the panel including the electronics from the backside with the backlight and light scattering layers after removing the metal frame.

tempImageZvo25e.png

This backlight unit including the light scattering layers needs obviously cleaning!

PanelOnly.jpg
Here you see the LCD panel and the electronics, only. This way it is much more easy to handle and to clean. Be carefull with the flat cable connectors to avoid an self-made iMac flex-gate (or flexgate?).

Applied the very same destructive process to one of my panels with a broken backlight.

Now I took the perfect panel from the 2010 and put it onto the frame from the 2009, connected the 2010 iMac facing electronics and tried it in one iMac11,3 - worked perfectly.

Connected 2011 iMac facing electronics to the Frankenstein panel, but if refused to boot the iMac even if I just connected the panel to the inverter board. Weird....@Airknight reported using a Late 2009 LCD worked in the 2011 iMac.

Needs patience and all the tools already mentioned in the great guide about cleaning a panel from @dfranetic.
 
Last edited:
Hello, I'm trying to follow the forum topic, but I have a couple of questions.
Wanted to change my iMac 27 (2009) to iMac 27 (2011)
and as I understand the maximum card will be GTX 880M/Quadro K5100M which will work fine in MacOS.
But I need good support for MacOS Monterey, and that can only be provided by AMD cards that do not work properly on the 2011 model, so I have no choice and continue to use 2009 with an AMD card (w7170m / WX7100) Or just buy an iMac 5K, I understood everything correctly?
Good support can be achieved with Kepler cards, patching is pretty good, but not perfect!
Perfect support only with AMD cards on Monterey.
 
Last edited:
  • Like
Reactions: WingedFrost
Register on MacRumors! This sidebar will go away, and you'll see fewer ads.