Become a MacRumors Supporter for $50/year with no ads, ability to filter front page stories, and private forums.

taow14

macrumors newbie
Apr 27, 2020
3
15
Just want to share my experience with adding a 0.3mm copper pad here.

After lurking for the past few days, I got inspired and decided to add a 0.3mm copper pad to the heatsink and replace the thermal paste with ARTIC MX-4. My configuration is i7/16/1tb. I used the OdiySurveil(TM) 15Pack 5-Size 15x15mm IC Chipset GPU CPU Thermal Heatsink Copper Pad from Amazon.

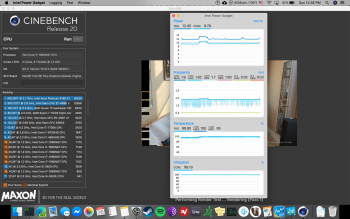
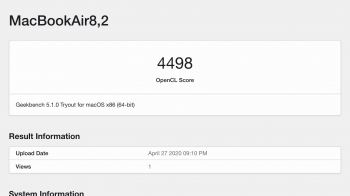
The performance increase is noticeable. GeekBench 5 score is now averaging around 3700 (around a 15% performance increase), and cinebench score is around 1150. While running cinebench, the fan stays around 4000 rpm, and core avg at 1.8ghz (an increase from 1.55ghz I was getting before the mod). If anyone is curious, with the fan turn on at 8,000rpm, CPU temp averages 93 celsius while running cinebench

My browsing temperature with light workload averages around 50-60 celsius, and the fan rarely comes on anymore. Overall, this is a cheap 15$ investment for a cool 15% performance increase.
 

Attachments

  • Screen Shot 2020-04-27 at 10.00.17 AM.png
    Screen Shot 2020-04-27 at 10.00.17 AM.png
    312.8 KB · Views: 602
  • Screen Shot 2020-04-26 at 12.38.12 PM.png
    Screen Shot 2020-04-26 at 12.38.12 PM.png
    1.1 MB · Views: 410
Last edited:

esphil

macrumors regular
Oct 19, 2008
190
95
Just want to share my experience with adding a 0.3mm copper pad here.

After lurking for the past few days, I got inspired and decided to add a 0.3mm copper pad to the heatsink and replace the thermal paste with ARTIC MX-4. My configuration is i7/16/1tb. I used the OdiySurveil(TM) 15Pack 5-Size 15x15mm IC Chipset GPU CPU Thermal Heatsink Copper Pad from Amazon.

The performance increase is noticeable. GeekBench 5 score is now averaging around 3700 (around a 15% performance increase), and cinebench score is around 1150. While running cinebench, the fan stays under 4000 rpm, and core avg at 1.8ghz (an increase from 1.55ghz I was getting before the mod). If anyone is curious, with the fan turn on at 8,000rpm, CPU temp averages 93 celsius while running cinebench

My browsing temperature with light workload averages around 50 celsius, and the fan rarely comes on anymore. Overall, this is a cheap 15$ investment for a cool 15% performance increase.
Thats awesome! Do you apply the thermal pastes on both sides of the pad? I might have to try this.
 

taow14

macrumors newbie
Apr 27, 2020
3
15
Thats awesome! Do you apply the thermal pastes on both sides of the pad? I might have to try this.
Yep, I applied a thin layer on both sides (on the CPU and on the heatsink, and then sandwich the copper pads in between). Also forgot to mention. I used 1 and a half worth of copper pad and laid them side by side to cover the whole surface area.
 

rba1989

macrumors newbie
Apr 6, 2020
23
56
Just want to share my experience with adding a 0.3mm copper pad here.

After lurking for the past few days, I got inspired and decided to add a 0.3mm copper pad to the heatsink and replace the thermal paste with ARTIC MX-4. My configuration is i7/16/1tb. I used the OdiySurveil(TM) 15Pack 5-Size 15x15mm IC Chipset GPU CPU Thermal Heatsink Copper Pad from Amazon.

The performance increase is noticeable. GeekBench 5 score is now averaging around 3700 (around a 15% performance increase), and cinebench score is around 1150. While running cinebench, the fan stays around 4000 rpm, and core avg at 1.8ghz (an increase from 1.55ghz I was getting before the mod). If anyone is curious, with the fan turn on at 8,000rpm, CPU temp averages 93 celsius while running cinebench

My browsing temperature with light workload averages around 50-60 celsius, and the fan rarely comes on anymore. Overall, this is a cheap 15$ investment for a cool 15% performance increase.
Thanks for sharing!

If you took a photo of the process, please share with us.

What about chassis, are there any improvements in thermals?
 

Robotronic

macrumors member
Sep 11, 2014
62
84
So here's the update for my v2 heatsink mod. For those of you late to the party, read my original mod post first.

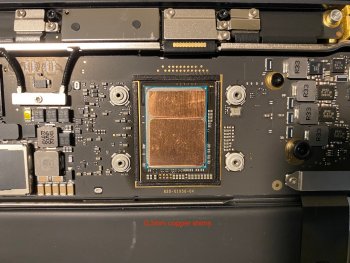
I ordered this set of shims from Amazon. The 0.3mm shim turns out to be the best thickness for 2020 heatsink. The set I ordered was only 15x15mm square, which is actually too small, but I was impatient and these were the only ones that were Prime. I had to use two pieces, one for the CPU die and one for the GPU die, cut to size with a regular pair of scissors. The copper is soft enough at this thickness that regular scissors will work, you just have to be careful. Also worth noting: to cut the small piece for the GPU, I didn't make one cut, I made several cuts taking a little off at a time, that way it warps the final piece a minimal amount and you can flatten it back out. I put a thin layer of paste on the dies, then another layer on one side of the shims. The performance in the end is about the same as with my original foil sandwich mod, but the copper shim is the way to go, definitely worth the price of admission.

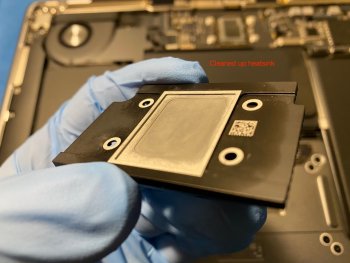
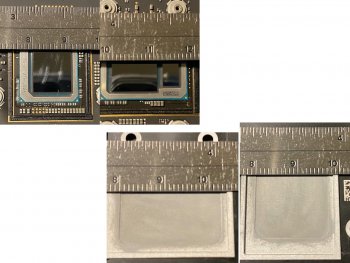
The dimensions of the dies combined is about 16x12mm, and the milled section of the heatsink is about 22x17mm. A 20x20mm shim would be ideal, and only have to be trimmed on one side. Be sure your shim fits within the milled out section of the heatsink, otherwise you'll end up with another air/paste gap instead of making good metal/metal contact with minimal paste in between.

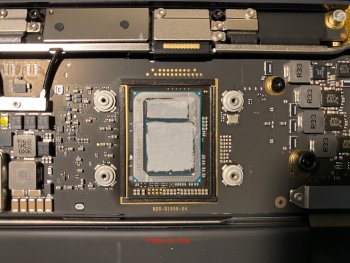
When applying paste, the new method of application for PC building is to put a small dab in the center, then install the heatsink. This is for modern high-pressure heatsink mounts that are torqued down and put a lot of force on the die, which forces the paste into a thin layer. The Air heatsink mount is just four little screws that don't exert much force, so you need to spread the paste in advance, but you want it as thin as you can get it, less is more in this case.

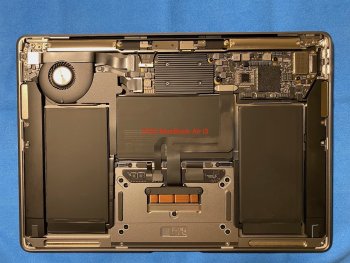
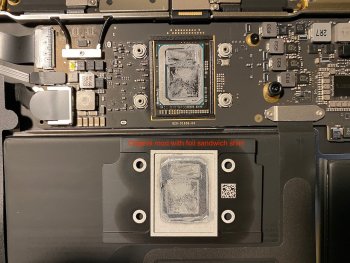
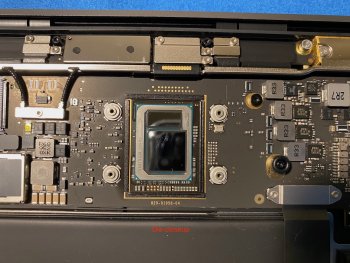
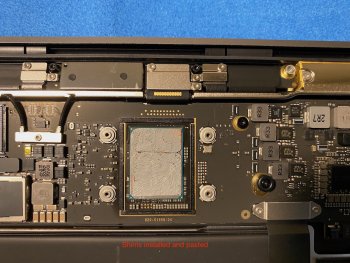
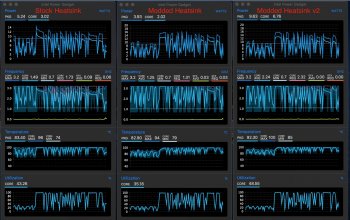
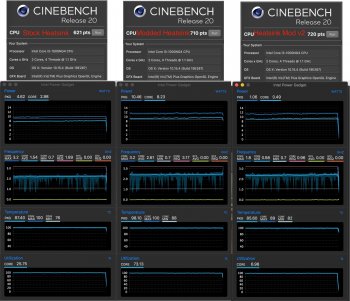
The attached photos show: an overview of the innards of the 2020 i3 Air; heatsink just after being removed with original foil sandwich mod; closeup of the heatsink showing the milled out section that goes over the dies (I still don't understand why Apple would do this); closeups of the dies and heatsinks with measurements; my two pieces of 0.3mm copper shim in place on the dies; final shots of the paste applied; Geekbench and Cinebench results comparing original stock heatsink, my first mod with the foil sandwich, and v2 mod with the copper shim.
 

Attachments

  • IMG_0681.jpeg
    IMG_0681.jpeg
    458.5 KB · Views: 13,308
  • IMG_0683.jpeg
    IMG_0683.jpeg
    427 KB · Views: 2,049
  • IMG_0684.jpeg
    IMG_0684.jpeg
    231 KB · Views: 2,021
  • IMG_0687.jpeg
    IMG_0687.jpeg
    440.8 KB · Views: 2,126
  • Measurements.jpg
    Measurements.jpg
    152.1 KB · Views: 2,134
  • IMG_0690.jpeg
    IMG_0690.jpeg
    393.2 KB · Views: 2,135
  • IMG_0691.jpeg
    IMG_0691.jpeg
    319 KB · Views: 2,075
  • IMG_0692.jpeg
    IMG_0692.jpeg
    445.3 KB · Views: 2,338
  • 3rd Geekbench Run Stock vs Mod vs Mod2.jpg
    3rd Geekbench Run Stock vs Mod vs Mod2.jpg
    473.5 KB · Views: 2,371
  • Cinebench Stock vs Mod vs Mod2.jpg
    Cinebench Stock vs Mod vs Mod2.jpg
    504.1 KB · Views: 2,344

esphil

macrumors regular
Oct 19, 2008
190
95
@Jordi Padreny @RiaKoobcam you/we should start a project to sell these things at scale. Maybe we could start a poll and see how many people will buy and at what pricepoint. This will literally change my mind about returning the 2020 i5 MBA. Apple just seed fund us lol
Especially if someone could develop a custom fan and heatsink. I think there would be a even bigger power boost. I might even add a EGPU to this unit for when its docked if I need the extra power outside of the integrated graphics.
 
  • Like
Reactions: srkirt

srkirt

Suspended
Apr 12, 2020
257
179
Barcelona
[QUOTE = "vyruzreaper, publicación: 28409782, miembro: 980628"]
[USUARIO = 1213089] @Jordi Padreny [/ USUARIO] [USUARIO = 1213283] @RiaKoobcam [/ USUARIO] [USUARIO = 1214606] @ taow14 [/ USUARIO] usted / nosotros deberíamos comenzar un proyecto para vender estas cosas a gran escala. Tal vez podríamos comenzar una encuesta y ver cuántas personas comprarán y a qué precio. Esto literalmente cambiará mi opinión sobre el regreso del 2020 i5 MBA. Apple acaba de financiarnos jajaja
[/CITAR]

Forgive the idea and the design is mine ...
 

magbarn

macrumors 68030
Oct 25, 2008
2,995
2,365
Just want to share my experience with adding a 0.3mm copper pad here.

After lurking for the past few days, I got inspired and decided to add a 0.3mm copper pad to the heatsink and replace the thermal paste with ARTIC MX-4. My configuration is i7/16/1tb. I used the OdiySurveil(TM) 15Pack 5-Size 15x15mm IC Chipset GPU CPU Thermal Heatsink Copper Pad from Amazon.

The performance increase is noticeable. GeekBench 5 score is now averaging around 3700 (around a 15% performance increase), and cinebench score is around 1150. While running cinebench, the fan stays around 4000 rpm, and core avg at 1.8ghz (an increase from 1.55ghz I was getting before the mod). If anyone is curious, with the fan turn on at 8,000rpm, CPU temp averages 93 celsius while running cinebench

My browsing temperature with light workload averages around 50-60 celsius, and the fan rarely comes on anymore. Overall, this is a cheap 15$ investment for a cool 15% performance increase.
That is awesome! My i7 drops to 950 or so on cinebench r20 after several runs and doesn’t come back up. A cold run is about 1025 or so. With your mod you’re running 15% faster sustained performance than my i7 running hot. That’s over twice the performance gap than what i7 upgraders are paying $150 for the stock i7 vs i5 performance gap!
 

vyruzreaper

macrumors regular
Jul 19, 2015
121
116
[QUOTE = "vyruzreaper, publicación: 28409782, miembro: 980628"]
[USUARIO = 1213089] @Jordi Padreny [/ USUARIO] [USUARIO = 1213283] @RiaKoobcam [/ USUARIO] [USUARIO = 1214606] @ taow14 [/ USUARIO] usted / nosotros deberíamos comenzar un proyecto para vender estas cosas a gran escala. Tal vez podríamos comenzar una encuesta y ver cuántas personas comprarán y a qué precio. Esto literalmente cambiará mi opinión sobre el regreso del 2020 i5 MBA. Apple acaba de financiarnos jajaja
[/CITAR]

Forgive the idea and the design is mine ...
Ok bro, I just want something for all the people on this forum that are frustrated. You can take all the credit and money. I just want to see this thru for everyone. If you don't want to do it, there are so many other designs - either way I appreciate all your info and posts. I will be doing my own version next week and potentially designing a new heatsink. I will not be creating a custom favn however - way over my head with heat tunnels etc.
 

kinchee87

macrumors 6502
Jan 9, 2007
289
212
New Zealand
@taow14 I have the exact same configuration as you, so I'm very excited by the improvements you've seen!

@Robotronic Thanks for your detailed pictures and tips on doing the mod!

I'm still waiting for all my goodies to arrive so that I can proceed with the mod as well.
 
  • Like
Reactions: vyruzreaper

taow14

macrumors newbie
Apr 27, 2020
3
15
That is awesome! My i7 drops to 950 or so on cinebench r20 after several runs and doesn’t come back up. A cold run is about 1025 or so. With your mod you’re running 15% faster sustained performance than my i7 running hot. That’s over twice the performance gap than what i7 upgraders are paying $150 for the stock i7 vs i5 performance gap!
I just tried running cinebench 3 times straight just now. The score came out at 1050 w/ the fan spinning at max and core avg of 1.75. Seems like only a 10% increase w/ sustained performance when compared to stock.
 
  • Like
Reactions: vyruzreaper

EValentino

macrumors newbie
Apr 27, 2020
8
14
Good work guys! If an custom heatsink or fan comes out i’ll be first in line to buy one!
[automerge]1588014058[/automerge]
I just tried running cinebench 3 times straight just now. The score came out at 1050 w/ the fan spinning at max and core avg of 1.75. Seems like only a 10% increase w/ sustained performance when compared to stock.

10% is not bad, and it means a way cooler machine overall right?
 

sundialsoft

macrumors regular
Sep 2, 2010
172
66
Scotland
I have a 2020 MBA on order. Should be here in 3 weeks. I tested my current 2015 MBA with my usual apps including Xcode and also tried Blender which I'm thinking of using. Xcode didn't push the computer doing a build of a big swift project. The only time I could get the MBA to go up to 100 degrees was in Blender by continually rotating a 3D mesh of a spaceship. I will do the same when the 2020 arrives. It's an i5 so it will be very interesting to test beside the current one.
 

guiguigui

macrumors newbie
Apr 13, 2020
27
23
Just want to share my experience with adding a 0.3mm copper pad here.

After lurking for the past few days, I got inspired and decided to add a 0.3mm copper pad to the heatsink and replace the thermal paste with ARTIC MX-4. My configuration is i7/16/1tb. I used the OdiySurveil(TM) 15Pack 5-Size 15x15mm IC Chipset GPU CPU Thermal Heatsink Copper Pad from Amazon.

The performance increase is noticeable. GeekBench 5 score is now averaging around 3700 (around a 15% performance increase), and cinebench score is around 1150. While running cinebench, the fan stays around 4000 rpm, and core avg at 1.8ghz (an increase from 1.55ghz I was getting before the mod). If anyone is curious, with the fan turn on at 8,000rpm, CPU temp averages 93 celsius while running cinebench

My browsing temperature with light workload averages around 50-60 celsius, and the fan rarely comes on anymore. Overall, this is a cheap 15$ investment for a cool 15% performance increase.
So here's the update for my v2 heatsink mod. For those of you late to the party, read my original mod post first.

I ordered this set of shims from Amazon. The 0.3mm shim turns out to be the best thickness for 2020 heatsink. The set I ordered was only 15x15mm square, which is actually too small, but I was impatient and these were the only ones that were Prime. I had to use two pieces, one for the CPU die and one for the GPU die, cut to size with a regular pair of scissors. The copper is soft enough at this thickness that regular scissors will work, you just have to be careful. Also worth noting: to cut the small piece for the GPU, I didn't make one cut, I made several cuts taking a little off at a time, that way it warps the final piece a minimal amount and you can flatten it back out. I put a thin layer of paste on the dies, then another layer on one side of the shims. The performance in the end is about the same as with my original foil sandwich mod, but the copper shim is the way to go, definitely worth the price of admission.

The dimensions of the dies combined is about 16x12mm, and the milled section of the heatsink is about 22x17mm. A 20x20mm shim would be ideal, and only have to be trimmed on one side. Be sure your shim fits within the milled out section of the heatsink, otherwise you'll end up with another air/paste gap instead of making good metal/metal contact with minimal paste in between.

When applying paste, the new method of application for PC building is to put a small dab in the center, then install the heatsink. This is for modern high-pressure heatsink mounts that are torqued down and put a lot of force on the die, which forces the paste into a thin layer. The Air heatsink mount is just four little screws that don't exert much force, so you need to spread the paste in advance, but you want it as thin as you can get it, less is more in this case.

The attached photos show: an overview of the innards of the 2020 i3 Air; heatsink just after being removed with original foil sandwich mod; closeup of the heatsink showing the milled out section that goes over the dies (I still don't understand why Apple would do this); closeups of the dies and heatsinks with measurements; my two pieces of 0.3mm copper shim in place on the dies; final shots of the paste applied; Geekbench and Cinebench results comparing original stock heatsink, my first mod with the foil sandwich, and v2 mod with the copper shim.

So for the 2020 model with the copper shim got these results

@taow14 's i7
- sustained freq 1.55GHz --> 1.85GHz (+16%)
- synthetic performance increase in Cinebench ~1000 --> 1150 (+15%)

@Robotronic 's i3
- sustained freq ~2.2GHz --> ~2.4GHz (+10%)
- synthetic performance increase in Cinebench 621 --> 720 (+16%)

My i5 is arriving this thursday and just ordered this copper shim too. Will post my results, seems like the perfect mod if we're getting a 15% performance increase under sustained loads.

Looking forward to see some results on battery performance with the mod, due to the whole assembly running a bit cooler. Seems great that the mod is basically improving apple's thermal solution, allowing to get even more power from the same machine without overclocking etc.
Btw, could there be a functional reason the heatsink has this milled part? Maybe thermal expansion? Shouldn't be...

Thanks all for sharing, and @Jordi Padreny for sharing his results with kind of the same mods on his 2019, who could just have ignored our 2020's 'issue'!
 

srkirt

Suspended
Apr 12, 2020
257
179
Barcelona
Ok bro, I just want something for all the people on this forum that are frustrated. You can take all the credit and money. I just want to see this thru for everyone. If you don't want to do it, there are so many other designs - either way I appreciate all your info and posts. I will be doing my own version next week and potentially designing a new heatsink. I will not be creating a custom favn however - way over my head with heat tunnels etc.
Sorry I apologize I had not seen that at the beginning of the message you addressed my name.
[automerge]1588020336[/automerge]
I have managed to lower another 3º simply by sanding with 1000 sandpaper and glass-ceramic paste the heatsink inside until it is aluminum.
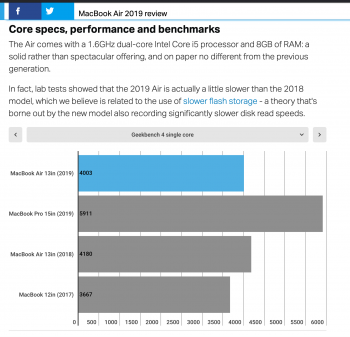
What do you think about the performance of MBA 2019 ???
 

Attachments

  • Captura de pantalla 2020-04-27 a las 22.40.04.png
    Captura de pantalla 2020-04-27 a las 22.40.04.png
    344.7 KB · Views: 335
  • Like
Reactions: vyruzreaper

RiaKoobcam

macrumors regular
Apr 17, 2020
225
289
So here's the update for my v2 heatsink mod. For those of you late to the party, read my original mod post first.

I ordered this set of shims from Amazon. The 0.3mm shim turns out to be the best thickness for 2020 heatsink. The set I ordered was only 15x15mm square, which is actually too small, but I was impatient and these were the only ones that were Prime. I had to use two pieces, one for the CPU die and one for the GPU die, cut to size with a regular pair of scissors. The copper is soft enough at this thickness that regular scissors will work, you just have to be careful. Also worth noting: to cut the small piece for the GPU, I didn't make one cut, I made several cuts taking a little off at a time, that way it warps the final piece a minimal amount and you can flatten it back out. I put a thin layer of paste on the dies, then another layer on one side of the shims. The performance in the end is about the same as with my original foil sandwich mod, but the copper shim is the way to go, definitely worth the price of admission.

The dimensions of the dies combined is about 16x12mm, and the milled section of the heatsink is about 22x17mm. A 20x20mm shim would be ideal, and only have to be trimmed on one side. Be sure your shim fits within the milled out section of the heatsink, otherwise you'll end up with another air/paste gap instead of making good metal/metal contact with minimal paste in between.

When applying paste, the new method of application for PC building is to put a small dab in the center, then install the heatsink. This is for modern high-pressure heatsink mounts that are torqued down and put a lot of force on the die, which forces the paste into a thin layer. The Air heatsink mount is just four little screws that don't exert much force, so you need to spread the paste in advance, but you want it as thin as you can get it, less is more in this case.

The attached photos show: an overview of the innards of the 2020 i3 Air; heatsink just after being removed with original foil sandwich mod; closeup of the heatsink showing the milled out section that goes over the dies (I still don't understand why Apple would do this); closeups of the dies and heatsinks with measurements; my two pieces of 0.3mm copper shim in place on the dies; final shots of the paste applied; Geekbench and Cinebench results comparing original stock heatsink, my first mod with the foil sandwich, and v2 mod with the copper shim.

Awesome, awesome stuff. Thanks so much for taking those photos and posting both the process and the results. You're a legend.
 
  • Love
Reactions: srkirt

srkirt

Suspended
Apr 12, 2020
257
179
Barcelona
[QUOTE = "RiaKoobcam, publicación: 28410986, miembro: 1213283"]
Impresionante, cosas increíbles. Muchas gracias por tomar esas fotos y publicar tanto el proceso como los resultados. Eres una leyenda
[/CITAR]
You have to make the wind tunnel sheet.
[automerge]1588022538[/automerge]
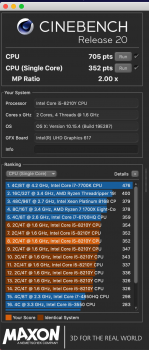
They say that of origin marks 1,113.
 

Attachments

  • Captura de pantalla 2020-04-27 a las 23.10.39.png
    Captura de pantalla 2020-04-27 a las 23.10.39.png
    110.5 KB · Views: 340
  • Captura de pantalla 2020-04-27 a las 23.28.12.png
    Captura de pantalla 2020-04-27 a las 23.28.12.png
    243.2 KB · Views: 362

RiaKoobcam

macrumors regular
Apr 17, 2020
225
289
This thread is becoming legendary -> glad to be doing it with everyone here

Reminds me of the Dell XPS copper mod thread (except they used to completely break and melt your face if you didn't do the mod).

But cooling your laptop down and slightly increasing the performance for $15 bucks and twenty minutes work? That's awesome.
 
  • Like
Reactions: vyruzreaper

srkirt

Suspended
Apr 12, 2020
257
179
Barcelona
[QUOTE = "esphil, publicación: 28409816, miembro: 239059"]
Especialmente si alguien pudiera desarrollar un ventilador personalizado y un disipador térmico. Creo que habría un aumento de poder aún mayor. Incluso podría agregar un EGPU a esta unidad para cuando esté acoplado si necesito la potencia adicional fuera de los gráficos integrados.
[/CITAR]
Especially if someone could develop a custom fan and heatsink. I think there would be a even bigger power boost. I might even add a EGPU to this unit for when its docked if I need the extra power outside of the integrated graphics.
It is possible a heatsink with a mini fan by removing the original cover and putting one of protection you win mm ... I am already working on the heatsink ...
 
  • Like
Reactions: esphil

EValentino

macrumors newbie
Apr 27, 2020
8
14
[QUOTE = "esphil, publicación: 28409816, miembro: 239059"]
Especialmente si alguien pudiera desarrollar un ventilador personalizado y un disipador térmico. Creo que habría un aumento de poder aún mayor. Incluso podría agregar un EGPU a esta unidad para cuando esté acoplado si necesito la potencia adicional fuera de los gráficos integrados.
[/CITAR]

It is possible a heatsink with a mini fan by removing the original cover and putting one of protection you win mm ... I am already working on the heatsink ...

What kind of bottomcase is that on the second picture? Never seen such a thing before.
 
Register on MacRumors! This sidebar will go away, and you'll see fewer ads.