Become a MacRumors Supporter for $50/year with no ads, ability to filter front page stories, and private forums.

BeeNu

macrumors newbie
Dec 8, 2020
6
0
Like I said, same control environment...
Can’t say that it degrades ... at least not in my case ... 3 weeks after my last benchmark I got my highest multi-core score (3870 w/ i5) today and that’s from running the benchmark not even after cold start.

Guess there are so many different things factoring in.
 

prism

macrumors 65816
Dec 6, 2006
1,065
393
Can’t say that it degrades ... at least not in my case ... 3 weeks after my last benchmark I got my highest multi-core score (3870 w/ i5) today and that’s from running the benchmark not even after cold start.

Guess there are so many different things factoring in.
Good to know and impressive multi score you got there!
 

Liverbird

macrumors newbie
Dec 29, 2020
3
9
Hello, after thoroughly reading this whole thread, I decided to attempt this mod.
Gathered the materials and followed @fcracer's guide. (https://fcracer.com/macbook-air-2020-performance-modification/)

I went with the Paste + Shim + Pad mod.
Yes, the Pad makes the bottom feel a little bit warmer under mid-high load, but only a little bit, nothing serious, besides, if I'm gonna do heavy lifting with this laptop, I might as well just sit on my desk.

My machine is a MBA 2020 i5/8Gb/512Gb running Catalina (I'm gonna update to Big Sur after this)

I didn't run any benchmarks but I can already see an improvement. I'm gonna describe, in natural language, some of my use cases:

- At boot, this Air easily reached 100ºC because of all the auto-start apps that I have, but now, this thing barely reaches 70ºC and a couple of seconds later it goes all the way down to 48ºC.

- Under regular use
  • WhatsApp
  • Spotify
  • Discord
  • Outlook
  • Around 5 Chrome tabs (I have a heavily customized Chrome installation with a theme and many extensions)
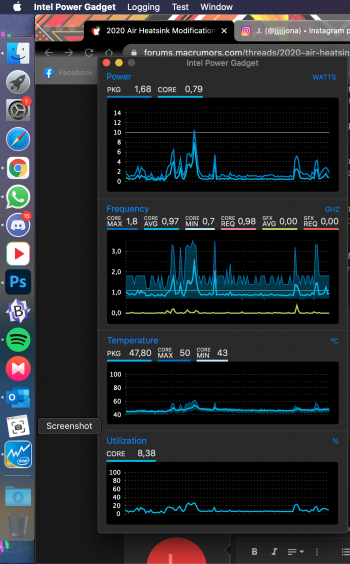
The computer previously reached around 65ºC, but now? it runs between 47-53ºC. It even went as low as 42ºC, and idling at 39ºC.

- Launching Photoshop was another task that made this Air easily go up to 100ºC, but now opening a document it only reaches 70-73ºC, and then after opening the doc with PS idling, the temps go as low as 51ºC, but working with the document only reaches around 53ºC (With ALL the other stuff previously mentioned already running).

- Watching YouTube or any other streaming service (Full HD) this laptop now reaches around 50-55ºC, previously reached around 65ºC.

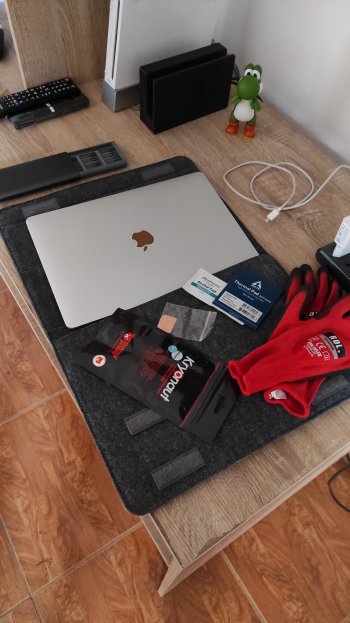
To summarize, I used the following stuff:
  • Xiaomi Wiha Screwdriver set
  • 20x20x0.3mm Shim (cut to size)
  • Kyronaut Thermal Grizzly
  • Arctic 50x50x1mm Pad (cut to size)
  • Isopropyl Alcohol
  • Cotton Swabs (to clean the heatsink, the shim and the dies)
  • Some gloves to avoid leaving fingerprints
  • Macs Fan Control and Intel Power Gadget (to monitor the fan and temps)
  • And A LOT OF TIME AND PATIENCE
If you are gonna do it, make sure you have the correct tools and just do it calmly, no one's rushing you, take your time ;)

Trust me, this mod is pretty easy (and non-invasive to the machine) if you have the patience.
I didn't disconnect the battery because I was careful enough but I recommend you to do it, it's just an extra security step.

A little tip, when screwing back down the screws, turn them a little counterclock-wise until you hear a little click, that way you know the threads are aligned.

I know my way around computers, but I was still scared AF while opening this little Air considering how overpriced this thing is here in Chile, this model cost me 1,500,000 CLP back in September (Around 2,100 USD), imagine how much a Pro costs here...

People saying: "Just go for the M1 Air" or "You might as well just go for a Pro", are missing the point here, this machine only needed better thermals, that's it... And besides, Apple Silicon is still a pretty new technology, an Intel Mac is the way to go for now until we have better compatibility with mainsteam software, and that's gonna happen at least in a couple of years...

Pics: the first one was before attempting anything, the second one is a Screenshot of the temps of my Air at the time of posting this with all those things previously mentioned already running.

Many thanks to everyone involved in the development of this mod, the Internet did it again ;)
 

Attachments

  • IMG_20201229_165131.jpg
    IMG_20201229_165131.jpg
    340.5 KB · Views: 306
  • Screen Shot 2020-12-29 at 19.35.23.png
    Screen Shot 2020-12-29 at 19.35.23.png
    713.3 KB · Views: 303
Last edited:

SesameWasher

macrumors 6502
Nov 22, 2015
288
54
I would assume they had to upgrade the internals if what I read is true: that they are using U-Series CPUs instead of Y-Series CPUs. Anyone confirm the CPU series? If they’re using a U-Series CPU one would have to assume it’s not passively cooled any longer. Just like Apple improved the 16” MBP, I have to assume they’re getting smarter and not just going thinner all the time now that Ive has left. Of course, we all know what they say about assumptions. I guess we will know next week at the latest.
MBA 2020 has increased weight and height. But why?
This might be old but...

It isn't that .7mm causing the increase, rather actual improvements over the heatsink (16") and fan. There's no size difference between the 16" and 15".

As for the Air, a nerfed heatsink but y'all probably known by now.
 

prism

macrumors 65816
Dec 6, 2006
1,065
393
Hello, after thoroughly reading this whole thread, I decided to attempt this mod.
Gathered the materials and followed @fcracer's guide. (https://fcracer.com/macbook-air-2020-performance-modification/)

I went with the Paste + Shim + Pad mod.
Yes, the Pad makes the bottom feel a little bit warmer under mid-high load, but only a little bit, nothing serious, besides, if I'm gonna do heavy lifting with this laptop, I might as well just sit on my desk.

My machine is a MBA 2020 i5/8Gb/512Gb running Catalina (I'm gonna update to Big Sur after this)

I didn't run any benchmarks but I can already see an improvement. I'm gonna describe, in natural language, some of my use cases:

- At boot, this Air easily reached 100ºC because of all the auto-start apps that I have, but now, this thing barely reaches 70ºC and a couple of seconds later it goes all the way down to 48ºC.

- Under regular use
  • WhatsApp
  • Spotify
  • Discord
  • Outlook
  • Around 5 Chrome tabs (I have a heavily customized Chrome installation with a theme and many extensions)
The computer previously reached around 65ºC, but now? it runs between 47-53ºC. It even went as low as 42ºC, and idling at 39ºC.

- Launching Photoshop was another task that made this Air easily go up to 100ºC, but now opening a document it only reaches 70-73ºC, and then after opening the doc with PS idling, the temps go as low as 51ºC, but working with the document only reaches around 53ºC (With ALL the other stuff previously mentioned already running).

- Watching YouTube or any other streaming service (Full HD) this laptop now reaches around 50-55ºC, previously reached around 65ºC.

To summarize, I used the following stuff:
  • Xiaomi Wiha Screwdriver set
  • 20x20x0.3mm Shim (cut to size)
  • Kyronaut Thermal Grizzly
  • Arctic 50x50x1mm Pad (cut to size)
  • Isopropyl Alcohol
  • Cotton Swabs (to clean the heatsink, the shim and the dies)
  • Some gloves to avoid leaving fingerprints
  • Macs Fan Control and Intel Power Gadget (to monitor the fan and temps)
  • And A LOT OF TIME AND PATIENCE
If you are gonna do it, make sure you have the correct tools and just do it calmly, no one's rushing you, take your time ;)

Trust me, this mod is pretty easy (and non-invasive to the machine) if you have the patience.
I didn't disconnect the battery because I was careful enough but I recommend you to do it, it's just an extra security step.

A little tip, when screwing back down the screws, turn them a little counterclock-wise until you hear a little click, that way you know the threads are aligned.

I know my way around computers, but I was still scared AF while opening this little Air considering how overpriced this thing is here in Chile, this model cost me 1,500,000 CLP back in September (Around 2,100 USD), imagine how much a Pro costs here...

People saying: "Just go for the M1 Air" or "You might as well just go for a Pro", are missing the point here, this machine only needed better thermals, that's it... And besides, Apple Silicon is still a pretty new technology, an Intel Mac is the way to go for now until we have better compatibility with mainsteam software, and that's gonna happen at least in a couple of years...

Pics: the first one was before attempting anything, the second one is a Screenshot of the temps of my Air at the time of posting this with all those things previously mentioned already running.

Many thanks to everyone involved in the development of this mod, the Internet did it again ;)
Would be curious to see your Geekbench scores!
 

Liverbird

macrumors newbie
Dec 29, 2020
3
9
Would be curious to see your Geekbench scores!
Here ya go:

Coldboot:
Screen Shot 2021-01-04 at 15.12.53.png


After using the laptop for a little while:
Screen Shot 2021-01-04 at 15.12.47.png

Both tests running macOS Catalina.
My machine is a MBA 2020 i5/8Gb/512Gb
The fans never kicked in under those tests.

Used Big Sur for a couple of days, but for some reason I noticed that the computer ran about 7º hotter (sometimes even more) than with Catalina, and the performance was kinda sluggish (Used an USB drive to do a fresh install, not an update)
Resetted SMC and NVRAM but nothing changed, I'm gonna update to Big Sur when Apple polishes it a little bit more because I kinda liked the UI.
Didn't run any benchmarks under Big Sur though.

So I rolled back to Catalina and now the machine runs cooler and buttery smooth again.
 
Last edited:
  • Like
Reactions: prism

prism

macrumors 65816
Dec 6, 2006
1,065
393
Here ya go:

Coldboot:
View attachment 1706729

After using the laptop for a little while:
View attachment 1706730

Both tests running macOS Catalina.
My machine is a MBA 2020 i5/8Gb/512Gb
The fans never kicked in under those tests.

Used Big Sur for a couple of days, but for some reason I noticed that the computer ran about 7º hotter (sometimes even more) than with Catalina, and the performance was kinda sluggish (Used an USB drive to do a fresh install, not an update)
Resetted SMC and NVRAM but nothing changed, I'm gonna update to Big Sur when Apple polishes it a little bit more because I kinda liked the UI.
Didn't run any benchmarks under Big Sur though.

So I rolled back to Catalina and now the machine runs cooler and buttery smooth again.
Nice scores, but the fans do kick in, you just don't hear them. You can check it out with the fanny app.
 

kadiribrahimerturk

macrumors newbie
Dec 21, 2020
3
11
Ekran Alıntısı.JPG
Ekran Alıntısı.JPG
Ekran Alıntısı2.JPG
Ekran Alıntısı3.JPG
Ekran Alıntısı4.JPG

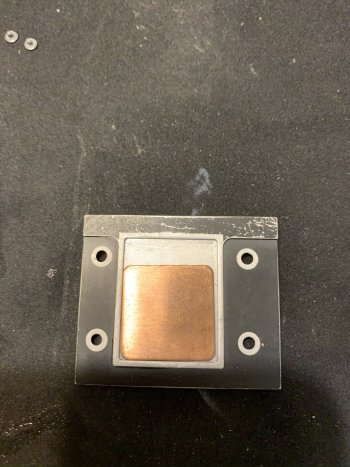
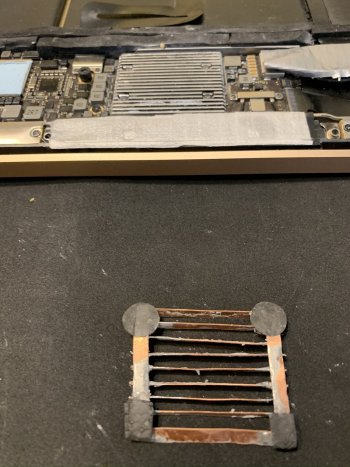
Hi everybody. I'm a mechanical engineer. I've designed a new cooler for Macbook air. I designed wings with much more surface area. I designed the entire air to pass through the wings by increasing the wing length. I also completely reset the gap between the processor and heatsink. As the air flow is blocked in thermal pad mode, other components and the battery were getting hotter. As all the heat was transferred to the bottom case, it caused extra heating of the batteries. In this design, lower case temperature, lower battery and processor temperatures are aimed. I am thinking of producing with CNC from copper block.
If there is a demand, I aim to make mass production.

. I am waiting for your comments. Sorry for my english

Topluluk Tarafından Doğrulandı simgesi
 

SuperSonic80

macrumors member
Apr 20, 2019
38
31
That's cool, but going further I would consider adding a thin heatpipe (there are 1mm thick heatpipes on a market) to pass the heat closer to the fan.
View attachment 1707822 View attachment 1707822 View attachment 1707823 View attachment 1707824 View attachment 1707825
Hi everybody. I'm a mechanical engineer. I've designed a new cooler for Macbook air. I designed wings with much more surface area. I designed the entire air to pass through the wings by increasing the wing length. I also completely reset the gap between the processor and heatsink. As the air flow is blocked in thermal pad mode, other components and the battery were getting hotter. As all the heat was transferred to the bottom case, it caused extra heating of the batteries. In this design, lower case temperature, lower battery and processor temperatures are aimed. I am thinking of producing with CNC from copper block.
If there is a demand, I aim to make mass production.

. I am waiting for your comments. Sorry for my english

View attachment 1707828
 

kadiribrahimerturk

macrumors newbie
Dec 21, 2020
3
11
Hello there. The fan in the Macbook Air works for vacuum, not for blowing, so air flows through the cooler. In other words, it actually has an active cooling system, but it does not provide cooling because it has little contact with the air cooler. That's why I designed a cooler with a much larger surface area. All the air drawn by the fan must pass through the cooler blades. Thank you
XAVKrLNmWnE5CvRe.huge.jpg
 

srkirt

Suspended
Apr 12, 2020
257
179
Barcelona
my projector was the most daring until it died ... I sold it for € 400 after 6 months ... but I managed to reach the performance of an i7 !!! now I will have an MBA M1 shortly
 

Attachments

  • IMG_0098.JPEG
    IMG_0098.JPEG
    525.5 KB · Views: 288
  • IMG_0096.JPEG
    IMG_0096.JPEG
    457.5 KB · Views: 277
  • IMG_0024.JPEG
    IMG_0024.JPEG
    407.2 KB · Views: 294
  • IMG_0032.JPEG
    IMG_0032.JPEG
    488.2 KB · Views: 298
  • Like
Reactions: Loog

BeeNu

macrumors newbie
Dec 8, 2020
6
0
Hello there. The fan in the Macbook Air works for vacuum, not for blowing, so air flows through the cooler. In other words, it actually has an active cooling system, but it does not provide cooling because it has little contact with the air cooler. That's why I designed a cooler with a much larger surface area. All the air drawn by the fan must pass through the cooler blades. Thank you View attachment 1708875

So did you run any benchmarks with your cooler design?
Would be interesting to see how well it fares against the copper shim & thermal pad mod.
 

adrianstuartt

macrumors member
Jun 12, 2020
53
54
View attachment 1707822 View attachment 1707822 View attachment 1707823 View attachment 1707824 View attachment 1707825
Hi everybody. I'm a mechanical engineer. I've designed a new cooler for Macbook air. I designed wings with much more surface area. I designed the entire air to pass through the wings by increasing the wing length. I also completely reset the gap between the processor and heatsink. As the air flow is blocked in thermal pad mode, other components and the battery were getting hotter. As all the heat was transferred to the bottom case, it caused extra heating of the batteries. In this design, lower case temperature, lower battery and processor temperatures are aimed. I am thinking of producing with CNC from copper block.
If there is a demand, I aim to make mass production.

. I am waiting for your comments. Sorry for my english

View attachment 1707828

I would consider buying one.

My concern;

i think most of the benefit of this would be from increasing the mass of the heatsink than the cooling; I know you are working with a CNC and not 'skiving' the fins, but could the fin density be reasonably increased on CNC ?
 

kadiribrahimerturk

macrumors newbie
Dec 21, 2020
3
11
my projector was the most daring until it died ... I sold it for € 400 after 6 months ... but I managed to reach the performance of an i7 !!! now I will have an MBA M1 shortly
The main idea of your project is similar to mine. It was a good work, I congratulate. Your success with this design shows that I am on the right track.
So did you run any benchmarks with your cooler design?
Would be interesting to see how well it fares against the copper shim & thermal pad mod.
Hello there. I have not yet been able to proceed to the production and testing phase. The cooling design and fan function in Macbook Air may not be what you think. As I tried to show above, the fan acts as a vacuum and the air flows over the cooler and reaches the fan. This ensures active cooling. I can produce it with CNC or any other method. My work on this subject continues. I do not have a CNC. I will eliminate the need for copper plates. The bottom case and batteries get very hot in thermal pad mode. Since the air flow is blocked, cooling of all other components is prevented. I will test it soon and share the results.
I would consider buying one.

My concern;

i think most of the benefit of this would be from increasing the mass of the heatsink than the cooling; I know you are working with a CNC and not 'skiving' the fins, but could the fin density be reasonably increased on CNC ?
Your comment was funny :) We'll just wait and see. Please read the design details carefully.Since the space is limited, increasing the number of wings makes the wings thinner. It is possible to increase the number of blades, but production costs and difficulty may increase.
 

Cumbertrump

macrumors newbie
Jan 10, 2021
1
3
I upgraded from a 2013 MacBook Pro to a 2020 MacBook Air i5/8GB/256 since the specs were almost unbelievable (including tenth gen CPU) and I really liked the looks of the newer MacBook Airs.

When I saw the launch event, I immediately preordered mine and I was very eager for it to arrive. When I finally got my hands on mine, I was through the roof. Although that feeling didn’t last long. In times where online meetings were unavoidable, I had my first MS Teams meeting with my new MacBook. Immediately the temperatures rose, and the thing had become a helicopter.

Since then, I had downloaded Turbo Boost Switcher and I rarely heard the fans turn on. I had a look on this forum (around the end of April) but there weren’t any clear steps on how to make this MacBook behave like it should.

However, when the new M1 MacBooks launched, I was very jealous and sad (seeing I had spent so much on a new laptop and I was pretty much crippling it by not allowing the turbo to kick in). I revisited this forum and saw that there was a clear step-by-step guide on how to make this MacBook be the best form of itself. Here I really want to thank fcracer for his elaborate guide on his website.

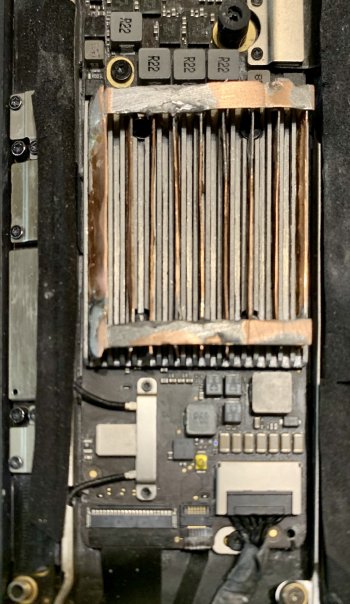
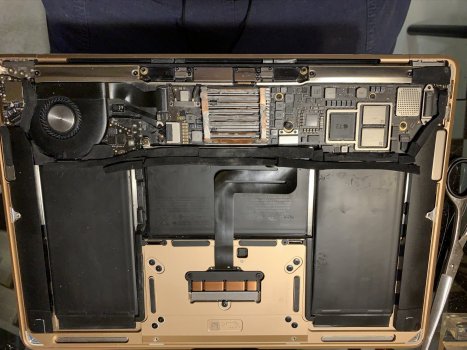
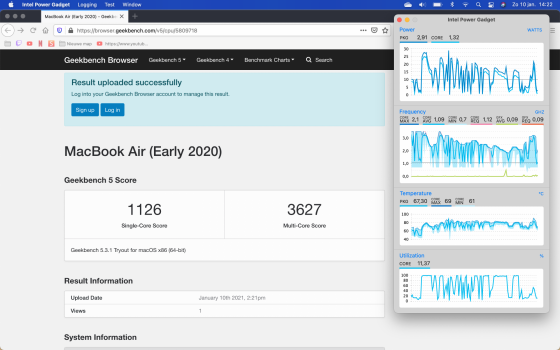
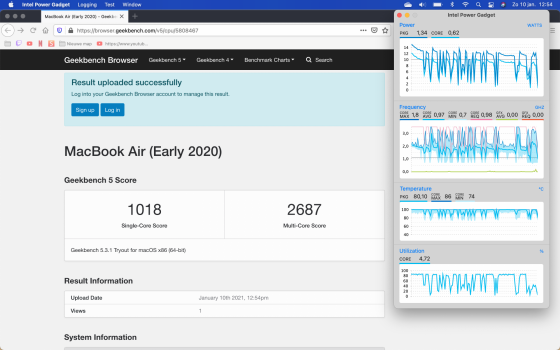
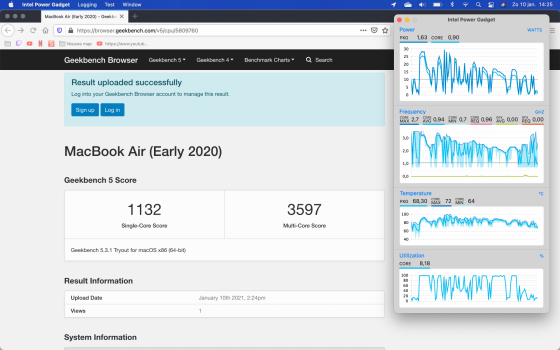
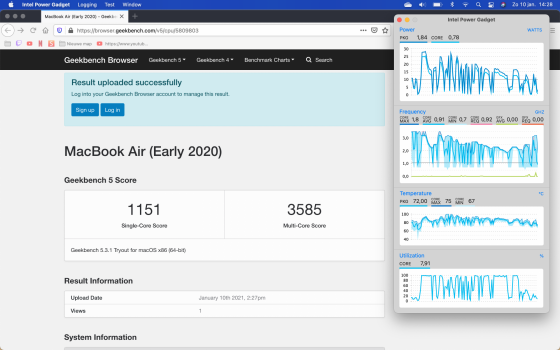
Well, to make a long story short, I did the thermal pad + shim mod just now and I’m exhilarated with the results! The only thing I’m not sure of, is whether I applied enough thermal paste. I made sure everything was coated lightly, but I’m pondering whether I should’ve applied more.

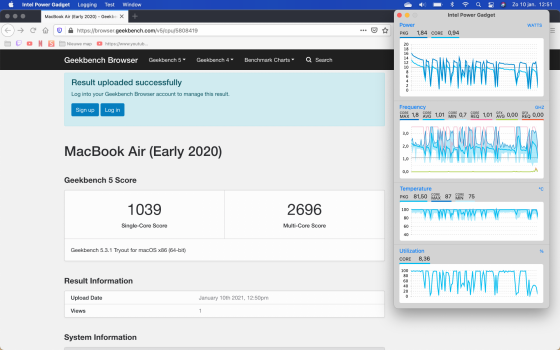
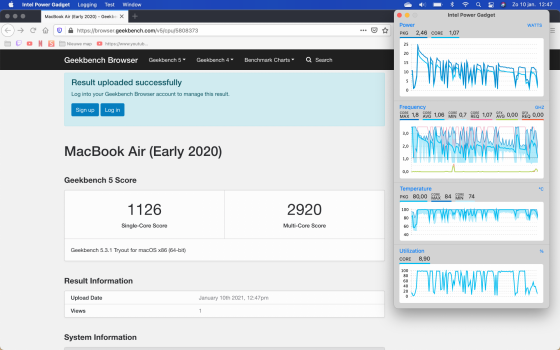
Nevertheless, check my screenshots down below.

I performed three test runs (before and after mods). Each first test was conducted from a cold start, meaning I left the MacBook for at least 20 minutes in sleep mode and then fired up Geekbench 5 and Intel Power Gadget.

I ran three tests back-to-back to see what the degradation of the results were like.

On the tests before the mods, the fans were spinning (each test it got louder), while after the mods, the fans didn’t even turn on.

For anyone wondering, I used a 0.3mm copper shim (trimmed to 20x16mm), Thermal Grizzly Kryonaut and a 1.5mm Arctic thermal pad.


TLDR: Finally did the thermal pad + shim mod and I’m really happy with the results. If you’re thinking about doing it, just do it. It’ll make you much happier!
 

Attachments

  • Schermafbeelding 2021-01-10 om 12.51.05.png
    Schermafbeelding 2021-01-10 om 12.51.05.png
    772.8 KB · Views: 167
  • Schermafbeelding 2021-01-10 om 12.47.53.png
    Schermafbeelding 2021-01-10 om 12.47.53.png
    775 KB · Views: 174
  • Schermafbeelding 2021-01-10 om 14.22.13.png
    Schermafbeelding 2021-01-10 om 14.22.13.png
    764.9 KB · Views: 151
  • Schermafbeelding 2021-01-10 om 12.54.16.png
    Schermafbeelding 2021-01-10 om 12.54.16.png
    769.7 KB · Views: 157
  • Schermafbeelding 2021-01-10 om 14.25.11.png
    Schermafbeelding 2021-01-10 om 14.25.11.png
    763.5 KB · Views: 163
  • Schermafbeelding 2021-01-10 om 14.28.08.png
    Schermafbeelding 2021-01-10 om 14.28.08.png
    763.3 KB · Views: 173

Loog

macrumors regular
Apr 14, 2020
164
167
my projector was the most daring until it died ... I sold it for € 400 after 6 months ... but I managed to reach the performance of an i7 !!! now I will have an MBA M1 shortly
I though you had moved over lock stock and barrel to a Huawei matebook? Knew you'd be back @srkirt LOL

I'm still running my 2018 modded with 0.5mm shim which is working fine, I'll be upgrading to the new MBP 13" 4 port when the next M1X or whatever its called. I have priced up 16GB and 512GB current MBA/P and I expect this will be the same price give or take as the base entry 4 port when this is released if Apple follow previous form and hopefully with 14" and mini LED. I doubt the MBA will see another major uplift until 2022. Saying that Apple did a huge u turn with the M1 having only just moved to 10th 6 months previously.
 
  • Love
Reactions: srkirt

jedisniper17

macrumors newbie
Jan 18, 2021
2
1
I was enlightened by this thread and I did my mod by adding three 160mm (long) x 9 mm (wide) x 1 mm heat pipes. covered the entire heat pipe with 0.5mm paste (both sides) so that the heat pipe become 2mm thick.
Forgive me that the paste cover is a little bit ugly but it can transfer the heat to the bottom case efficiently.
And I am very excited to found that the multiple core CPU performance improved about 35% (3700 vs 2700 before). And the CPU is now with 39~45 degree (idle) which it was at 55~60 degree (idle) before my mod.
MacbookAirMod1.jpg
MacbookAirMod2.jpg
 
  • Like
Reactions: Cumbertrump

jedisniper17

macrumors newbie
Jan 18, 2021
2
1
I was enlightened by this thread and I did my mod by adding three 160mm (long) x 9 mm (wide) x 1 mm heat pipes. covered the entire heat pipe with 0.5mm paste (both sides) so that the heat pipe become 2mm thick.
Forgive me that the paste cover is a little bit ugly but it can transfer the heat to the bottom case efficiently.
And I am very excited to found that the multiple core CPU performance improved about 35% (3700 vs 2700 before). And the CPU is now with 39~45 degree (idle) which it was at 55~60 degree (idle) before my mod.
View attachment 1715020 View attachment 1715021
I am also very interested in the new M1 Macbook Air model. Can it be improved to the same performance level with M1 Macbook Pro?
 

nikey22

macrumors regular
Dec 3, 2019
200
1,043
ON, Canada

2020 MacBook Air "Core i3" 1.1Ghz 13" (MBA 9,1)

OS: Big Sur
Problem: Fan turning on and loud after Google meets, Zoom sessions, Youtube live streams
Solution: I read all 95 pages

CPU-PCH_PASTE.png


SHIM_PASTE.png


heatsink.JPG


Results:
  • My son asked me after using it again: "hey dad, did you remove the fan from my computer?"


Insanely Great!
-Steve Jobs
 
Last edited:

05c0

macrumors newbie
Dec 29, 2020
1
4

2018 MacBook Air "Core i5" 1.6GHz 8GB 13"​

OS: Catalina 10.15.7
Problem: Couldn't get any real work done without earphones because the fan was at its maximum speed most of the time, CPU temps were at 99-100 Celsius, the overall performance wasn't the best because it would constantly thermal throttle even with my limited workload

Solution:
  • Replaced thermal paste with Thermalright TF8 (13.8 W/mK)
  • Copper shim 20x20x0.3mm (cut to size: 16x20x0.3mm)
  • Arctic thermal pad APT2560, 50x50x1.5mm (cut to the size of the heatsink 4.3 x 3.6cm, used the remainder for an older 15" Pro, which really made a difference as well); I decided not to remove the foamy piece from the back cover (I've noticed it's different for other models, where a different kind of thermal shield may be used) in case I've got to take the laptop in for a keyboard replacement again (as I've read removing the thermal shield makes nearly no difference)
  • Pictures of the progress:
Results:
  • Noticeably lower idle temperatures (36 to 39 Celsius compared to ~45 before the mods)
  • Noticeably quieter under load
  • Temperatures raise much slower and drop much faster when stress tested
  • Average temperatures dropped from 99-100 Celsius to 85-90 Celsius under identical workload, the laptop is usable again
  • Battery temperatures stayed the same (surprisingly)
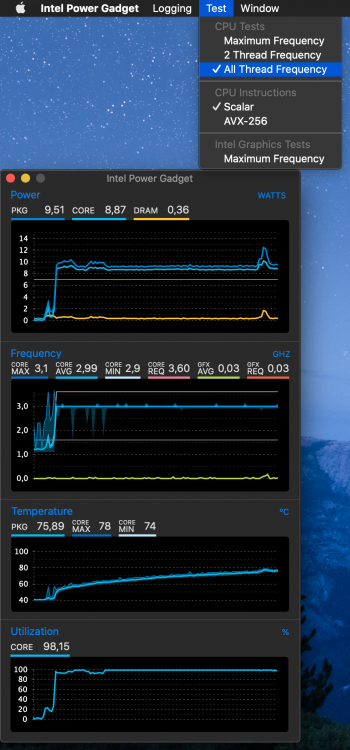
  • Intel Power Gadget's "All Thread Frequency" never exceeds 84 Celsius for PKG and 87 Celsius for Core Max even if tested for a full hour
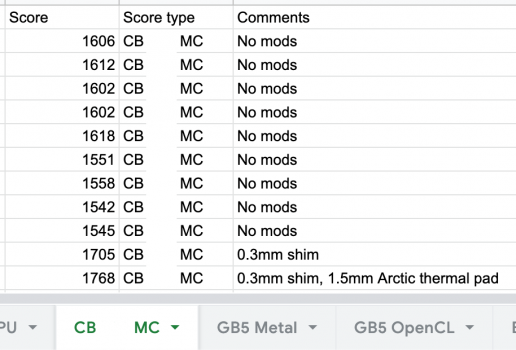
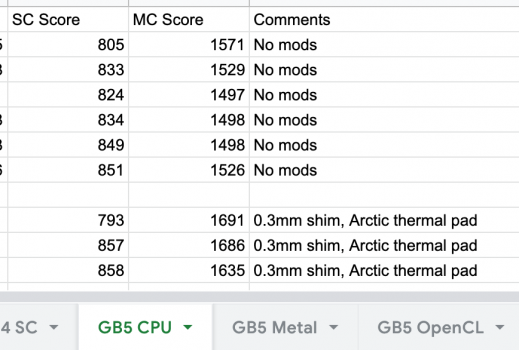
  • Cinebench R23 Multi core: 1612 -> 1768 (9.68% increase)
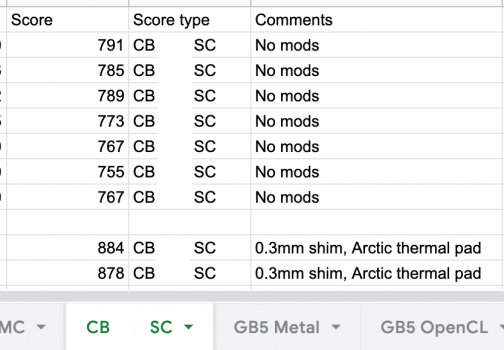
  • Cinebench R23 Single core: 791 -> 884 (11.76% increase)
  • Geekbench 5 CPU Single core: 851 -> 858 (0.82% increase)
  • Geekbench 5 CPU Multi core: 1571 -> 1691 (7.64% increase)
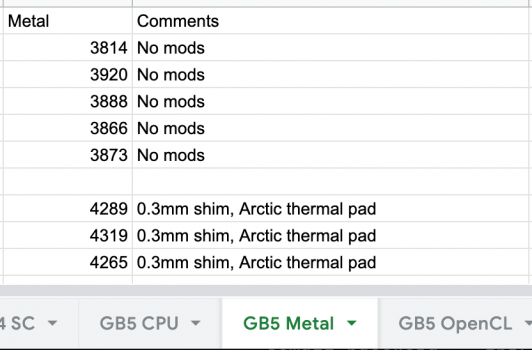
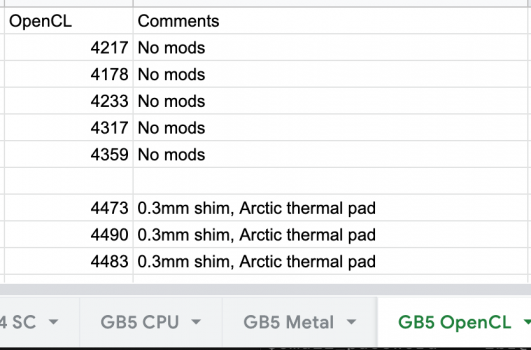
  • Geekbench 5 Metal: 3920 -> 4319 (10.18% increase)
  • Geekbench 5 OpenCL: 4359 -> 4490 (3% increase)
 

Attachments

  • IPG_AllThreadFrequency_0.3mm-shim+thermal-pad.png
    IPG_AllThreadFrequency_0.3mm-shim+thermal-pad.png
    1.1 MB · Views: 164
  • CB_R23_SC.png
    CB_R23_SC.png
    79.3 KB · Views: 113
  • CB_R23_MC.png
    CB_R23_MC.png
    86.8 KB · Views: 104
  • GB5_Metal.png
    GB5_Metal.png
    69.3 KB · Views: 104
  • GB5_CPU.png
    GB5_CPU.png
    79.2 KB · Views: 99
  • GB5_OpenCL.png
    GB5_OpenCL.png
    68.8 KB · Views: 118
Last edited:

MrTSolar

macrumors 6502
Jun 8, 2017
369
444
Linus just posted about thermal temps in the MBA, which sheds more light onto why Apple has done what they have.
I can fully appreciate the M1 MacBook Air throttling under extended loads because of its fanless design and having to balance bottom plate temperatures.

However, there's no excuse for the crappy thermal couple between the processor and heatsink in the Intel MBAs. That was a pure marketing stunt. A file transfer to a network drive (although it was nearly a full system backup) had my Air at 170 F and full fan for most of the day without any modifications. The frame around the top row of keys was so hot I could barely keep my finger on it. Proper heatsink contact would actually keep the case cooler.
 

srkirt

Suspended
Apr 12, 2020
257
179
Barcelona
Hello friends !! messing up my MBA 2018 was a blessing ... I've had my MBA 2020 M1 512gb for a week and it's from another world ... It cost me € 1299 and doesn't get hot except trying to play 8K videos at 60fps (can't) at 30fps if that reproduces it. Now when I compare one design with another I see a brutal difference in everything. On the outside it is so identical that the covers of the upper and lower cover have served me well. I will visit this thread because I pushed the wedge and the wind tunnel, tell you one thing: make the tunnel watertight and try to make a small radiator to put on top of the heatsink, that's the maximum I got (performance of an i7). Do not cover the heatsink with paste since that slows down the air flow ... you only have to weld copper fins so that the radiator is higher, nothing more.
A greeting!!!
macbook_air_2019_review_9_thumb1200_4-3.jpg
 
  • Like
  • Haha
Reactions: Loog and retta283
Register on MacRumors! This sidebar will go away, and you'll see fewer ads.