No problem let me know
Do you want to try buying one and testing with your 17" ? It would be valuable information for the next batch.
If you or any others have issues on arrival, just let me know.
")
No problem let me know
Unfortunately, I have not had a 17" beta tester yet, so you would be the first to find out. Perhaps @flehman can chime in on this one.
I used heavy duty packing tape to secure my 2 cards. With my testing I have downloaded over 50GB of data and the card itself doesn't really get hot. Once the lid is on there isn't a whole lot of room for different types of adheasives. Me and @troop231 agreed on this solution so cards won't get damaged when being pulled up from the optical drive.I am one of them, but must confess this week at work is pretty wall-to-wall so I’m not sure when I might get round to it.
One question I am turning in my mind before I do the switch is about different possible adhesives for securing the bottom of the card against the optical drive. Have you observed any issue with heat compromising the scotch tape? Top of optical drive doesn’t seem like a spot that should get super hot, but under enough use the whole thing can get pretty toasty.
Nothing concrete yet, just more work for me to do. The future should hopefully be bright.
thanks @troop231 ! i may hold out until an option exists without having to modify the subwoofer. all the other stuff, i have no problem modifying the case or mount.
I just ordered one. I will let everyone know how it works in my Early 2011 MBP 17. Now I am off to cancel that vaporware QuickerTek Ucard order that I NEVER received any information status from QuickerTek after ordering it over TWO months ago.
THANK YOU Troop231!
I selected expedited shipping so should have an update sometime this week regarding installation and results! YAY!
It only requires the removal of the subwoofer. The subwoofer is so small it doesn't contribute to audio 'quality' very much.
Thank you for the clarification. PM coming your way.
Just to clarify, I hope you didn't think that I meant that the bottom lid doesn't need modified anymore, because it still does.
I installed my card last night and immediately broke the solder joints upon install. I used my soldering iron with a tip and solder that were far too large and got the card soldered back together albeit using some solder wick after bridging a few pads together. To my surprise the card worked and showed 1gb in the network monitor utility. My access points are both capable of 1300mb however the best I have seen is 527mb, still better than what I got with the old card thoughThree buyers received their cards today, and I'm eager to hear how the installs went. You know who you are
Do you have the longest antenna wire in position 3? That wire was originally for Bluetooth on the a1286 and on the iMac card position 3 is bluetooth.I installed my card last night and immediately broke the solder joints upon install. I used my soldering iron with a tip and solder that as far too large and got the card soldered back together albeit using some solder wick after bridging a few pads together. To my surprise the card worked and showed 1gb in the network monitor utility. My access points are both capable of 1300mb however the best I have seen is 527mb, still better than what I got with the old card though
I installed my card last night and immediately broke the solder joints upon install. I used my soldering iron with a tip and solder that were far too large and got the card soldered back together albeit using some solder wick after bridging a few pads together. To my surprise the card worked and showed 1gb in the network monitor utility. My access points are both capable of 1300mb however the best I have seen is 527mb, still better than what I got with the old card though
Wow, that's terrible, but glad you sorted it out. I noticed it looks like you're using a 13" with the subwoofer still installed; that wasn't recommended to do and may have contributed to the breakage of the joints. There's not enough space in there.
@highvoltage12v and I spent a long time discussing these space issues with the 13" the past few months while I was developing the board.
I saw your edit and yes I followed the J numbers from the old card to match up each wire.
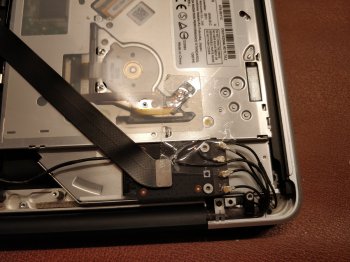
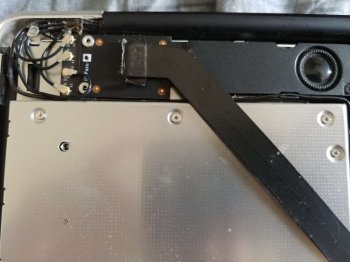
I broke the solder joints by pressing the card down onto the double sided tape. I guess I have a heavy hand, but the card connector fits with room to spare into subwoofer housing. I used a dremel and trimmed the bottom cover and everything fit fine. I will try adjusting my access point settings to improve my connection speeds. My neighborhood does have a fair amount of wifi however, I have tried my best to select channels with the lowest amount of interference.
I have the best experience with channel 153.I saw your edit and yes I followed the J numbers from the old card to match up each wire.
I broke the solder joints by pressing the card down onto the double sided tape. I guess I have a heavy hand, but the card connector fits with room to spare into subwoofer housing. I used a dremel and trimmed the bottom cover and everything fit fine. I will try adjusting my access point settings to improve my connection speeds. My neighborhood does have a fair amount of wifi however, I have tried my best to select channels with the lowest amount of interference.
I saw your edit and yes I followed the J numbers from the old card to match up each wire.
I broke the solder joints by pressing the card down onto the double sided tape. I guess I have a heavy hand, but the card connector fits with room to spare into subwoofer housing. I used a dremel and trimmed the bottom cover and everything fit fine. I will try adjusting my access point settings to improve my connection speeds. My neighborhood does have a fair amount of wifi however, I have tried my best to select channels with the lowest amount of interference.
Can you post more photos that can benefit other 13" owners and myself? Namely, can you screw down the top left screw point of the bottom lid into the original and trimmed AirPort bracket? Lastly, did you trim the subwoofer as I did in my earlier photos in this thread?
Thank you!
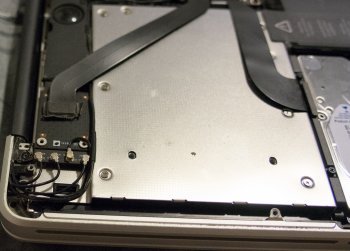
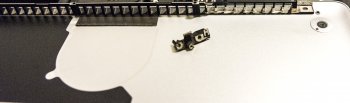
I cut the edge off the stock wifi card bracket with 2 screws into the chassis so I can still have all the screws in bottom cover. The wifi card is stuck to data doubler hard drive chassis(in place of superdrive) with double sided tape. I trimmed the subwoofer to allow the card to fit and just maybe it will provide some sound vs it missing. I have thought about using epoxy to seal the subwoofer back up and seeing how a smaller enclosure works.
So, you modified the bottom lid like I showed? Can I see what that looks like? Thank you!
Here is a picture of the bottom lid and a piece of the stock wifi card fixture that allows every screw to be used for the bottom lid.