Become a MacRumors Supporter for $50/year with no ads, ability to filter front page stories, and private forums.
Status
The first post of this thread is a WikiPost and can be edited by anyone with the appropiate permissions. Your edits will be public.
No heatsink yet. Ran Blackmagic for a bit and the temp climbed to 110F. Next time the machine is disassembled it'd probably be good to add one. (planning to add a sata SSD for boot camp)

It's been turned on 30 mins, normal use no heavy access, ambient air is 88F, CT4000P3SSD8 temp stable at 99F.
Good to know, thanks.

For the upgrade of the NVMe, did you install Monterey on it first in an external case before installing it in the iMac?
 
Last edited:
Well, yes and no.

The 4tb nVME was in a usb-c case for a while and happened to have a carbon copy cloner image of the 2017 iMac system when installed. Worked fine.

I then proceeded to Bork that install unbootable by screwing around.

Then I nuked the 4tb drive and ran CCC again to clone the 2tb drive. The 2tb was in the 2017 iMac which was booted into target mode. Booted the 2019 iMac from the 2tb and CCC’d it onto the 4tb internal nVME. Rebooted and all was well, the flag has been transferred to the 2019 machine and now it’s the main daily driver.
 
Just upgraded my iMac 27 HDD - went slow, couple of snags with hard to reach screws but over happy with the result.

Device: Late 2013 - 14,2 - ME088LL/A (3.2Ghz i5-4570, HDD only)
Blade upgrade: None -> 1TB OWC Aura Pro X2
HDD upgrade: 1 TB SATA HDD -> 1TB Samsung 860 Evo SATA SSD
Speed test: around 750 MB/s read, 750 MB/s write
OS: Catalina 10.15.7
Adapter: None
Temperature sensor: none
Issues after fresh OS install: everything is ok - no issues.
 
New member here and new to macs. Is this sub good to post a lengthy question about the macOS part. I've got a late 2015 27" iMac with NO HDD inside and planning to install an SSD like you're doing here, but first need to get macOS on it. Have been trying few things with no luck. If not in the sub, where about please?
 
FYI to @dobrink, et al:

I did a small bit of adjustment to the legibility for this wikipost, as some prior edits which were manually selected in “black”, rather than let the forum software, Xenforo, handle it as a “default” text colour, meant users of the MR forums in dark mode (a user preference setting you can find in the footer of this and every forum page) were seeing the wikipost text appear like this:

1689763538200.png


Without spending too much time, I also lightened the “blue” text call-out just enough (they now look a bit like “cornflower-blue”, if you remember your Crayola crayons) so that it’s still easily legible against a white background, and also on a dark background.

Some other areas of the wikipost will probably need additional tightening up of colour and contrast tolerances by those of you who make semi-regular updates to it, but the above ought to at least help for anyone trying to use the pretty useful info whilst viewing it in MR Forums’ dark mode.
 
I am upgrading an 2019 iMac 27" 5k model 19.1 with either NVME 2TB Samsung 980 Pro or 2TB WD Black SN770.

I prefer the specs of the Samsung as it has AES security and better sustained transfer rate than the WD Black for video. I have installed the Samsung and it works like a dream. SMART lists all 100% OK. I appreciate that these are both PCIE4 NVME going into a PCIE 3 slot. However buying PCIE 3.0 - when I can find them, is nearly the same cost as PCIE 4 so I opted for future expansion options perhaps as external SSD drives.

Questions:
1. Are TRIM accumulation times fixed in the Samsung 980 Pro SSD? The Samsung Evo Plus installed easily but was notorious for TRIM delays accumulating over time on the iMac and I do not want to make that mistake.
2. How do I check to judge for myself if trim times are accumulating without waiting 3 months?

All help much appreciated.
 
I am using an 2019 iMac 21 model 19,2 with Samsung SSD 860 EVO 1TB in an external USB enclosure as TM backup

After around 6 months of use, I don't see any trim issue with that solution.
# log show --predicate "processID == 0" | grep spaceman | grep -i trim
...
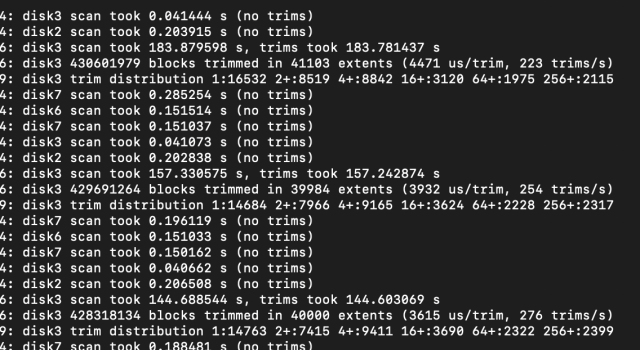
2023-07-09 16:57:23.047398+0200 0x342 kernel: (apfs) spaceman_scan_free_blocks:3154: disk2 scan took 2.423546 s, trims took 2.328469 s
2023-07-09 17:05:21.028132+0200 0x2317 kernel: (apfs) spaceman_scan_free_blocks:3154: disk4 scan took 12.533481 s, trims took 12.365264 s

disk2 is APPLE SSD SM0032L 28GB
disk4 is SSD 860 EVO 1TB
trims took ~ 10-14 sec to complete.

I now plan to open the body and upgrade ram + storage soon.
 
NVME External enclosures present no boot Trim problems. I can run Adata as NVME boot disk from external enclosure but Adata is definitely incompatible with a 2019 iMac as an internal NVME boot drive.

Is your Disk4 an internal SATA 860 Evo? If so, as a boot disk it should be smooth and fast.
I have fitted an internal SATA 870 Evo and it boots at 13 seconds. No Trim issues with SATA. If you use Macs Fan Control software, no temperature sensor is needed on the SATA drives as the software does the job. After SATA disk insertion, fans will race until you configure the software.

Tell me, how did you access the Trim information you quoted? I need to do the same to measure the 980 Samsung Pro.

I do not know your experience opening a 2019 iMac so I offer a caution:

After cutting adhesive and releasing screen from back, (I use a scalpel to cut adhesive seal as it is clean and easily controlled. The blade is inserted max 5 mm and there are no protruding cables to cut. Wheel is good if you wish to be cautious and ensure no scratches).

Be very careful detaching of the LCD cable from the logic board. Lift stirrup and fold it back - then gently pull multi-pin cable back parallel with motherboard. Both cable and socket are very fragile. Screen can be opened about 15 centimetres without straining the LCD Cable socket. (See OWC or MacFixit video’s). Refitting pins back into socket is even more critical. I used a magnifying glass to understand the fitting process to learn how easily it can be damaged. The video’s are performed by experts who make it look easy, and it is - once you understand what you are doing.

Generally, fitting a SATA SSD inside the 2019 can be done with bare hands AFTER discharging body static through a wrist band or metal tool onto bare metal. Simply avoid contact with the power board.

However, should moving a powerboard become necessary, I recommend wearing rubber surgical gloves as it takes very little body static to damage the power board. Apple recommend waiting half an hour to allow capacitor dicharge before opening a computer. People with greater knowledge than I, recommend next day operation as capacitors can take a very long time to fully discharge. Often they carry very small charges when sold as new.

The human body stores quite high voltages which are quickly discharged when touching a conductor. It is usually a fast and painless occurance. In my ignorance, I killed a power board without knowing when or how. All I know is I removed it with bare hands. I assume I touched or mishandled the board and allowed capacitors to make contact with me, or some other component. Video’s on YouTube create a casual and very false impression regarding correct handling of electronic components.

Cheap surgical rubber gloves can potentially save you thousands of dollars while generally keeping perspiration off your computer components.
 
Last edited:
NVME External enclosures present no problems. I can run Adata as NVME boot disk from external enclosure but Adata is definitely incompatible with a 2019 iMac as an internal NVME boot drive.

Tell me, how did you access the Trim information you supplied? I need to do the same.

Have a second look at their reply. They used the above Terminal command to view those excerpts:

Code:
log show --predicate "processID == 0" | grep spaceman | grep -i trim

I redacted the “grep spaceman” portion to see more of the log data for my system and found this in there:

Code:
2023-07-15 23:20:02.459396-0400 0x1de      Default     0x0                  0      0    kernel: (apfs) spaceman_trim_free_blocks:3009: scan took 20.909810 s, trims took 20.445868 s
 
  • Like
Reactions: Terraaustralis
Thank you for pointing out my oversight. B S Magnet. Bad hair day!

I ran the Terminal command and found trims recorded as minimal with no evidence of accumulated times as yet.

I have no knowledge of Terminal instructions. What is the code you used to redact "grep spaceman" please?
 

Attachments

  • Screenshot 2023-08-04 at 1.14.01 pm.png
    Screenshot 2023-08-04 at 1.14.01 pm.png
    472.2 KB · Views: 115
Last edited:
  • Like
Reactions: B S Magnet
People with greater knowledge than I, recommend next day operation as capacitors can take a very long time to fully discharge.
from the iFixit website:
"Before beginning any work on your iMac: Unplug the computer and press and hold the power button for ten seconds to discharge the power supply's capacitors"
 
from the iFixit website:
"Before beginning any work on your iMac: Unplug the computer and press and hold the power button for ten seconds to discharge the power supply's capacitors"
Thank you. I did know that but overlooked mention. From what I understand, despite pressing power button there is still residual power in the capacitors but is probably considered of little consequence when handled by experienced technicians.
Cheers.
 
Last edited:
  • Like
Reactions: mwidjaya
I am using an 2019 iMac 21 model 19,2 with Samsung SSD 860 EVO 1TB in an external USB enclosure as TM backup

After around 6 months of use, I don't see any trim issue with that solution.
# log show --predicate "processID == 0" | grep spaceman | grep -i trim
...
2023-07-09 16:57:23.047398+0200 0x342 kernel: (apfs) spaceman_scan_free_blocks:3154: disk2 scan took 2.423546 s, trims took 2.328469 s
2023-07-09 17:05:21.028132+0200 0x2317 kernel: (apfs) spaceman_scan_free_blocks:3154: disk4 scan took 12.533481 s, trims took 12.365264 s

disk2 is APPLE SSD SM0032L 28GB
disk4 is SSD 860 EVO 1TB
trims took ~ 10-14 sec to complete.

I now plan to open the body and upgrade ram + storage soon.
Hi iMac2019, Thanks for the input.
12 seconds seems like a significant trim time. Is that due to the 860 Evo carrying considerable data?
 
Hi Terraaustralis and all,
Thanks for the hints and tips ;)
I plan to upgrade next week as I have to gather all bits to do so; hope it will go smootly and end up successfully.
I will update the thread accordinly when completed.

As seen, trim time don't evolve negatively (one month later)
2023-08-04 15:05:31.385607+0200 kernel: (apfs) spaceman_scan_free_blocks:3154: disk4 scan took 12.598653 s, trims took 12.375149 s

I don't think 12 seconds is a significant trim time as it tooks 2,5 seconds for the 28GB Apple blade compared to 1TB external volume.

Btw, disk4 is 2/3 of space used.
# df -h
/dev/disk2s5 957Gi 500Gi 435Gi 54% 1941055 4556626160 0% /System/Volumes/Data
/dev/disk4s2 931Gi 595Gi 336Gi 64% 1670898 3523502360 0% /Volumes/Time_Machine
 
Finally I have something to contribute to the upgrade thread :)

Started with a 2019 iMac 27" 19,1 that had a 3.7ghz i5-9600K

Upgraded the cpu to an 8 core 3.6ghz i9-9900K from eBay (reports 16 with hyperthreading!)

used the $14 NVME adapter from amazon

and a PCI-E gen3 4TB Crucial NVME from Best Buy ($189!) (the gen 4 was $40 more)

So far with Monterey it screams and there haven't been any issues.

Did you take out the original SATA drive physically? (I have a fusion drive so has a mechanical SATA drive)
 
As an Amazon Associate, MacRumors earns a commission from qualifying purchases made through links in this post.
anyone have recommended parts list (tools/accessories) with amazon links? for 2019 27" imac?
ifixit vs owc kit for tools?
 
Hi Terraaustralis and all,
Thanks for the hints and tips ;)
I plan to upgrade next week as I have to gather all bits to do so; hope it will go smootly and end up successfully.
I will update the thread accordinly when completed.

As seen, trim time don't evolve negatively (one month later)
2023-08-04 15:05:31.385607+0200 kernel: (apfs) spaceman_scan_free_blocks:3154: disk4 scan took 12.598653 s, trims took 12.375149 s

I don't think 12 seconds is a significant trim time as it tooks 2,5 seconds for the 28GB Apple blade compared to 1TB external volume.

Btw, disk4 is 2/3 of space used.
# df -h
/dev/disk2s5 957Gi 500Gi 435Gi 54% 1941055 4556626160 0% /System/Volumes/Data
/dev/disk4s2 931Gi 595Gi 336Gi 64% 1670898 3523502360 0% /Volumes/Time_Machine

"May the Force be with you young Skywalker"
This link is useful: https://www.tonymacx86.com/threads/choosing-a-compatible-nvme-ssd-for-your-macos-boot-drive.323479/

As mentioned in my original post, I have been struggling with NVME choice as the regular advice has been avoid Samsung based on PCIE products, particularly the 970 Evo Plus. This Tonymac86.com article supplied to me by James Bond (Many thanks James), is fairly definitive but is open to further question to Generation 4 PCIE products.

Quote "The lawsuit was finally settled in 2018 in Apple's favor. Apple still purchases OLED displays and NAND flash (for iPhones) from Samsung but not SSDs for installation in Mac laptops or desktops".

It is not true that since the Samsung/Apple court case that Apple never used Samsung products. You and I have a Samsung Polaris controller and Samsung NAND as standard on the 128GB NVME in our 2019 iMacs.

Earlier in Macrumors, ‘Hifitoaster’ supplied a Tonymac86 article which analysed the TRIM issue, and found the source of incompatibility in the Apple o/s software/Samsung controller coding. That suggests future iterations of both may have overcome the incompatibility in the normal course of upgrading.

With welcome input from other contributors, I am testing the PCIE 4 Samsung 980 Pro as boot drive with Ventura 13.5 to establish the facts. So far - so good.

Good Luck with the upgrade.
 
Did you take out the original SATA drive physically? (I have a fusion drive so has a mechanical SATA drive)
Thanks for your contribution Ken.
Perhaps you would like to use the Command line code provided by iMac 2019 above to keep track of TRIM performance and keep us posted in 3 or 6 months time.

log show --predicate "processID == 0" | grep spaceman | grep -i trim

Regarding Tool kit; Being value conscious I purchased this kit; https://www.aliexpress.com/w/wholes...xt=54+bit+driver+kit&spm=a2g0o.home.1000002.0 and a Torx 25 long reach with no hole: The Torx tool kit does not contain a needed Torx 25 so buy this:

Good quality excellent value.
Tweezers with a bent tip are very useful for removing and fitting tiny plugs etc.

Refer to my earlier comments re static electricity and good practice.
 
Last edited:
Did you take out the original SATA drive physically? (I have a fusion drive so has a mechanical SATA drive)
Thanks for your contribution Ken.
Perhaps you would like to use the Command line code provided by iMac 2019 above to keep track of TRIM performance and keep us posted in 3 or 6 months time.

log show --predicate "processID == 0" | grep spaceman | grep -i trim

Regarding Tool kit; Being value conscious I purchased this kit; https://www.aliexpress.com/w/wholes...xt=54+bit+driver+kit&spm=a2g0o.home.1000002.0 and a Torx 25 long reach with no hole:

Good quality excellent value.
Did you take out the original SATA drive physically? (I have a fusion drive so has a mechanical SATA drive)
Yes. I creted a boot disk and I also had on hand a clone of my entire drive on external SSD. Of course there was also Time Machine backup so I had plenty of recovery/formatting options. In fact the Mac immediately recognised the Samsung and it was easily formatted via Recovery and disk utility. No EFI issues.

Very important you wear surgical gloves as the removal of the Power board is necessary to access removal of logic board. See the MacFixit or OWC video’s.

Two plugs must be removed which connect power board to Motherboard. They are tricky. Each one has a clip beneath, out of sight, which has a barb at one end to hold the plug. The other end is free and it pivots like a see-saw. Squeeze the free end and simultaneously work the plug loose. Not easy. Due to the tight fit of the main set of power cables I found it best to ease out the entire power board from beneath the ‘chin’ of the iMac body. This means easing the 4 pin cable out from beneath the ‘chin’ just enough to manipulate the board. Turn the power board vertical to access the 4pin cable near the ‘chin’. As the cable will be under tension I found a fine flat edge to lift the hook (barb), free and the plug slipped out easily. The big power plug took more work but now, with room to move, can be done more safely.

On the video’s, a technician gets his fingers underneath the power board and removes the power plug squeezing thumb and fingers, without pulling the whole board out. He must have strong fingers and practiced technique. I cannot do that.

Given these considerations you can understand why I emphasise the value of using surgical gloves to insulate inadvertant contact with the power board. Wrestling with a tight plug is a formulae for accidental damage.

With that behind removing the logic board is straight forward and the NVME is on the back. I work on a towel. this reduces chance of damage to circuit boards and if scews are dropped they are more easily found and recovered.

Please reads my earlier comments about screen removal.
Best Wishes
 
Last edited:
I'm currently using MacsFanControl and iStats Menu. However, in any case I would like to have the sensor. Is it mandatory for the latest 2017 iMacs? For the SSD part, think that I'm going for the Samsung Evo because it offers more lifetime.
I think the sensor is needed for the older imacs.
 
Hi guys just Upgraded Imac 21,5 2015
Thks for this wonderful forum
Greetings from Sardinia
Device late 2015 - 16.2 (I5- 2,6 GHz - Fusion HDD 1TB+Blade 24 GB)
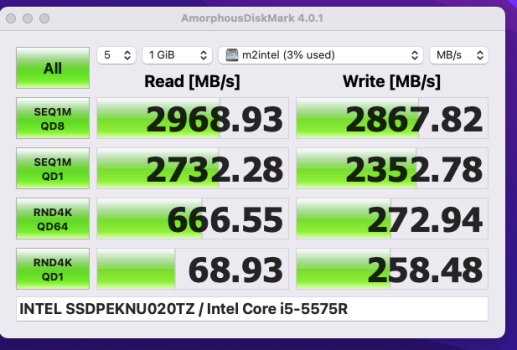
Blade upgrade: 24GB Blade -> 2TB Intel 670P NVME SSD (8 GT/s x4 confirmed)
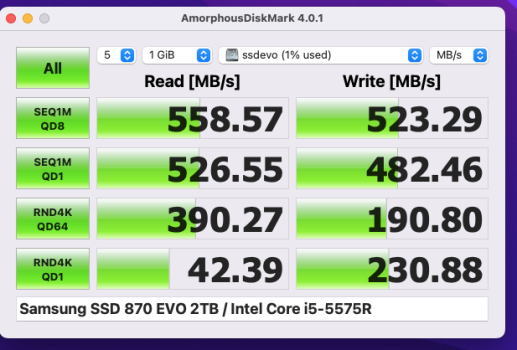
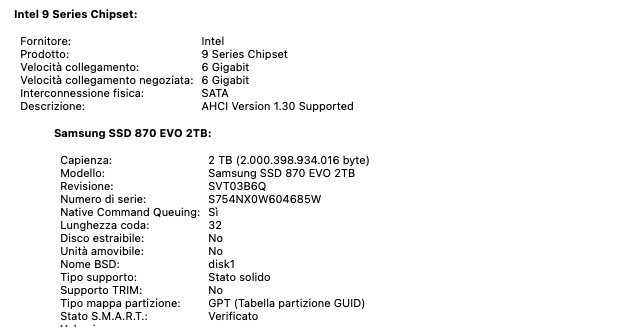
HDD upgrade: 1TB SATA HDD -> 2TB Samsung 870 EVO SSD SATA III (6 Gigabit confirmed)
Speed test: blade Intel 670P 2867 MB/s write, 2968 MB/s read, SATA SSD 870 EVO 523 MB/s write, 558 MB/s read
OS: Monterey 12.6.8
Adapter: Sintech
Issue after fresh OS install: nothing
Now my Imac is incredible fast!!!
all done for 250 €
 

Attachments

  • Schermata 2023-08-14 alle 20.14.11.png
    Schermata 2023-08-14 alle 20.14.11.png
    26.3 KB · Views: 139
  • Schermata 2023-08-14 alle 20.08.13.png
    Schermata 2023-08-14 alle 20.08.13.png
    100.3 KB · Views: 136
  • Schermata 2023-08-14 alle 20.12.16.png
    Schermata 2023-08-14 alle 20.12.16.png
    99.6 KB · Views: 133
  • Schermata 2023-08-14 alle 20.13.00.png
    Schermata 2023-08-14 alle 20.13.00.png
    65.7 KB · Views: 134
  • Schermata 2023-08-14 alle 20.14.55.png
    Schermata 2023-08-14 alle 20.14.55.png
    44.6 KB · Views: 133
Last edited:
Hi, do I take a risk of issue to buy a Samsung 980 pro for my imac 2017?
It is a great NVME and has what Samsung describe as ‘Automatic Trim function’, but that only seems designed to work for Windows users. Samsung AU offer no help.

I have been running a 2TB Samsung 980 Pro PCIE 4.0 on a 2019 iMac for two weeks with Ventura 13.5 and find it works well with Ventura o/s Trim OFF - except there is a hesitation in the loading bar which suggests there is an incompatibility with part of the initialisation Process. My concern is that with Trim off in o/s and if no support for Trim from the NVME Elpis controller under Ventura, that is a formula for later NVME problems. Samsung AU will not offer any help regarding implementation of Trim with this product. With Trim ON under Ventura, the drive slows significantly. If used as a boot drive in my UGREEN external enclosure, it slows about 40%. I believe the enclosure chip is part of the problem.

The difference between year of iMac model is less important than the o/s you are running. Once you get to Monterey or Ventura you hit issues. Black Magic gives me Samsung 980 Pro write speeds of 2995 Mbps and read of 3050 Mbps. As for Big Sur? Possibly a better result for the Samsung. Trim issue is another story for another day.

A WD Black SN 770 PCIE 4.0 is a better choice. It lacks AES security, it is DRAM-less and will loose speed significantly in sustained copying after 1.5 mins or so. But it is cheaper, Mac compatible, fast and apparently fault free on Mac.
I have switched to the WD Black SN770 and it seems smoother. Write; 2875Mbps; Read; 2935Mbps.

Good Luck
 
Last edited:
Register on MacRumors! This sidebar will go away, and you'll see fewer ads.