Become a MacRumors Supporter for $50/year with no ads, ability to filter front page stories, and private forums.
Status
Not open for further replies.
Have you tried to download Combo update and install from OS?

https://support.apple.com/kb/DL1944?locale=en_US

Yes, that does not work either

I have even tried running the full 10.13.2 installer (6GB) from another drive, but still the same result.

Now I am cloning the whole thing to a harddrive formatted in APFS and then I will install the update on the harddrive, and lastly clone back the whole thing

Hope that’s not how it will look like for every update! :(
 
A little update on this.
The only thing which worked, was the following procedure:

• clone the whole drive to another APFS drive
• remove the SSD used for the redirect (NvmeBoot)
• boot on the other drive
• update macOS to 10.13.2
• clone the whole system back to the NVME drive
• re-do the whole process for the redirect
• remove the other drive, and bless NvmeBoot

I am thinking I will keep a 1TB SSD on a USB3 connection (so that it cannot boot or confuse the boot loader) and have CCC clone the system to it periodically, so it's ready if an update comes along.
 
  • Like
Reactions: owbp
Hi.

Thank you for you post! It's awesome!
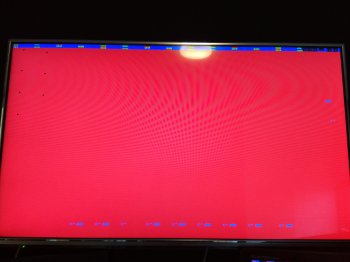
I got it booting except, when it enters the OS, the monitor output turns all red. Everything works, I can type in my password and it boots all the way, but I can't see anything but this. Luckily I can reboot with ctrl+cmd+eject and enter a working OS. Does anyone have any idea why this is happening and how to fix it? I have followed the guide by copy pasting everything to make sure I didn't screw anything up.

Thank you!
 

Attachments

  • IMG_20180108_092734.jpg
    IMG_20180108_092734.jpg
    1.3 MB · Views: 333
Works for me, just a little black screen (few seconds) with white text before grey boot screen

Thank you
 
A little update.

Fixed a workaround to update to a new OS, although it’s only possible because of other hardware we have laying around:

I took the Samsung 960 Pro from the Mac Pro and simply booted from it on my MacBook Pro 2017, while using a TB3 enclosure :)

Updated to 10.13.3, and then I put it back.

I wonder.. if you got a TB3 to TB2 adapter, and a TB to FW800 adapter, and booted the Mac Pro into Target Disk Mode, could you boot the MBP ‘17 from that? That way, you could update the OS quicker, without having to open up anything.
 
Hi!

I read about the NVMe cards that aren't bootable because the EFI rom (off course) doesn't list them at the boot manager. The first thing i learned when fiddling around with a hackintosh (back in '05 with deadmoo image) was the "rd=" option. So since i already successfully booted OSX from an USB3.0 stick on a cMP3,1 (where booting from USB3.0 isn't supported), here's how it should also work with a Samsung 950 Pro NVMe.

Note: I haven't got an 950Pro to test this, but it should work just like doing this with a USB-Stick on an cMP with USB3.0 cards. The NVMe driver must already be installed and kernelcache rebuilded!
Note2: I did this long ago on a MountainLion system, so the procedure might vary, e.g. files are laying somewhere else on the source disk etc.

1. Partition your 950Pro and clone an already installed system to your 950Pro, e.g. your running system.

2. Use a spare SSD (USB stick would also work) and partition it as:
Partition Map Scheme: GUID Partition Table
Format: Mac OS Extended (Journaled)
Partition Name: NVMeBoot

3. Now do the following on the Terminal to make the SSD/USBStick bootable:
mkdir -p /Volumes/NVMeBoot/System/Library/CoreServices/
mkdir -p /Volumes/NVMeBoot/Library/Preferences/SystemConfiguration/
mkdir -p /Volumes/NVMeBoot/System/Library/Caches/com.apple.kext.caches/Startup/

cp /System/Library/CoreServices/SystemVersion.plist /Volumes/NVMeBoot/System/Library/CoreServices/
cp /System/Library/CoreServices/boot.efi /Volumes/NVMeBoot/System/Library/CoreServices/
cp /Library/Preferences/SystemConfiguration/com.apple.Boot.plist /Volumes/NVMeBoot/Library/Preferences/SystemConfiguration/
cp /System/Library/Caches/com.apple.kext.caches/Startup/kernelcache /Volumes/NVMeBoot/System/Library/Caches/com.apple.kext.caches/Startup/

sudo bless --folder /Volumes/NVMeBoot/ -label NVMeBoot

4. Change /Volumes/NVMeBoot/Library/Preferences/SystemConfiguration/com.apple.Boot.plist so it reads

<?xml version="1.0" encoding="UTF-8"?>
<!DOCTYPE plist PUBLIC "-//Apple//DTD PLIST 1.0//EN" "http://www.apple.com/DTDs/PropertyList-1.0.dtd">
<plist version="1.0">
<dict>
<key>Kernel Cache</key>
<string>/System/Library/Caches/com.apple.kext.caches/Startup/kernelcache</string>
<key>Kernel Flags</key>
<string>boot-uuid=69D67D3F-908E-39B1-B284-BB796536406D rd=*uuid -v</string>
</dict>
</plist>

Note: Change the UUID (in my case 69D67D3F-908E-39B1-B284-BB796536406D) to match the UUID from your 950Pro's root partition! Open "Disk Utility.app", click the 9050Pro's partition to where you cloned your OSX onto and press CMD+i. Now copy the number where it says "Universal Unique Identifier:" and paste it to com.apple.Boot.plist "boot-uuid=" line.

That should be it, reboot and check it out. Would be nice if someone could test this.

It is not a booting from NVMe, as it uses USB UHCI data transfer protocol. I have a successful boot from NVMe SSD from PCIe using crafted NVMExpress EFI Driver. Installed macOS High Sierra 10.13.3. Everything was done on Mac Pro 2008 (MacPro3,1).

8f5e02e700e9.jpg
 
Probably should change name of thread and make it a sticky. Something like Boot macOS from NVMe SSD on cMP using USB2 thumbdrive bootstrap.
 
Last edited:
That should be it, reboot and check it out. Would be nice if someone could test this.

Wow - you are the man. I really like this since I don't have to mess with a different boot manager to load the driver.

I still have concerns that the OS updates will not go well, but we will burn that bridge when we get there...

Just to clarify for anyone wondering, this can be done on literally any disk. I just created a tiny partition on one of the 3.5" drives and dropped everything there.

I also ran a slightly different command to bless the drive. I used MOUNT instead of folder and set it as the startup disk:

sudo bless --mount "/Volumes/NVMeBoot/" --setboot

Great tip. Deserves a sticky for all cMP users.
 
  • Like
Reactions: Minimum91
Hello, is it possible to use this method booting from pci-e on cmp? cmp doesn't have nvme driver in its firmware; nvme won't be recognized until login to high Sierra.


Hi!

I read about the NVMe cards that aren't bootable because the EFI rom (off course) doesn't list them at the boot manager. The first thing i learned when fiddling around with a hackintosh (back in '05 with deadmoo image) was the "rd=" option. So since i already successfully booted OSX from an USB3.0 stick on a cMP3,1 (where booting from USB3.0 isn't supported), here's how it should also work with a Samsung 950 Pro NVMe.

Note: I haven't got an 950Pro to test this, but it should work just like doing this with a USB-Stick on an cMP with USB3.0 cards. The NVMe driver must already be installed and kernelcache rebuilded!
Note2: I did this long ago on a MountainLion system, so the procedure might vary, e.g. files are laying somewhere else on the source disk etc.

1. Partition your 950Pro and clone an already installed system to your 950Pro, e.g. your running system.

2. Use a spare SSD (USB stick would also work) and partition it as:
Partition Map Scheme: GUID Partition Table
Format: Mac OS Extended (Journaled)
Partition Name: NVMeBoot

3. Now do the following on the Terminal to make the SSD/USBStick bootable:
mkdir -p /Volumes/NVMeBoot/System/Library/CoreServices/
mkdir -p /Volumes/NVMeBoot/Library/Preferences/SystemConfiguration/
mkdir -p /Volumes/NVMeBoot/System/Library/Caches/com.apple.kext.caches/Startup/

cp /System/Library/CoreServices/SystemVersion.plist /Volumes/NVMeBoot/System/Library/CoreServices/
cp /System/Library/CoreServices/boot.efi /Volumes/NVMeBoot/System/Library/CoreServices/
cp /Library/Preferences/SystemConfiguration/com.apple.Boot.plist /Volumes/NVMeBoot/Library/Preferences/SystemConfiguration/
cp /System/Library/Caches/com.apple.kext.caches/Startup/kernelcache /Volumes/NVMeBoot/System/Library/Caches/com.apple.kext.caches/Startup/

sudo bless --folder /Volumes/NVMeBoot/ -label NVMeBoot

4. Change /Volumes/NVMeBoot/Library/Preferences/SystemConfiguration/com.apple.Boot.plist so it reads

<?xml version="1.0" encoding="UTF-8"?>
<!DOCTYPE plist PUBLIC "-//Apple//DTD PLIST 1.0//EN" "http://www.apple.com/DTDs/PropertyList-1.0.dtd">
<plist version="1.0">
<dict>
<key>Kernel Cache</key>
<string>/System/Library/Caches/com.apple.kext.caches/Startup/kernelcache</string>
<key>Kernel Flags</key>
<string>boot-uuid=69D67D3F-908E-39B1-B284-BB796536406D rd=*uuid -v</string>
</dict>
</plist>

Note: Change the UUID (in my case 69D67D3F-908E-39B1-B284-BB796536406D) to match the UUID from your 950Pro's root partition! Open "Disk Utility.app", click the 9050Pro's partition to where you cloned your OSX onto and press CMD+i. Now copy the number where it says "Universal Unique Identifier:" and paste it to com.apple.Boot.plist "boot-uuid=" line.

That should be it, reboot and check it out. Would be nice if someone could test this.
 
Hello, is it possible to use this method booting from pci-e on cmp? cmp doesn't have nvme driver in its firmware; nvme won't be recognized until login to high Sierra.

LOL - holy crap, are you people reading a different first post than I am? It is literally telling you that this is what it’s for and how to do it.

If you can’t understand that, then maybe you shouldn’t mess with how your system boots. This is going to make it difficult to install updates and it may leave you with boot difficulties you have to think through. If you already have questions, just buy a Samsung sm951 and call it a day.
 
  • Like
Reactions: h9826790
LOL - holy crap, are you people reading a different first post than I am? It is literally telling you that this is what it’s for and how to do it.

If you can’t understand that, then maybe you shouldn’t mess with how your system boots. This is going to make it difficult to install updates and it may leave you with boot difficulties you have to think through. If you already have questions, just buy a Samsung sm951 and call it a day.

More precise, SM951 AHCI.
 
  • Like
Reactions: Fry-man22
Not exactly the same, but close...

You can create a Fusion drive with non-bootable devices and it will be bootable. For example, on a cMP and High Sierra, an NVMe PCIe SSD and a RAID 0 of spinning disks. You can create a Fusion drive with the SSD and RAID and it is bootable.
 
  • Like
Reactions: MisterAndrew
I know the cMP 5,1 doesn't support booting an NVMe SSD, but what about a genuine Apple SSPOLARIS NVMe SSD? Does that not work either?
Nope. Firmware lacks NVMe code. High Sierra has the ability to access NVMe, but booting requires Firmware implementation.
 
Nope. Firmware lacks NVMe code. High Sierra has the ability to access NVMe, but booting requires Firmware implementation.

Okay thanks. Has anyone verified that with the newest firmware yet? I didn't see anyone mention that in the new firmware thread. But I guess it's unlikely that Apple would enable NVMe support for a machine that never came with a blade SSD and therefore lacks a connector for those cards.
 
Hi!

I read about the NVMe cards that aren't bootable because the EFI rom (off course) doesn't list them at the boot manager. The first thing i learned when fiddling around with a hackintosh (back in '05 with deadmoo image) was the "rd=" option. So since i already successfully booted OSX from an USB3.0 stick on a cMP3,1 (where booting from USB3.0 isn't supported), here's how it should also work with a Samsung 950 Pro NVMe.

Note: I haven't got an 950Pro to test this, but it should work just like doing this with a USB-Stick on an cMP with USB3.0 cards. The NVMe driver must already be installed and kernelcache rebuilded!
Note2: I did this long ago on a MountainLion system, so the procedure might vary, e.g. files are laying somewhere else on the source disk etc.

1. Partition your 950Pro and clone an already installed system to your 950Pro, e.g. your running system.

2. Use a spare SSD (USB stick would also work) and partition it as:
Partition Map Scheme: GUID Partition Table
Format: Mac OS Extended (Journaled)
Partition Name: NVMeBoot

3. Now do the following on the Terminal to make the SSD/USBStick bootable:
mkdir -p /Volumes/NVMeBoot/System/Library/CoreServices/
mkdir -p /Volumes/NVMeBoot/Library/Preferences/SystemConfiguration/
mkdir -p /Volumes/NVMeBoot/System/Library/Caches/com.apple.kext.caches/Startup/

cp /System/Library/CoreServices/SystemVersion.plist /Volumes/NVMeBoot/System/Library/CoreServices/
cp /System/Library/CoreServices/boot.efi /Volumes/NVMeBoot/System/Library/CoreServices/
cp /Library/Preferences/SystemConfiguration/com.apple.Boot.plist /Volumes/NVMeBoot/Library/Preferences/SystemConfiguration/
cp /System/Library/Caches/com.apple.kext.caches/Startup/kernelcache /Volumes/NVMeBoot/System/Library/Caches/com.apple.kext.caches/Startup/

sudo bless --folder /Volumes/NVMeBoot/ -label NVMeBoot

4. Change /Volumes/NVMeBoot/Library/Preferences/SystemConfiguration/com.apple.Boot.plist so it reads

<?xml version="1.0" encoding="UTF-8"?>
<!DOCTYPE plist PUBLIC "-//Apple//DTD PLIST 1.0//EN" "http://www.apple.com/DTDs/PropertyList-1.0.dtd">
<plist version="1.0">
<dict>
<key>Kernel Cache</key>
<string>/System/Library/Caches/com.apple.kext.caches/Startup/kernelcache</string>
<key>Kernel Flags</key>
<string>boot-uuid=69D67D3F-908E-39B1-B284-BB796536406D rd=*uuid -v</string>
</dict>
</plist>

Note: Change the UUID (in my case 69D67D3F-908E-39B1-B284-BB796536406D) to match the UUID from your 950Pro's root partition! Open "Disk Utility.app", click the 9050Pro's partition to where you cloned your OSX onto and press CMD+i. Now copy the number where it says "Universal Unique Identifier:" and paste it to com.apple.Boot.plist "boot-uuid=" line.

That should be it, reboot and check it out. Would be nice if someone could test this.
You’ve just described the USB redirect method. It does work, but is pretty involved and requires maintenance after OS updates (I think).
 
The best method I have used and it works best is to create a Fusion Drive with a SATA SSD, and a NVMe SSD. It requires no maintenance and the OS can be upgraded without problems.
That is the method I mentioned. What I see, though, is a belief that you have to use AHCI blades and have no other options. I think the fusion drive method, with some complexity with terminal commands, is very much doable.
 
  • Like
Reactions: h9826790
The best method I have used and it works best is to create a Fusion Drive with a SATA SSD, and a NVMe SSD. It requires no maintenance and the OS can be upgraded without problems.

That’s pretty clever. Any concerns that OS and other ‘hot’ files are cached on the SATA drive, which would most likely be slower than NVMe?

What are the performance characteristics of this kind of set up?
 
That’s pretty clever. Any concerns that OS and other ‘hot’ files are cached on the SATA drive, which would most likely be slower than NVMe?

What are the performance characteristics of this kind of set up?

It's been tested, the OS know which SSD is faster and will use the faster drive correctly.

In fact, if you pair a 2TB NVMe to a 120GB SATA SSD. I think we can pretty much ignore the effect of the SATA SSD.
 
Status
Not open for further replies.
Register on MacRumors! This sidebar will go away, and you'll see fewer ads.