Become a MacRumors Supporter for $50/year with no ads, ability to filter front page stories, and private forums.
Does keyboard/mouse work? If so, you can at single user prompt:
- Mount toot read/write
- launchctl load /System/Library/LaunchDaemons/com.apple.opendirectoryd.plist
- passwd root
- set a password
- touch /var/db/.AppleSetupDone

This enables the root user and skips most of the setup screens. See how you go!
After doing that, I can key-in user (root), and password, and it's accepted.
But stop with infinity circle running.:)
15db2-03.jpg


I think, it really should be Writable=No issue, we need Writable=Yes to write user data.:)
 
  • Like
Reactions: jackluke
After trying so many times, I give up to clean install Catalina to MBR HFS+ for now.

By using @toru173's ditto method,
Finally, I got MBR HFS+ Catalina works perfectly now.:):)

(Hackintosh with Clover, BooterConfig=0x28, CsrActiveConfig=0x67)
This is what I do.

1. Use createinstallmedia to make an USB Catalina Installer.

2. Boot to USB Catalina Installer, and clean install Catalina to a blank APFS partition, and get "GPT1015", "GPT1015 - Data", two APFS partitions.

3. Boot to USB Catalina Installer, open Utilities -> Terminal, use ditto to copy files to MBR HFS+ partition "macOS1015":

DB1
ditto /Volumes/GPT1015/ /Volumes/macOS1015/
ditto /Volumes/GPT1015/System/Library/Templates/Data/Device/ /Volumes/macOS1015/
DB2
ditto /Volumes/GPT1015/ /Volumes/macOS1015/
ditto /Volumes/GPT1015/System/Library/Templates/Data/ /Volumes/macOS1015/

4. Boot to "macOS1015" MBR HFS+ partition on single user mode:

/sbin/mount -uw /
update_dyld_shared_cache -force
kextcache -i /
reboot

5. Reboot to "macOS1015" MBR HFS+ partition, and setup a user and login, finish the installation.
(Got Writable=Yes. I don't know why?)

Then, after login to "macOS1015" MBR HFS+ partition, everything works perfectly without slow speed on SSD.
It's the only solution for me till now.:):)
MBRHFS+1015.jpg
 
Last edited:
After trying so many times, I give up to clean install Catalina to MBR HFS+ for now.

By using @toru173's ditto method,
Finally, I got MBR HFS+ Catalina works perfectly now.:):)

(Hackintosh with Clover, BooterConfig=0x28 , CsrActiveConfig=0x3E7)
This is what I do.

1. Clean Install Catalina B2 to blank APFS partition, and get "GPT1015", "GPT1015 - Data", two APFS partitions.

2. Login to APFS Catalina "GPT1015", and setup an user, finish the installation.

3. Use ditto to MBR HFS+ partition "macOS1015" on Mojave.
sudo ditto /Volumes/GPT1015/ /Volumes/macOS1015/
sudo ditto /Volumes/GPT1015\ -\ Data/ /Volumes/macOS1015/

4. Boot to MBR HFS+ "macOS1015" on single user mode:
/sbin/mount -uw /
update_dyld_shared_cache -force
kextcache -system-prelinked-kernel
reboot

5. Reboot to MBR HFS+ "macOS1015". Got [Writable=Yes]. (Don't know why?)

Then, login to MBR HFS+ Catalina "macOS1015", everything works perfectly without slow speed on SSD.
It's the only solution for me now.:):)
View attachment 844030

Great work!

I also was almost close here are my previous attempts, the only part I don't tried was "ditto" directly over a Mojave installation.

I guess you used a Mojave HFS+ installation as targeting for your Catalina APFS "ditto".

That should give a valid HFS+ structure and root:wheel permissions with symlinks to the Users folder.

I really don't know that if HFS+ Mojave will affect the structure permissions of ditto or not.
 
Last edited:
I guess a Mojave HFS+ helped to keep a more valid HFS+ symlink/POSIX structure, since during APFS "ditto" the Mojave Users folder is untouched and merged with the APFS Data and so also APFS System are merged and upgraded, just my supposition.
I just do that again,
Boot to USB Catalina DB2 Installer, open Terminal, ditto works fine too.:)
 
Well, looks like no more HFS+ boot volumes for 10.15 and "beyond" (according to Mike Bombich).

I will continue to keep all my data (with the exception of email and a very few other things) on HFS+ volumes that exist on partitions (and drives) "outside of" the APFS "data volumes".

Assuming that we'll still be able to at least do that...

So far I've seen no change in how it treats external volumes. Time machine (for now) still requires an HFS volume. I think until that changes they'll avoid changes to the handling of none System/App volumes. It just wouldn't make sense until that happens but the new attributes and functionality in apfs does make me think that might be available sooner than later.

I don't like that there's no options on installing to hfs because I have several projects still locked to it, so I have to maintain a separate Sierra install right now to access two applications that are abandoned now and will take time to port to the apfs structures. It's the one scenario where I think a legacy mode would have been a good idea like the transition to osx from os9.
 
  • Like
Reactions: TimothyR734
After trying so many times, I give up to clean install Catalina to MBR HFS+ for now.

By using @toru173's ditto method,
Finally, I got MBR HFS+ Catalina works perfectly now.:):)

(Hackintosh with Clover, BooterConfig=0x28, CsrActiveConfig=0x3E7)
This is what I do.

1. Use createinstallmedia to make an USB Catalina DB2 Installer.

2. Boot to USB Catalina DB2 Installer, and clean install Catalina to a blank APFS partition, and get "GPT1015", "GPT1015 - Data", two APFS partitions.

3. Boot to USB Catalina DB2 Installer, open Terminal, use ditto to copy to MBR HFS+ partition "macOS1015":

ditto /Volumes/GPT1015/ /Volumes/macOS1015/
ditto /Volumes/GPT1015\ -\ Data/ /Volumes/macOS1015/

4. Boot to "macOS1015" MBR HFS+ partition on single user mode:

/sbin/mount -uw /
update_dyld_shared_cache -force
kextcache -system-prelinked-kernel
reboot

5. Reboot to "macOS1015" MBR HFS+ partition, and setup an user and login, finish the installation. Got [Writable=Yes]. (I don't know why?)

Then, after login to "macOS1015" MBR HFS+ partition, everything works perfectly without slow speed on SSD.
It's the only solution for me till now.:):)
View attachment 844030
Good work! I’m glad my method was successful for you. I also had success installing to a disk image on the target volume, then dittoing out to /. This way you don’t have to partition, and you can delete the disk image at the end of the process. Don’t forget to touch /macOS\ Install\ Data at the root of the disk image, otherwise the installer fails with error 28.
 
Good work! I’m glad my method was successful for you. I also had success installing to a disk image on the target volume, then dittoing out to /. This way you don’t have to partition, and you can delete the disk image at the end of the process. Don’t forget to touch /macOS\ Install\ Data at the root of the disk image, otherwise the installer fails with error 28.

Now I know Catalina can work on MBR HFS+.
When I figure out why it can't get /System/Library/CoreServices/Setup Assistant.app start,
it will success to clean install to MBR HFS+ directly soon or later, by using this HFS+ installer maker method based on 10.12 OSInstaller without "ditto".
 
Last edited:
It's done.
Just figure out why it can't get /System/Library/CoreServices/Setup Assistant.app start?
Only need to remove a stupid folder "/private/var/db" before ditto the Templates Data to root /.
The permissions of "/private/var/db" reject Setup Assistant.app, that's what's happened before.

Now, I can use this 10.12 OSInstaller HFS+ installer maker method to install to MBR HFS+ directly, and need some postinstall steps only.:)

And @jackluke you are right, it seems HFS+ is always Writable=Yes.

Well done! I'm excited to try it! If I understand correctly, I can now:
- Use a 10.12 or 10.13 installer to install InstallInfo.plist (or run the installer), writing Catalina to disk
- Delete /private/var/db from the installed target
- Ditto /System/Library/Templates/Data to /
- Reboot, and enjoy!

Just looking at an install, it seems that the installer writes receipts to /private/var/db using the permissions of the current user. This would be why the folder path never worked for me!

Edit: You get around the problem of verifying the dmg chunklist by replacing the chunklist validation code library? Great idea. I was stuck forever on how to generate a valid chunklist, your solution is much better. However, I think Apple firmware still checks for a valid chunklist on recovery boot so this solution may not work for supported Macs.
 
Last edited:
I just tried to rm -rf /private/* before ditto on DP1 installing from 10.13, same behaviour. I'm going to try with DP2 to see if it's any different. If it doesn't work I'll manually build an installer, because I got most of the way through boot last time I tried that.
 
I just tried to rm -rf /private/* before ditto on DP1 installing from 10.13, same behaviour. I'm going to try with DP2 to see if it's any different. If it doesn't work I'll manually build an installer, because I got most of the way through boot last time I tried that.
I just move /private/var to be /private/var-installer.

DB1 is Ditto /System/Library/Templates/Data/Device/ to /
DB2 is Ditto /System/Library/Templates/Data/ to /

And you may need this after installation and ditto.

4. Boot to "Target" HFS+ partition on single user mode:

/sbin/mount -uw /
update_dyld_shared_cache -force
kextcache -i /
reboot

It works here with both DB1, DB2.
 
Last edited:
I feel so silly. I’d forgotten what I learned when working with Mojave RAID: installing to a volume requires that permissions are enabled. Trying again...

Edit: *sobs* It was permissions all along! It seems the installer enables permissions DURING the install process (which is when I always checked it), and disables again after. So when I tried to copy with ditto everything was written with the wrong permission. The one time it worked I bet I’d deselected ‘ignore permissions on this volume’

Oh well. This now means I have a workable solution! I’m thinking the next step is to leverage a script at /etc/rc.cdrom or rc.installer_cleanup to automatically ditto and optionally rebuild caches after the install.
 
Last edited:
It looks like some apps can't work on HFS+, only work on APFS, like as iCloud drive.

But it doesn't matter to me, I don't use it on my hackintoch.;)

----------------------------------------------------------------------
List of known issues:
1. iCloud Drive need APFS to work.
2. Some apps can't install to HFS+, but install to APFS fine.
----------------------------------------------------------------------

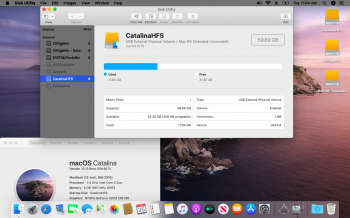
Have you tried to copy/move the /Volumes/CatalinaHFS/System/Applications/ in /Volumes/CatalinaHFS/Applications/ ?

In order to give a more valid HFS+ OSX Catalina structure.
 
  • Like
Reactions: TimothyR734
I've tried your method: Catalina on HFS+

but got many Catalina frameworks rejected with single user mode messages: "update_dyld_shared_cache: warning: x86_64 rejected from cached dylibs"
 
  • Like
Reactions: TimothyR734
Have you tried to copy/move the /Volumes/CatalinaHFS/System/Applications/ in /Volumes/CatalinaHFS/Applications/ ?

In order to give a more valid HFS+ OSX Catalina structure.

Not yet.
I can use app directly, but some app pkg installer will get error during pkg installation.
I didn't know the root cause.

I've tried your method: Catalina on HFS+

but got many Catalina frameworks rejected with single user mode messages: "update_dyld_shared_cache: warning: x86_64 rejected from cached dylibs"
I saw that too. I don't know if it affects or not.
Maybe we need some other method. I didn't try..not to "update_dyld_shared_cache -force"
 
Not yet.
I can use app directly, but some app pkg installer will get error during pkg installation.
I didn't know the root cause.


I saw that too. I don't know if it affects or not.
Maybe we need some other method. I didn't try..not to "update_dyld_shared_cache -force"

I've tried the Catalina HFS+ "ditto" without using "update_dyld_shared_cache -force"
but from single user mode I needed to fix some ownerships, so even if it is not a best practice I wrote:
mount -uw /
chown -R root:wheel /
chmod -R 755 /S*/L*/E*/
kextcache -i /


now only messages I encounter during verbose booting are:
EXC_RESOURCE some (few) pid processes (non-fatal)
and some crashes on "PerfPowerService"

but it seems to work and reach the GUI mode.

And agreed, the previous reason for non HFS+ booting was addressed mainly to this path /private/var/ mismatched owner/group permissions.
 
Last edited:
After some 10-15 minutes to create a new user from Terminal single user mode and a resetpassword from a HighSierra Recovery Terminal, I confirm that Catalina HFS+ is working!

However I noticed even if avoid the ".AppleSetupDone", there is a "stage2" applesetupassistant for the new user created for setting up the Mac, and you have to complete it, otherwise you can't access the Finder and Dock.

And I haven't used the "update_dyld_shared_cache -force".

Thanks to @toru173 and @crazybirdy for their useful tips.
 

Attachments

  • Screen Shot 2019-06-25 at 11.04.52 AM.png
    Screen Shot 2019-06-25 at 11.04.52 AM.png
    910.1 KB · Views: 307
After some 10-15 minutes to create a new user from Terminal single user mode and a resetpassword from a HighSierra Recovery Terminal, I confirm that Catalina HFS+ is working!

However I noticed even if avoid the ".AppleSetupDone", there is a "stage2" applesetupassistant for the new user created for setting up the Mac, and you have to complete it, otherwise you can't access the Finder and Dock.

And I haven't used the "update_dyld_shared_cache -force".

Thanks to @toru173 and @crazybirdy for their useful tips.
That's good news.
 
That's good news.

I guess this: update_dyld_shared_cache -force
is not needed, also to avoid the many rejected frameworks.

You're right on these:

- there is no need to move /CatalinaHFS/System/Applications/ to /CatalinaHFS/Applications/ since they are already symlinked in that mount point by Catalina and the Apps are working from there

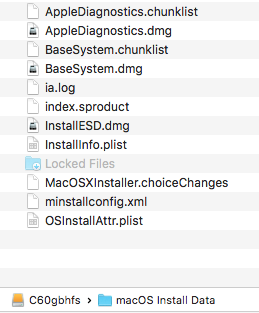
- an HFS+ Catalina Installation is only possible skipping the stage1 Installer (the "macOS Install Data" temporary volume from createinstallmedia), but using only the stage2 Installer that (if patched) won't convert the Volume in APFS

After the stage1 Installer , I've tried also to edit the OSInstallAttr.plist setting:
<key>Do APFS Convert</key>
<false/>

But hasn't worked and during stage2 Installer the HFS+ volume has been converted to APFS.

So your MBR-HFS+ Catalina Installer is a good solution also for real Mac and will keep the GUID partition scheme untouched, great work!
 

Attachments

  • Catalina stage1 Installer.png
    Catalina stage1 Installer.png
    40.7 KB · Views: 316
Last edited:
The same process works to install to an HFS formatted RAID; however, once installed you need to rebuild the booting partitions using kextcache -fu /Volumes/Macintosh\ RAID. This only seemed to work correctly when running kextcache from the installer

you can simply ignore the cache, renaming as follows, in single-user:

/sbin/mount -uw /
mv /usr/standalone/bootcaches.plist /usr/standalone/bootcaches.bak

reboot
 
  • Like
Reactions: TimothyR734
you can simply ignore the cache, renaming as follows, in single-user:

/sbin/mount -uw /
mv /usr/standalone/bootcaches.plist /usr/standalone/bootcaches.bak

reboot
I used kextcache in this instance to build the helper partitions, but after that it can be ignored
[doublepost=1561979468][/doublepost]I was building a stage1+stage2 installer, but ran across some difficulties. I’ll be looking into it when I get a chance!
 
Register on MacRumors! This sidebar will go away, and you'll see fewer ads.