Become a MacRumors Supporter for $50/year with no ads, ability to filter front page stories, and private forums.
Status
The first post of this thread is a WikiPost and can be edited by anyone with the appropiate permissions. Your edits will be public.
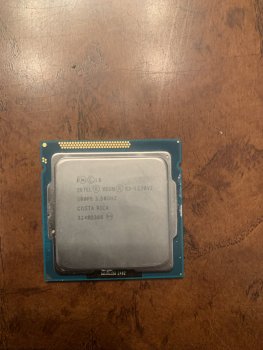
Hello, is it possible to install i3 3770 or Xeon e3 v2 series (Intel Xeon E3-1240 v2 )?
I mean will it work?
 
bonjour,

Just as a reminder and I intended to do it soon (but lack of money for the moment ...) These are Ivy Bridge processors, perfectly compatible in terms of hardware, but it is still not proven that a modified rom allows to start on these processors, for my part I think that it is necessary to erase the integrality of the Microcodes Sandy Bridge and to put only that of this range (same socket) of Ivy Bridge.
Capture d’écran 2020-07-06 à 17.09.19.png

Capture d’écran 2020-07-06 à 17.04.46.png


Good luck!

Edit: My modification was made entirely with a hexadecimal editor.

Edit2: besides if there are experts in modifying EFI Roms it would be great, there are hibernation concerns with Xeon (no IGPU) and I noticed a long time ago that my new Wifi/Bluetooth card (the Wifi) did not work at startup (when we are in the menu for selecting disks at startup).
 
Last edited:
  • Like
Reactions: SamuraiLegion
bonjour,

Just as a reminder and I intended to do it soon (but lack of money for the moment ...) These are Ivy Bridge processors, perfectly compatible in terms of hardware, but it is still not proven that a modified rom allows to start on these processors, for my part I think that it is necessary to erase the integrality of the Microcodes Sandy Bridge and to put only that of this range (same socket) of Ivy Bridge.
View attachment 931160
View attachment 931158

Good luck!

Edit: My modification was made entirely with a hexadecimal editor.
Hey. Thank you for all the work and research you have done regarding Ivy CPU’s into our aging iMac 2011’s.

I have one question. I am extremely new to this and would like to know what are all the materials I need to change the microcode on a CPU? Also, what software do you use to change the microcode?
 
Re,

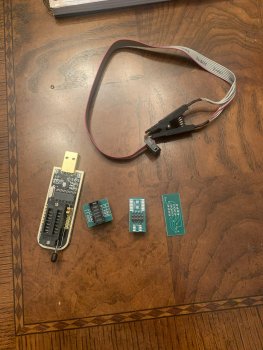
As I said with a hexadecimal editor, I obviously have all the microcodes at my disposal to play delete and add, I give you the link, otherwise it is rather "boring" because I do not know why but the microcodes are in duplicate in the rom, if really you succeed not really i could possibly do it for you but I would need your rom (because unique serial number by machine), and to re-flash the rom you must obligatorily a reprogrammer as shown in this topic, so nothing really simple and of course without any guarantee that it works.
 
  • Like
Reactions: Ausdauersportler
Re,

As I said with a hexadecimal editor, I obviously have all the microcodes at my disposal to play delete and add, I give you the link, otherwise it is rather "boring" because I do not know why but the microcodes are in duplicate in the rom, if really you succeed not really i could possibly do it for you but I would need your rom (because unique serial number by machine), and to re-flash the rom you must obligatorily a reprogrammer as shown in this topic, so nothing really simple and of course without any guarantee that it works.
Alright. Is the ROM tied to the CPU of the Zeon? In any matter, I can provide any information on Friday.


Currently I can not boot into my system due to the GPU of my base model IMac 2011 27inch gpu dying. The Zeon and my WX7100 should be here by Friday in which I can provide the necessary information.

Tell me please, why you decided to choose wx7100 instead gtx 980ti?
I know that some guys using it but without boot screen.
 
Tell me please, why you decided to choose wx7100 instead gtx 980ti?
I know that some guys using it but without boot screen.
After doing extensive research in the iMac 2011 GPU, I have come to learn that AMD GPU will be supported by Apple in the long run. So, I saw the .pdf sheet and it shows that the WX7100 is the most powerful AMD gpu that will work on the iMac 2011 without any heatsink modifications (just needs the 3 pipe heat sink which goes about $20 on eBay).

Were you thinking about upgrading your GPU as well?

DifficultEven: Even with the 3 pipe heat sink one of the square coils of the WX7100 may come close to the upper metal part and get into contact. I had to use a Dremel to grind away a small part. Please make sure have the GPU flat aligned to the copper part and avoid in any case any contact of a electrical components of the card with the sink, unless isolated by K5 pro, MC paste or electrical tape or modification of the sink.

Edit:
We found out lately that the VER 1.0 GPU (RX480, WX7100) will not boot in the iMac12,2. I had the chance to get an WX7100 VER 1.1 which works perfectly in the 2011. It was possible to install it on the 2011 heat sink without any modification, the one coil comes close to the sink, but does not touch it.
You can find a big print on the PCB showing the version number. All VER 1.0 cards work fine in Late 2009 and Mid 2010 27 iMacs.
 
Last edited:
  • Like
Reactions: 358
That is not entirely true: Even with the 3 pipe heat sink one of the square coils of the WX7100 may come close to the upper metal part and get into contact. I had to use a Dremel to grind away a small part. Please make sure have the GPU flat aligned to the copper part and avoid in any case any contact of a electrical components of the card with the sink, unless isolated by K5 pro, MC paste or electrical tape or modification of the sink.
I bet some of the "no boot" cases published in the thread may be caused simply be bad installation of the card on the sink.
Thank you. I scoured that iMac 2011 GPU thread and I’ve looked up and down on the first page. There was a guy there who had confirmed that there was no heatsink modifications needed but, his WX7100 would not work on his 27in iMac, so I will definitely take your word for it.

Just to make sure we’re on the same page. I do possess a dremel nor do I have experience with using one, would electrical tape suffice?
[automerge]1594320560[/automerge]
Re,

As I said with a hexadecimal editor, I obviously have all the microcodes at my disposal to play delete and add, I give you the link, otherwise it is rather "boring" because I do not know why but the microcodes are in duplicate in the rom, if really you succeed not really i could possibly do it for you but I would need your rom (because unique serial number by machine), and to re-flash the rom you must obligatorily a reprogrammer as shown in this topic, so nothing really simple and of course without any guarantee that it works.
Bonjour, my friend. My Xeon has arrived. Unfortunately, my GPU has not arrived but could you guide me through setting up this Xeon in terms of flashing the rom?

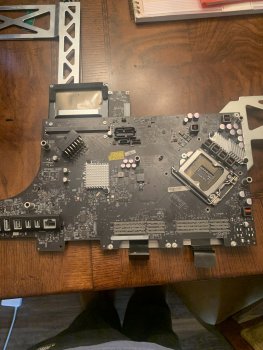
Currently, I have the iMac 27inch all disassembled with both the GPU and CPU disconnected. I also have a CH341a programmer. The other computer I have is a mid 2012 MacBook PRO that has a BOOTCAMP partition.


If need to be, I can bake my old GPU from the iMac
 

Attachments

  • 447989C5-36A8-4A07-B3C3-A9B6112F0B83.jpeg
    447989C5-36A8-4A07-B3C3-A9B6112F0B83.jpeg
    348.5 KB · Views: 622
  • 49A12BAE-280E-4D19-BE2B-47B78F3ED258.jpeg
    49A12BAE-280E-4D19-BE2B-47B78F3ED258.jpeg
    478.9 KB · Views: 483
  • 4B3C5E4B-2386-4DC7-99A1-3CDD87035FEB.jpeg
    4B3C5E4B-2386-4DC7-99A1-3CDD87035FEB.jpeg
    513.5 KB · Views: 647
Last edited:
Thank you. I scoured that iMac 2011 GPU thread and I’ve looked up and down on the first page. There was a guy there who had confirmed that there was no heatsink modifications needed but, his WX7100 would not work on his 27in iMac, so I will definitely take your word for it.

Just to make sure we’re on the same page. I do possess a dremel nor do I have experience with using one, would electrical tape suffice?
[automerge]1594320560[/automerge]

Bonjour, my friend. My Xeon has arrived. Unfortunately, my GPU has not arrived but could you guide me through setting up this Xeon in terms of flashing the rom?

Currently, I have the iMac 27inch all disassembled with both the GPU and CPU disconnected. I also have a CH341a programmer. The other computer I have is a mid 2012 MacBook PRO that has a BOOTCAMP partition.


If need to be, I can bake my old GPU from the iMac
First of all I’m curios if it work without any modifications and flashing, but as I understand your video card is not working so you can’t confirm it works or not till you get video card,
Also, you should check if the video card is working or not with the old processor, after this try to replace cpu
Alrighty. I baked my old AMD GPU at 390 degrees Fahrenheit and installed the Xeon. Once everything was re-assembled, I plugged in the computer and...nothing.

No chime, no Grey screen. I can clearly hear the dvd drive start up and I believe I hear a fan running as well. Upon looking at the LED diagnostics, only the first two was on. LED #3 means that the GPU was not found, or something like that. In other words, the computer could not communicate with the LCD.

Now, this could mean either 3 things. (1) The Xeon doesn't work, (2), Old AMD GPU is done for, or (3) Both. OR..perhaps maybe I seated the logic board wrong?

Luckily, I have an i7 2600 next to me and I'll be using that tomorrow morning to test again without touching the GPU.

Will update tomorrow.
 
Bonjour,

It would have been better to test with your original processor 😅, knowing that many worlds have tested the installation of Ivy Bridge processors without modification of the rom, if not as soon as I have time, maybe today, I would give you a tutorial, trying to make you do a simple copy-paste, rather than a long and tedious modification. ;)

I remind you that there is still no guarantee that the Ivy Bridges will work on our machines, even if, and that only engages me, I believe that at the hardware level it should pass. o_O
 
  • Like
Reactions: Ausdauersportler
Alrighty. I baked my old AMD GPU at 390 degrees Fahrenheit and installed the Xeon. Once everything was re-assembled, I plugged in the computer and...nothing.

No chime, no Grey screen. I can clearly hear the dvd drive start up and I believe I hear a fan running as well. Upon looking at the LED diagnostics, only the first two was on. LED #3 means that the GPU was not found, or something like that. In other words, the computer could not communicate with the LCD.

Now, this could mean either 3 things. (1) The Xeon doesn't work, (2), Old AMD GPU is done for, or (3) Both. OR..perhaps maybe I seated the logic board wrong?

Luckily, I have an i7 2600 next to me and I'll be using that tomorrow morning to test again without touching the GPU.

Will update tomorrow.
Copied from the service manual, again:
LED #1
  • Indicates that the trickle voltage from power supply has been detected by main logic board. This LED will turn ON when you connect the iMac to a working AC power source. The LED will remain ON as long as the computer is ON or asleep.
  • When computer has been correctly shutdown, the LED#1 behavior may differ:
  • - If a startup event is scheduled in System Preferences/Energy saver, LED#1 will stay ON after
    a correct shutdown,
  • - If no startup event is scheduled in System Preferences/Energy saver, LED#1 will turn OFF
    and will stay OFF as long as power cord is kept connected and AC power source is present. Disconnecting the power cord and plugging it back will turn back this LED ON , even if computer is still off.
  • After disconnecting and reconnecting the AC power source, this LED could remain OFF if the AC power source is missing or disconnected , if the logic board is disconnected from the power supply or from the AC receptacle, or if the power supply board is faulty.
LED #2
• Indicates that computer is turned on. This LED will be ON as long as computer is turned on (but is not asleep) and power supply and voltage regulators are working correctly.​
LED #3
• Indicates that computer and video card are communicating. This LED will be ON when computer is communicating properly with video card. If LEDs 1 and 2 are ON and you heard the startup sound, but LED 3 is OFF, then the backup battery (on back of logic board) may need to be reseated, or the video card might be installed incorrectly or needs replacement.​
LED #4
•​
Indicates that computer and LCD panel are communicating. This LED will be ON when computer is turned on and video signal is being generated. If LED#4 is ON and there is no image on display, then the LCD panel, the LED backlight board, or the cables between LCD and logic board or backlight board might be installed incorrectly, or need replacement.​
If you enable remote login, screen sharing and file sharing you may access your booted system remotely. Do this in any case while making such experiments - it let you check the system even without a working internal display. Hope you have success with the CPU experiment.​
 
Hope you have success with the CPU experiment
Bonsoir,

Me too, and on my side I would take an i7 3770s or an i7 3770 (preferably for the 1st), especially because of the iGPU (Intel HD 4000) which would allow me logically to "recover" the hibernation and avoid too many changes.

In addition we have a big change to be able to put memory at 1600Mhz.

EDIT: on the other hand if "it works" no PCie 3.0 but 2.0 "old chipsets" requires.
(I do not know if my last expression is understandable because of the change of language...)


Just for info if that is enough as help, to find and change the info of the microcodes, it is enough just to recover and copy the 1st portion of the 1st (cpu206A3_plat12_ver00000009_2010-06-09_PRD_261BDACD.bin it seems to me) and the last portion of the last (cpu206A7_plat12_ver000000F_2019 -02-17_PRD_8D15DF31.bin it seems to me) and delete 2 times the integrity of the microcodes then replace with that of the Ivy Bridge (cpu306A9_plat12_ver00000021_2019-02-13_PRD_A8DF9213.bin) and after the 2 add identically F after this microcodes, so that the rom is again the same size as it was originally (8388608 Bytes).

Voilà! I hope I did not say stupid things.

Anyway and we will say that I am damn stubborn, I would test anyway on my side when I would have again a pliers for reprogramming and that I would have the new processor.
 
Last edited:
  • Like
Reactions: SamuraiLegion
Copied from the service manual, again:
LED #1
  • Indicates that the trickle voltage from power supply has been detected by main logic board. This LED will turn ON when you connect the iMac to a working AC power source. The LED will remain ON as long as the computer is ON or asleep.
  • When computer has been correctly shutdown, the LED#1 behavior may differ:
  • - If a startup event is scheduled in System Preferences/Energy saver, LED#1 will stay ON after
    a correct shutdown,
  • - If no startup event is scheduled in System Preferences/Energy saver, LED#1 will turn OFF
    and will stay OFF as long as power cord is kept connected and AC power source is present. Disconnecting the power cord and plugging it back will turn back this LED ON , even if computer is still off.
  • After disconnecting and reconnecting the AC power source, this LED could remain OFF if the AC power source is missing or disconnected , if the logic board is disconnected from the power supply or from the AC receptacle, or if the power supply board is faulty.
LED #2
• Indicates that computer is turned on. This LED will be ON as long as computer is turned on (but is not asleep) and power supply and voltage regulators are working correctly.​
LED #3
• Indicates that computer and video card are communicating. This LED will be ON when computer is communicating properly with video card. If LEDs 1 and 2 are ON and you heard the startup sound, but LED 3 is OFF, then the backup battery (on back of logic board) may need to be reseated, or the video card might be installed incorrectly or needs replacement.​
LED #4
•​
Indicates that computer and LCD panel are communicating. This LED will be ON when computer is turned on and video signal is being generated. If LED#4 is ON and there is no image on display, then the LCD panel, the LED backlight board, or the cables between LCD and logic board or backlight board might be installed incorrectly, or need replacement.​
If you enable remote login, screen sharing and file sharing you may access your booted system remotely. Do this in any case while making such experiments - it let you check the system even without a working internal display. Hope you have success with the CPU experiment.​
Thanks, again. Just put back the original Processor (i5 2500s) and ram. Did not touch the GPU. Everything booted up fine. Which is crazy because that baking the GPU actually works and it’s been a solid year since I’ve last booted it.

Anyway...enabled remote login with SSH, confirmed that I’m able to login and execute commands in the terminal. Quick question, is there a way I can just see the Screen of the iMac through my MacBook? Googled a way to open system profiler through terminal and it correctly displays all the information of the iMac to the MacBook.

Later on today, I will put the Xeon on there and will post the results of the remote login information.
Yes, using screen sharing you can use the iMac remotely.

First enable screen sharing in the sharing system pref pane on your iMac.
Now use on your Macbook the Finder->Go to->Network, double click the iMac icon and use the screen sharing icon to connect.

Check this now before reinstalling the new CPU....
 
  • Like
Reactions: SamuraiLegion
Bonsoir,

Me too, and on my side I would take an i7 3770s or an i7 3770 (preferably for the 1st), especially because of the iGPU (Intel HD 4000) which would allow me logically to "recover" the hibernation and avoid too many changes.

In addition we have a big change to be able to put memory at 1600Mhz.

EDIT: on the other hand if "it works" no PCie 3.0 but 2.0 "old chipsets" requires.
(I do not know if my last expression is understandable because of the change of language...)


Just for info if that is enough as help, to find and change the info of the microcodes, it is enough just to recover and copy the 1st portion of the 1st (cpu206A3_plat12_ver00000009_2010-06-09_PRD_261BDACD.bin it seems to me) and the last portion of the last (cpu206A7_plat12_ver000000F_2019 -02-17_PRD_8D15DF31.bin it seems to me) and delete 2 times the integrity of the microcodes then replace with that of the Ivy Bridge (cpu306A9_plat12_ver00000021_2019-02-13_PRD_A8DF9213.bin) and after the 2 add identically F after this microcodes, so that the rom is again the same size as it was originally (8388608 Bytes).

Voilà! I hope I did not say stupid things.

Anyway and we will say that I am damn stubborn, I would test anyway on my side when I would have again a pliers for reprogramming and that I would have the new processor.
UPDATE. Enabled screen sharing, made sure it worked with the i5 2500S, reinstalled the Xeon and....nothing. It boots up with a black screen. I can confirm that the HDD runs and I plugged in various USB and Thunderbolt devices and they do light up.

Waited for a long time and the screen sharing never showed. Installed the i5 and the i7 and it roughly takes 3 minutes for the computer to boot and I would be able to see the iMac on my network on the MacBook. Never was the case with the Xeon installed.


BUT. The show must go on. This was a test just to see if the Xeon would work out of box, this information seems like it was already known.

Steph999 and Sportler. I am extremely new into using microcodes and using a CH341a programmer, essentially I would need a step by step guide on what to do. I've seen a little bit of Nick's post in the iMac GPU thread about using the programmer and microcodes and stuff but other than I am willing to be a remote guinea pig to see if would get the 2011 iMacs to Ivy bridge.

In short, let's start from the beginning. I know where to flash the EEPROM of the motherboard (I believe Nick's post said it was near the wifi/bluetooth card). Where do I go from there? And what programs do I need to obtain the information of the chip? I would also need to know how to backup and change microcodes.

I believe if we work together, we can make Ivy bridge work on our Mac's.
Sorry, I cannot walk you through this. The GPU thread has a (large) section about using flash tools. You can install the flashrom software on you Macbook using brew (terminal commands). Reading and writing the iMac BIOS is easy, it take some time (about a minute) to finish, it is 8GB.
With the microcode mods you will have to ask @StephN999. He should write a short or better longer guide.
 
  • Like
Reactions: SamuraiLegion
Sorry, I cannot walk you through this. The GPU thread has a (large) section about using flash tools. You can install the flashrom software on you Macbook using brew (terminal commands). Reading and writing the iMac BIOS is easy, it take some time (about a minute) to finish, it is 8GB.
With the microcode mods you will have to ask @StephN999. He should write a short or better longer guide.
Understandable. I’ll take a look at the thread again and do some research. Will update if any progress is made.
 
Bonjour,

I tried to keep it simple:

On an iMac 21'5 we replace from the start of line 6914304 to the end of line 7176168 with this code provided (replace .txt by .bin).

Tested with 3 different roms of iMac 2011 21.5 inch and verified with "Apple Microcode Tool" from dosdude1.

Capture d’écran 2020-07-11 à 12.58.12.png

for a 27 "I will have to develop because I imagine that everything does not have to be quite in the same place.


PS: I was very surprised to see in the rom my SSID wifi (I did not look more).

PPS: I would modify this message later.

Edit: I personally use "Hex Fiend" as a hex editor.

Edit2: Attached 2 screenshots showing what there is before and after the modified "code".

Capture 1.png
Capture 2.png
 

Attachments

  • code.txt
    255.7 KB · Views: 226
Last edited:
Bonjour,

I tried to keep it simple:

On an iMac 21'5 we replace from the start of line 6914304 to the end of line 7176168 with this code provided (replace .txt by .bin).

Tested with 3 different roms of iMac 2011 21.5 inch and verified with "Apple Microcode Tool" from dosdude1.

View attachment 932819

for a 27 "I will have to develop because I imagine that everything does not have to be quite in the same place.


PS: I was very surprised to see in the rom my SSID wifi (I did not look more).

PPS: I would modify this message later.

Edit: I personally use "Hex Fiend" as a hex editor.

Edit2: Attached 2 screenshots showing what there is before and after the modified "code".

View attachment 932821
View attachment 932822

Okay! I think I understand it now. Will get back to you on the progress with modifying the microcode. Thanks for the help
 
  • Like
Reactions: Ausdauersportler
Register on MacRumors! This sidebar will go away, and you'll see fewer ads.