Become a MacRumors Supporter for $50/year with no ads, ability to filter front page stories, and private forums.

T-Bone90

macrumors regular
Feb 8, 2018
100
25
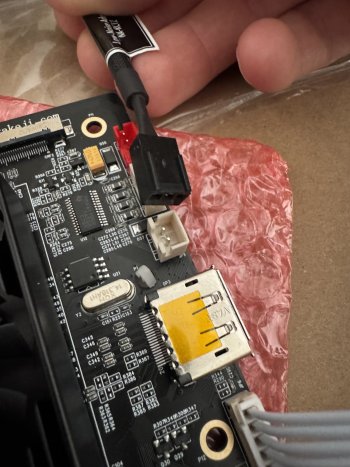
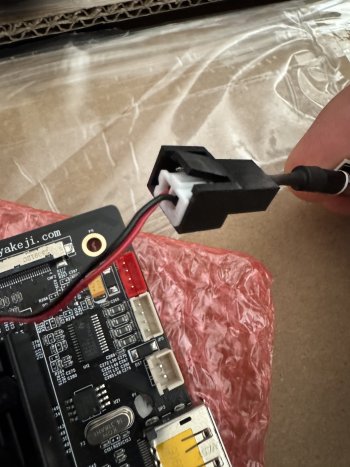
I have one more question. As recommended far before, I bought the fan control NA-RC12 for the R1811 fan.

But now I've seen that this don't fit at all. Even if I ignore the yellow wire and only take black and red, the adapter does not fit the board at all.
 

Attachments

  • IMG_7810.jpeg
    IMG_7810.jpeg
    405 KB · Views: 68
  • IMG_7811.jpeg
    IMG_7811.jpeg
    365.4 KB · Views: 37

usert888

macrumors newbie
Aug 8, 2024
18
25
Excitingly (especially for him) my son has just acquired a monster PC graphics (gaming) card which should do HDMI 2.1 up to 8K so I'll shortly be able to test the T19 HDMI 5K capability. In less jolly news, Haijing Cool store are being less than helpful with my query about audio behaviour, including several assertions about their product that I would disagree with! - e.g. "First ,the T19 driver board need 24V 5A power" (product description says 12/24V and nothing about needing 125W PSU .. - and anyway, the audio glitch is identical on 12V or 24V), plus "Second, our board is only responsible for providing 5k video output, audio is only an additional function, not the main function" (product description references on-board power amp etcetera)..! Not sure the idea of "you might get audio, might not" is a realistic product definition ..
Buyer(s) beware!!
It's very confusing indeed. Also on the Stonetaskin website, for R1811 you have three options:

1723723157046.png


It is not clear to me what panel 'HDMI 2.1 Latest Version' is meant for.
 

PaulD-UK

macrumors 6502a
Oct 23, 2009
876
473
I searched until I found someone selling a set of strips with the official Apple Part No. on the packaging - I have no way of telling if they are original. ;):

Model ________________________ Starter kit Refill kit
iMac (Retina 5K, 27-inch, Late 2014) 076-1444 076-00009
iMac (Retina 5K, 27-inch, Mid 2015) 076-1444 076-00009
iMac (Retina 5K, 27-inch, Late 2015) 076-1444 076-00009

iMac (Retina 5K, 27-inch, 2017) 076-00330 076-00332

iMac Pro (2017) 076-00374 076-00375

Retina 5K, 27-inch, 2019 Refill Kit: 076-00332
Made up of:
27" Adhesive Strip Location ID Number Part Number
Top Left 22 946-01031
Top Right 23 946-03775
Left Side 16 946-4552
Right Side 21 946-03774
Bottom Left 26 946-07463
Bottom Right 25 946-07462
 

PaulD-UK

macrumors 6502a
Oct 23, 2009
876
473
re: R1811 V4 HDMI 2.1.
There doesn't seem to be any major differences between the older V4 board which can only do HDMI 4K, and the newer board (still branded V4) that can deliver 5K 8-bit when an HDMI 2.1 input cable is used.
There may be a hardware difference, its not clear.

The obvious difference is that the new one has the 'Blue/Yellow' Realtek branded OSD firmware.
The older HDMI 2.0 v04 firmware OSD only has the highlight coloured.

It may be that the HDMI 2.1 version can do the full 5K 10-bit if a proper Certified 8K HDMI 2.1 cable is used, and it is driven by a Windows PC with nVidia graphics driver s/w?
Maybe ever the newest Macs can do proper 8K HDMI?
The older M1+/M2+ Macs had a lower spec HDMI port only capable of 5K 8-bit..

It may be the older V4 boards are now all shipping with the new Realtek OSD, but are not capable of 5K over HDMI, only 4k.

If you need to use the HDMI port on a MacBook Pro, or Mac mini/Studio, then you can now get 5K on a DIY monitor, whereas before you could only get 4K with the HDMI port.

For example, to run Final Cut Pro with three monitors, the third one can only be HDMI.
That is a limitation of FCP...
 
Last edited:

fhall1

macrumors 68040
Dec 18, 2007
3,875
1,319
(Central) NY State of mind
Hello everyone,
which adhesive strips did you buy to close the iMac again?

I found many on Amazon and Aliexpress or expensive on iFixit. But I have read with many that after a few days the screen fell off.

Which ones are recommended?
I used the iFixit ones on my 2015 iMac case. I too read about the glass falling off, so I was pretty paranoid about gluing it back on. A couple hints - make sure you remove all remnants of the old adhesive strips from both the case and the glass. I used a plastic scraper and isopropyl alcohol to make sure the two sides were as clean as possible. Then make sure everything is good to go - everything is placed inside that you want inside, and test that it all works before using the strips. I then applied the strips, made sure the glass and case were properly aligned on all sides and used three pieces of painters tape on each of the 4 edges to tape the glass to the case...then laid the case on its back, so the weight of the glass held it against the case. After 24 hours, I set it up on its base, but left the painters tape on for a couple more days. After 2 more days I carefully peeled off the painter's tape. The glass has been holding fine for 6 months now with no indication of separating.
 
  • Like
Reactions: T-Bone90

PaulD-UK

macrumors 6502a
Oct 23, 2009
876
473
@T-Bone90
You have to buy a pair of JST XH plug and sockets, with leads attached.
You then cut off the plug and socket of the NA-RC12 adapter and solder on the JST XH ones.
Then you can plug the RC12 into the R1811's socket, and the fan lead will fit into the new socket, with the resistor now in circuit to slow the fan down.
Like in the diagram, where it says 150 ohm resistor (ignore the rest) that @Aiwi posted.

https://www.amazon.de/-/en/JST-XH-Balance-Silicone-Woodland-Printer/dp/B07YKHV46N
 
Last edited:
  • Like
Reactions: T-Bone90

T-Bone90

macrumors regular
Feb 8, 2018
100
25
At the top of the iMac stand there are 8 bolts.
These screw into the 8 screw holes on the inside of VESA mount.
The bolts go through the holes in the hinge.
They are not special but like all Apple parts they are not common. 😹
M2.5x7 I think, Apple part 922-8174.

I don’t think it’s a brilliant solution but it’s the way @fiatlux did it…
I have another question about this. If there are 8 screws on the iMac stand, can't I use them right away for the crafted VESA mount? Or do I really need separate screws?
Or do you mean this screws in the third picture:


I'm not quite sure yet whether I'll build it like that or try it out with the foot first. I just don't want to open the iMac a second time. :D
 
Last edited:

PaulD-UK

macrumors 6502a
Oct 23, 2009
876
473
The screws fit in the 8 screw holes in pic 3 of that link, across the middle of the hinge.
They are different to 5K iMac stand screws.
 
  • Like
Reactions: T-Bone90

T-Bone90

macrumors regular
Feb 8, 2018
100
25
Thanks a lot. I'm not sure yet if I'll go through this with the VESA. I haven't found anyone who sells the screws. VESA would be great, because I would then still have some space under the monitor and the foot does not block everything. In addition, I would not have to put additional weight in the iMac for the tilting mechanism to work.

After reading many more pages of the thread, there are still a few unanswered questions that are not entirely clear to me. Sorry for the many questions about.

1) I'm not quite sure yet how to do it, but I would probably like to insert the power supply in the iMac case and solder the original Apple power plug. Do I still need any extra adapters or cables for this? Or do I simply cut off the cable from the power supply and the cable of the iMac power adapter and solder plus with plus minus with minus? I'm not sure there's a grounding? For example in this post ( #1,639 ) there is an adapter between power supply and original iMac power.

2) With the crossover boards of the sound, I have already read that you should swap plus and minus on the right speaker. This refers to the red and black cable directly on the crossover board, doesn't it? Or do I have to change red and black on the plug, which goes into the R1811 board? And the right speaker is the one seen from the front or from the back?

3) As discussed further above, I will connected the iMac to my Thunderbolt dock with a DP cable to USB-C. Now, however, it is so that I also want to install a webcam in part. Am I correct in the assumption that I then also have to pull an additional USB cable to the MacBook or the dock for the webcam? Because I want to avoid that. Doesn't it make more sense for me to go directly via the USB C port of the R1811 to USB C in the Thunderbolt Dock? However, I don't want my MacBook to be charged. The Thunderbolt Dock already does this. Or does DisplayPort also bring all USB ports from the R1811 to the Macbook?

4) I also read earlier that the power supply, which is included with the R 1811, is not really high-quality. I'm thinking about buying another one from Germany directly. Do you have any recommendations? How much tension do I need? I have already tested the R1811 power supply for a few minutes, and it ran stable and did not get warm, but before I assemble everything and then clue the iMac, I think about installing a better one directly. Or would you rather test the enclosed inside first and fix the display only with adhesive tape?

6) Does it make sense to take the original iMac fan into operation? Some have that. It gets quite warm in the summer and if I have also throttled the R1811 fan now. or don't you necessarily need it?

7) I have now seen a lot of examples of how, among other things, ports are installed and cables are laid. I'm absolutely unsure how I want to do it. I'm also unsure whether I only put the one cable to the Mac or at least pull other cables outwards (or make them accessible through the RAM flap. I know you probably can't help me there either, but how did you approach the matter? Just highlife and tried it out? I like many projects. For example, I really like how @Aiwi used almost all ports originally. That with the 90° angles or the disassembled USB hub. Or the built-in microphones (although this probably exceeds my knowledge). On the other hand, I like how @usert888 cut open the old ports and installed the buttons there with a 3d print (are there any news there?). Or do you go through the RAM lid? Or through the power adapter connection. Since I have the R1811, the buttons do not necessarily have to be operable because of the remote control (maybe only as a reserve through the RAM slot). But I also didn't find any real 3d prints to place the R1811 board. I also found little for the power supply. I didn't necessarily want to just stick with hot glue either.
 
Last edited:

usert888

macrumors newbie
Aug 8, 2024
18
25
I made some progress with the button panel on the backside (for an iMac 5K Late 2014). Still in prototyping colors. I used DIN-something screws to make them flush, as with other screws my fingers had trouble finding the buttons.

I'm now waiting for a spare part for my 3D printer to finalize it in the correct colors and with symbols on the buttons.

IMG_9020.jpeg
IMG_9022.jpeg
IMG_9021.jpeg
IMG_9023.jpeg
IMG_9024.jpeg
 

PaulD-UK

macrumors 6502a
Oct 23, 2009
876
473
@T-Bone90 The screws should come with the VESA mount kit, in the box if it is 'new', so if you buy a used one you might have to check.

1. Yes you connect your PSU to the original wires coming in at the bottom of the iMac.
The 'adapter' is the proper Molex Micro-Fit 3 pin socket that was used in that build - the wire marked red is the Live wire, the other is Neutral. You are looking at the bottom of the socket.
When you get your PSU you connect it - solder is easier if you haven't got the correct socket - to the correct L and N pins/wire of the PSU.
The iMac case is the earth and it is important to earth your PSU to the case where you fit it - if it has an earth point.

2. On the crossover, change the red and black wires on the R input of the crossover. That is all that needs Ito be touched.

3. DP doesn't carry a USB signal. To get a webcam to work you will have to connect the R1811's USB-C port to the dock or the Mac.
This can carry the video signal instead of using DP, but you MUST have a proper USB-C (or Thunderbolt 3/4) cable that can carry 8K video.

4. The PSU needs to be 24v 5 amp, although 4 amps is enough if you don't charge a laptop.
I used a PSU from a better manufacturer, who guaranteed it.
The original HD mounts in the case seem to be the easiest way to mount it securely.

6. If the case interior isn't cooled with a fan it will get warm.
Using a low speed fan that blows air out of the case completely stops the monitor getting warm.

7. Doing a complicated build takes a long time!
I find it easiest to use aluminium metalwork to fit everything, but that needs a lot of tools to do it that way.
3D printing is still too new for everyone to get the parts they need.

That is why most people keep it simpler, and you can follow the pictures in this thread to guide you...
The monitor will look as good from the front, whatever the inside looks like.;)
 
Last edited:
  • Like
Reactions: T-Bone90

T-Bone90

macrumors regular
Feb 8, 2018
100
25
@T-Bone90 The screws should come with the VESA mount kit, in the box if it is 'new', so if you buy a used one you might have to check.
All right thanks.
1. Yes you connect your PSU to the original wires coming in at the bottom of the iMac.
The 'adapter' is the proper Molex Micro-Fit 3 pin socket that was used in that build - the wire marked red is the Live wire, the other is Neutral. You are looking at the bottom of the socket.
When you get your PSU you connect it - solder is easier if you haven't got the correct socket - to the correct L and N pins/wire of the PSU.
The iMac case is the earth and it is important to earth your PSU to the case where you fit it - if it has an earth point.
Sorry I haven't understood it 100% yet. :) So just soldering and is good? The iMac PSU socket then only has two cables, so to speak, red and black? And the power supply also only comes with two cables. So soldering 1:1? Black is the earth and red tension? I don't need the Molex plug?
2. On the crossover, change the red and black wires on the R input of the crossover. That is all that needs Ito be touched.
OK and you mean the right speaker when you look at the screen from the front?

So in the picture the yellow marked one? I exchange red and black there?

Bildschirmfoto 2024-08-16 um 23.09.56.png


3. DP doesn't carry a USB signal. To get a webcam to work you will have to connect the R1811's USB-C port to the dock or the Mac.
This can carry the video signal instead of using DP, but you MUST have a proper USB-C (or Thunderbolt 3/4) cable that can carry 8K video.
OK, too bad. If I had known that earlier, I wouldn't have needed to order another DP cable.
Hmm, do you have a recommendation for a good USB-C cable, which definitely works? It should then also bring the full resolution. If I also use the other USB port, is everything transmitted via the one cable, so to speak? So can I completely omit DP? USB-C also makes 10 bit?

4. The PSU needs to be 24v 5 amp, although 4 amps is enough if you don't charge a laptop.
I used a PSU from a better manufacturer, who guaranteed it.
The original HD mounts in the case seem to be the easiest way to mount it securely.
OK, I'll see if I can find a good provider. Some have installed an open power supply, but I think that doesn't necessarily have to be or? Can I somehow turn off that it charges my laptop via USB-C?

6. If the case interior isn't cooled with a fan it will get warm.
Using a low speed fan that blows air out of the case completely stops the monitor getting warm.
Hmm, so is it advisable that I install the original iMac fan? That's a lot more handicraft work.

Only the R1811 fan is not sufficient?
7. Doing a complicated build takes a long time!
I find it easiest to use aluminium metalwork to fit everything, but that needs a lot of tools to do it that way.
3D printing is still too new for everyone to get the parts they need.

That is why most people keep it simpler, and you can follow the pictures in this thread to guide you...
The monitor will look as good from the front, whatever the inside looks like.;)
That's right :cool:


@Aiwi Did you happen maybe to write down the dimensions of the acrylic plate where the R1811 is screwed on? I think it's great that you can still reach the connections through the RAM opening. Would possibly screw it similarly.
And I haven't seen it now...but where did you mount the small board with the buttons so that the IR signal can still get through?
And can I control the iMac fan with a 3-pin control? I still have an old "Zalman Fanmate 2" at home, but it only has 3 pins. I don't know if that will work then. And did you pin the pins correctly again and connect them with a plug or just solder them? Sorry for the many questions :eek:
 
Last edited:

jag001

macrumors newbie
Oct 13, 2023
25
27
Ok update on the T18 board... still running beautifully after 15000km of bumping up and down in my caravan, running directly off the 12v system and using very little power to do so!! Back on my desk in my office at home now and it's as good as the iMac Pro I was sitting in front of previously. Can't recommend the conversion highly enough, and putting my strip control buttons into the USB-A slots was a brilliant idea that has continued working perfectly.
 

Attachments

  • tempImageUOEiMo.png
    tempImageUOEiMo.png
    2.1 MB · Views: 47

wanabxtrm

macrumors newbie
Aug 16, 2024
1
0
First post here! Thanks to everyone who's contributed!

After a long life, my iMac 5k finally succumbed to corrosion, but now has new life as a display!

That said I do have a question for the masses. I'm using the StoneTaskin R1811 V.4. It's running fine, and was an easy install thanks to this forum. The last month or so it stood standby as a tv for an Apple TV until I replaced my computer.

However now that I have a new MacBook (Pro 14" M3) I have a question. The MacBook recognized the monitor on plug in via HDMI immediately, however, I can't select a display higher than 1920x1080.

Is this a setting issue on the control card, or because I'm using a HDMI chord vice a display port? Thanks in advance for the assitance!.
 

usert888

macrumors newbie
Aug 8, 2024
18
25
First post here! Thanks to everyone who's contributed!

After a long life, my iMac 5k finally succumbed to corrosion, but now has new life as a display!

That said I do have a question for the masses. I'm using the StoneTaskin R1811 V.4. It's running fine, and was an easy install thanks to this forum. The last month or so it stood standby as a tv for an Apple TV until I replaced my computer.

However now that I have a new MacBook (Pro 14" M3) I have a question. The MacBook recognized the monitor on plug in via HDMI immediately, however, I can't select a display higher than 1920x1080.

Is this a setting issue on the control card, or because I'm using a HDMI chord vice a display port? Thanks in advance for the assitance!.
HDMI cable should still get you up to 4K. Maybe it's the cable, try an higher quality HDMI cable to see if that helps. Use a DP or USB-C cable for 5K.
 
Last edited:

PaulD-UK

macrumors 6502a
Oct 23, 2009
876
473
@wanabxtrm If you have a HDMI 2.0 R1811 you only get 4K over HDMI.

4K at retina resolution is 1080p and MacOS defaults to that HiDPI setting, 4K that looks like 1080p.

If it’s actually only 1080p then probably it’s a cable problem.

You can get the full 4K in System Settings > Displays.

As @usert888 says, you can get 5K using a USB-C to DisplayPort 1.4 8K cable.
 
Last edited:
  • Like
Reactions: usert888

PaulD-UK

macrumors 6502a
Oct 23, 2009
876
473
@T-Bone90
1. Yes soldering the PSU input wires is fine.
As this is mains power use two layers of heat-shrink plastic sheathing to insulate your solder joint.

2. Yes your yellow circle shows the crossover wires to swap.

3. A single USB-C cable to the Mac will be fine for video and connecting a webcam.
But if you don't have MagSafe power connected to a MBP, the R1811 will also charge a laptop, and you can't stop this.
That's why people use a USB-C to DP cable, it doesn't charge the laptop.
But the USB ports on the R1811 won't work with DP.
If you connect the R1811 with a USB-C cable to a TB3 dock, then nothing gets charged.
Both DP 1.4 and USB-C give the same 5K RGB 10-bit video quality on the monitor.

4. Connecting with a USB-C cable will also charge a laptop, and you can't stop this.
Most of the cheaper 24v PSUs made in China don't meet EU standards. Because they are very low power they don't have to meet all the efficiency standards.
For a PSU to seal into an iMac case I think it best to get a PSU fully certified to EU regulations.
I bought this PSU because I found a local supplier at a cheaper price.
The brand that @Aiwi bought is easy to mount where the iMac HD used to be. You don't need such a high amp one if you are not charging a laptop.

6. Only using the R1811 fan will work.
Most builder haven't fitted another fan, and their monitor has worked fine.
I built mine with a fan because I was worried about heat, but the R1811 generates a lot less heat than I expected. ;)
To control an iMac fan's speed you have to use a 4 wire PWM controller.
I used this one, but the Noctua NA-FC1 is easier to fit, soldering the wires and not using all the Noctua plugs/sockets.
 
Last edited:

T-Bone90

macrumors regular
Feb 8, 2018
100
25
Thanks a lot @PaulD-UK

Because of the Power supply:
Can I just get some power supply from Amazon?
They all seem to be similar to me (Magnetic ring and so on...)


Or does it have to be even more expensive? I really can't find anything else on Amazon. Otherwise, I'll just try one of them. At least everyone has the CE mark.

Because of the iMac fan:
I still have an old "Zalman Fan Mate 2" - https://www.alza.at/zalman-fan-mate-2-d101890.htm at home. But if I've seen that correctly, it only has 3 pins and still works analog, so I can't use the iMac fan like that, right? Maybe I'll just leave him out.
 

PaulD-UK

macrumors 6502a
Oct 23, 2009
876
473
Those PSUs are quite large - the smallest is 37 mm deep. That is a tight fit inside an iMac case, except in the very middle. There are thinner ones that are easier to fit.

The iMac fan is much noisier if you use a 2/3 wire speed controller.
With a 4 wire PWM controller it is almost silent.
 

T-Bone90

macrumors regular
Feb 8, 2018
100
25
Hmm, I really can't find a power supply, which is really much smaller.

I still found that, which is not too thick but has 6A.

Or one with 4A. However, a webcam should be on and possibly also the USB ports. I don't know if there are 4A a bit.

Or here 3.5mm

Or I'll build an open one

Just a bit overquestioned. Do you have a recommendation from Germany?

Ok I will check the PWM variants.
Does the iMac fan have the right connection or do you have to pin it again?
 

PaulD-UK

macrumors 6502a
Oct 23, 2009
876
473
@T-Bone90 The third one, MeanWell LRS-100-24, would be my choice.
It has a proper data sheet with all the correct certifications, and has been tested for reliability.

Most of all, it is the same size as the one @Aiwi used, and fits in the Hard Drive bay neatly, so easy to mount properly.
It allows the Imac fan to be used, if you need to cool the iMac case.


Aiwi's blog shows how to connect to the iMac fan, as you need to solder wires to it.

 
Last edited:
  • Like
Reactions: T-Bone90

T-Bone90

macrumors regular
Feb 8, 2018
100
25
@PaulD-UK thanks a lot, I will try the MeanWell.
I'm thinking about doing it like @Aiwi and installing the 4 USB ports. He writes that he has also connected 5V. Can I do this on the power supply somehow or do I still need a converter?

If I understood correctly, he has connected an additional USB-3 hub to the board.

This means the USB-3 hub on the board, then connect the USB distributor to the USB-3 hub ... but there are two ports on it. Don't see through it properly

Or does it need the DC-DC converter 24V to 5V 6A?

Seems quite complex to me in the end...maybe I'll do without it and just guide all the cables through the round Apple power port. ^^
 

Aiwi

macrumors member
Oct 21, 2010
94
89
@PaulD-UK thanks a lot, I will try the MeanWell.
I'm thinking about doing it like @Aiwi and installing the 4 USB ports. He writes that he has also connected 5V. Can I do this on the power supply somehow or do I still need a converter?

If I understood correctly, he has connected an additional USB-3 hub to the board.

This means the USB-3 hub on the board, then connect the USB distributor to the USB-3 hub ... but there are two ports on it. Don't see through it properly

Or does it need the DC-DC converter 24V to 5V 6A?

Seems quite complex to me in the end...maybe I'll do without it and just guide all the cables through the round Apple power port. ^^

I have a 4 port USB Hub connected to one of the USB 2 ports on the R1811. (The hub is USB 3 but that was just a mistake and USB 2 will be enough)

I then have a 5V power supply adding extra power to the usb hub. So that all of the USB ports can draw as much power as they want.

I use a 24V->5V DC-DC converter to do this.
 
  • Like
Reactions: T-Bone90

T-Bone90

macrumors regular
Feb 8, 2018
100
25
I have a 4 port USB Hub connected to one of the USB 2 ports on the R1811. (The hub is USB 3 but that was just a mistake and USB 2 will be enough)
You don't mean the hub but the distributor where you removed the port housings?

I then have a 5V power supply adding extra power to the usb hub. So that all of the USB ports can draw as much power as they want.
Ah ok, so you just soldered the 5V power supply in between?
So from the 24V power supply down to 5V with the converter and then use that to operate the 5V power supply. Then the ports are controlled with plus?

///Edit: Sorry for the confusion.

I mean you have two hubs here. You take one for the connections at the back but for what the other and how did you connect the additional short USB cables for the additional 5V power?

IMG_7858.png
Sorry again for the many questions and the bad English 🙈
 
Last edited:
Register on MacRumors! This sidebar will go away, and you'll see fewer ads.