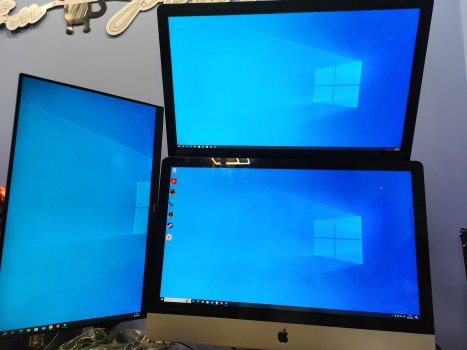
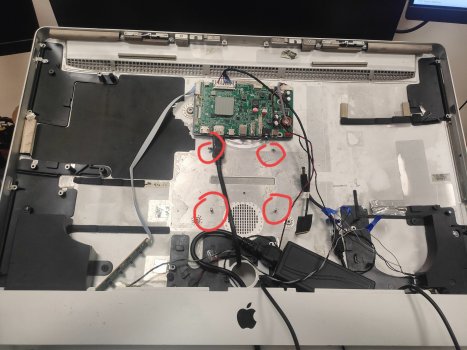
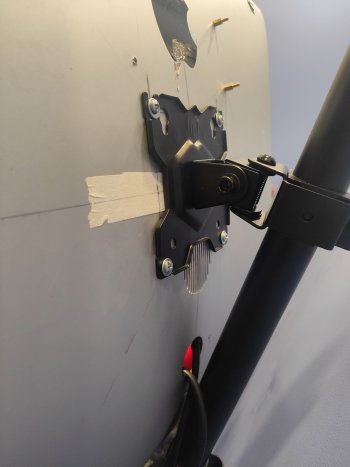
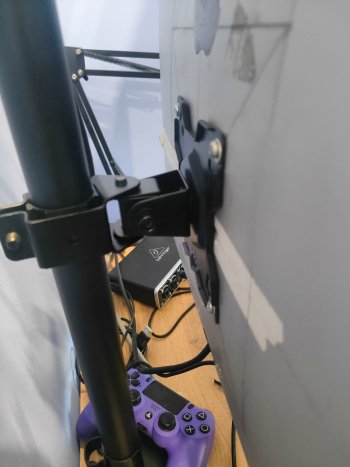
and I just found the center by the diagonals and drilled holes in the case. I screwed in the standard screws from the bracket mount, thereby cutting threads in the metal. It holds tightlyDoes anybody know a VESA mount for the iMac 2017, which is not necessarily from Apple and is so extremely expensive? You can hardly find anything there somehow.
Looks amazing. Thank you for providing the 3D prints!
Why did you attach the board to the display and not in the aluminum case? Is there a reason for that?
For example, do the templates also fit in the aluminum case? I'm not sure where to mount something yet, but most of them have probably mounted it in the case.
Got a tip for us?
Let us know
Become a MacRumors Supporter for $50/year with no ads, ability to filter front page stories, and private forums.
DIY 5k Monitor - success :-)
- Thread starter fiatlux
- WikiPost WikiPost
- Start date
- Sort by reaction score
You are using an out of date browser. It may not display this or other websites correctly.
You should upgrade or use an alternative browser.
You should upgrade or use an alternative browser.
- Status
- The first post of this thread is a WikiPost and can be edited by anyone with the appropiate permissions. Your edits will be public.
@PaulD-UK thank you but does it absolutely have to be original Apple? Doesn't it also make a cheap one (although I haven't found one yet that fits the iMac 2017)? Are there really so bad?
Or are there simply none?
I found a few mounts for the iMac Pro but too expensive. I have to take a closet look for this these days. Maybe there are even more craft solutions. The Build in your link already looks good.
Or are there simply none?
I found a few mounts for the iMac Pro but too expensive. I have to take a closet look for this these days. Maybe there are even more craft solutions. The Build in your link already looks good.
Thank you.Does anybody know a VESA mount for the iMac 2017, which is not necessarily from Apple and is so extremely expensive? You can hardly find anything there somehow.
Looks amazing. Thank you for providing the 3D prints!
Why did you attach the board to the display and not in the aluminum case? Is there a reason for that?
For example, do the templates also fit in the aluminum case? I'm not sure where to mount something yet, but most of them have probably mounted it in the case.
I attached it to the LCD panel because this way the heatsink and fan align with the ventilation holes in the iMac case.
And it a nice flat surface to mount it on. When mounting in the case I would need specially designed brackets. The board brackets now use simple adhesive tape.
Because retrofitting a VESA mount to 2012+ iMacs involved a complete strip-down, no one has made a 27" user fitted one.
The iMac Pro adapter is user-fit from outside the case (on an iMac Pro).
HumanCentric made a cheaper (slightly) one.

The iMac Pro adapter is user-fit from outside the case (on an iMac Pro).
HumanCentric made a cheaper (slightly) one.

HumanCentric VESA Mount Adapter Compatible with iMac Pro (Late 2017) - Will not fit other models
HumanCentric VESA Mounting Adapter Compatible with iMac Pro (Late 2017) Will Not Fit Other Models
www.amazon.de
As an Amazon Associate, MacRumors earns a commission from qualifying purchases made through links in this post.
Interesting. Do you have pictures of the back or close-ups?and I just found the center by the diagonals and drilled holes in the case. I screwed in the standard screws from the bracket mount, thereby cutting threads in the metal. It holds tightly
Ah OK hmm maybe there are more Craft solutions. The VESA Mount from iMac Pro is also not suitable, you say.Because retrofitting a VESA mount to 2012+ iMacs involved a complete strip-down, no one has made a 27" user fitted one.
The iMac Pro adapter is user-fit from outside the case (on an iMac Pro).
HumanCentric made a cheaper (slightly) one.

HumanCentric VESA Mount Adapter Compatible with iMac Pro (Late 2017) - Will not fit other models
HumanCentric VESA Mounting Adapter Compatible with iMac Pro (Late 2017) Will Not Fit Other Modelswww.amazon.de
And so expensive. If I had known before that you can hardly get a VESA Mount ...
Sounds interested. But I haven't really understood that yet. So he has an old VESA mount where the mechanism in the middle did not fit. And he still simply screwed it together and it is held by pressing?The OP in this thread used a pre-2011 VESA mount. He used the hinge from a 2011 iMac 27". These old VESA mounts are much cheaper.
Can I then perhaps also take a replica that only fits older iMacs?
As an Amazon Associate, MacRumors earns a commission from qualifying purchases made through links in this post.
"So he has an old VESA mount where the mechanism in the middle did not fit. And he still simply screwed it together and it is held by pressing?"
On the outside you have this:
Or the Apple VESA Mount Adapter original equivalent (tab HF72EB in this link):
On the inside you have this:
 And you screw them together through the slot in the iMac case, which they are designed to do...
You need to make sure one or other of the sellers sells you the 9 screws.
On the outside you have this:
Or the Apple VESA Mount Adapter original equivalent (tab HF72EB in this link):
On the inside you have this:

Apple iMac A1312 27" 2009 2010 2011 Rückseite Ständer Scharnier Mechanismus Unterstützung Halterung | eBay
Entdecken Sie Apple iMac A1312 27" 2009 2010 2011 Rückseite Ständer Scharnier Mechanismus Unterstützung Halterung in der groÃen Auswahl bei eBay. Kostenlose Lieferung für viele Artikel!
www.ebay.de
You need to make sure one or other of the sellers sells you the 9 screws.
Last edited:
As an Amazon Associate, MacRumors earns a commission from qualifying purchases made through links in this post.
Hi - thought I'd upload (if it works) a more clearcut diagnostic vid of the strange audio+video-playback side-effect I get with my T19 build. (It also should make it easier to send to the Haijing Cool aliX store.). I'd never have thought that audio playback device behaviour would affect the video playback!
Thank you for your patience with me"So he has an old VESA mount where the mechanism in the middle did not fit. And he still simply screwed it together and it is held by pressing?"
On the outside you have this:
Or the Apple VESA Mount Adapter original equivalent (tab HF72EB in this link):
On the inside you have this:
And you screw them together through the slot in the iMac case, which they are designed to do...
Apple iMac A1312 27" 2009 2010 2011 Rückseite Ständer Scharnier Mechanismus Unterstützung Halterung | eBay
Entdecken Sie Apple iMac A1312 27" 2009 2010 2011 Rückseite Ständer Scharnier Mechanismus Unterstützung Halterung in der groÃen Auswahl bei eBay. Kostenlose Lieferung für viele Artikel!www.ebay.de
You need to make sure one or other of the sellers sells you the 9 screws.
From which 9 screws are you speaking? Do you mean 8 screws for the mechanism and 1 screw for the VESA Mount?
Are this special screws?
As an Amazon Associate, MacRumors earns a commission from qualifying purchases made through links in this post.
At the top of the iMac stand there are 8 bolts.
These screw into the 8 screw holes on the inside of VESA mount.
The bolts go through the holes in the hinge.
They are not special but like all Apple parts they are not common. 😹
M2.5x7 I think, Apple part 922-8174.
I don’t think it’s a brilliant solution but it’s the way @fiatlux did it…
These screw into the 8 screw holes on the inside of VESA mount.
The bolts go through the holes in the hinge.
They are not special but like all Apple parts they are not common. 😹
M2.5x7 I think, Apple part 922-8174.
I don’t think it’s a brilliant solution but it’s the way @fiatlux did it…
Last edited:
I simply found the center horizontally and vertically, then drew diagonal lines through it and, having attached the vesa mount, marked the points on the diagonals where the bolts should be. You can also fasten everything on the back side with nuts and a washer, it was important for me to put the monitor into operation as quickly as possible, so I don’t bother with the appearance and did everything haphazardly inside.
Attachments
Pure coincidentally I found and bought another two iMac 5K Late 2014's with VESA mounts to convert...
In the meantime I found the buttons in the VESA mount not be very comfortable to use, so am now moving them to the backside. When finished I'll share the design here: https://www.printables.com/model/968024-diy-imac-late-2014-5k-monitor-kit-for-r1811-driver


In the meantime I found the buttons in the VESA mount not be very comfortable to use, so am now moving them to the backside. When finished I'll share the design here: https://www.printables.com/model/968024-diy-imac-late-2014-5k-monitor-kit-for-r1811-driver


Quote: @usert888 "if the amp chip gets too hot, if so, what should I do?"
If you remove jumper B then the inductance will be in circuit, and cut down high frequencies, and return the speaker impedance to 4 ohms at all frequencies, which is how it should be.
However the sound may not sound quite as good - I don't know.
Just for future reference: I can confirm the CSC3110 doesn't get hot. I also tested with and without B jumper. With the jumper installed it sounds so much better.
So after a few weeks my JRY-W9RQUHD-FA1 got here. First thing I noticed is that I didn't have enough types of screwdrivers to remove everything from the iMac (motherboard, speakers, etc.). So after a few extra days I could finally remove everything and install the board.
A couple of observations for anyone interested in this board:
Thanks everyone that provided SO much information and pictures to make the process much easier.
A couple of observations for anyone interested in this board:
- It does indeed work on 12v. I tested with a GST60A12 power supply (12v 5A) and it powers up perfectly
- Testing at full brightness it consumes 44-45w according to my (cheap) meter
- I managed to find two mounts in the iMac case that make the board fit almost perfectly. It's not 100% level so I didn't tighten the screws that much (only enough to prevent it from wobbling). One of the mounts is the top-left one from the hard drive mount, and the other is the left-most one from the fan. Those two match the top-left and lower-right holes in the board. I can take some pictures later if anyone is interested
- The board does get a bit warm. I might need to install a fan blowing some air to cool it down
- This is the second 2017 screen I've seen that has slight pink edges around. Not as noticeable as another one I saw before but if you look closely you can still see it
- MonitorControl works fine to change the backlight with the keyboard keys
- I used an 8K compatible USB-C to DisplayPort cable and get no chroma subsampling (full 4:4:4) with a MacBook Pro M2
Thanks everyone that provided SO much information and pictures to make the process much easier.
Hello all,
Long time.
It’s been over a month since I tweaked the interfaces on my conversion, so I’ve got some confidence that it’s stable enough.
My goal was to preserve the iMac look as stock as possible while achieving sufficient connections to use the display with both my Mac and a Windows PC.
While also having access to the display menu (JRY, no IR controls).
Where I landed:
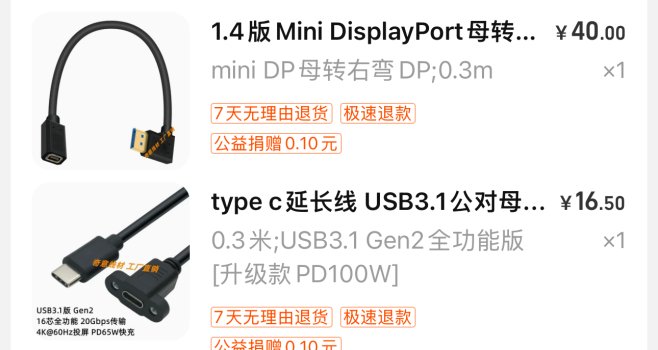
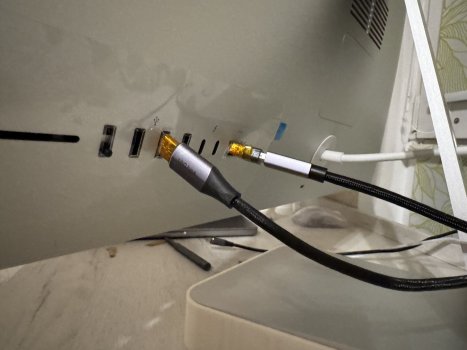
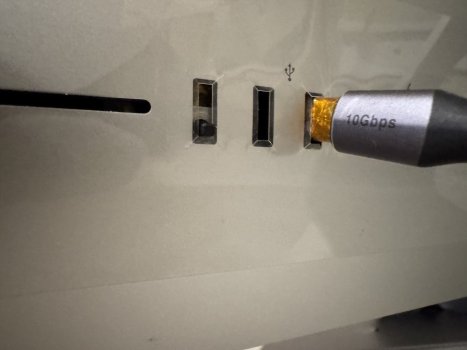
1. Place joystick at the USB 2 port (I desired to use the headphone jack but it’s too close to the speaker, so the joystick didn’t fit)
2. Place Type-C female at the USB 2 port (for Mac)
3. Place mini DP 1.4 female at the Ethernet port (then mini DP to DP cable to the PC)
Unfortunately, I did not find internal cables thin enough to keep the female port inside of iMac housing. The ports are pushed out by the cables resistance.
I removed the plastic covers of the female connectors on the cables to fit them. Then taped for the protection.
The advantage over direct connection to the board is that the cables can be replaced at any time.
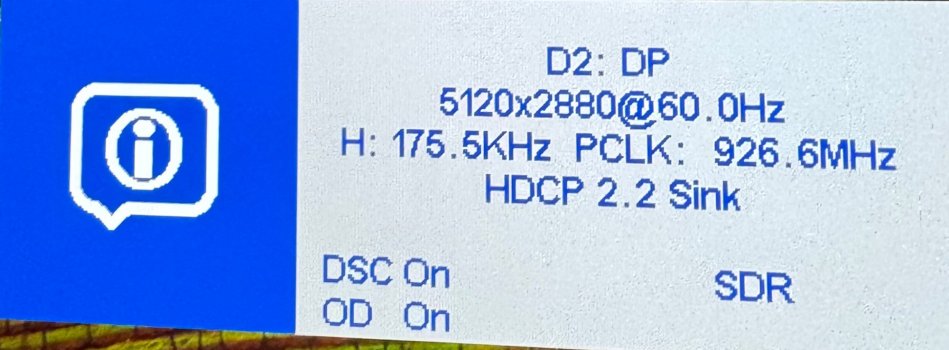
Both let me achieve 5K@60 with 8 bit colour.
The joystick itself is superglued and I had no issue whatsoever using it. It’s rock solid.
I used only the axis to control the menu.
While the power is controlled by the iMac power button instead of the joystick press action.
PS. A warning about the Sony webcam sensor. I own exactly the same camera as Aiwi mentions in his guide.
It does not fit my 2020 case, being too thick.
I made a few attempts fitting it, also trying to sand the camera tunnel on the back of the display to none. Yet, the assembly is about 1 mm thicker than it should be.
That without the camera holding plastic bracket from the iMac.
Maybe it’s possible to sand the case of the iMac but I decided not to.
So, please, be mindful.
PPS. The back latch on the case provides access to the Noctua PWM fan controller (connected to the stock iMac fan). However, I really set to ~75% a while ago and never experienced any overheating issue, never heard the fan noise. The iMac stands right at the windows and it’s currently hot here, reaching 35C.
PPPS you may see the plastic on the case. It’s just there, since I bought a brand new case and never got to peeling it off. It carries no functional purpose whatsoever
Attachments
Last edited:
So my R1811 v4 board has already arrived and I'm happy. It has a super high-quality. It also runs right away and brings me the full 5K resolution. The only thing I don't have yet is 10bit.
I have just tested my Displayport cable, which I already had there.
It is this:
https://www.amazon.de/gp/product/B075V27G2R/ref=ppx_yo_dt_b_search_asin_title? ie=UTF8&psc=1
I have full 5K resolution but I don't see anywhere that works 10 bit.
Can you tell me where it's easiest to see if 10 bits works?
If it's due to the cable, I'll buy another one. I think it doesn't work because of the DP 1.2 cable. Are there any recommendations for a good one?
Otherwise, I ordered the crossover and also a 4k webcam. I also will make the standard fan quieter.
If everything works, I still have to think about everything because of brackets. I think that I print a few things in 3D from the templates that are already available from other users.
That looks awesome. I think if everything works for you, I'll do the same.In the meantime I found the buttons in the VESA mount not be very comfortable to use, so am now moving them to the backside. When finished I'll share the design here: https://www.printables.com/model/968024-diy-imac-late-2014-5k-monitor-kit-for-r1811-driver
Last edited:
As an Amazon Associate, MacRumors earns a commission from qualifying purchases made through links in this post.
@T-Bone90 That looks like an 8-bit cable, because its 4K/60Hz.
You need a DP1.4 8K (also 4K/120Hz) cable.
I use a Cable Matters one, from Amazon.
When you have 5K 10-bit the colour space mode should be RGB in the OSD.
If you get YUV, also called YCbCr, you are probably only getting 8-bit,
If you are getting YUV, then the cable is causing that.
You need a DP1.4 8K (also 4K/120Hz) cable.
I use a Cable Matters one, from Amazon.
When you have 5K 10-bit the colour space mode should be RGB in the OSD.
If you get YUV, also called YCbCr, you are probably only getting 8-bit,
If you are getting YUV, then the cable is causing that.
@PaulD-UK hmm thats a bit difficult.
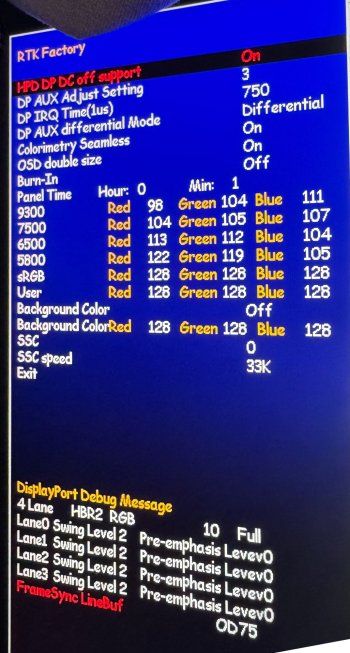
I only see this screen in the factory menu. There below is RGB and 10. But otherwise I don't know how to test whether macOS also uses 10 bits. In the advanced system settings in macOS under display I don't see anything, not even anything from 30bit (which I had read somewhere).
///edit: I have test a virtual Windows 11 and it shows 8 bit. But I don't know how meaningful virtual is.
Attachments
Last edited:
Fine, second pic, where it says DisplayPort Debug Message:
4 Lane HBR2 RGB 10 Bit Full…
That means everything is full resolution RGB 10 bit. 🙂
The first pic shows DSC On, which also shows that you have everything set right for 10 bit.
MacOS doesn’t tell you anything about what your monitor is actually showing.
That’s how it works
Did you buy a R1811 HDMI 2.1 card - that’s what the OSD suggests?
Oh OK. Hmm funny, that Windows only uses 8 bit. Somehow you can certainly test it. Would be interesting.Fine, second pic, where it says DisplayPort Debug Message:
4 Lane HBR2 RGB 10 Bit Full…
That means everything is full resolution RGB 10 bit. 🙂
The first pic shows DSC On, which also shows that you have everything set right for 10 bit.
MacOS doesn’t tell you anything about what your monitor is actually showing.
That’s how it works
Especially with these pictures of beams, I would have to run smoothly on the iMac and on my old monitor in theory I must see the beams. I'll look there again.
So far, I don't see any difference between old and new monitor (iMac)...my old have only 8 bit.
According to Amazon, the cable is not designed for this either.
But I had already ordered a newer cable so my mistake. 😅
No, I bought V4, but didn't want to spend the money for HDMI 2.1.Did you buy a R1811 HDMI 2.1 card - that’s what the OSD suggests?
Is it really the HDMI 2.1 version?
Last edited:
I also have that OSD with my R1811 V4. Somewhere above I posted screenshots of all menus except for this popup info OSD.I don’t know what version HDMI you have, but I’ve only ever seen that OSD layout on HDMI 2.1 versions.
It’s better than the old OSD 👍
Excitingly (especially for him) my son has just acquired a monster PC graphics (gaming) card which should do HDMI 2.1 up to 8K so I'll shortly be able to test the T19 HDMI 5K capability. In less jolly news, Haijing Cool store are being less than helpful with my query about audio behaviour, including several assertions about their product that I would disagree with! - e.g. "First ,the T19 driver board need 24V 5A power" (product description says 12/24V and nothing about needing 125W PSU .. - and anyway, the audio glitch is identical on 12V or 24V), plus "Second, our board is only responsible for providing 5k video output, audio is only an additional function, not the main function" (product description references on-board power amp etcetera)..! Not sure the idea of "you might get audio, might not" is a realistic product definition ..I also have that OSD with my R1811 V4. Somewhere above I posted screenshots of all menus except for this popup info OSD.
Buyer(s) beware!!
TBH I haven't done it yet and I can almost imagine never going there just in case, given some tales of it being much harder to cut back in through fresh tapes than 8-year vintage..Hello everyone,
which adhesive strips did you buy to close the iMac again?
I found many on Amazon and Aliexpress or expensive on iFixit. But I have read with many that after a few days the screen fell off.
Which ones are recommended?
I was wondering about gluing some plastic tabs to the back of the bottom of the screen that would hook behind the chinstrap and then just tethering/taping the top edge. That said, I have also noted that the screen unit to glass adhesion seems to be "going" on mine - again, old adhesive degrading I think. Anyone else observed that (and addressed it - maybe just spots of superglue?)
Register on MacRumors! This sidebar will go away, and you'll see fewer ads.


