Become a MacRumors Supporter for $50/year with no ads, ability to filter front page stories, and private forums.
Status
The first post of this thread is a WikiPost and can be edited by anyone with the appropiate permissions. Your edits will be public.
I've read a lot of thread but I can't find anything relating to the 2012 Retina with GPU issues. My question is, does this fix cover the 2012 Nvidia problems as well?
This fix should be universal for any Mac with dual graphics, regardless of whether a discrete GPU is AMD or NVIDIA, but personally I haven't tried it with other Macs. There could be some small differences though, e.g. the NVIDIA drivers should be removed from OS X in a different way, but maybe that wouldn't be required
[doublepost=1521818705][/doublepost]
I tried modifying the efivars as mentioned early in the thread. However I did so fairly recently and the info was probably out of date. So my modifying at first was unsuccessful until I deleted and recreated the prefs. But I clearly broke something in the efivars because now the macbook pro won't boot. Just bongs and stays at a white screen. No logo or anything. Resetting PRAM and SMC has no effect. Ditto Cmd+F, Option, Cmd+V, or even unplugging the hard drive. Ugh. Anyone have any suggestions on how to get the EFI back to factory?
> Resetting the PRAM and SMC has no effect
It should have reset all your efivars! But if you believe that for some reason this doesn't reset the efivars in your case, you could try the following: disconnect a charger and also disconnect a battery from your MBP's motherboard (could do that even without a special screwdriver, removal a battery from MBP's case is not required) , then carefully press and hold a power on button, maybe for 1 minute just in case, then assemble everything back. That should discharge the elements of your MBP and all the volatile memory should be reset - and that includes the "efivars memory"

However, if that doesn't help, maybe there is another problem with your Mac: e.g. the hard drive died or its' OS X filesystem got corrupted. You could test this if e.g. you'd try booting your Mac from ArchLinux USB drive again - with nomodeset parameter of course - and see if that works. If yes, then maybe you'd either have to replace a hard drive (if its' indeed broken) or reinstall OS there
[doublepost=1521819001][/doublepost]
However I had no brightness control
Thats a common issue, and I forgot if there is a fix for it (haven't fixed this on my Mac but maybe someone else has done it), please search this thread
I tried to update Mac OS, now I’m getting stuck in a boot loop (image attached) its using the integrated gpu but it’s getting Stuck on gioscreenlockstate
it could be that, when you tried to update OS X, it has reinstalled the AMD drivers and now tries to load them even though you've disabled a discrete GPU. Maybe you could fix that by removing the AMD drivers again
[doublepost=1521819208][/doublepost]
I am now able to boot into my clean install of Sierra. Everything is just perfect for some minutes, but after a while kernel_task takes up a 100-something% of cpu and everything becomes sluggish
Other than making sure that you've indeed removed the AMD drivers, I don't have many ideas... What will happen if you'll get the root rights through the Terminal and then try to kill that kernel_task by its' process ID ?
[doublepost=1521819351][/doublepost]
I don't understand what you said : I should reboot (or shutdown) every time via Terminal to avoid the system freeze ?
I meant, try using that reboot command in a Terminal when you could not shutdown your MBP through the normal means e.g. through your OS X graphical interface
[doublepost=1521819714][/doublepost]
I don't get the main menu. There's is no auto-boot countdown, giving me the option to press 'e'. The system seems to panic and initialise the default kernel, which then sends the screen blank
I am not sure about the latest ArchLinux ISO images, maybe they've changed something since my writing of that manual. Still, before a Linux kernel is booted, there should be a GRUB bootloader. It could be that by default that GRUB menu isn't visible but you could show it e.g. maybe by pressing and holding the Shift key like this article suggests: https://askubuntu.com/questions/16042/how-to-get-to-the-grub-menu-at-boot-time (doesn't matter if Arch or Ubuntu, GRUB is a common part) . Then, when you reach the GRUB menu, you could press "e" key to edit the Linux kernel boot parameters, and append the "nomodeset" there - that should fix your issues
[doublepost=1521819940][/doublepost]
I have the macbook pro early 2011 17" with ssd and high sierra. Both integrated and discrete gpus work fine. I would like to use only the integrated gpu. Is the most efficient way to use gfxCardStatus?
Currently, yes. But if/when your discrete GPU will get broken, regardless of your gfxCardStatus settings your OS X would be stuck at booting and you'll have to join us at doing the fixes from this thread
 
Last edited:
Fix for 17 inch dGPU switch issue

(Tested successfully in both “early” and “late” 2011 17 inch MacBook Pro)


This guide is based on the experience of many users (including me) while trying to fix the very well known issue with AMD dGPU on 17’’ MacBook Pro from 2011 (both early and late):


Step 0) As a starting point I made a clean installation of Sierra (Version 10.12.4) — This is just a step for establishing a common middle ground and is not really needed….

0.1) To do this just download the installer from the App Store and then use “DiskMaker X” to create a bootable installation.

0.2) After the bootable image is created, proceed to turn off your computer and hold the “Alt” or “Options” Key. Select the Sierra installer and proceed with the installation (I format the HDD partition to make a clean install on it)


Note: You might need to do this on another computer. Just buy one of those cheap usb to sata connectors and use it to connect it to another Mac so you don’t risk having your installation failed because of your machine.


Step 1) Prepare a Bootable USB pendrive with a non GUI Linux (Credits to AppleMacFinder)


1.1) Download ArchLinux ISO

You need a working computer for that and a spare CD/DVD/USB drive. Download the latest Arch Linux ISO image from this page - https://www.archlinux.org/download/ , at the time of writing it is archlinux-2017.03.01-dual.iso . Then you could either simply burn this ISO to CD/DVD (which later could be either inserted to MBP's SuperDrive or External DVD Drive connected to MBP by two USB cables) or create a bootable USB: use the great detailed instructions from this page, https://wiki.archlinux.org/index.php/USB_flash_installation_media


1.2) Creating the bootable USB with the .iso:

In macOS

First, you need to identify the USB device. Open /Applications/Utilities/Terminal and list all storage devices with the command:

*) diskutil list


Your USB device will appear as something like /dev/disk2 (external, physical). Verify that this is the device you want to erase by checking its name and size and then use its identifier for the commands below instead of /dev/diskX.

A USB device is normally auto-mounted in macOS, and you have to unmount (not eject) it before block-writing to it with dd. In Terminal, do:

*) diskutil unmountDisk /dev/diskX


Now copy the ISO image file to the device. The dd command is similar to its Linux counterpart, but notice the 'r' before 'disk' for raw mode which makes the transfer much faster:

*) sudo dd if=path/to/arch.iso of=/dev/rdiskX bs=1m

After completion, macOS may complain that "The disk you inserted was not readable by this computer". Select 'Ignore'. The USB device will be bootable.


Step 2) Boot to Linux (Credits to AppleMacFinder):

2.1) Boot to it: insert this CD/DVD/USB to Macbook Pro, hold Option key while booting, choose "EFI boot" (that is your bootable installation media), press "e" key to edit the GRUB options of the Arch Linux archiso x86_64 UEFI CD menu entry while it is selected at the main screen, add nomodeset to the end of this line and press Enter. If everything is done correctly, you will find yourself at the Linux console! (It takes some time so be patient and wait for the prompt)


2.2) Edit EFI vars: looks like efivarfs filesystem is mounted by default! So you can already cd /sys/firmware/efi/efivars and ls to explore this directory and see if there is a "gpu-power-prefs-..." variable (where ... is UUID of this variable).


2.2-Case 1:

If there is such a variable, its better to remove it with rm.

*) rm gpu-power-prefs-…


In my case the efivarfs has been mounted by default with read/write permissions, but if you are getting the "operation not permitted" message while attempting to rm, it means that in your case efivarfs has been mounted as read-only and you need to remount it with read-write permissions and try again (credits to totoe_84 for this valuable addition) (Try this and then try to remove it):

*) cd /

*) umount /sys/firmware/efi/efivars/

*) mount -t efivarfs rw /sys/firmware/efi/efivars/

*) cd /sys/firmware/efi/efivars/

*) rm gpu-power-prefs-…


If this also fails (If you still can’t erase the file) use chattr command to disable file immutability and then erase the file:

*) chattr -i "/sys/firmware/efi/efivars/gpu-power-prefs-…”

*) cd /sys/firmware/efi/efivars/

*) rm gpu-power-prefs-…


2.2-Case 2:

The file gpu-power-prefs-… doesn’t exist well then you don’t have to delete it hahaha. (I repaired 2 17 inch models and 1 didn’t have it, so it’s fine)


2.3) Create a new gpu-power-prefs-… file (Original credit mentioned above, https://github.com/0xbb/gpu-switch/blob/master/gpu-switch, Credits to AppleMacFinder):

*) printf "\x07\x00\x00\x00\x01\x00\x00\x00" > /sys/firmware/efi/efivars/gpu-power-prefs-fa4ce28d-b62f-4c99-9cc3-6815686e30f9


2.4) Add immutability to the gpu-power-prefs-… file (Credits to AppleMacFinder):

This chattr command is supposed to lock a file to make it accessible only by "superuser" - and so that, while booting, your EFI will have no chance to screw up your gpu-power-prefs-... variable under any circumstances


*) chattr +i "/sys/firmware/efi/efivars/gpu-power-prefs-fa4ce28d-b62f-4c99-9cc3-6815686e30f9"


2.5) Unmount efivars and reboot (Credits to AppleMacFinder):

Could not unmount efivars if you are inside this directory, so change to the root directory

*) cd /

*) umount /sys/firmware/efi/efivars/

Guarantees that your EFI variables are flushed to efivarfs filesystem, please unmount it safely before rebooting)

*) reboot


3) Eliminate AMD Kexts (Credits to newfield),
Note: You might need to do this every time you do an OS updates, since each update normally writes the AMD Kexts again.


(His words and this also happened to me!: After disabling the dGPU using Arch, normal boot would hang halfway. Although safe boot would work. I wound up having to remove all the AMD kext files in the Terminal in Recovery Console)


Trying to remove them in Single User just gave me sandbox errors. (Summary -> Don’t do it in Single User Mode the one that you boot with Cmd + S)


3.1) So what you have to do is:

If you have FileVault Unlock it first:

Unlock first.

Then Boot into Recovery (“cmd + r”, it will boot without failing, if it fails then repeat step 2 and then after that boot directly into recovery with command + R, I had to do this once because the dGPU got active again after booting into the os with AMD kexts)

*) Boot into recovery mode (Command + r)

*) Start Terminal

*) diskutil cs list (find UUID for drive)

*) diskutil coreStorage unlockVolume UUID

*) cd /Volumes/Macintosh\ HD

*) mkdir AMD_Kexts

*) mv System/Library/Extensions/AMD*.* AMD_Kexts/

*) reboot


(If you only have one storage with 1 partition just use "cd /Volumes/Macintosh\ HD" and the remaining commands after starting the terminal)


Extra STEP), if your PC is now working! Download “steveschow” branch of gfxCardStatus (gfxCardStatus v2.4.3i) or just download the app directly from:

URLS:

https://github.com/steveschow/gfxCardStatus/releases

https://github.com/steveschow/gfxCardStatus

With this application you can even prove that the dedicated GPU can't get activated. Even if you try to change the selected GPU to the dedicated one, it just won't change.


—————

The End!

AND VOILA!!! You have a working 17 inch MacBook Pro. As I said I tested this with an early 2011 and late 2011 17 inch MacBook Pro’s and both are now running (Before they were both dead)


Big thanks to AppleMacFinder, to the makers and contributors of this thread, to gfxCardStatus maker and forkers :D (steveschow) and to switch-gpu makers I can’t thank you guys enough as I am so happy to bring both of this incredible machines back to life. With this post I am not trying to take any credit, but as I had 2 machines I run into different issues with both, which could be helpful to others, thats why I was inclined to make “my own” guide and share it with you.


I just created an account here to share this, Hope it helps more people!


After following this fix my computer now boots 1/4 way at the Apple screen then just shuts off. Does not attempt to reboot. Any ideas what went wrong. I had the fix working originally but had to keep reapplying it .
 
Currently, yes. But if/when your discrete GPU will get broken, regardless of your gfxCardStatus settings your OS X would be stuck at booting and you'll have to join us at doing the fixes from this thread

Thanks for the answer. There are many cases that I work in my pc for 3-4 hours without saving my work. Is it possible that the discrete card's failure will occur while I am working, so I will lose all the unsaved work for these 3-4 hours?
 
  • Like
Reactions: AppleMacFinder
If you don't have time to read my story (which also describes some interesting technical approaches) just scroll down this thread until a "100% WORKING SOLUTION" text

Discrete AMD GPU of my 2011 MacBook Pro 8,2 has finally failed because of the reasons mentioned here ( http://logicboardmac.blogspot.ru/ ) and there ( https://www.macrumors.com/2015/02/19/2011-macbook-pro-repair-program-apple/ ) . It has been working perfectly for 6 years under quite a high load, even tried SETI@HOME mining at background! So I was confident that my MBP is not affected by bad solder / bad soldering quality and didn't want to bring it to Apple for a free repair program - partially because couldn't find the time to pause my important software projects, partially because I was afraid that Apple might give me a less reliable logic board or refuse a free repair because of the several unrelated repairs that I did manually by myself earlier to save money: changed thermal paste a few times, replaced the internal battery 2 times, replaced a keyboard with broken buttons, etc. But it finally broke down last week: laptop's screen image became distorted, it refused to boot OS X (always freezing half-way), and - Apple free repair program has already ended! I know there are affordable solutions like $50 BGA resoldering at unofficial local repair shop and that its possible to get a new replacement HD 6750M chip from AliExpress for $35 or cheaper ( http://www.aliexpress.com/item/DC-2...0028-216-0810028-BGA-Chipset/32764872143.html or https://www.aliexpress.com/item/DC-2015-New-216-0810001-216-0810001-Graphic-Chipset/32718112928.html , because don't know if this is true - https://www.rossmanngroup.com/board...0604-replace-216-0810005-gpu-with-216-0810028 ) to guarantee a successful repair, so the total price of repair would be either $50 or $50+$35=$85 - less than $100 in any case. But I don't like investing money to the old computers, so I have thought - what if there is some hack to force MBP to use integrated graphics ALL THE TIME, even while booting ? And then started to explore the possible solutions...

===

First of all, it is possible to successfully boot a MBP to OS X while still using the failed GPU, after you remove the AMD drivers by booting in command line mode (CMD+S) and entering these commands:
1) fsck -fy (to check a disk)
2) mount -uw / (mount a root filesystem with read/write permissions)
3) sudo mkdir /AMD_Kexts/ (make a directory to store the AMD drivers in case you'll need them in future)
4) sudo mv /System/Library/Extensions/AMD*.* /AMD_Kexts/ (move the AMD drivers)
5) sudo rm -rf /System/Library/Caches/com.apple.kext.caches/ (remove the AMD drivers cache)
6) sudo mkdir /System/Library/Caches/com.apple.kext.caches/ (just in case OS X will be dumb and will not recreate this directory, I am creating it for OS X)
7) sudo touch /System/Library/Extensions/ (to update the timestamps so that new driver caches - without AMD drivers - will be definitely rebuilt)
8) sudo umount / (umount a partition to guarantee that your changes are flushed to it)
9) sudo reboot

The degree of your inconvenience while doing these steps - strongly depends on how heavily a screen's image is distorted in your case. In my case it was even more difficult because the OS X partition became a "read-only" partition (because of too many emergency shutdowns I did while desperately trying to boot OS X with a failed GPU) so I had to remove a hard drive from MacBook Pro and (using a USB to SATA 2.5" adapter taken from my portable HDD) attached it to a computer with Linux, then followed these instructions:

https://superuser.com/questions/961401/mounting-hfs-partition-on-arch-linux (1st answer) - carefully executed a number of commands, calculated a sizelimit for my parition layout, and finally ran sudo mount -t hfsplus -o force,rw,sizelimit=YOURNUMBER /dev/sdb2 /mnt to mount this HFS+ partition to /mnt directory in read-write mode. Then I performed these "1)-7)" steps you see above, and also repaired a filesystem by running sudo fsck.hfsplus -f /dev/sdb2 before unmounting a partition with sudo umount /mnt and putting a hard drive back to MBP...

===

This gave me a MBP which could boot to OS X although STILL using a broken AMD GPU: so it screen's image is very distorted (could browse the Internet but quite inconvenient to read a text), Launchpad is super laggy, and you can't switch to Integrated GPU using gfxCardStatus because: without AMD drivers (which we had to remove to successfully boot to OS X) Macbook Pro thinks its' internal screen is External Display and gfxCardStatus tells it is impossible to switch because External Display is using AMD GPU. Somewhere I found a suggestion that it is possible to rebuild a gfxCardStatus from the source code - https://github.com/codykrieger/gfxCardStatus - with removed or commented out 156-166 lines in the ./gfxCardStatus/Classes/GSProcess.m to make it to ignore the external display:

// find out if an external monitor is forcing the discrete gpu on
CGDirectDisplayID displays[8];
CGDisplayCount displayCount = 0;
if (CGGetOnlineDisplayList(8, displays, &displayCount) == noErr) {
for (int i = 0; i < displayCount; i++) {
if ( ! CGDisplayIsBuiltin(displays))
[list addObject:[NSDictionary dictionaryWithObjectsAndKeys:
Str(@"External Display"), kTaskItemName,
@"", kTaskItemPID, nil]];
}
}


So I rebuilt a gfxCardStatus using the instructions from the last reply of this issue -
https://github.com/codykrieger/gfxCardStatus/issues/229
(also had to download a MacOSX10.11.sdk from here - https://github.com/phracker/MacOSX-SDKs/releases - unpack and copy it to XCode's /Applications/Xcode.app/Contents/Developer/Platforms/MacOSX.platform/Developer/SDKs/MacOSX10.11.sdk - because of the Apple's stupidity the latest XCode for El Capitan does not include SDK for El Capitan!) However, it still didn't work - gfxCardStatus only pretended that it has switched to Integrated GPU, while in reality OS X did not let it switch! Even after I edited ./gfxCardStatus/Classes/GSGPU.m file to enable the mysterious "Nuke it from orbit switching" option, it still couldn't switch...

===

Then I discovered this interesting repository - https://github.com/0xbb/gpu-switch - which is partially similar by its' source code to gfxCardStatus but also has the "Login Hooks" (install_hooks.sh) to "automate the switching process for login/logout". Sadly it didn't work for me... However, there is a very interesting gpu-switch text file right at the root of this repository, which describes the EFI variables!

https://github.com/0xbb/gpu-switch/blob/master/gpu-switch

After studying it and also reading this issue's comments - https://github.com/0xbb/gpu-switch/issues/11 - I became confident to try this solution, but found out that my MacBook Pro 2011 8,2 with OS X El Capitan 10.11.6 is in a VERY problematic situation:

1) rEFInd is not installed, and to install it - must disable SIP protection. But I cannot boot to Recovery mode (Command+Option+R) or to OS X Installation DVD/USB (hold Option), (to disable SIP), because they freeze while booting! - although I removed AMD kexts from my system, of course these recovery tools are using AMD kexts integrated to their design. Also cannot use Rootfool hack ( https://github.com/gdbinit/rootfool ) to disable SIP during runtime, because it works only at OS X version older than 10.11.4

2) Tried overheating my Macbook Pro on purpose (forcing CPU usage to 100% and putting it to a tightly closed bag) to force it to shutdown from overheating and then quickly reboot so that Integrated graphics will be enabled during the boot time - making it possible to boot to Recovery. But because of the wonderful high end thermal paste I have applied not so long ago - cannot overheat it even after waiting for a long time! At this point I thought that could either: a) remove AMD kexts from Installation media, or b) to connect MBP's hard drive to a Linux machine again and run a bunch of chmods to remove the SIP flags from the directories mentioned here ( http://apple.stackexchange.com/questions/193368/what-is-the-rootless-feature-in-el-capitan-really ) which could potentially make a system unbootable, or c) to try installing rEFInd to HFS+ partition directly from a Linux machine with root rights because it will bypass SIP --- but have not explored these options, although some of them might have worked...

3) Wanted to boot a Linux LiveCD to edit the EFI variables from there, but no matter what I did: tried booting straight without GRUB option modifications, tried editing GRUB boot options (with "e" key) to add nomodeset / remove quiet splash / or both in every combination , or like suggested in this article ( https://wiki.archlinux.org/index.php/MacBookPro8,1/8,2/8,3_(2011) ) also add i915.modeset=0 radeon.modeset=0 or radeon.modeset=0 i915.modeset=1 i915.lvds_channel_mode=2 ; and then pressed Fn+F10 or Shift+Ctrl+Fn+F10 to boot with these options: but the Linux boot process always failed at different boot stages, no matter what popular user-friendly Linux distribution or what version of it I am trying: tried many releases of Ubuntu / Lubuntu / Fedora , even the old "AMD64 Mac" and "Alternate AMD64 Mac" images, but they always failed - either at the very beginning of boot process (black screen, or a black screen with a blinking or stuck _ character at the left upper corner) or failed at the very end of it - right before it is supposed to show a graphical desktop environment...

Later, totoe_84 wrote that he was able to boot Ubuntu in graphical mode using the following setup for GRUB:
  • To disable the AMD graphics card I added the following lines after set gfxpayload=keep
outb 0x728 1
outb 0x710 2
outb 0x740 2
outb 0x750 0
  • Next I added the following after quiet splash
    i915.lvds_channel_mode=2 i915.modeset=1 i915.lvds_use_ssc=0
(based on https://ubuntuforums.org/showthread.php?t=2157775 )

===

Then I remembered that there are not-mainstream Linux distributions for advanced users, which have a LiveCD without any graphical interface: you are dropped to a pure console and you are supposed to install the system along with only those graphical interfaces and software packages / groups of packages which you explicitly select. For example: Arch Linux (https://www.archlinux.org/) and Gentoo Linux (https://gentoo.org/) . Because their LiveCD does not have a graphical interface, they could be booted without a problem to a pure Linux console and there you could edit the EFI variables ! So here is a...

===
=== 100% WORKING SOLUTION
===
=== Force your MBP to ALWAYS use Intel integrated GPU (EFI variable fix)
===
=== to make it great again ! ;)
===


1) Create the Arch Linux LiveCD/LiveUSB :

You need a working computer for that and a spare CD/DVD/USB drive. Download the latest Arch Linux ISO image from this page - https://www.archlinux.org/download/ , at the time of writing it is archlinux-2017.03.01-dual.iso . Then you could either simply burn this ISO to CD/DVD (which later could be either inserted to MBP's SuperDrive or External DVD Drive connected to MBP by two USB cables) or create a bootable USB: use the great detailed instructions from this page, https://wiki.archlinux.org/index.php/USB_flash_installation_media

2) Boot to it: insert this CD/DVD/USB to Macbook Pro, hold Option key while booting, choose "EFI boot" (that is your bootable installation media), press "e" key to edit the GRUB options of the Arch Linux archiso x86_64 UEFI CD menu entry while it is selected at the main screen, add nomodeset to the end of this line and press Enter. If everything is done correctly, you will find yourself at the Linux console!

3) Edit EFI vars: looks like efivarfs filesystem is mounted by default! So you can already cd /sys/firmware/efi/efivars and ls to explore this directory and see if there is a "gpu-power-prefs-..." variable (where ... is UUID of this variable). If there is such a variable, its better to remove it with rm. In my case the efivarfs has been mounted by default with read/write permissions, but if you are getting the "operation not permitted" message while attempting to rm, it means that in your case efivarfs has been mounted as read-only and you need to remount it with read-write permissions and try again (credits to totoe_84 for this valuable addition) :
*) cd /
*) umount /sys/firmware/efi/efivars/
*) mount -t efivarfs rw /sys/firmware/efi/efivars/
*) cd /sys/firmware/efi/efivars/

If your screen is so distorted that it is difficult to see the letters, just start typing the rm gpu-power-pre and then press TAB key for autocompletion. In my case there were not such a EFI variable, only "gpu-active-..." and maybe somehow related "gfx-saved-config-restore-status-..." . Then I looked again at that gpu-switch text file (mentioned above, https://github.com/0xbb/gpu-switch/blob/master/gpu-switch),
and entered THESE COMMANDS:

*) chattr -i "/sys/firmware/efi/efivars/" <----- skip this command

Actually a gpu-switch script had "${sysfs_efi_vars}/${efi_gpu}" but I didnt have a "gpu-power-prefs-..." variable - so, partially by mistake, I didn't add that efi_gpu suffix and entered this incomplete path accidentally

*)
printf "\x07\x00\x00\x00\x01\x00\x00\x00" > /sys/firmware/efi/efivars/gpu-power-prefs-fa4ce28d-b62f-4c99-9cc3-6815686e30f9

Did not have a EFI "gpu-power-prefs-" variable so I thought that it will be OK to create a new one with a random UUID - in this case, taken directly from a gpu-switch script

*) chattr +i "/sys/firmware/efi/efivars/gpu-power-prefs-fa4ce28d-b62f-4c99-9cc3-6815686e30f9"

http://www.tecmint.com/chattr-command-examples/ - chattr (Change Attribute) is a command line Linux utility that is used to set/unset certain attributes to a file in Linux system to secure accidental deletion or modification of important files and folders, even though you are logged in as a root user.
...
Syntax of chattr ---> chattr [operator] [flags] [filename]
...
A file is set with ‘i‘ attribute (+i as you see in this command) ---> cannot be modified (immutable). Means no renaming, no symbolic link creation, no execution, no writable, only superuser can unset the attribute.
...
Operator
  1. + : Adds the attribute to the existing attribute of the files.
  2. : Removes the attribute to the existing attribute of the files.
  3. = : Keep the existing attributes that the files have.
This chattr command is supposed to lock a file to make it accessible only by "superuser" - and so that, while booting, your EFI will have no chance to screw up your gpu-power-prefs-... variable under any circumstances

*) cd /

Could not unmount efivars if you are inside this directory, so change to the root directory

*) umount /sys/firmware/efi/efivars/

Guarantees that your EFI variables are flushed to efivarfs filesystem, please unmount it safely before rebooting)

*) reboot

===> IF YOU DID EVERYTHING CORRECTLY, MOST LIKELY THAT YOUR MACBOOK PRO IS NOW USING INTEGRATED GRAPHICS WHILE BOOTING, AFTER BOOTING, AND IS WORKING GREAT AGAIN ! ;)

In the future maybe you could need to re-apply this solution if you would have to reset your PRAM / NVRAM / SMC because of some other problems, so remember this solution somewhere... Funny thing: now you can't switch to Discrete GPU even using gfxCardStatus, it is forever stuck at Integrated


I spent two working days to discover this solution, and really hope that it will work flawlessly for every MBP owner with a broken discrete GPU. Good luck!
[doublepost=1522068399][/doublepost]just wanted to say the "100% working solution" worked like a charm...absolutely no thanks to apple who simply told me that my MacBook book pro was "vintage" and they could not help me..and neither did any of my local mac repair dealers who told me that the video issue was infact a DESIGN FLAW and although apple had the extended repair program which I participated in..in the end, they told me is was at best a "bandaid repair and that it would happen again...now I have my MacBook back and working like new thanks to macrumors 6502a... you rock!!!
 
  • Like
Reactions: AppleMacFinder
I've already done ten clean installs of the HighSierra on Macbook Pro 2011.

The problem is in the AMDRadeonX3000.kext that will be loaded on the first or second reboot after half/partial installation.

This is why you have to use the verbose boot to know where the installation is freezing.

Follow The Guide MikeN to move the AMDRadeonX3000.kext and then return to the next step of installing the High Sierra. - #875

0 - Start clean install HighSierra -> copy files to system partition -> reboot -> continue installation -> system try load AMDRadeonX3000.kext -> freeze installation -> if Macbook Pro not auto reboot -> press power button -> force shutdown.

0.1 - Disable SIP - boot Recovery Mode Single User - Press Command + R + S at boot:
Code:
csrutil disable


0.2 - Restart the system:
Code:
reboot


1- Boot into single user-mode by holding

<Cmd>+<s>


2 – enable verbose boot mode:
Code:
nvram boot-args="-v"


3 - Verify system partition:
Code:
/sbin/fsck -fy


4 – mount root partition writeable - do not forget the last slash "/"
Code:
/sbin/mount -uw /


5 - make a kext-backup directory
Code:
mkdir -p /System/Library/Extensions-off


6 – only move ONE offending kext out of the way:
Code:
mv -v /System/Library/Extensions/AMDRadeonX3000.kext /System/Library/Extensions-off/


7 – let the system update its kextcache:
Code:
touch /System/Library/Extensions/


8 – wait for the kextcache process to finish - 1 or 2 minutes -> then
Code:
reboot


9 - Boot normal
Continue to install the HighSierra.

10 - After completing the installation of HighSierra -> create login name, etc -> reboot the system and Enable SIP again.

Finder -> Applications -> Utilities -> Terminal:
Code:
sudo shutdown -r now


11 - Enable SIP - boot Recovery Mode Single User - Press Command + R + S at boot:
Code:
csrutil enable

reboot


12 - Boot normal.

Do not forget to read the entire MikeN Guide to load (kextload) the AMDRadeonX3000.kext to lower the system temperature and turn off the AMD GPU - #875 .

Do not forget to read this post about MacOS update and AMDRadeonX3000.kext - #1425

First of all: Thank you @everyone who put in so much effort for all the different solutions. I followed the solution of @nsgr .. My graphics card: AMD Radeon HD 6770M


However for me it was necessary to also remove ATIRadeonX2000.kext from the /System/Library/Extensions/ directory. So now I both (re)moved AMDRadeonX3000.kext and the ATIRadeonX2000.kext.
If I leave the ATIRadeonX2000.kext in the /Extensions directory the whole screen goes crazy after booting. distorted images/flickering... one time the login interface was half positioned on my screen...

So my question is: Is it necessary to have the ATIRadeonX2000.kext in the directory?? Because everybody here only speaks of (re)moving the AMDRadeonX3000 file...

Anyways. with the AMDRadeonX3000 loaded with the LoginHook steps: my GPU analog is at 20 degrees celsius!!! when just running safari.. Almost too low I would expect.

Hope somebody has an answer..
 
  • Like
Reactions: AppleMacFinder
Fix for 17 inch dGPU switch issue

(Tested successfully in both “early” and “late” 2011 17 inch MacBook Pro)


This guide is based on the experience of many users (including me) while trying to fix the very well known issue with AMD dGPU on 17’’ MacBook Pro from 2011 (both early and late):


Step 0) As a starting point I made a clean installation of Sierra (Version 10.12.4) — This is just a step for establishing a common middle ground and is not really needed….

0.1) To do this just download the installer from the App Store and then use “DiskMaker X” to create a bootable installation.

0.2) After the bootable image is created, proceed to turn off your computer and hold the “Alt” or “Options” Key. Select the Sierra installer and proceed with the installation (I format the HDD partition to make a clean install on it)


Note: You might need to do this on another computer. Just buy one of those cheap usb to sata connectors and use it to connect it to another Mac so you don’t risk having your installation failed because of your machine.


Step 1) Prepare a Bootable USB pendrive with a non GUI Linux (Credits to AppleMacFinder)


1.1) Download ArchLinux ISO

You need a working computer for that and a spare CD/DVD/USB drive. Download the latest Arch Linux ISO image from this page - https://www.archlinux.org/download/ , at the time of writing it is archlinux-2017.03.01-dual.iso . Then you could either simply burn this ISO to CD/DVD (which later could be either inserted to MBP's SuperDrive or External DVD Drive connected to MBP by two USB cables) or create a bootable USB: use the great detailed instructions from this page, https://wiki.archlinux.org/index.php/USB_flash_installation_media


1.2) Creating the bootable USB with the .iso:

In macOS

First, you need to identify the USB device. Open /Applications/Utilities/Terminal and list all storage devices with the command:

*) diskutil list


Your USB device will appear as something like /dev/disk2 (external, physical). Verify that this is the device you want to erase by checking its name and size and then use its identifier for the commands below instead of /dev/diskX.

A USB device is normally auto-mounted in macOS, and you have to unmount (not eject) it before block-writing to it with dd. In Terminal, do:

*) diskutil unmountDisk /dev/diskX


Now copy the ISO image file to the device. The dd command is similar to its Linux counterpart, but notice the 'r' before 'disk' for raw mode which makes the transfer much faster:

*) sudo dd if=path/to/arch.iso of=/dev/rdiskX bs=1m

After completion, macOS may complain that "The disk you inserted was not readable by this computer". Select 'Ignore'. The USB device will be bootable.


Step 2) Boot to Linux (Credits to AppleMacFinder):

2.1) Boot to it: insert this CD/DVD/USB to Macbook Pro, hold Option key while booting, choose "EFI boot" (that is your bootable installation media), press "e" key to edit the GRUB options of the Arch Linux archiso x86_64 UEFI CD menu entry while it is selected at the main screen, add nomodeset to the end of this line and press Enter. If everything is done correctly, you will find yourself at the Linux console! (It takes some time so be patient and wait for the prompt)


2.2) Edit EFI vars: looks like efivarfs filesystem is mounted by default! So you can already cd /sys/firmware/efi/efivars and ls to explore this directory and see if there is a "gpu-power-prefs-..." variable (where ... is UUID of this variable).


2.2-Case 1:

If there is such a variable, its better to remove it with rm.

*) rm gpu-power-prefs-…


In my case the efivarfs has been mounted by default with read/write permissions, but if you are getting the "operation not permitted" message while attempting to rm, it means that in your case efivarfs has been mounted as read-only and you need to remount it with read-write permissions and try again (credits to totoe_84 for this valuable addition) (Try this and then try to remove it):

*) cd /

*) umount /sys/firmware/efi/efivars/

*) mount -t efivarfs rw /sys/firmware/efi/efivars/

*) cd /sys/firmware/efi/efivars/

*) rm gpu-power-prefs-…


If this also fails (If you still can’t erase the file) use chattr command to disable file immutability and then erase the file:

*) chattr -i "/sys/firmware/efi/efivars/gpu-power-prefs-…”

*) cd /sys/firmware/efi/efivars/

*) rm gpu-power-prefs-…


2.2-Case 2:

The file gpu-power-prefs-… doesn’t exist well then you don’t have to delete it hahaha. (I repaired 2 17 inch models and 1 didn’t have it, so it’s fine)


2.3) Create a new gpu-power-prefs-… file (Original credit mentioned above, https://github.com/0xbb/gpu-switch/blob/master/gpu-switch, Credits to AppleMacFinder):

*) printf "\x07\x00\x00\x00\x01\x00\x00\x00" > /sys/firmware/efi/efivars/gpu-power-prefs-fa4ce28d-b62f-4c99-9cc3-6815686e30f9


2.4) Add immutability to the gpu-power-prefs-… file (Credits to AppleMacFinder):

This chattr command is supposed to lock a file to make it accessible only by "superuser" - and so that, while booting, your EFI will have no chance to screw up your gpu-power-prefs-... variable under any circumstances


*) chattr +i "/sys/firmware/efi/efivars/gpu-power-prefs-fa4ce28d-b62f-4c99-9cc3-6815686e30f9"


2.5) Unmount efivars and reboot (Credits to AppleMacFinder):

Could not unmount efivars if you are inside this directory, so change to the root directory

*) cd /

*) umount /sys/firmware/efi/efivars/

Guarantees that your EFI variables are flushed to efivarfs filesystem, please unmount it safely before rebooting)

*) reboot


3) Eliminate AMD Kexts (Credits to newfield),
Note: You might need to do this every time you do an OS updates, since each update normally writes the AMD Kexts again.


(His words and this also happened to me!: After disabling the dGPU using Arch, normal boot would hang halfway. Although safe boot would work. I wound up having to remove all the AMD kext files in the Terminal in Recovery Console)


Trying to remove them in Single User just gave me sandbox errors. (Summary -> Don’t do it in Single User Mode the one that you boot with Cmd + S)


3.1) So what you have to do is:

If you have FileVault Unlock it first:

Unlock first.

Then Boot into Recovery (“cmd + r”, it will boot without failing, if it fails then repeat step 2 and then after that boot directly into recovery with command + R, I had to do this once because the dGPU got active again after booting into the os with AMD kexts)

*) Boot into recovery mode (Command + r)

*) Start Terminal

*) diskutil cs list (find UUID for drive)

*) diskutil coreStorage unlockVolume UUID

*) cd /Volumes/Macintosh\ HD

*) mkdir AMD_Kexts

*) mv System/Library/Extensions/AMD*.* AMD_Kexts/

*) reboot


(If you only have one storage with 1 partition just use "cd /Volumes/Macintosh\ HD" and the remaining commands after starting the terminal)


Extra STEP), if your PC is now working! Download “steveschow” branch of gfxCardStatus (gfxCardStatus v2.4.3i) or just download the app directly from:

URLS:

https://github.com/steveschow/gfxCardStatus/releases

https://github.com/steveschow/gfxCardStatus

With this application you can even prove that the dedicated GPU can't get activated. Even if you try to change the selected GPU to the dedicated one, it just won't change.


—————

The End!

AND VOILA!!! You have a working 17 inch MacBook Pro. As I said I tested this with an early 2011 and late 2011 17 inch MacBook Pro’s and both are now running (Before they were both dead)


Big thanks to AppleMacFinder, to the makers and contributors of this thread, to gfxCardStatus maker and forkers :D (steveschow) and to switch-gpu makers I can’t thank you guys enough as I am so happy to bring both of this incredible machines back to life. With this post I am not trying to take any credit, but as I had 2 machines I run into different issues with both, which could be helpful to others, thats why I was inclined to make “my own” guide and share it with you.


I just created an account here to share this, Hope it helps more people!
[doublepost=1522129917][/doublepost]Worked as a charm on a MBP15 Early 2011! Thanks a lot!
 
  • Like
Reactions: AppleMacFinder
[doublepost=1522129917][/doublepost]Worked as a charm on a MBP15 Early 2011! Thanks a lot!

could I perhaps get alittle more clarity on the procedure starting with step 3 eliminate AMD kexts..right now i have my desktop back using arch linux...you mention filevault...i do not appear to have anything called filevault...where would I look for this on my currently working macbook...i feel if i can do this right then I will no longer have the computer starting with AMD again..i am not a wiz at this so these last few steps you list seem like the right thing to do...to keep the AMD from happening again when I do a reboot...i am not clear on the term UUID you mention in step 3...could you give me an example?
 
  • Like
Reactions: AppleMacFinder
First of all: Thank you @everyone who put in so much effort for all the different solutions. I followed the solution of @nsgr .. My graphics card: AMD Radeon HD 6770M


However for me it was necessary to also remove ATIRadeonX2000.kext from the /System/Library/Extensions/ directory. So now I both (re)moved AMDRadeonX3000.kext and the ATIRadeonX2000.kext.
If I leave the ATIRadeonX2000.kext in the /Extensions directory the whole screen goes crazy after booting. distorted images/flickering... one time the login interface was half positioned on my screen...

So my question is: Is it necessary to have the ATIRadeonX2000.kext in the directory?? Because everybody here only speaks of (re)moving the AMDRadeonX3000 file...

Anyways. with the AMDRadeonX3000 loaded with the LoginHook steps: my GPU analog is at 20 degrees celsius!!! when just running safari.. Almost too low I would expect.

Hope somebody has an answer..

1 - If you are "Almost too low", then the AMD GPU may be active.
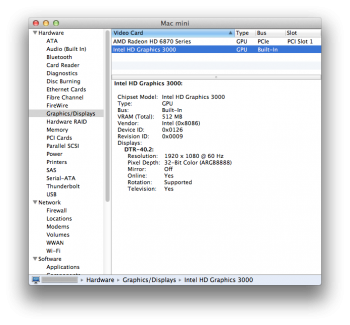
Picture upload example: Graphics-Display-Intel_HD_Graphics_3000.png.

Apple button (left up corner) -> About this Mac -> System Report -> Graphics/Display -> Intel GPU -> Displays Online: Yes.

If the AMD GPU has the Online Display: Yes, then your AMD GPU is set to active/primary/main.


2 - Search your device id of your AMD GPU in the kexts using the "grep" command.

The result will show which AMD kexts are used by your AMD GPU.

My example: Macbook Pro 15 Early 2011 - AMD Radeon HD 6750M -> device id: 6741

Apple button (left up corner) -> About this Mac -> System Report -> Graphics/Display -> AMD GPU ->
Device ID: 0x6741 -> 6741

Code:
grep -iRl 6741 /System/Library/Extensions/

/System/Library/Extensions/AMD6000Controller.kext/Contents/Info.plist
/System/Library/Extensions/AppleGraphicsPowerManagement.kext/Contents/Info.plist
/System/Library/Extensions/AMDLegacySupport.kext/Contents/Info.plist
/System/Library/Extensions/AppleKextExcludeList.kext/Contents/Info.plist


grep -iRl 6741 /DisableExtensions/

/DisableExtensions/AMDRadeonX3000.kext/Contents/Info.plist

My example -> AMD GPU use kexts:

AMD6000Controller.kext
AppleGraphicsPowerManagement.kext
AMDLegacySupport.kext

AMDRadeonX3000.kext


3 - Set up your Intel GPU to be the primary GPU:

Boot in Single User Mode -> press Command + S key at boot.

Code:
nvram fa4ce28d-b62f-4c99-9cc3-6815686e30f9:gpu-power-prefs=%01%00%00%00

reboot

Boot normal (AMDRadeonX3000.kext moved out from /System/Library/Extensions).
[doublepost=1522177485][/doublepost]
could I perhaps get alittle more clarity on the procedure starting with step 3 eliminate AMD kexts..right now i have my desktop back using arch linux...you mention filevault...i do not appear to have anything called filevault...where would I look for this on my currently working macbook...i feel if i can do this right then I will no longer have the computer starting with AMD again..i am not a wiz at this so these last few steps you list seem like the right thing to do...to keep the AMD from happening again when I do a reboot...i am not clear on the term UUID you mention in step 3...could you give me an example?

Filevault -> encrypt disk - It's just a security measure. It does not affect the choice of the GPU for Intel.

Use FileVault to encrypt the startup disk on your Mac
https://support.apple.com/en-us/HT204837
 

Attachments

  • Graphics-Display-Intel_HD_Graphics_3000.png
    Graphics-Display-Intel_HD_Graphics_3000.png
    99.3 KB · Views: 255
Last edited:
  • Like
Reactions: AppleMacFinder
If you don't have time to read my story (which also describes some interesting technical approaches) just scroll down this thread until a "100% WORKING SOLUTION" text

Discrete AMD GPU of my 2011 MacBook Pro 8,2 has finally failed because of the reasons mentioned here ( http://logicboardmac.blogspot.ru/ ) and there ( https://www.macrumors.com/2015/02/19/2011-macbook-pro-repair-program-apple/ ) . It has been working perfectly for 6 years under quite a high load, even tried SETI@HOME mining at background! So I was confident that my MBP is not affected by bad solder / bad soldering quality and didn't want to bring it to Apple for a free repair program - partially because couldn't find the time to pause my important software projects, partially because I was afraid that Apple might give me a less reliable logic board or refuse a free repair because of the several unrelated repairs that I did manually by myself earlier to save money: changed thermal paste a few times, replaced the internal battery 2 times, replaced a keyboard with broken buttons, etc. But it finally broke down last week: laptop's screen image became distorted, it refused to boot OS X (always freezing half-way), and - Apple free repair program has already ended! I know there are affordable solutions like $50 BGA resoldering at unofficial local repair shop and that its possible to get a new replacement HD 6750M chip from AliExpress for $35 or cheaper ( http://www.aliexpress.com/item/DC-2...0028-216-0810028-BGA-Chipset/32764872143.html or https://www.aliexpress.com/item/DC-2015-New-216-0810001-216-0810001-Graphic-Chipset/32718112928.html , because don't know if this is true - https://www.rossmanngroup.com/board...0604-replace-216-0810005-gpu-with-216-0810028 ) to guarantee a successful repair, so the total price of repair would be either $50 or $50+$35=$85 - less than $100 in any case. But I don't like investing money to the old computers, so I have thought - what if there is some hack to force MBP to use integrated graphics ALL THE TIME, even while booting ? And then started to explore the possible solutions...

===

First of all, it is possible to successfully boot a MBP to OS X while still using the failed GPU, after you remove the AMD drivers by booting in command line mode (CMD+S) and entering these commands:
1) fsck -fy (to check a disk)
2) mount -uw / (mount a root filesystem with read/write permissions)
3) sudo mkdir /AMD_Kexts/ (make a directory to store the AMD drivers in case you'll need them in future)
4) sudo mv /System/Library/Extensions/AMD*.* /AMD_Kexts/ (move the AMD drivers)
5) sudo rm -rf /System/Library/Caches/com.apple.kext.caches/ (remove the AMD drivers cache)
6) sudo mkdir /System/Library/Caches/com.apple.kext.caches/ (just in case OS X will be dumb and will not recreate this directory, I am creating it for OS X)
7) sudo touch /System/Library/Extensions/ (to update the timestamps so that new driver caches - without AMD drivers - will be definitely rebuilt)
8) sudo umount / (umount a partition to guarantee that your changes are flushed to it)
9) sudo reboot

The degree of your inconvenience while doing these steps - strongly depends on how heavily a screen's image is distorted in your case. In my case it was even more difficult because the OS X partition became a "read-only" partition (because of too many emergency shutdowns I did while desperately trying to boot OS X with a failed GPU) so I had to remove a hard drive from MacBook Pro and (using a USB to SATA 2.5" adapter taken from my portable HDD) attached it to a computer with Linux, then followed these instructions:

https://superuser.com/questions/961401/mounting-hfs-partition-on-arch-linux (1st answer) - carefully executed a number of commands, calculated a sizelimit for my parition layout, and finally ran sudo mount -t hfsplus -o force,rw,sizelimit=YOURNUMBER /dev/sdb2 /mnt to mount this HFS+ partition to /mnt directory in read-write mode. Then I performed these "1)-7)" steps you see above, and also repaired a filesystem by running sudo fsck.hfsplus -f /dev/sdb2 before unmounting a partition with sudo umount /mnt and putting a hard drive back to MBP...

===

This gave me a MBP which could boot to OS X although STILL using a broken AMD GPU: so it screen's image is very distorted (could browse the Internet but quite inconvenient to read a text), Launchpad is super laggy, and you can't switch to Integrated GPU using gfxCardStatus because: without AMD drivers (which we had to remove to successfully boot to OS X) Macbook Pro thinks its' internal screen is External Display and gfxCardStatus tells it is impossible to switch because External Display is using AMD GPU. Somewhere I found a suggestion that it is possible to rebuild a gfxCardStatus from the source code - https://github.com/codykrieger/gfxCardStatus - with removed or commented out 156-166 lines in the ./gfxCardStatus/Classes/GSProcess.m to make it to ignore the external display:

// find out if an external monitor is forcing the discrete gpu on
CGDirectDisplayID displays[8];
CGDisplayCount displayCount = 0;
if (CGGetOnlineDisplayList(8, displays, &displayCount) == noErr) {
for (int i = 0; i < displayCount; i++) {
if ( ! CGDisplayIsBuiltin(displays))
[list addObject:[NSDictionary dictionaryWithObjectsAndKeys:
Str(@"External Display"), kTaskItemName,
@"", kTaskItemPID, nil]];
}
}


So I rebuilt a gfxCardStatus using the instructions from the last reply of this issue -
https://github.com/codykrieger/gfxCardStatus/issues/229
(also had to download a MacOSX10.11.sdk from here - https://github.com/phracker/MacOSX-SDKs/releases - unpack and copy it to XCode's /Applications/Xcode.app/Contents/Developer/Platforms/MacOSX.platform/Developer/SDKs/MacOSX10.11.sdk - because of the Apple's stupidity the latest XCode for El Capitan does not include SDK for El Capitan!) However, it still didn't work - gfxCardStatus only pretended that it has switched to Integrated GPU, while in reality OS X did not let it switch! Even after I edited ./gfxCardStatus/Classes/GSGPU.m file to enable the mysterious "Nuke it from orbit switching" option, it still couldn't switch...

===

Then I discovered this interesting repository - https://github.com/0xbb/gpu-switch - which is partially similar by its' source code to gfxCardStatus but also has the "Login Hooks" (install_hooks.sh) to "automate the switching process for login/logout". Sadly it didn't work for me... However, there is a very interesting gpu-switch text file right at the root of this repository, which describes the EFI variables!

https://github.com/0xbb/gpu-switch/blob/master/gpu-switch

After studying it and also reading this issue's comments - https://github.com/0xbb/gpu-switch/issues/11 - I became confident to try this solution, but found out that my MacBook Pro 2011 8,2 with OS X El Capitan 10.11.6 is in a VERY problematic situation:

1) rEFInd is not installed, and to install it - must disable SIP protection. But I cannot boot to Recovery mode (Command+Option+R) or to OS X Installation DVD/USB (hold Option), (to disable SIP), because they freeze while booting! - although I removed AMD kexts from my system, of course these recovery tools are using AMD kexts integrated to their design. Also cannot use Rootfool hack ( https://github.com/gdbinit/rootfool ) to disable SIP during runtime, because it works only at OS X version older than 10.11.4

2) Tried overheating my Macbook Pro on purpose (forcing CPU usage to 100% and putting it to a tightly closed bag) to force it to shutdown from overheating and then quickly reboot so that Integrated graphics will be enabled during the boot time - making it possible to boot to Recovery. But because of the wonderful high end thermal paste I have applied not so long ago - cannot overheat it even after waiting for a long time! At this point I thought that could either: a) remove AMD kexts from Installation media, or b) to connect MBP's hard drive to a Linux machine again and run a bunch of chmods to remove the SIP flags from the directories mentioned here ( http://apple.stackexchange.com/questions/193368/what-is-the-rootless-feature-in-el-capitan-really ) which could potentially make a system unbootable, or c) to try installing rEFInd to HFS+ partition directly from a Linux machine with root rights because it will bypass SIP --- but have not explored these options, although some of them might have worked...

3) Wanted to boot a Linux LiveCD to edit the EFI variables from there, but no matter what I did: tried booting straight without GRUB option modifications, tried editing GRUB boot options (with "e" key) to add nomodeset / remove quiet splash / or both in every combination , or like suggested in this article ( https://wiki.archlinux.org/index.php/MacBookPro8,1/8,2/8,3_(2011) ) also add i915.modeset=0 radeon.modeset=0 or radeon.modeset=0 i915.modeset=1 i915.lvds_channel_mode=2 ; and then pressed Fn+F10 or Shift+Ctrl+Fn+F10 to boot with these options: but the Linux boot process always failed at different boot stages, no matter what popular user-friendly Linux distribution or what version of it I am trying: tried many releases of Ubuntu / Lubuntu / Fedora , even the old "AMD64 Mac" and "Alternate AMD64 Mac" images, but they always failed - either at the very beginning of boot process (black screen, or a black screen with a blinking or stuck _ character at the left upper corner) or failed at the very end of it - right before it is supposed to show a graphical desktop environment...

Later, totoe_84 wrote that he was able to boot Ubuntu in graphical mode using the following setup for GRUB:
  • To disable the AMD graphics card I added the following lines after set gfxpayload=keep
outb 0x728 1
outb 0x710 2
outb 0x740 2
outb 0x750 0
  • Next I added the following after quiet splash
    i915.lvds_channel_mode=2 i915.modeset=1 i915.lvds_use_ssc=0
(based on https://ubuntuforums.org/showthread.php?t=2157775 )

===

Then I remembered that there are not-mainstream Linux distributions for advanced users, which have a LiveCD without any graphical interface: you are dropped to a pure console and you are supposed to install the system along with only those graphical interfaces and software packages / groups of packages which you explicitly select. For example: Arch Linux (https://www.archlinux.org/) and Gentoo Linux (https://gentoo.org/) . Because their LiveCD does not have a graphical interface, they could be booted without a problem to a pure Linux console and there you could edit the EFI variables ! So here is a...

===
=== 100% WORKING SOLUTION
===
=== Force your MBP to ALWAYS use Intel integrated GPU (EFI variable fix)
===
=== to make it great again ! ;)
===


1) Create the Arch Linux LiveCD/LiveUSB :

You need a working computer for that and a spare CD/DVD/USB drive. Download the latest Arch Linux ISO image from this page - https://www.archlinux.org/download/ , at the time of writing it is archlinux-2017.03.01-dual.iso . Then you could either simply burn this ISO to CD/DVD (which later could be either inserted to MBP's SuperDrive or External DVD Drive connected to MBP by two USB cables) or create a bootable USB: use the great detailed instructions from this page, https://wiki.archlinux.org/index.php/USB_flash_installation_media

2) Boot to it: insert this CD/DVD/USB to Macbook Pro, hold Option key while booting, choose "EFI boot" (that is your bootable installation media), press "e" key to edit the GRUB options of the Arch Linux archiso x86_64 UEFI CD menu entry while it is selected at the main screen, add nomodeset to the end of this line and press Enter. If everything is done correctly, you will find yourself at the Linux console!

3) Edit EFI vars: looks like efivarfs filesystem is mounted by default! So you can already cd /sys/firmware/efi/efivars and ls to explore this directory and see if there is a "gpu-power-prefs-..." variable (where ... is UUID of this variable). If there is such a variable, its better to remove it with rm. In my case the efivarfs has been mounted by default with read/write permissions, but if you are getting the "operation not permitted" message while attempting to rm, it means that in your case efivarfs has been mounted as read-only and you need to remount it with read-write permissions and try again (credits to totoe_84 for this valuable addition) :
*) cd /
*) umount /sys/firmware/efi/efivars/
*) mount -t efivarfs rw /sys/firmware/efi/efivars/
*) cd /sys/firmware/efi/efivars/

If your screen is so distorted that it is difficult to see the letters, just start typing the rm gpu-power-pre and then press TAB key for autocompletion. In my case there were not such a EFI variable, only "gpu-active-..." and maybe somehow related "gfx-saved-config-restore-status-..." . Then I looked again at that gpu-switch text file (mentioned above, https://github.com/0xbb/gpu-switch/blob/master/gpu-switch),
and entered THESE COMMANDS:

*) chattr -i "/sys/firmware/efi/efivars/" <----- skip this command

Actually a gpu-switch script had "${sysfs_efi_vars}/${efi_gpu}" but I didnt have a "gpu-power-prefs-..." variable - so, partially by mistake, I didn't add that efi_gpu suffix and entered this incomplete path accidentally

*)
printf "\x07\x00\x00\x00\x01\x00\x00\x00" > /sys/firmware/efi/efivars/gpu-power-prefs-fa4ce28d-b62f-4c99-9cc3-6815686e30f9

Did not have a EFI "gpu-power-prefs-" variable so I thought that it will be OK to create a new one with a random UUID - in this case, taken directly from a gpu-switch script

*) chattr +i "/sys/firmware/efi/efivars/gpu-power-prefs-fa4ce28d-b62f-4c99-9cc3-6815686e30f9"

http://www.tecmint.com/chattr-command-examples/ - chattr (Change Attribute) is a command line Linux utility that is used to set/unset certain attributes to a file in Linux system to secure accidental deletion or modification of important files and folders, even though you are logged in as a root user.
...
Syntax of chattr ---> chattr [operator] [flags] [filename]
...
A file is set with ‘i‘ attribute (+i as you see in this command) ---> cannot be modified (immutable). Means no renaming, no symbolic link creation, no execution, no writable, only superuser can unset the attribute.
...
Operator
  1. + : Adds the attribute to the existing attribute of the files.
  2. : Removes the attribute to the existing attribute of the files.
  3. = : Keep the existing attributes that the files have.
This chattr command is supposed to lock a file to make it accessible only by "superuser" - and so that, while booting, your EFI will have no chance to screw up your gpu-power-prefs-... variable under any circumstances

*) cd /

Could not unmount efivars if you are inside this directory, so change to the root directory

*) umount /sys/firmware/efi/efivars/

Guarantees that your EFI variables are flushed to efivarfs filesystem, please unmount it safely before rebooting)

*) reboot

===> IF YOU DID EVERYTHING CORRECTLY, MOST LIKELY THAT YOUR MACBOOK PRO IS NOW USING INTEGRATED GRAPHICS WHILE BOOTING, AFTER BOOTING, AND IS WORKING GREAT AGAIN ! ;)

In the future maybe you could need to re-apply this solution if you would have to reset your PRAM / NVRAM / SMC because of some other problems, so remember this solution somewhere... Funny thing: now you can't switch to Discrete GPU even using gfxCardStatus, it is forever stuck at Integrated


I spent two working days to discover this solution, and really hope that it will work flawlessly for every MBP owner with a broken discrete GPU. Good luck!

Hello thanks for excellent solution. I did all with good results. My MBP boots on Intel video but when it gets to about 80% of progress bar fans are going on full speed and it restarts still with proper video output. Did any body had this problem? I'm not sure if this post is still active. Thanks for help.
 
  • Like
Reactions: AppleMacFinder
his fix should be universal for any Mac with dual graphics, regardless of whether a discrete GPU is AMD or NVIDIA, but personally I haven't tried it with other Macs. There could be some small differences though, e.g. the NVIDIA drivers should be removed from OS X in a different way, but maybe that wouldn't be required

I think it did the trick indeed, however, sometimes it still crashes (the GPU). I can see that GFXStatus has changed settings to the Intel HD graphics.
 
  • Like
Reactions: AppleMacFinder
Mr. (Ms?) @AppleMacFinder,

This worked like a charm for me. Torrented the iso, used rufus to put it on a usb drive with a Win10 laptop, typed in the commands (though the lazy guy in me would have preferred copy/paste, but alas...), rebooted, and voila! First boot in 3 weeks since it died.

I then upgraded the OS to 10.13.4 while the process was fresh in my mind. (Side note: THAT didn't go as smoothly as I'd hoped, but several reboots later, it's working again.)

So thank you very much. As someone who participated in the extended repair, I knew quite well what the problem was when it first manifested itself about two months ago. Once it truly died, I took it to the Apple Store to verify and indeed that was the cause.

So this is certainly the best news I've had all week (maybe month).

Again, thank you.
 
  • Like
Reactions: AppleMacFinder
Great news !!!

The Mac OS installer (USB Stick/Pendrive) also boots into Single User Mode. Tested with Sierra and High Sierra installers.

If you do not have a Mac OS system installed (HD / SSD empty), then you can now use the nvram gpu-power-prefs command with the Mac OS installer.

To get the graphical part of the Mac OS installer you need to configure nvram gpu-power-prefs for the Intel GPU.
Otherwise the Macbook Pro will freeze on the gray screen (problem with AMD6000Controller.kext).

As a bonus, you can also disable SIP with the csrutil command (El Capitan, Sierra and High Sierra). This Single User Mode is special.

Disable SIP:
Code:
csrutil disable

Enable SIP:
Code:
csrutil enable

SIP Status
Code:
csrutil status

I did a complete test:

1 - Clear NVRAM / PRAM

Press Option + Command + P + R keys at boot and wait reboot MacBook Pro.


2 - After reboot, press Option key at boot and plug Mac OS installer (USB Stick/Pendrive).
Now the gpu-power-prefs will start with the AMD GPU with red screen and white stripes.


3 - You will see the Mac OS installer icon and a Wi-Fi selection menu (red screen and white stripes).

Press the Command + S keys and hold down these keys and click the Mac OS installer icon.

Hold down the Command + S keys until the Single User Mode process is finished and the command prompt appears to write the nvram commands.


4 - Now write these nvram commands:
Code:
nvram fa4ce28d-b62f-4c99-9cc3-6815686e30f9:gpu-power-prefs=%01%00%00%00
nvram boot-args="-v"


5 - Reboot the system:
Code:
reboot


6 - After reboot (screen OK), press Option key at boot -> show Mac OS installer icon (USB Stick/Pendrive) -> click Mac OS Installer and start installation Mac OS.


7 - During the Mac OS installation, after the second reboot (I guess), Macbook Pro will freeze because of AMDRadeonX3000.kext.

IOConsoleUsers: gIOScreenLockState 3, hs 0, bs 0, now 0


8 - Press power button to turn off MacBook Pro if the Macbook Pro does not automatically restart (overheat system).


9 - Follow The Guide MikeN - #875 -> move AMDRadeonX3000.kext to directory /Extensions-off. Do not forget that El Capitan, Sierra and High Sierra have to be with SIP disable to move the AMDRadeonX3000.kext.


10 - Reboot Macbook Pro and finish installing Mac OS.

11 - Load AMDRadeonX3000.kext or use Login Hook -> The Guide MikeN - #875

Manual load AMDRadeonX3000.kext (decrease AMD GPU and System temperature)-> after login screen -> Finder -> Applications -> Utilities -> Terminal
Code:
sudo kextload /System/Library/Extensions-off/AMDRadeonX3000.kext
[doublepost=1517191633][/doublepost]

Instructions above.

Would above mentioned steps work on my Mac Book Pro, to do a clean install of my present OS 10.9.5 from a usb key? My AMD is failed on this Mac Book Pro 2011 (2.2GHz Intel core i7)?
 
  • Like
Reactions: AppleMacFinder
[doublepost=1522068399][/doublepost]just wanted to say the "100% working solution" worked like a charm...absolutely no thanks to apple who simply told me that my MacBook book pro was "vintage" and they could not help me..and neither did any of my local mac repair dealers who told me that the video issue was infact a DESIGN FLAW and although apple had the extended repair program which I participated in..in the end, they told me is was at best a "bandaid repair and that it would happen again...now I have my MacBook back and working like new thanks to macrumors 6502a... you rock!!!

Followed the instructions, but got stopped with Operation not permitted, and so unmounted according to directions, but when I tried the mount command, with -t efivars rw /sys... It returned "unknown filesystem type 'efivars'. What can i do? I am not very experienced with command-line. It also reports "can't find in /etc/fstab" when I enter

mount -t efivars -rw /sys/firmware/efi/efivars

Did I make some syntax mistakes? (I noticed what I thought were a few typo errors in the original post.)

I'm worried now because when I go back to the beginning of step 3, and am into the efivars directory, nothing is listed when I enter the "ls" command. Is it possible I wrecked the filesystem?

Thanks.

John
 
Last edited:
  • Like
Reactions: AppleMacFinder
Would above mentioned steps work on my Mac Book Pro, to do a clean install of my present OS 10.9.5 from a usb key? My AMD is failed on this Mac Book Pro 2011 (2.2GHz Intel core i7)?

I installed only once the Mavericks (10.9) on the Macbook Pro 2011 and worked with nvram gpu-power-prefs.

After the nvram fa4ce28d-b62f-4c99-9cc3-6815686e30f9:gpu-power-prefs=%01%00%00%00, then if you can get to the Mavericks installation screen (10.9) you will be able to install Mavericks.

And yes, during the installation, Macbook will probably freeze due to AMDRadeonX3000.kext being loaded after the first or second reboot of the installation (rebuild cache) -> IOConsoleUsers: gIOScreenLockState 3 -> force shutdown press power button. That is why boot verbose is necessary (nvram boot-args).

Move AMDRadeonX3000.kext in Single User mode (MikeN Guide - #875) and then reboot to continue the Mavericks installation.

If you want to make LoginHook, do only after completely finish the installation of the Mavericks (create user login, choose keyboard, etc).
Test manual loading first with kextload AMDRadeonX3000.kext (after installation finish) with Finder -> Applications -> Utilities -> Terminal.

Boot in Single User mode (Command + S at boot):

1 - Set to Intel GPU -> gpu-power-prefs
Code:
nvram fa4ce28d-b62f-4c99-9cc3-6815686e30f9:gpu-power-prefs=%01%00%00%00


2 - Set boot verbose and Reboot Macbook Pro:
Code:
nvram boot-args="-v"
reboot


3 - Boot Mavericks installer -> press Option at boot.


Attachments

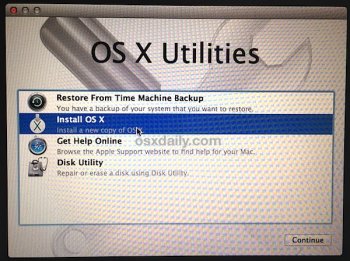
  • start-clean-install-os-x-mavericks.jpg
    start-clean-install-os-x-mavericks.jpg
    122.6 KB · Views: 218
Last edited:
  • Like
Reactions: AppleMacFinder
@AppleMacFinder thank you a lot for the solution posted!

I've done the steps in 100% working solution and was able to boot. After testing for half an hour, I see how previewing video in iMovie became clumsy. I also see how some animations started working not so well (for instance, OneNote login form). So I assume the Intel graphics card is in use all the time.

The curious issue I have is once I start gfxCardStatus that I got from https://gfx.io my MacBook immediately freezes. I see how letter "i" appears on the top panel but I am completely frozen with no mouse cursor visible. Automatic reboot follows shortly.
 
  • Like
Reactions: AppleMacFinder
It was working just fine for me for a while now, udpated to 10.13.4 last night and now I can't adjust the brightness nor my macbook goes to sleep when i close the lid. I tried running those commands again but noticed that only
AMDRadeonX4000.kext, AMDRadeonX5000.kext and AMDRadeonX5000HWServices.kext were available to be moved to AMD_Kexts, all the other AMD kext files were gone, maybe 10.13.4 removed them? Was anybody facing the same problem but found a workaround this?
 
Last edited:
  • Like
Reactions: AppleMacFinder
There is a lot of solutions floating around on the forum, Ive found a solution based on combining a few of them. I can honestly say the solution I present to you below has worked for me and is a pretty straight forward option.
This solution is tested on my MacBook Pro 17" 2011 running the latest Mac OS X High Sierra 10.13.3 (with supplemental Indian Character fix)

No Linux Needed - and little info down the bottom to help get you past the black screen if you are stuck on it.

Hope this Helps:

Disable Discrete Graphics in MacBookPro 17”

1. If you have previously attempted to remove AMD kexts, revert your system to the original state by installing the latest Mac OS combo update. Installing the update will update your kext files to the latest version. After the update is finished, your MacBook will restart and freeze as soon as the dGPU is activated. Shutdown or force a restart.


2. Clear the NVRAM by holding Option + Command + P + R on startup until the MacBook reboots.


3. Boot into the single user mode by pressing Command + S on startup. Execute the following commands to enable the iGPU during the boot phase:


sudo nvram fa4ce28d-b62f-4c99-9cc3-6815686e30f9:gpu-power-prefs=%01%00%00%00

reboot


4. Disable System Integrity Protection to allow editing system files. Boot into the verbose recovery mode by pressing Command + R + S on startup. Execute


csrutil disable

reboot


5. Go again into the the single user mode by pressing Command + S on startup. Mount root with write permissions via


/sbin/mount -uw /

(Note the space in front of the last forward slash). Next, create a backup folder by executing


mkdir backup

(To remove a directory rm -R Archives)

Move the AMDRadeonX3000.kext file to the backup folder you created by executing:


mv System/Library/Extensions/AMDRadeonX3000.kext backup/


Moving this kext file is sufficient to prevent graphics switching.


reboot


6. Re-enable System Integrity Protection inside the verbose recovery mode (Command + R + S) by executing


csrutil enable

reboot


7. Boot into Mac OS normally and start the Terminal. Navigate to your backup folder using


cd /backup


Load the former kext file manually by executing:


sudo kextload AMDRadeonX3000.kext


This will prevent the dGPU from idling at maximum TDP. This will not re-enable graphics switching. A restart is not required.


8.Now create a login hook to run every-time your mac turns on:


sudo mkdir -p /Library/LoginHook

sudo nano /Library/LoginHook/LoadX3000.sh


contents:


#!/bin/bash

kextload /AMD_Kexts/AMDRadeonX3000.kext

exit 0


Save the file, then execute the following commands:


sudo chmod a+x /Library/LoginHook/LoadX3000.sh

sudo defaults write com.apple.loginwindow LoginHook /Library/LoginHook/LoadX3000.sh


9.Now change the GPU Switch Options for when your computer sleeps with lid close:

GPU Switch Options: (0 - Integrated, 1 - Discrete, 2 - Dynamic)


To Show current pmset gpuswitch:


pmset -g


Change pmset gpuswitch to Integrated video card.


sudo pmset -a gpuswitch 0

sudo shutdown -r now


Boot normal & test close and open lid -> sleep


If you need to check which AMD Kext are loaded:

sudo kextstat | grep AMD


Make sure the AMDX3000 is in the list shown.


Closing remarks:


Steps 4, 5 ,6 and 9 will have to be executed after each major system update that breaks graphics switching. Step 3 has to be repeated after a NVRAM reset.

Step 7 will have to be executed after every system restart to prevent overheating (If you complete step 8, you are not required to do step 7 after every reboot).


Optional Note:


If at any point you are unable to turn on your macBook Pro (Stuck on the black screen without boot sound, or after a sleep the screen just wont turn on)

leave it on in its bricked like state, and place it in an area where the computer doesn’t get much ventilation (Like a laptop bag).

leave it in for about 10-15 min. the computer will get very hot!

Now, take the laptop out of the bag, and force a SMC Reset but holding Ctrl + Alt + Shift + power button.

as soon as the computer has turned off, turn it on again. Your computer should now boot up, and you can follow the steps above to try and get it working again.


This may not work for everyone, and is not particularly good for the macBook, but its the only way I have been able to get my MacBook to turn on for me.


Hope the steps above help!

I used this method and finally my MBP 2011 can boot again.
Unfortunately when i close the lid it will overheat and not wake up again.
Any possibility to fix these hibernate/sleep issues?

Btw I am on 10.13.4.

Thanks!
 
  • Like
Reactions: AppleMacFinder
Thanks for the answer. There are many cases that I work in my pc for 3-4 hours without saving my work. Is it possible that the discrete card's failure will occur while I am working, so I will lose all the unsaved work for these 3-4 hours?
It is more likely that your GPU would break down between the reboots, because of the physical nature of that process (solder balls shrinking/expanding while the temperatures are not constant), but just in case please backup your work more often. BTW it is unlikely that your image will be lost completely, it should become distorted but still visible enough to do some simple tasks like saving your work
to keep the AMD from happening again when I do a reboot...i am not clear on the term UUID you mention in step 3...could you give me an example?
for some people my original solution is permanent (well, until the NVRAM reset or the complete battery discharge), for the other people it is temporary and its' effect is lost after a reboot - so they have to follow the alternative solutions posted in this thread
Hello thanks for excellent solution. I did all with good results. My MBP boots on Intel video but when it gets to about 80% of progress bar fans are going on full speed and it restarts still with proper video output. Did any body had this problem? I'm not sure if this post is still active. Thanks for help.
Are you sure you have completed all the steps, including the removal of AMD drivers?
Hello. Does the fix from the first post work with high sierra? Thanks.
As far as I know - yes it works but its' less reliable, and high sierra is still considered a "beta version OS" by many. But if you really need a high sierra - please search this thread for any posts mentioning it, at the top of this page there is a search-in-thread tool
Ok, so when I use the LiveCD I have no GPU in my list. What do I do?
Not sure what you meant by this. If you mean "no existing gpu variable to remove", then just create a new one with a correct value according to the instructions
Followed the instructions, but got stopped with Operation not permitted, and so unmounted according to directions, but when I tried the mount command, with -t efivars rw /sys... It returned "unknown filesystem type 'efivars'. What can i do? I am not very experienced with command-line. It also reports "can't find in /etc/fstab" when I enter

mount -t efivars -rw /sys/firmware/efi/efivars

Did I make some syntax mistakes? (I noticed what I thought were a few typo errors in the original post.)

I'm worried now because when I go back to the beginning of step 3, and am into the efivars directory, nothing is listed when I enter the "ls" command. Is it possible I wrecked the filesystem?
I think, such problems could be fixed by resetting your NVRAM to its' original state, do it and then try again - https://www.macworld.com/article/2881177/macs/how-to-reset-your-macs-nvram-pram-and-smc.html - and if it doesnt work, could try the alternative solutionshttps://www.macworld.com/article/2881177/macs/how-to-reset-your-macs-nvram-pram-and-smc.html
 
Fix for 17 inch dGPU switch issue

(Tested successfully in both “early” and “late” 2011 17 inch MacBook Pro)


This guide is based on the experience of many users (including me) while trying to fix the very well known issue with AMD dGPU on 17’’ MacBook Pro from 2011 (both early and late):


Step 0) As a starting point I made a clean installation of Sierra (Version 10.12.4) — This is just a step for establishing a common middle ground and is not really needed….

0.1) To do this just download the installer from the App Store and then use “DiskMaker X” to create a bootable installation.

0.2) After the bootable image is created, proceed to turn off your computer and hold the “Alt” or “Options” Key. Select the Sierra installer and proceed with the installation (I format the HDD partition to make a clean install on it)


Note: You might need to do this on another computer. Just buy one of those cheap usb to sata connectors and use it to connect it to another Mac so you don’t risk having your installation failed because of your machine.


Step 1) Prepare a Bootable USB pendrive with a non GUI Linux (Credits to AppleMacFinder)


1.1) Download ArchLinux ISO

You need a working computer for that and a spare CD/DVD/USB drive. Download the latest Arch Linux ISO image from this page - https://www.archlinux.org/download/ , at the time of writing it is archlinux-2017.03.01-dual.iso . Then you could either simply burn this ISO to CD/DVD (which later could be either inserted to MBP's SuperDrive or External DVD Drive connected to MBP by two USB cables) or create a bootable USB: use the great detailed instructions from this page, https://wiki.archlinux.org/index.php/USB_flash_installation_media


1.2) Creating the bootable USB with the .iso:

In macOS

First, you need to identify the USB device. Open /Applications/Utilities/Terminal and list all storage devices with the command:

*) diskutil list


Your USB device will appear as something like /dev/disk2 (external, physical). Verify that this is the device you want to erase by checking its name and size and then use its identifier for the commands below instead of /dev/diskX.

A USB device is normally auto-mounted in macOS, and you have to unmount (not eject) it before block-writing to it with dd. In Terminal, do:

*) diskutil unmountDisk /dev/diskX


Now copy the ISO image file to the device. The dd command is similar to its Linux counterpart, but notice the 'r' before 'disk' for raw mode which makes the transfer much faster:

*) sudo dd if=path/to/arch.iso of=/dev/rdiskX bs=1m

After completion, macOS may complain that "The disk you inserted was not readable by this computer". Select 'Ignore'. The USB device will be bootable.


Step 2) Boot to Linux (Credits to AppleMacFinder):

2.1) Boot to it: insert this CD/DVD/USB to Macbook Pro, hold Option key while booting, choose "EFI boot" (that is your bootable installation media), press "e" key to edit the GRUB options of the Arch Linux archiso x86_64 UEFI CD menu entry while it is selected at the main screen, add nomodeset to the end of this line and press Enter. If everything is done correctly, you will find yourself at the Linux console! (It takes some time so be patient and wait for the prompt)


2.2) Edit EFI vars: looks like efivarfs filesystem is mounted by default! So you can already cd /sys/firmware/efi/efivars and ls to explore this directory and see if there is a "gpu-power-prefs-..." variable (where ... is UUID of this variable).


2.2-Case 1:

If there is such a variable, its better to remove it with rm.

*) rm gpu-power-prefs-…


In my case the efivarfs has been mounted by default with read/write permissions, but if you are getting the "operation not permitted" message while attempting to rm, it means that in your case efivarfs has been mounted as read-only and you need to remount it with read-write permissions and try again (credits to totoe_84 for this valuable addition) (Try this and then try to remove it):

*) cd /

*) umount /sys/firmware/efi/efivars/

*) mount -t efivarfs rw /sys/firmware/efi/efivars/

*) cd /sys/firmware/efi/efivars/

*) rm gpu-power-prefs-…


If this also fails (If you still can’t erase the file) use chattr command to disable file immutability and then erase the file:

*) chattr -i "/sys/firmware/efi/efivars/gpu-power-prefs-…”

*) cd /sys/firmware/efi/efivars/

*) rm gpu-power-prefs-…


2.2-Case 2:

The file gpu-power-prefs-… doesn’t exist well then you don’t have to delete it hahaha. (I repaired 2 17 inch models and 1 didn’t have it, so it’s fine)


2.3) Create a new gpu-power-prefs-… file (Original credit mentioned above, https://github.com/0xbb/gpu-switch/blob/master/gpu-switch, Credits to AppleMacFinder):

*) printf "\x07\x00\x00\x00\x01\x00\x00\x00" > /sys/firmware/efi/efivars/gpu-power-prefs-fa4ce28d-b62f-4c99-9cc3-6815686e30f9


2.4) Add immutability to the gpu-power-prefs-… file (Credits to AppleMacFinder):

This chattr command is supposed to lock a file to make it accessible only by "superuser" - and so that, while booting, your EFI will have no chance to screw up your gpu-power-prefs-... variable under any circumstances


*) chattr +i "/sys/firmware/efi/efivars/gpu-power-prefs-fa4ce28d-b62f-4c99-9cc3-6815686e30f9"


2.5) Unmount efivars and reboot (Credits to AppleMacFinder):

Could not unmount efivars if you are inside this directory, so change to the root directory

*) cd /

*) umount /sys/firmware/efi/efivars/

Guarantees that your EFI variables are flushed to efivarfs filesystem, please unmount it safely before rebooting)

*) reboot


3) Eliminate AMD Kexts (Credits to newfield),
Note: You might need to do this every time you do an OS updates, since each update normally writes the AMD Kexts again.


(His words and this also happened to me!: After disabling the dGPU using Arch, normal boot would hang halfway. Although safe boot would work. I wound up having to remove all the AMD kext files in the Terminal in Recovery Console)


Trying to remove them in Single User just gave me sandbox errors. (Summary -> Don’t do it in Single User Mode the one that you boot with Cmd + S)


3.1) So what you have to do is:

If you have FileVault Unlock it first:

Unlock first.

Then Boot into Recovery (“cmd + r”, it will boot without failing, if it fails then repeat step 2 and then after that boot directly into recovery with command + R, I had to do this once because the dGPU got active again after booting into the os with AMD kexts)

*) Boot into recovery mode (Command + r)

*) Start Terminal

*) diskutil cs list (find UUID for drive)

*) diskutil coreStorage unlockVolume UUID

*) cd /Volumes/Macintosh\ HD

*) mkdir AMD_Kexts

*) mv System/Library/Extensions/AMD*.* AMD_Kexts/

*) reboot


(If you only have one storage with 1 partition just use "cd /Volumes/Macintosh\ HD" and the remaining commands after starting the terminal)


Extra STEP), if your PC is now working! Download “steveschow” branch of gfxCardStatus (gfxCardStatus v2.4.3i) or just download the app directly from:

URLS:

https://github.com/steveschow/gfxCardStatus/releases

https://github.com/steveschow/gfxCardStatus

With this application you can even prove that the dedicated GPU can't get activated. Even if you try to change the selected GPU to the dedicated one, it just won't change.


—————

The End!

AND VOILA!!! You have a working 17 inch MacBook Pro. As I said I tested this with an early 2011 and late 2011 17 inch MacBook Pro’s and both are now running (Before they were both dead)


Big thanks to AppleMacFinder, to the makers and contributors of this thread, to gfxCardStatus maker and forkers :D (steveschow) and to switch-gpu makers I can’t thank you guys enough as I am so happy to bring both of this incredible machines back to life. With this post I am not trying to take any credit, but as I had 2 machines I run into different issues with both, which could be helpful to others, thats why I was inclined to make “my own” guide and share it with you.


I just created an account here to share this, Hope it helps more people!

Hello everybody! Thanks for the hard work you guys are putting in this problem! I do have the same problem.. I have heated the AMD chip already twice, so it will at least start up for a few more weeks. Now I want to disable the dGPU and trying to use this guide. But I can't come trough, can anybody tell me if I'm doing something wrong? I've put a picture with the post, so you guys can see what i've done.

I'm afraid that the OS X partition became a "read-only" partition (because of too many emergency shutdowns I did while desperately trying to boot OS X with a failed GPU). Can this be the problem that it keeps saying "Operation not permitted"?

Hope you guys can help!
IMG_5979 (1).jpg
 
  • Like
Reactions: AppleMacFinder
It was working just fine for me for a while now, udpated to 10.13.4 last night and now I can't adjust the brightness nor my macbook goes to sleep when i close the lid. I tried running those commands again but noticed that only
AMDRadeonX4000.kext, AMDRadeonX5000.kext and AMDRadeonX5000HWServices.kext were available to be moved to AMD_Kexts, all the other AMD kext files were gone, maybe 10.13.4 removed them? Was anybody facing the same problem but found a workaround this?

MacOS High Sierra 10.13.4 Combo Update has the kext AMDRadeonX3000.kext.

I've seen the contents of ComboUpdate with Pacifist after mounting the macOSUpdCombo10.13.4.dmg file.

I'm still in HighSierra 10.13.3. I'm going to do the update for 10.13.4 only tomorrow.

Download macOS High Sierra 10.13.4 Combo Update
https://support.apple.com/kb/DL1959?viewlocale=en_US&locale=en_US

Pacifist
https://www.charlessoft.com
 

Attachments

  • HighSierra-10.3.4-ComboUpdate-AMD-Kexts.png
    HighSierra-10.3.4-ComboUpdate-AMD-Kexts.png
    271 KB · Views: 197
  • HighSierra-10.3.4-ComboUpdate-Extensions.png
    HighSierra-10.3.4-ComboUpdate-Extensions.png
    269.2 KB · Views: 208
  • Like
Reactions: AppleMacFinder
It was working just fine for me for a while now, udpated to 10.13.4 last night and now I can't adjust the brightness nor my macbook goes to sleep when i close the lid. I tried running those commands again but noticed that only
AMDRadeonX4000.kext, AMDRadeonX5000.kext and AMDRadeonX5000HWServices.kext were available to be moved to AMD_Kexts, all the other AMD kext files were gone, maybe 10.13.4 removed them? Was anybody facing the same problem but found a workaround this?

I installed combo update 10.3.4 and it is the biggest update so far. At least 5 reboots until completing the installation.

It took 40 minutes the entire installation. This with an SSD disk.

During one of the reboots the macbook made a long beep and restarted again.

In the middle of the installation, in one of several reboots, the progress bar stopped at 75%. I had to force a shutdown (power button) - move the AMDRadeonX3000.kext - Reboot -> continue the installation.

Brightness is controlled by the AMD6000Controller.kext. If you have moved this kext, you will lose control of the brightness.

These kexts are mandatory to stay in /System/Library/Extensions during boot (brightness control):

AMD6000Controller.kext

AMDLegacySupport.kext

AMDLegacyFramebuffer

AMDSupport.kext

AMDFramebuffer.kext


In your case - AMDRadeonX3000.kext in /AMD_Kexts -> kextload manual -> power off AMD GPU after login:

/AMD_Kexts
AMDRadeonX3000.kext
Code:
sudo kextload /AMD_Kexts/AMDRadeonX3000.kext


1 - Move AMDRadeonX3000.kext -> MikeNGuide - #875

2 - Rename old AMDRadeonX3000.kext and move new AMDRadeonX3000.kext after update -> #1425
 
Last edited:
  • Like
Reactions: AppleMacFinder
Hi, Thank you for your instructions !

The first step work fine with my BMP 15" early 2011 (but It's very very slow ;-) ) ... but the second one don't work :
when I boot on my USB key (with Arch Linux Live on it) and If I choose "Arch Linux arches X86_64 UEFI CD" ... there is nothing, excepted some words on the left top ... and after a black screen ...

Can you help me ?
have you had success using arch Linux?
 
  • Like
Reactions: AppleMacFinder
After the modification, when I insert a cable for external display, mac understands it and the screen flashes but there is no output to the external display. Is it normal the screen flash?
 
  • Like
Reactions: AppleMacFinder
Register on MacRumors! This sidebar will go away, and you'll see fewer ads.