These are the stickers I mentioned.
The two stickers are emi tape not some sort of tamper proof label.
These are the stickers I mentioned.
Arcadeez:
Have you had any fan issues with the original hard drive after installing the SSD?
Also can you post links to exactly which two cables you purchased, the sata and the y-spliter?
This would be a huge help!
Arcadeez:
Have you had any fan issues with the original hard drive after installing the SSD?
This would be a huge help!
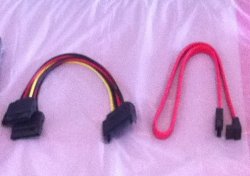
Sorry, I didn't take a close up photo. Let me re-post the previous pictures for reference.
However, I just purchased the exactly same cables posted in this previous thread.
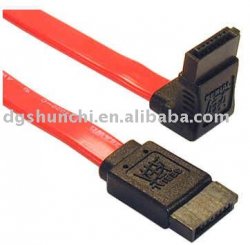
For the SATA cable, I just purchased Sata 2, I couldn't find any labeled as Sata 3. It still works and linked up to 6G.
I plugged the right angle (90 degree) SATA cable to the motherboard, and the straight end to the SSD.
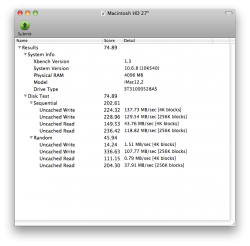
Now, I am using that iMac to reply this post.")
Will this slimline connector fit the SSD?
It appears it will fit the LB.
22 Pin SATA Female to Female Data Power Cable for HDD:
http://cgi.ebay.com/ws/eBayISAPI.dll?ViewItem&item=180650813025&ssPageName=STRK:MEWNX:IT
Thanks ... Ken
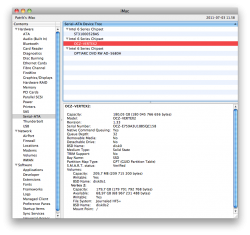
Yes, I read ChargedPC.
So, first time I tried the straight end to the motherboard, but I found a bit difficult to put back the MB to the iMac case, then I reversed, the right angle to MB, and the straight end to SSD.
Here is my pic for the SSD's SATA cable.
Awesome - Did you use tape to hold your SSD there? I am thinking about going to Home Depot and getting some hardware to rig up my own little bracket for mine. We'll see… UPS can't get here fast enough!!!
- Joe
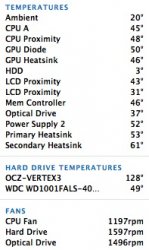
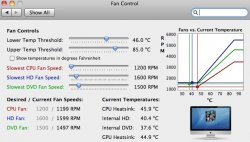
Anybody else waiting for the proper parts so there isn't any fan/temp issues? I figure it would be best to do it the way Apple sets it up from the factory with the BTO SSD like in this thread: https://forums.macrumors.com/threads/1178786/
I'm hesitant to jerry-rig such a fine machine.
okay, like I said, ChargedPC said the 90 degree Sata cable will not fit on the motherboard because it is so close to all other cables there. Thanks Arcadeez! I am doing mine as soon as I get my box from UPS - I am going to record everything too so I can post it on YouTube!
- Joe
Hi
My first attempt was with a slimline sata. I didn't remove the motherboard, just removed the screws and tilted it upwards and managed to get the cable in place. I placed the SSD underneath the DVD. Took about two hours, I was going slow and just removing as little as possible. Unfortunately, no ssd showed up. Turns out I had the wrong cable, It should have been micro sata, not slimline.
So I took the computer apart again, removed the motherboard. Went smooth, maybe 45 min. Took the DVD cable with me to the store and found out that it was micro sata, and only 13 pin, not 16 (7+7+2) pin which is what the store guy picked out first.
Installed the cables again, and this time I put the SSD next to the HDD, under the heat pipes from the graphics card. It is a snug fit so I didn't even bother taping it in place.