Become a MacRumors Supporter for $50/year with no ads, ability to filter front page stories, and private forums.

MacManager123

macrumors newbie
Dec 2, 2023
11
4
Principally, the SSD should work, but I have never heard of this brand, hence I personally would go with a Crucial or a Western Digital NVMe SSD. You also might want to add a 3mm thin metal cooler over the SSD which isa minor additional cost.

The rest of your plan sounds good. For peace of mind I recommend to add a step 6: after you seal it, place the iMac carefully screen down on a blanket on an even floor/table and let it rest there for 24h so that the weight of the iMac itself helps fastening the adhesive strips.

Good luck,
Magnus
How about a 500GB Crucial P3? Also, how do you recommend cloning the drive? And has anyone used These adhesive strips before? Or maybe I should just go with Ifixit or OWC. 🤔
 

mbosse

macrumors 6502a
Original poster
Apr 29, 2015
629
199
Vienna, Austria
How about a 500GB Crucial P3? Also, how do you recommend cloning the drive? And has anyone used These adhesive strips before? Or maybe I should just go with Ifixit or OWC.
Not a great fan of those low-budget drives like Crucial P3/2/1 (write endurance is not good (110TB for the 500GB P3), and for a rather involved upgrade like with the iMac you don't want to repeat the process after a few years). Get a much lauded Western Digital Blue SN570 or a Black SN750 or SN770, which have roughly 3x the write endurance. For a more comprehensive overview on suitable drives, go here: https://www.tonymacx86.com/threads/choosing-a-compatible-nvme-ssd-for-your-macos-boot-drive.323479/

I personally restore from a Time Machine backup, but if you want to clone I'd use Carbon Copy Cloner. IIRC, you have an unsupported macOS on your machine via a patcher, not sure if that works as I have no experience with such.

Best,
Magnus

(edited 10 Dec for update on recommended SSDs)
 
Last edited:

MacManager123

macrumors newbie
Dec 2, 2023
11
4
Well I just completed the upgrade, and so far is working smoothly. I went with a 500GB WD Black SN750 se and this adapter and getting ~750r/w which is a massive improvement but still not even close to the advertised 3600 read speeds for the ssd because of the 2x pcie lane. The IMac had never been opened before (as far as I know) and it was fairly simple to remove the display except for the three antenna sections on the right side which have wider adhesive. For these, I used the other end of the pizza cutter to cut it, being very careful about the display with those delicate ribbon cables. After disconnecting the display cables and removing the display completely, it was a breeze to remove all the internals thanks to OWC's extremely helpful guide, just make sure you keep track of all the screws. When inserting the adapter into the slot, it took a large amount of force to get it to seat fully, I suspect because the slot had never been used before. As for Kapton tape, none was needed because the adapter already had black tape/coating on the pins. No screw was present on the mother board, but the adapter did come with one. After putting all the internals back, I secured the display with painters tape, turned it on, and immediately saw "the disk you inserted was not readable by this computer". I initialized it and formatted it as apfs. As for cloning, I tried Super Duper for the first time and will never use anything else again. It has a very smooth UI and copied the entire volume in 10 min. Upon boot everything was amazingly fast, however I noticed that smart status was verified whereas most others who did this upgrade had unsupported smart status. I have no idea why this would be except for maybe the ssd/adapter combo? But anyway, as for sleep I have not yet tested and will update when I do. Honestly, the hardest part of this upgrade was removing the old adhesive, which I used rubbing alcohol for. I ordered these adhesive strips even though there were some reviews saying their displays fell off. When applying them I first thoroughly cleaned off the old adhesive residue with rubbing alcohol, then heated the chassis with a hair drier, and after applying the adhesives, I left the IMac face down with weights on top for a good 16 hours. Will update on how they hold up.

ps. Is there any way to make it run with 4 pcie lanes?

Screen Shot 2023-12-27 at 11.13.30 AM.png

Screen Shot 2023-12-27 at 11.14.53 AM.png
 
  • Like
Reactions: mbosse

MacMore

Suspended
Jan 4, 2024
33
13
The limitations to the amount of PCI-E lanes is limited by the PCI-E version in these Macs unfortunately. which means while you won't get the absolute performance of the drive it will still be significantly faster than going through the SATA bus either way.

In really simple terms it's a limitation of PCI-E 3.0.
 

MacMore

Suspended
Jan 4, 2024
33
13
For those not wishing to take apart their Macs, I recommend a NVMe enclosure and a TB2 adapter. I am currently using a Trebleet Dual Slot that has 2 NVMe slots and is currently booting 12.1 on a Crucial P5 1TB on a Late 2013 21.5". Its for sure not the most cost effective solution as the enclosure was 200$ and the price of the NVMe drive you get, but its a fantastic easy setup with no disassembly and it can be used with multiple Macs if you're like me and have a bunch laying around. View attachment 1929217
Thanks this is useful, as these machines are super painful to take apart I may pursue this option, the net benefit is also that I could use the same drive with my my M1 MacBook Pro at some point later.
 
  • Like
Reactions: Jack Neill

MacManager123

macrumors newbie
Dec 2, 2023
11
4
Thanks this is useful, as these machines are super painful to take apart I may pursue this option, the net benefit is also that I could use the same drive with my my M1 MacBook Pro at some point later.
I would just take it apart, as OWC has great tutorials on how to do so, and (depending on you model) you would have much faster r/w speeds. Honestly, the hardest part is removing the old adhesive.
 

MacMore

Suspended
Jan 4, 2024
33
13
I don't understand how so actually Thunderbolt is PCI-E (essentially) as is the NVME port. These really aren't the easiest Macs to take apart. What are we doing here?

Thunderbolt off PCI-E 3.0 uses four lanes also and accesses the bus directly, an internal drive, really, on a technical level can't be any faster than just using the TB2 adapter with an external drive....

Unless I am missing something of course, on a technical level whether internal or external, the bus cannot be any faster than what it is.

That is provided you are actually using a USB-C type (Thunderbolt 3) NVME external NVME case....
 
Last edited:

MacManager123

macrumors newbie
Dec 2, 2023
11
4
I don't understand how so actually Thunderbolt is PCI-E (essentially) as is the NVME port. These really aren't the easiest Macs to take apart.
Assuming your mac uses TB2 then the max speed for that would be 2500mbps which is slower than a pcie x4 slot (7880mbps). If it was a pcie x2, than TB2 would be faster (1970 mbps vs 2500). If your mac has TB3 than the max speed would be 5000 mbps. Over all, it really depends on what ssd you're using.
 

MacMore

Suspended
Jan 4, 2024
33
13
Assuming your mac uses TB2 then the max speed for that would be 2500mbps which is slower than a pcie x4 slot (7880mbps). If it was a pcie x2, than TB2 would be faster (1970 mbps vs 2500). If your mac has TB3 than the max speed would be 5000 mbps. Over all, it really depends on what ssd you're using.
Even on a point of technicality none of the read/write speeds are getting even close to the maximum of TB2. If you go back and look at the speeds provided by an external drive you will see my point it's not any faster or slower. It really doesn't support your point that an internal drive would be faster.
 

MacManager123

macrumors newbie
Dec 2, 2023
11
4
Even on a point of technicality none of the read/write speeds are getting even close to the maximum of TB2.
A pcie x4 lane has max speeds of 7880 mbps while TB2 only has 2500. Again, the max speed will always be limited by the speed of the ssd. This ssd has a max speed of 7300, and would not be able to run at it's max speed if over TB2, whereas over pcie x4, it would be able to.
 
Last edited:

MacMore

Suspended
Jan 4, 2024
33
13
A pcie x4 lane has max speeds of 7880 mbps while TB2 only has 2500. Again, the max speed will always be limited by the speed of the ssd. This ssd has a max speed of 7300, and would not be able to run at it's max speed if over TB2, whereas over pcie x4, it would be able to.
It may help to post the actual drive not the mounting methods.
 

woefi

macrumors member
Oct 17, 2013
79
43
Anyone done this with a 2019 5K iMac?
I have done this with my 2019 4K iMac which only had a 256 NVMe blade and no SATA cables.
After doing this to my late2013, the 2019 was easy as pie. Just needed the Sintech Adapter and the SATA-cable (923-0641)

I built in a 970 EVO Plus 1TB (which unfortunately is a suboptimal model for a mac as it known to take over a minute for TRIM on every boot) Speeds: 3000R/2900W until SLC cache is full.
At the SATA I connected a 2TB Crucial MX500 SSD for bulk storage.
This was ca. 2021, so today I recommend a 4TB SSD and a 2TB NVMe which are importantly NOT by Samsung.
 
  • Like
Reactions: mbosse

MacManager123

macrumors newbie
Dec 2, 2023
11
4
Well I just completed the upgrade, and so far is working smoothly. I went with a 500GB WD Black SN750 se and this adapter and getting ~750r/w which is a massive improvement but still not even close to the advertised 3600 read speeds for the ssd because of the 2x pcie lane. The IMac had never been opened before (as far as I know) and it was fairly simple to remove the display except for the three antenna sections on the right side which have wider adhesive. For these, I used the other end of the pizza cutter to cut it, being very careful about the display with those delicate ribbon cables. After disconnecting the display cables and removing the display completely, it was a breeze to remove all the internals thanks to OWC's extremely helpful guide, just make sure you keep track of all the screws. When inserting the adapter into the slot, it took a large amount of force to get it to seat fully, I suspect because the slot had never been used before. As for Kapton tape, none was needed because the adapter already had black tape/coating on the pins. No screw was present on the mother board, but the adapter did come with one. After putting all the internals back, I secured the display with painters tape, turned it on, and immediately saw "the disk you inserted was not readable by this computer". I initialized it and formatted it as apfs. As for cloning, I tried Super Duper for the first time and will never use anything else again. It has a very smooth UI and copied the entire volume in 10 min. Upon boot everything was amazingly fast, however I noticed that smart status was verified whereas most others who did this upgrade had unsupported smart status. I have no idea why this would be except for maybe the ssd/adapter combo? But anyway, as for sleep I have not yet tested and will update when I do. Honestly, the hardest part of this upgrade was removing the old adhesive, which I used rubbing alcohol for. I ordered these adhesive strips even though there were some reviews saying their displays fell off. When applying them I first thoroughly cleaned off the old adhesive residue with rubbing alcohol, then heated the chassis with a hair drier, and after applying the adhesives, I left the IMac face down with weights on top for a good 16 hours. Will update on how they hold up.

ps. Is there any way to make it run with 4 pcie lanes?

View attachment 2329562
View attachment 2329563
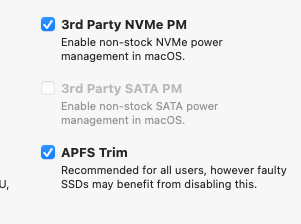
I have been using it for a few months now and have zero sleep problems and the adhesives are working great as well. I first though that it was boot rom that fixed my sleep problems but then found these settings in Open Core (my patcher for Big Sur). Over all the IMac is very fast and seems to have no problems!
 

Attachments

  • Screen Shot 2024-06-03 at 9.32.31 AM.png
    Screen Shot 2024-06-03 at 9.32.31 AM.png
    20.3 KB · Views: 35
  • Like
Reactions: mbosse

LuigiDJ

macrumors newbie
Oct 10, 2024
1
0
Colombia
Hello. Has anyone tried the Timetec model AS06 MAC NVME? Looking on amazon, I found this NVME and was wondering if somebody has tried it on an iMac late 2013, reviews are kind of mixed. It's gen3 and its form factor is directly compatible with this model. (1TB NVMe PCIe Gen3x4 3D NAND TLC SSD Designed for MAC Systems)
I'm choosing between the SN580 and this Timetec, budget is little tight, or any other choice based on your experiences?
1728598445245.png
 
Register on MacRumors! This sidebar will go away, and you'll see fewer ads.