Become a MacRumors Supporter for $50/year with no ads, ability to filter front page stories, and private forums.

rxs0

macrumors member
Original poster
Apr 4, 2019
68
118
Parameters entered. The computer hibernated and came back up with no problems. Again, no sleep or hibernation issues.

I am still working on the NVME drive Link Width of x2 problem.

Thanks.
 
Last edited:

rxs0

macrumors member
Original poster
Apr 4, 2019
68
118
Update:
I just removed the OWC in-Line Digital Thermal Sensor HDD Upgrade Cable without any fan problems turning on full blast or loud noise. This part doesn't seem to be necessary with my 2017 27-inch iMac configuration. I have removed the Apple 24MB SSD (32GB over provisioned) and 1TB Seagate spinning SATA hard drive.
 
Last edited:
  • Like
Reactions: mbosse

rxs0

macrumors member
Original poster
Apr 4, 2019
68
118
Update:
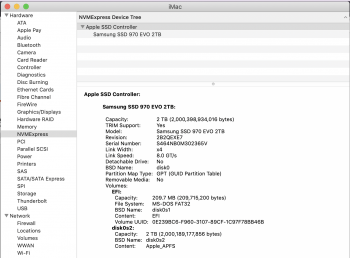
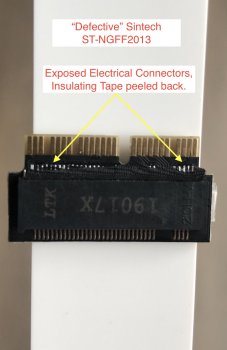
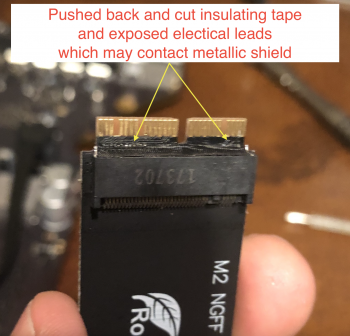
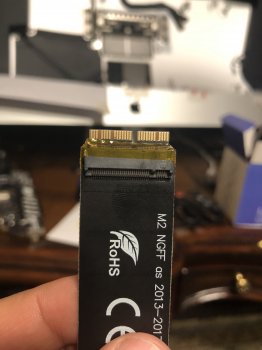
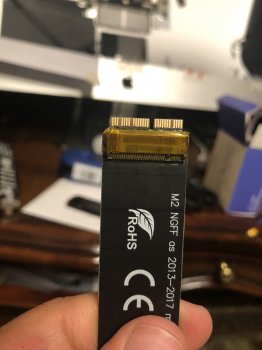
I turned out the NVME Link Width x 2 problem was due to the Short Sintech adapter. I am not sure if the adapter was defective or that the tight fitting adapter - drive combo forcibly pushed the adapter too far in the Apple NVME connector, peeling back part of the insulating tape and exposing multiple electrical connectors. This likely resulted in electrical shorting with the Apple NVME logic board flash storage connector metal shield (EM shield?) and possibly suboptimal adapter electrical pin contacts with the Apple NVME connector. I have attached a picture of my "defective" ST-NGFF2013 adapter, with the insulating tape partially peeled back, exposing multiple electrical connectors.

The long black Sintech adapter worked beautifully (with additional Kapton tape), with the drive recognized as a NVME Link Width x4 drive. Make sure the adapter is properly seated and aligned. If it isn't, it might work with fewer PCIe lanes (with a Link Width of x2) or not at all.

I initially did not push the long Sintech adapter in far enough and booted up to a flashing folder with a question mark inside (error message). Be sure to make sure the long Sintech adapter is fully pushed into the Logic Board NVME connector or else you will have to take apart the system again. :(

TRIM was enabled automatically right out of the box (macOS Mojave) even though it's a non-Apple NVME SSD.

Here is the link to the properly functioning Long Black Sintech adapter, ST-NGFF2013C),
https://www.amazon.com/gp/product/B01CWWAENG/ref=ppx_yo_dt_b_asin_title_o04_s00?ie=UTF8&psc=1
Sintech NGFF M.2 nVME SSD Adapter Card for Upgrade 2013-2015 Year Macs(Not Fit Early 2013 MacBook Pro)
https://www.amazon.com/gp/product/B01CWWAENG/ref=ppx_yo_dt_b_asin_title_o02_s00?ie=UTF8&psc=1

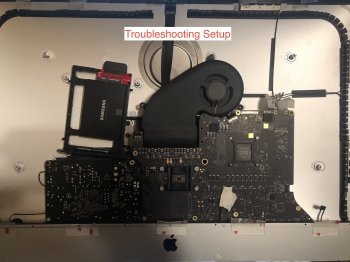
I also did the troubleshooting with a "partial reassembled" setup, meaning I left both speakers, iSight camera, headphone jack, WIFI/Bluetooth, and microphone cables disconnected to save time and wear on the cables. All other cables were connected as usual. I also only mounted the Logic Board with the captive screw and upper right hand corner screw, after plugging in some USB A cables in the back to ensure proper USB cable alignment along the back panel of the computer. I mounted the cooler with only the topmost screw and connected its cable to the logic board. The power supply should be mounted with all four screws for safety purposes. All power supply cables were connected. This partial "troubleshooting setup" worked perfectly for testing purposes with no error message encountered. This "troubleshooting setup" is probably not recommended, but I really wanted to save some time while troubleshooting the system.

Since I setup up the system to boot up from either the NVME drive or the SATA SSD drive, I booted off the SATA SSD drive to reinstall my backed up Carbon Copy Clone image (stored on the SATA SSD drive) back onto the Samsung 2TB 970 EVO NVME drive.

From other post. It seems like someone else had the same problem.:
ST-NGFF2013-C (after extensive corroboration it must be the 'C' version; do not get the non-C version)
http://eshop.sintech.cn/ngff-m2-pcie-ssd-card-as-2013-2014-2015-macbook-ssd-p-1229.html
https://forums.macrumors.com/thread...c-vega-internal-gpu-mac-pro-2013-6-1.2085886/
https://www.amazon.com/gp/product/B01CWWAENG/ref=ppx_yo_dt_b_asin_title_o04_s00?ie=UTF8&psc=1
 

Attachments

  • Screen Shot 2019-04-19 at 12.12.52 PM.png
    Screen Shot 2019-04-19 at 12.12.52 PM.png
    537.3 KB · Views: 797
  • Screen Shot 2019-04-19 at 1.06.34 PM.png
    Screen Shot 2019-04-19 at 1.06.34 PM.png
    726 KB · Views: 962
  • IMG_6272.jpg
    IMG_6272.jpg
    939.2 KB · Views: 968
  • IMG_6268.jpg
    IMG_6268.jpg
    912.8 KB · Views: 1,074
  • IMG_6294.jpg
    IMG_6294.jpg
    280.5 KB · Views: 1,166
  • Screen Shot 2019-04-21 at 4.44.48 AM.png
    Screen Shot 2019-04-21 at 4.44.48 AM.png
    857.9 KB · Views: 1,000
  • Screen Shot 2019-04-21 at 3.40.31 PM.png
    Screen Shot 2019-04-21 at 3.40.31 PM.png
    698.1 KB · Views: 803
  • Screen Shot 2019-04-21 at 3.39.51 PM.png
    Screen Shot 2019-04-21 at 3.39.51 PM.png
    719.5 KB · Views: 795
Last edited:
  • Like
Reactions: mbosse

rxs0

macrumors member
Original poster
Apr 4, 2019
68
118
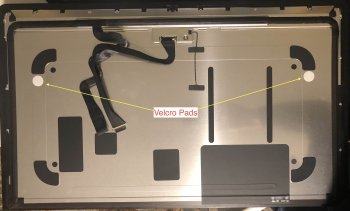
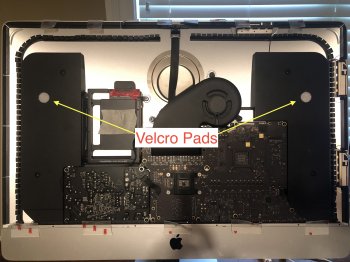
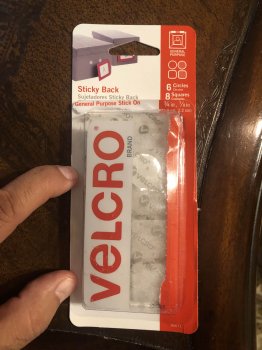
I also put some small round velcro pads (from Lowes) on the speakers and display as a backup in case the screen adhesive strips fail. They also allow easy removal of screen during repair.

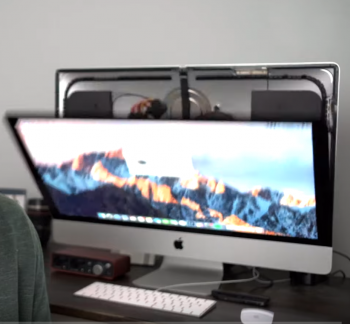
I have also included a screenshot of a YouTube video showing the moment the display adhesive fails, resulting in the detachment of the display. As you can see in the image, the adhesive first comes apart along the top of the display, with the display falling forward.

Extra attention should be given to cleaning the surface of the chassis with at least 90% isopropyl alcohol, as well as overnight clamping of screen to ensure a strong stable bond. Be sure to use Apple OEM adhesive strips, and not cheap after market strips.
 

Attachments

  • Screen Shot 2019-04-19 at 4.31.37 PM.jpg
    Screen Shot 2019-04-19 at 4.31.37 PM.jpg
    330.8 KB · Views: 781
  • IMG_6253.jpg
    IMG_6253.jpg
    1,004.9 KB · Views: 766
  • IMG_6257.jpg
    IMG_6257.jpg
    870.5 KB · Views: 856
  • Screen Shot 2019-04-22 at 2.55.29 AM.png
    Screen Shot 2019-04-22 at 2.55.29 AM.png
    727 KB · Views: 827
Last edited:

macgeek01

macrumors 6502a
Apr 2, 2013
841
79
Parameters entered. The computer hibernated and came back up with no problems. Again, no sleep or hibernation issues.

I am still working on the NVME drive Link Width of x2 problem.

Thanks.

Update:
I just removed the OWC in-Line Digital Thermal Sensor HDD Upgrade Cable without any problems with the fans turning on full blast or loud noise. This part doesn't seem to be necessary with my 2017 27-inch iMac configuration. I have removed the Apple 28MB SSD and 1TB Seagate spinning SATA hard drive.

Thanks for testing. The 2017 iMacs must have different firmware to support NVME sleep and standby opposed to only hibernate with Late 2015 and earlier models.

The sensor isn’t required for my Late 2015 either.
 

rxs0

macrumors member
Original poster
Apr 4, 2019
68
118
1. Other 2017 27-inch iMac users with successful NVME upgrades using Sintech adapter, without sleep issues:
- Jason S. https://www.ifixit.com/Answers/View/411888/NVME+M.2+SSD+with+adapter#answer551773
- R.T. https://www.ifixit.com/Answers/View/411888/NVME+M.2+SSD+with+adapter#answer561534
- jd2wheels https://forums.macrumors.com/thread...l-imac-27-ssd-upgrades.2162435/#post-26974454
- dscom https://forums.macrumors.com/thread...ssd-to-m-2-nvme.2034976/page-62#post-26173989
- psymac https://forums.macrumors.com/threads/ssd-pcie-bus-thermal-throttling.2166710/

2. Temperatures of the Samsung 2TB EVO 970 NVME drive with EKWB EK-M.2 NVMe Heatsink at idle and at full load.

- Idle: 45C (113F), no audible fan
- Full Load: 46-55C (115-131F), loud fan noise

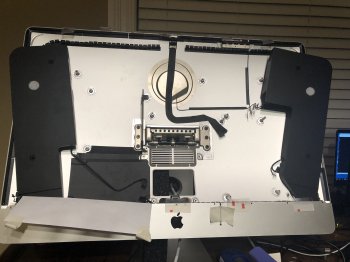
3. Incidentally, you can also disassemble the system leaving the speakers within the chassis (with removal of the speaker screws) and right hard drive bracket in place. The speakers can then be moved out of the way, but again remain within the chassis. I did not remove the trim.
 

Attachments

  • IMG_6397.JPG
    IMG_6397.JPG
    2.2 MB · Views: 614
Last edited:

macgeek01

macrumors 6502a
Apr 2, 2013
841
79

Thanks for sharing. The interesting thing is that Late 2015 iMacs support Apple NVME and even shipped with a 24GB MVME module (actually 32GB but over provisioned) with 1TB Fusion Drives. I tested one and no standby/hibernation issues with one.
 
  • Like
Reactions: rxs0

rxs0

macrumors member
Original poster
Apr 4, 2019
68
118
NVME drive assembly installation:

1. Potential problems with NVME drive assembly installation.

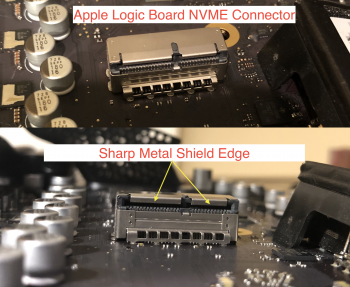
An improperly installed NVME drive assembly can lead to a very tight fit within the Apple NVME socket. This can lead to delayed anterior migration of the drive assembly into the Apple connector, which can result in cutting of the Sintech adapter's insulating tape along the front sharp edge of the Apple connector metal shield. This in turn can lead to electrical shorting with the shield and suboptimal contact alignment of the electrical pins. Electrical shorting with the NVME drive can result in slower negotiated Link Width speed of x2 instead of x4, instability/random crashes, or inability for the system to recognize and use drive. There are even reports of this resulting in sleep problems with the 2013/2014 MacBook Pro laptops. I have attached images showing the Apple NVME connector metal shield as well as a long black adapter with pushed back and cut insulating tape, revealing the underlying electrical connectors.

Prior to my final successful installation, I encountered this problem with the computer no longer seeing the NVME drive, booting off of the backup SATA SSD drive instead. I removed the iMac NVME drive and installed it into the Sabrent NVME enclosure and hooked it up to my MacBook Pro laptop for testing. Fortunately, the drive was recognized and functioned normally. Incidentally, I needed to use a USB-C to USB-C thunderbolt cable, as the included cable of the Sabrent kit with the USB-C adapter did not work on my MacBook Pro.


2. NVME drive/heatsink assembly.

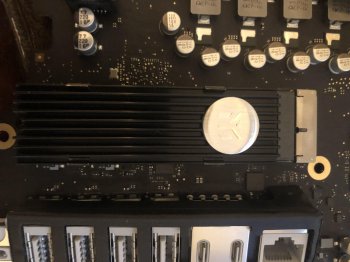
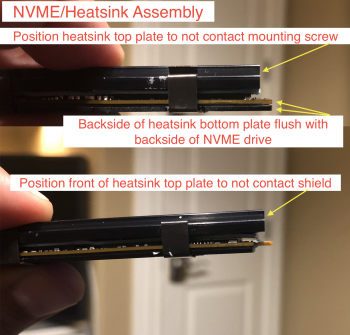
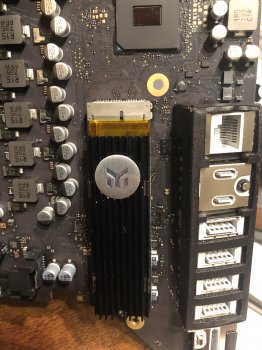
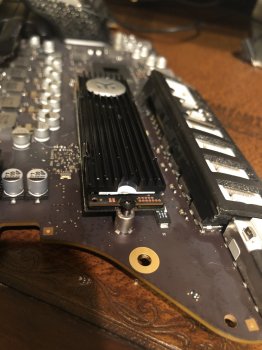
Be sure the back side of the heatsink bottom plate is "flush" with the back side of the NVME drive along the mounting screw side of the assembly. The top ribbed heatsink needs to be positioned forward so that the mounting screw does not contact the top heatsink plate. The top heatsink plate however still needs to be behind and not contacting the Apple NVME shield. There is plenty of clearance between the top heatsink plate and the NVME electrical terminals.


3. Adding additional Kapton tape to the insulating tape of the Long Black Sintech Adapter

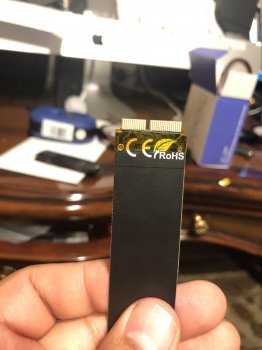
Although the Sintech long black adapter has insulating tape along the front electrical contacts, this tape can easily be pulled back and torn, exposing electrical contacts. As mentioned in an earlier post, additional Kapton electrical tape is really necessary to protect against this problem of pulled back or cut insulating tape. I used 1/4" Polyimide High Temperature Resistant Tape. I first applied a single small strip over the side with the insulating tape, with the tape edge just behind the electrical contacts. I then wrapped this single strip of tape with additional loops of Kapton tape to secure the tape strip as seen in the photos. Another option would be to place a larger (cut to fit) square piece of Kapton tape tucked between the Apple NVME metal shield and Sintech adapter. This would adequately prevent any inadvertent contact between the Sintech "electrical connectors" and logic board metal shield.


4. Securing the NVME drive/Heatsink/Sintech Adapter assembly with mounting screw

I replaced the stock Apple M2 5mm T8 screw with a M2 6mm T8 screw, taken from the Sabrent NVME drive enclosure kit. Be sure to apply minimal forward tension on the drive assembly by only partially screwing down this screw, which only contacts the NVME drive and not the heatsink.


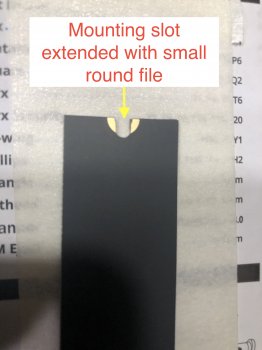
5. Consider extending the Sintech long black adapter mounting slot with a small round file if the adapter fits too tight or bends with mounting screw. See post #38 below.


6. Some other users have put a little rubber pad under the adapter so that there isn't too high mechanical stress. I did not do this.


7. Other users with the same Sintech adaptor pins shorting with metal shield of the NVME connector.
- "This is an old thread, but I can post a fix to the same problem. When I did this upgrade, initially with a SinTech adapter, everything worked fine on re-install, then several days later the system became unstable, wouldn't boot consistently, etc. The problem turned out to be some of the SinTech adapter pins contacting with the metal on the "shield" of the SSD connector on the logic board. I insulated the pins (just to the rear of the SSD connection itself) with Kapton tape, and voila! Problem solved. I guess over time the adapter moved just slightly (100ths of a mm) as the laptop rattled around in my backpack and caused the short. At any rate, easy and cheap fix."
https://apple.stackexchange.com/questions/325815/nvme-samsung-960-evo-with-adapter-mba-mid-2013

- https://github.com/evanslify/macbook-nvme-ssd-upgrade

- https://forums.macrumors.com/threads/upgrading-2013-2014-macbook-pro-ssd-to-m-2-nvme.2034976/

- https://forums.macrumors.com/threads/upgrading-2013-2014-macbook-pro-ssd-to-m-2-nvme.2034976/page-24

- https://forums.macrumors.com/thread...ssd-to-m-2-nvme.2034976/page-35#post-25786258
A lot of people here got only 2x PCIe lanes because adapters were installed without proper insulation (kapton tape). Once proper insulation was applied on the back of the adapter, a 4x lanes link was available


8. Customer Questions and Answers by Sintech on Amazon website regarding the Sintech long black adapter (NGFFF2013-C):
https://www.amazon.com/ask/questions/asin/B01CWWAENG/1/ref=ask_ql_psf_ql_hza?isAnswered=true

- Question:
What is the difference between your shorter adapter plug (b07fyy3h5f) and your longer adapter card (b01cwwaeng)? which is better for crucial 1tb sdd?
Answer:
they are same function. But long card is more stable after assembed with SSD.
best reards
sintech cn see less
By Sintech adapter

- Question:
Technically this should support all NON-nvme pcie/m.2 ssd's?
Answer:
Since the introduction of OS X High Sierra, NVMe has been supported. In fact, our customers use NVMe drives almost exclusively with this adapter today as AHCI based M.2 drives are outdated and harder to come by nowadays. Please note that if you're using this adapter with an NVMe drive, you MUST first install OS X High Sierra on the built-in AHCI drive. The High Sierra installation package will install firmware updates that enable NVMe support! see less
By Sylvesters Seller on April 8, 2018
yes, M.2 PCIe SSD only has 2 types: ACHI and nVME. it support M.2 PCIe ACHI SSD only.
best regards
www.pc-adapter.net
By Sintech adapter

- Question:
Does it support samsung 970 pro? (not evo, but pro)
Answer:
it can't. you'd better not to use Samsung SSD because there are many problem for their SSD,I suggest you to use intel,Adata SSD.
best regards
sintech cn see less
By Sintech adapter

- Question:
Will it support intel 760p pcie m.2 ssd?
Answer:
yes,it can support.
best regards
sintech cn
Sintech adapter

- Question:
I already bought st-ngff2013-c long version. my mbp 2015 13" has a new intel 760p 2tb ssd. but the back is bending. can i shorten the long version?
Answer:
yes,you can shorten a little at screw notch part for it. [I used a small round file to extend notch].
best regards
sintech cn see less
Sintech adapter

- Question:
Hi, has anyone install it with "samsung 970 evo 2tb - nvme pcie m.2 2280 ssd (mz-v7e2t0bw)"?
Answer:
Yes. It work fine. Just make sure you update to High Sierra or Mojave with your old SSD before installing the replacement [As mentioned above, this allows for the firmware to be updated allowing the system to recognize and use the NVME drive.]
LTN
 

Attachments

  • Screen Shot 2019-04-23 at 12.06.55 AM.png
    Screen Shot 2019-04-23 at 12.06.55 AM.png
    3.1 MB · Views: 1,251
  • Screen Shot 2019-04-22 at 11.22.30 PM.png
    Screen Shot 2019-04-22 at 11.22.30 PM.png
    3.7 MB · Views: 1,138
  • Screen Shot 2019-04-22 at 11.38.13 PM.png
    Screen Shot 2019-04-22 at 11.38.13 PM.png
    2.4 MB · Views: 1,171
  • IMG_6370.JPG
    IMG_6370.JPG
    1.5 MB · Views: 1,113
  • IMG_6372.JPG
    IMG_6372.JPG
    1.5 MB · Views: 1,126
  • IMG_6373.JPG
    IMG_6373.JPG
    1.3 MB · Views: 1,058
  • IMG_6391.JPG
    IMG_6391.JPG
    2.1 MB · Views: 1,088
  • IMG_6395.JPG
    IMG_6395.JPG
    1.7 MB · Views: 1,137
Last edited:

rxs0

macrumors member
Original poster
Apr 4, 2019
68
118
Update: The system now has a total of 128 GB of DDR4 2666MHz Sodimm ram. Please see post below:
https://forums.macrumors.com/thread...itfalls-and-tips.2177812/page-3#post-27358749

-------------

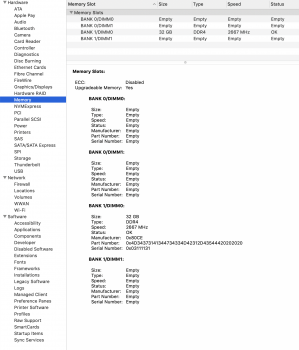
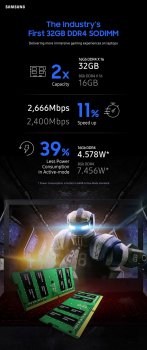
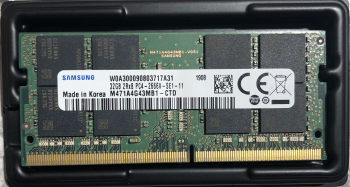
I just upgraded the memory to a single 32GB DDR4 2666MHz sodimm of ram in my 2017 27-inch iMac as below, with no problems. I'd rather buy the 2666MHz ram instead of the 2400MHz ram in case I upgrade to the 2019 27-inch iMac. Although the 2666MHz sodimm upgrade in a 2017 27-inch iMac has been mentioned before, the high capacity 32GB DDR4 2666MHz sodimms are relatively new.
https://www.samsung.com/semiconductor/insights/news-events/the-industrys-first-32gb-ddr4-sodimm/
https://www.samsung.com/semiconductor/dram/module/M471A4G43MB1-CTD/
I will add additional 32GB sodimms to see how much the system can max out at with 32GB simms.

Samsung 32GB DDR4 2666MHz RAM Memory Module for Laptop Computers (260 Pin SODIMM, 1.2V) M471A4G43MB1
https://www.amazon.com/gp/product/B07N124XDS/ref=ppx_yo_dt_b_asin_title_o02_s00?ie=UTF8&psc=1

See prior old post dated August 27, 2017.
2017 27" iMac accepts 2666mhz Ram.
https://forums.macrumors.com/threads/2017-27-imac-accepts-2666mhz-ram.2061552/
 

Attachments

  • Screen Shot 2019-04-24 at 1.51.04 PM.png
    Screen Shot 2019-04-24 at 1.51.04 PM.png
    747.5 KB · Views: 474
  • detail-the-industrys-first-32gb-ddr4-sodimm.jpg
    detail-the-industrys-first-32gb-ddr4-sodimm.jpg
    362.3 KB · Views: 433
Last edited:

djangoreinhardt442

macrumors member
Apr 6, 2019
66
33
I just upgraded the memory to a single 32GB DDR4 2666MHz sodimm of ram in my 2017 27-inch iMac as below, with no problems. I'd rather buy the 2666MHz ram instead of the 2400MHz ram in case I upgrade to the 2019 27-inch iMac. Although the 2666MHz sodimm upgrade in a 2017 27-inch iMac has been mentioned before, the high capacity 32GB DDR4 2666MHz sodimms are relatively new.
https://www.samsung.com/semiconductor/insights/news-events/the-industrys-first-32gb-ddr4-sodimm/
https://www.samsung.com/semiconductor/dram/module/M471A4G43MB1-CTD/
I will add additional 32GB sodimms to see how much the system can max out at with 32GB simms.

Samsung 32GB DDR4 2666MHz RAM Memory Module for Laptop Computers (260 Pin SODIMM, 1.2V) M471A4G43MB1
https://www.amazon.com/gp/product/B07N124XDS/ref=ppx_yo_dt_b_asin_title_o02_s00?ie=UTF8&psc=1

See prior old post dated August 27, 2017.
2017 27" iMac accepts 2666mhz Ram.
https://forums.macrumors.com/threads/2017-27-imac-accepts-2666mhz-ram.2061552/

Thank you for such a comprehensive write-up. The amount of detail you have gone into is amazing. The time it took to write all this.....wow!!!
Thank you for taking the time to share it all with us!

Now that you have everything installed, can supply us with some benchmarks?

SSD benchmarks (Black Magic and Amorphous). Btw, anyone know if AS-SSD bench is available for Mac?
Geekbench? or any other measure you have used to show improvements. (Filecopy, etc.).

Thanks!
 
  • Like
Reactions: rxs0

rxs0

macrumors member
Original poster
Apr 4, 2019
68
118
Thank you for such a comprehensive write-up. The amount of detail you have gone into is amazing. The time it took to write all this.....wow!!!
Thank you for taking the time to share it all with us!

Now that you have everything installed, can supply us with some benchmarks?

SSD benchmarks (Black Magic and Amorphous). Btw, anyone know if AS-SSD bench is available for Mac?
Geekbench? or any other measure you have used to show improvements. (Filecopy, etc.).

Thanks!
Thank you.

I will run these benchmarks when I am back in town.
Thanks.
 

alexdd

macrumors member
Oct 26, 2012
36
0
Testing system with 2TB Samsung NVME 970 EVO drive.


EKWB EK-M.2 NVMe Heatsink- Black
https://www.amazon.com/gp/product/B073RHHYCM/ref=ppx_yo_dt_b_asin_title_o06_s00?ie=UTF8&psc=1
https://www.ekwb.com/shop/ek-m-2-nvme-heatsink-black#ow_alert_box

Installation with this heatsink was tight using the short Sintech adapter, which I again don't recommend.


Update: I ended using the long version of the Sintech adapter. See post below.

To install NVME heatsink, you "sandwich" the assembly as follows: heatsink bottom, the included 0.5mm thermal pad, NVME drive, 1mm thermal pad, heatsink top, and hold it all together with the clips on notches on the side. Use a tweezer/screwdriver to lift the clip in place.
Be careful how you align the heatsink, so it doesn't cover the connectors or the screw hole on the other side. Please see post #33.

Thanks.
First you put the heatsink with the NVMe and then you connect with the adapter?
 
Last edited:

rxs0

macrumors member
Original poster
Apr 4, 2019
68
118
First you put the heatsink with the NVMe and then you connect with the adapter?

Yes, that is correct. First attach the heatsink to the NVME drive before installing heatsink-NVME drive assembly into the Sintech long black adapter. Please see posts #20 and #33. The important points are that the heatsink needs to be positioned so that:
- the mounting screw does not contact the heatsink when fully assembled, and
- the heatsink does not contact the metal shield of the logic board.
The mounting screw should only contact and engage the NVME drive board.

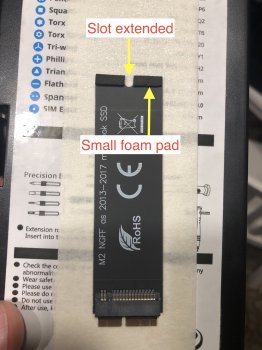
The long black Sintech adapter comes with a small foam pad "spacer" (see picture below) at the mounting end of the adapter. The NVME drive rests on this small foam pad when fully assembled.

Again, I strongly recommend the use of Kapton tape to prevent any electrical shorting between the Sintech adapter and the logic board metal shield. You can either "wrap" the terminal end of the Sintech adapter, like I did, or slip a square piece of Kapton tape between the Sintech adapter and logic board metal shield. The potential tight fit of the adapter within the logic board metal shield can lead to constant forward tension and delayed peeling back and tearing of the provided black insulating tape on the long black Sintech adapter, resulting is electrical shorting.

If you have trouble fitting the adapter-heatsink-NVME drive assembly into the logic board, you can partially extend the mounting slot of the long black Sintech adapter with a small round file. This step may not be necessary. Check for proper fit of drive assembly prior to complete reassembly.
https://www.amazon.com/dp/B07GKWMN3...&pd_rd_r=914d6501-6ad4-11e9-b80c-09dbc8d3b34b

The smaller mounting screw (Flat head, M2, 6mm machine screw) which came with the Sabrent NVME enclosure also helped getting the whole assembly to fit properly.

Thanks
 

Attachments

  • IMG_6343.JPG
    IMG_6343.JPG
    1.4 MB · Views: 636
  • IMG_6345.JPG
    IMG_6345.JPG
    2.1 MB · Views: 629
Last edited:
  • Like
Reactions: MacInTO and alexdd

oKUtItyp

macrumors member
Apr 30, 2019
39
9
If I only upgrade the HDD to the SSD, OWC in-Line Digital Thermal Sensor is not required?
 

rxs0

macrumors member
Original poster
Apr 4, 2019
68
118
If I only upgrade the HDD to the SSD, OWC in-Line Digital Thermal Sensor is not required?
Probably depends on model, year, and firmware version. Worse case scenario, you can try the upgrade and see if your fans turn up full blast. You can then either revert to factory configuration, use OWC in-line Digital Thermal Sensor HDD Upgrade Cable, or use fan software control. Best of luck.
Thanks.
 
Last edited:

mlody

macrumors 68000
Nov 11, 2012
1,625
1,236
Windy City
I am planning to buy 2017 27" 2TB fusion model because I do not feel comfortable taking the whole iMac apart even though I upgraded HDD to SSD on both of my iMacs (2010 and 2012).

I would like to use the internal 128 GB Apple Flash drive as the OS boot and replace the 2 TB HDD with SSD and use that as media storage and use the 2 TB HDD in an external enclosure as a Time Machine backup.

Should I be aware of any pitfalls with such setup?

Thanks
 

rxs0

macrumors member
Original poster
Apr 4, 2019
68
118
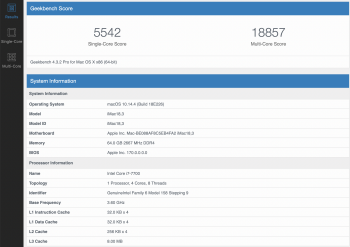
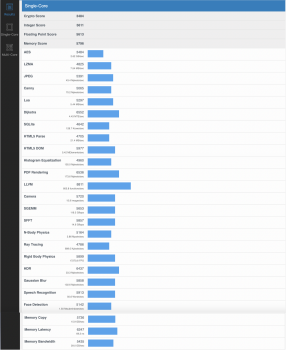
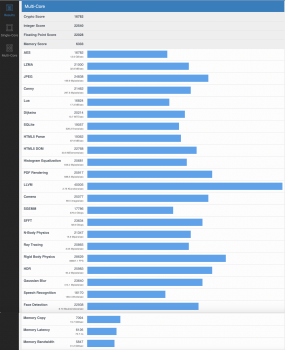
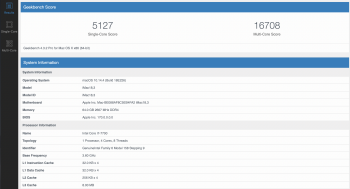
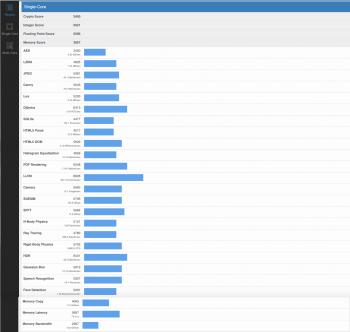
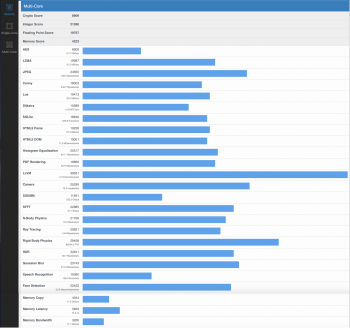
Geekbench 4 Results using:

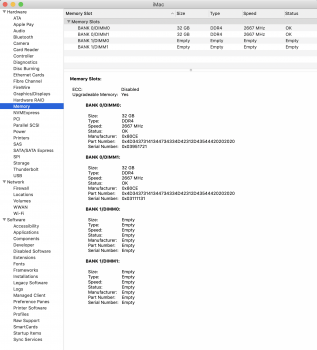
(2) 32GB DDR4 2666MHz sodimm of ram
Running well with no problems.

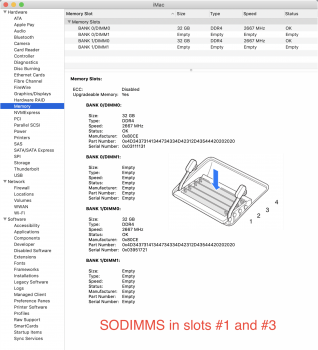
The (2) ram modules were paired by DIMM0 and NOT by Bank number. See post #47 below to compare how much incorrectly pairing the modules by Bank number results in significantly decreased speed.

BANK 0/DIMM0: 32 GB
BANK 0/DIMM1: Empty
BANK 1/DIMM0: 32 GB
BANK 1/DIMM1: Empty


https://www.samsung.com/semiconductor/insights/news-events/the-industrys-first-32gb-ddr4-sodimm/
https://www.samsung.com/semiconductor/dram/module/M471A4G43MB1-CTD/

Samsung 32GB DDR4 2666MHz RAM Memory Module for Laptop Computers (260 Pin SODIMM, 1.2V) M471A4G43MB1
https://www.amazon.com/gp/product/B07N124XDS/ref=ppx_yo_dt_b_asin_title_o02_s00?ie=UTF8&psc=1

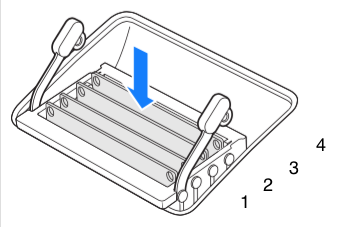
Be sure to pair identical SODIMMS by paired DIMM number and NOT Bank number. That is, pair (2) identical SODIMMS as DIMM0 in slots #1 and #3 or as DIMM1 in slots #2 and #4. Pairing (2) identical SODIMMS by Bank number will result in decreased speed. I will post these results soon.

For example, if you are upgrading to (2) 4GB SODIMMS and (2) 8 GB SODIMMS, pair as follows:

BANK 0/DIMM0: 4 GB
BANK 0/DIMM1: 8 GB
BANK 1/DIMM0: 4 GB
BANK 1/DIMM1: 8 GB


https://www.ifixit.com/Answers/View/223429/How+to+couple+RAM+Modules+in+iMac+27

As mentioned in prior post, I will attempt to load this 2017 27-inch iMac with (4) 32GB SODIMMS in the coming weeks.
 

Attachments

  • Screen Shot 2019-05-04 at 4.00.48 AM.png
    Screen Shot 2019-05-04 at 4.00.48 AM.png
    2.5 MB · Views: 406
  • 667619040.png
    667619040.png
    51.2 KB · Views: 421
  • Memory1-3.png
    Memory1-3.png
    149.5 KB · Views: 449
  • GB1-3.png
    GB1-3.png
    806.2 KB · Views: 459
  • SingleCore1-3.png
    SingleCore1-3.png
    3 MB · Views: 445
  • MultiCore1-3.png
    MultiCore1-3.png
    2.5 MB · Views: 387
Last edited:

chrispri

macrumors newbie
May 4, 2019
5
2
Is it necessary to mount a heatsink on the ssd?
I installed the ssd yesterday and everything works fine so far.
Thanks for the great thread.
 

rxs0

macrumors member
Original poster
Apr 4, 2019
68
118
Is it necessary to mount a heatsink on the ssd?
I installed the ssd yesterday and everything works fine so far.
Thanks for the great thread.

A heatsink may be desirable to prevent thermal throttling once the NVME drive gets too hot. To keep the NVME drive from overheating, Samsung has implemented what they call Dynamic Thermal Guard (DTG). This technology monitors the temperature of the NVME drive and will reduce its performance once it reaches a certain temperature. For the Samsung 970 EVO, thermal throttling (DTG) kicks in at around 79C.

If you're going to push the 970 EVO hard and don't want DTG to activate and slow down performance, you may want to consider adding a heatsink to the drive. I choose the EKWB EK-M.2 NVMe Heatsink mentioned above given its good performance and low profile for the tight iMac case.

In my system at Full Load, my Samsung 970 EVO 2TB NVME with EKWB heatsink temperatures varied from 46-55C (115-131F), with loud system fan noise.

See article and video below.

Thanks.

http://www.cdrlabs.com/reviews/sams...ve/thermal-throttling-and-final-thoughts.html

 
Last edited:

djangoreinhardt442

macrumors member
Apr 6, 2019
66
33
Geekbench 4 Results using:

(2) 32GB DDR4 2666MHz sodimm of ram
Running well with no problems.

https://www.samsung.com/semiconductor/insights/news-events/the-industrys-first-32gb-ddr4-sodimm/
https://www.samsung.com/semiconductor/dram/module/M471A4G43MB1-CTD/

Samsung 32GB DDR4 2666MHz RAM Memory Module for Laptop Computers (260 Pin SODIMM, 1.2V) M471A4G43MB1
https://www.amazon.com/gp/product/B07N124XDS/ref=ppx_yo_dt_b_asin_title_o02_s00?ie=UTF8&psc=1

Be sure to pair identical SODIMMS by paired DIMM number and NOT Bank number. That is, pair (2) identical SODIMMS as DIMM0 in slots #1 and #3 or as DIMM1 in slots #2 and #4. Pairing (2) identical SODIMMS by Bank number will result in decreased speed. I will post these results soon.

If you are upgrading to (2) 4GB SODIMMS and (2) 8 GB SODIMMS, pair as follows:

BANK 1/DIMM1: 8 GB
BANK 1/DIMM0: 4 GB
BANK 0/DIMM1: 8 GB

BANK 0/DIMM0: 4 GB

https://www.ifixit.com/Answers/View/223429/How+to+couple+RAM+Modules+in+iMac+27

As mentioned in prior post, I will attempt to load this 2017 27-inch iMac with (4) 32GB SODIMMS in the coming weeks.


Awesome! thank you for those posts.
Have you got any CrystalDiskMark (I mean Amorphous DiskMark) benchies?

Now you have me wondering if I should upgrade to i7-7700K (i have one sitting around and I have moved onto Z390 boards), or just leave in the i5 3.8gHz I have in there originally.

I know you had mentioned that you don't want to use a K CPU in your iMac, due to thermals.
Quinn Nelson from Snazzylabs did a similar upgrade (youtube) and he did use a K variant;
I have seen some people report thermal throttling issues with the K CPU
Have you hit more than 95 C your CPU?

Keep up the good info, this is an amazing thread
and again, THANK YOU
 

rxs0

macrumors member
Original poster
Apr 4, 2019
68
118
Here are the Geekbench 4 Results with INCORRECT memory pairing, that is, with the ram matching by Bank number (in this case Bank 0) and not DIMM number. As you can see, the speed is significantly decreased when compared to when the ram modules are paired by DIMM number. See attached screenshot of spreadsheet.

BANK 0/DIMM0: 32 GB
BANK 0/DIMM1: 32 GB
BANK 1/DIMM0: Empty
BANK 1/DIMM1: Empty

Apparently, one user also complained of instability with the ram paired by Bank number.

"I had a problem with my iMac 27 2014.
I have 2 DIMMs 4GB and 2 DIMMs 8GB.
I put (by myself) the modules with the same size on the same banks.
After having this issues (my iMac freezed every once in a while) I send my iMac to Apple Store and after several days they found the memory was not in the correct position and they changed it so that the same size are on the same DIMM.
I never had a problem since then"
10/11/2017 by Giova

https://www.ifixit.com/Answers/View/223429/How+to+couple+RAM+Modules+in+iMac+27

Thanks.
 

Attachments

  • Config3-4.png
    Config3-4.png
    809.1 KB · Views: 309
  • GB3-4.png
    GB3-4.png
    896.1 KB · Views: 322
  • SingleCore3-4.png
    SingleCore3-4.png
    2.9 MB · Views: 292
  • MultiCore3-4.png
    MultiCore3-4.png
    3.6 MB · Views: 303
  • Screen Shot 2019-05-04 at 10.32.20 AM.png
    Screen Shot 2019-05-04 at 10.32.20 AM.png
    309.7 KB · Views: 393
Last edited:

chrispri

macrumors newbie
May 4, 2019
5
2
I put everything together but my microphone didnt work. But I solved the problem...

The microphone only works for me if I put no adhesive tape (to mount the screen) over the microphone.
So I cut the strip number 14 in two parts and left space for the microphone ;) Now it works fine.
 
Last edited:
  • Like
Reactions: rxs0

rxs0

macrumors member
Original poster
Apr 4, 2019
68
118
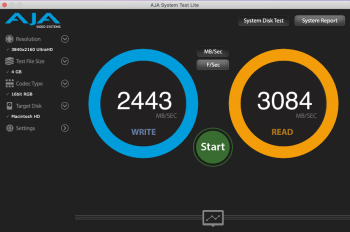
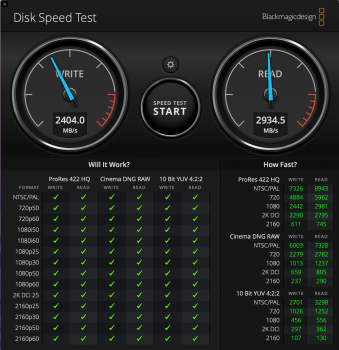
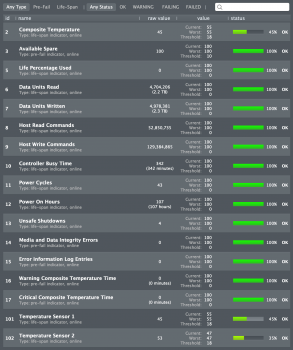
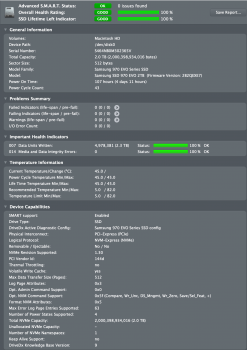
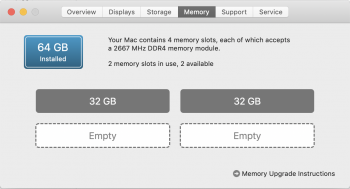
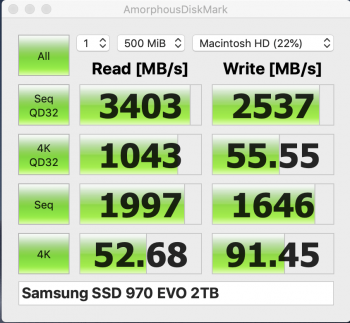
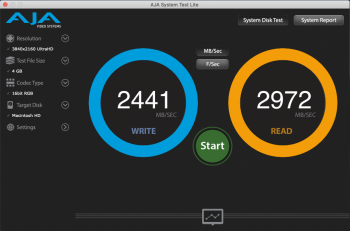
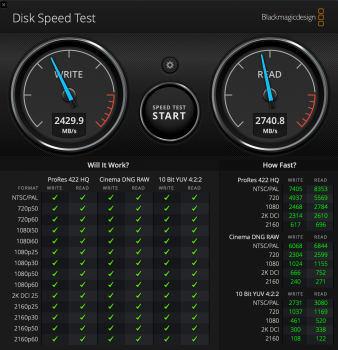
Updated disk benchmarks with total 64 GB DDR4 2666MHz SODIMMS.
System is running stable with no problems.
Passed Apple diagnostic test (boot while holding down "D" key).
 

Attachments

  • Screen Shot 2019-05-04 at 6.16.16 PM.png
    Screen Shot 2019-05-04 at 6.16.16 PM.png
    265.4 KB · Views: 435
  • Screen Shot 2019-05-04 at 8.49.18 PM.png
    Screen Shot 2019-05-04 at 8.49.18 PM.png
    753.6 KB · Views: 378
  • Screen Shot 2019-05-04 at 8.49.59 PM.png
    Screen Shot 2019-05-04 at 8.49.59 PM.png
    846 KB · Views: 423
  • Screen Shot 2019-05-14 at 1.02.35 AM.png
    Screen Shot 2019-05-14 at 1.02.35 AM.png
    8 MB · Views: 466
Last edited:
Register on MacRumors! This sidebar will go away, and you'll see fewer ads.