Become a MacRumors Supporter for $50/year with no ads, ability to filter front page stories, and private forums.
I have a question? considering the two back plane aux connections are rated 75W. Each cable has three 12v wire rated 25W each, is it possible to bridge the 3 12v and corresponding grounds and connect them to pins 1 & 5 in a six plus two way connector x2, then using the pixla method tap all four of the 12v and grounds to supply pin 2&3 and 6&7 to provide two six or eight way connections. The two aux connections will draw 50W, as do each of the four 12v pixla connections. Loop ground connection to pins 4&8 on each connector.
 
Last edited:
I have a question? considering the two back plane aux connections are rated 75W. Each cable has three 12v wire rated 25W each, is it possible to bridge the 3 12v and corresponding grounds and connect them to pins 1 & 5 in an eight way connector x2, then using the pixla method tap all four of the 12v and grounds to supply pin 2&3 and 7&8 to provide two eight way connections. The two aux connections will draw 50W, as do each of the four 12v pixla connections. Loop ground connection to pins 4&6 on each connector.
I can't see why not, but why make it so complicated?
 
Hi guys...
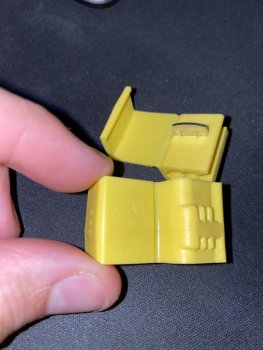
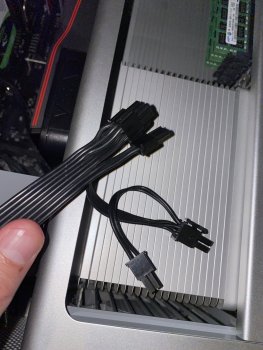
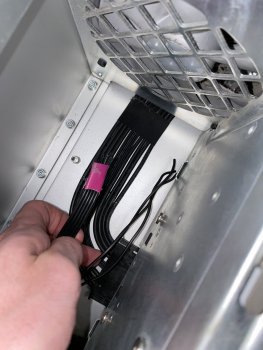
Ive bought the yellow version of 3m but it wasnt enough to cut trough the pcie cable i bought...(it has two 6+2 pins on the vga side) at the other it was 6 pin connector which i cut off


since the psu 12v/grounds are a bit thicker and my vga cable thinner...
Which 3M scotchlock size would you guys recommend?

im in Brazil and very limited on other parts besides the scotchlocks
 

Attachments

  • image.jpg
    image.jpg
    421.8 KB · Views: 225
  • image.jpg
    image.jpg
    504.9 KB · Views: 252
  • image.jpg
    image.jpg
    356.1 KB · Views: 229
True. I wonder why people like to mutilate their cables instead of doing a bit of soldering :p

I did the variant where you open the backplane connector and solder 2 pairs of wire in there, and output to standard connectors that you can then use for whatever you need.
 
I think I've mixed up the middle 3 connectors on the main PSU plug and now my 5,1 won't power on.

See on the 2nd image there is 3 plastic connectors in between the GND and 12v+ pins

Can anyone help with this?

image.jpg


IMG_0135.jpg
Can you provide any pointers on your soldering methods? For example, what type of solder did you use and solder gun heat required.
 
Can you provide any pointers on your soldering methods? For example, what type of solder did you use and solder gun heat required.
I soldered my wires directly to the power supply board. when welding elements with large ground plan or with thick and long wires it takes a lot of power so that the heat at your welding point is sufficient. If your iron is not powerful enough the tin will not melt because the heat will be dissipated in the wire or the ground plane. I advise you at least this: https://www.amazon.fr/Station-soudage-anarelle-Weller-T0053250699/dp/B01M11J8LP and by leaving several minutes the son in heat before putting your flame on it. 150W would be better.
For wire soldering do not forget to etammer your wires before:
 
As an Amazon Associate, MacRumors earns a commission from qualifying purchases made through links in this post.
I posted some pics in the "Pin out" thread over there : https://forums.macrumors.com/threads/need-mac-pro-2009-2012-psu-pin-out.2122393/

No special soldering, except an 80W soldering iron. As always, put some solder first on the separate parts, and then reheat to fuse them. Big copper wires tend to absorb the heat. It's a bit tricky when you only do it about once a year (like me), but it can be done. You can train yourself with a big wire and some metal part that's about the size of the real connector.
 
I soldered my wires directly to the power supply board. when welding elements with large ground plan or with thick and long wires it takes a lot of power so that the heat at your welding point is sufficient. If your iron is not powerful enough the tin will not melt because the heat will be dissipated in the wire or the ground plane. I advise you at least this: https://www.amazon.fr/Station-soudage-anarelle-Weller-T0053250699/dp/B01M11J8LP and by leaving several minutes the son in heat before putting your flame on it. 150W would be better.
For wire soldering do not forget to etammer your wires before:
Today I found this video. It shows it is much more easy to solder the cables to the connector than the power supply board. There is enough space available. I know some have already soldered their cables to the connector. This video shows, how easy you can disassably the connector.

Warning: Never just stick in cables like in the video. Always use a save connection like crimp or soldering. This Video is only important for the disassembling.

With soldering to the connector it looks like a part of the installation.

Here an example of the first 2 cables
IMG_2162.jpg
 
Last edited:
As an Amazon Associate, MacRumors earns a commission from qualifying purchases made through links in this post.
holy ****

never do this like shown in the video. Solder or crimp it.

This method is just good for some voltage readings but never to draw current from the PSU in the 100 watts range.

It's prone to burn the connector (and the GPU) if it gets lose contact.


...

anway, the video shows what cables you will pick up to solder, but very please, don't just stick the cables in.
 
Last edited:
holy ****

never do this like shown in the video. Solder or crimp it.

This method is just good for some voltage readings but never to draw current from the PSU in the 100 watts range.

It's prone to burn the connector (and the GPU) if it's get lose contact.


...

anway, the video show what cables you will pick up to solder, but very please, don't just stick the cables in.
Hey Macschrauber du alter Pirat ;)

Yes, this is a really dangerous methode, don't do this at home! Soldering or crimp is nessesary for save operating and low electrical resistance. The one and only important information in this video is the disassambling of the connector.

I have added a warning to this video.
 
Last edited:
Question to soldering and adapter guys. How did you get the connector through the hole?

Or what was your way? Crimp connector later? Soldering on the case like in this video?

It is necessary to remove the Logicboard or other parts like metal plates between Drive and PCIe section?
 
Last edited:
Question to soldering and adapter guys. How did you get the connector through the hole?

Or what was your way? Crimp connector later? Soldering on the case like in this video?

It is necessary to remove the Logicboard or other parts like metal plates between Drive and PCIe section?
Pass the open end wires through the hole, not the connector.
 
Another one installed. Maybe not 100% needed for the vega56 or RX5700XT that replaced it (was running Powerlink) but I decided it was easy to do and will ensure there is never a shortfall. Plus I might play about with flashing the '56 with a '64 bios at some point and that will overload.


tempImageGfoX8W.jpg

tempImagejkvyfh.png
 
Last edited:
After years of pushing the mod, I did it last week and a good surprise!
What pushes me to do it were the number of unexpected shutdowns while I was working on Lightroom those previous days. I was able to reproduce the issue and isolated therefore the issue down to the graphic card power. With AI denoise function and extended use of the GPU, Lightroom was requesting to my GPU to much power. My Vega 56 (reference design sapphire) seems to eat more than what the 2 PCI-e power can deliver + additional power available from the dvd bay.

With the Mod, the card seems to feel much better, and no more unexpected shutdown with Lightroom !

I follow the mod from the first post. Simple and cost nothing just a bit of time.
 
After years of pushing the mod, I did it last week and a good surprise!
What pushes me to do it were the number of unexpected shutdowns while I was working on Lightroom those previous days. I was able to reproduce the issue and isolated therefore the issue down to the graphic card power. With AI denoise function and extended use of the GPU, Lightroom was requesting to my GPU to much power. My Vega 56 (reference design sapphire) seems to eat more than what the 2 PCI-e power can deliver + additional power available from the dvd bay.

Even my the Apple recommended Sapphire Pulse RX 580 when used flat out can cause SMC emergency shutdowns, see FurMark stress test. While for most people this rarely or even never happen, the moment you start to have full power power draw for a long time with any of the ~200W TDP GPUs, you'll have SMC emergency shutdowns like you were having it.

Also, one thing that I've read about over the years and thought that was also another sure reason for the SMC power draw monitoring to trigger SMC power shutdowns, but never had it personally, was the fast switching spikes of some workloads. I started to notice it when running Topaz for up-scaling and de-noising my old home videos, the frequent spikes of usage of some of the plug-ins are probably worse than a higher load with a constant power draw.

With the Mod, the card seems to feel much better, and no more unexpected shutdown with Lightroom !

I follow the mod from the first post. Simple and cost nothing just a bit of time.

Better late than never! :p
 
Even my the Apple recommended Sapphire Pulse RX 580 when used flat out can cause SMC emergency shutdowns, see FurMark stress test. While for most people this rarely or even never happen, the moment you start to have full power power draw for a long time with any of the ~200W TDP GPUs, you'll have SMC emergency shutdowns like you were having it.

Also, one thing that I've read about over the years and thought that was also another sure reason for the SMC power draw monitoring to trigger SMC power shutdowns, but never had it personally, was the fast switching spikes of some workloads. I started to notice it when running Topaz for up-scaling and de-noising my old home videos, the frequent spikes of usage of some of the plug-ins are probably worse than a higher load with a constant power draw.


Better late than never! :p
Absolutely correct, with some workload the card require a large amount of power for very short period of time which weren’t the cases or less frequent few years ago.
This is now a constant with all GPU, the main power supply must be able to switch quickly to answer to those spikes of power consumption.

So now, yes, I would recommend to any AMD Vega 56 owner to do this mod :p
The mod is easy when we have all materials. The hardest part is when you have to fit all cables on the MP! It can be tricky.
 
  • Like
Reactions: crjackson2134
Register on MacRumors! This sidebar will go away, and you'll see fewer ads.