Become a MacRumors Supporter for $50/year with no ads, ability to filter front page stories, and private forums.
Yeah.....no, not even close.

I’ve been down this rabbit hole many times with you before. I genuinely appreciate your feedback on the foreign segment and I like you’re styling with customs that match my own, but I tend to stay silent when you post inaccuracies on domestics (Many times on EV’s/muscles) over and over again, even when other members disagreed in the past with you Over the course of being involved in this thread with vehicles alike. Like I said, if someone doesn’t agree with you, you lose sense of the topic to channel your bitterness through the same recycled argument. But I digress.

Ultimately, we all have opinions and view points that conflict with the automotive world, I respect yours and I have acknowledged your points many times, even when you ramble over inaccuracies. Heck, I make mistakes to, but We all learn through each other’s passions for the same appreciation of cars and tech involved. Key is, stay open minded on everyone’s angles. That’s how we all learn.
 
Last edited:
That new Mach-E does look nice and the price is reasonable... until the dealerships mark it up to the stratosphere. Granted, some dealerships say they're not going to mark it up. We'll see about that. One of my friends went to a Ford dealership recently and saw Mustangs (gas-powered) on display with a sign that said "MARKET ADJUSTMENT OF $50,000". Seriously? WTF.

Well, there's __asking__ for ADM, and then there's actually getting it :D

One thing about those two Mustangs, they're GT500s and they have the rare Carbon Fiber Track Pack, and while I can't tell from just the photos, I'm assuming those are also painted stripes (this combo became the "Golden Ticket"). That car at MSRP (with the couple of other options) is right up near $100K, so it's already sort of pricey. Based on a few owners, the "reasonable" and more common ADM on a GT500 + CFTP + PS was around $10K.

I wouldn't pay a nickel of ADM, especially on a car that's doing to be built for a few years, and with a little patience can be scored for MSRP.


[...] Porsche knows their target demographic for the luxury EV segment that outsources the majority who won’t pay that price.

Outsources? No idea what this means. Porsche builds EVs, they sell them for X price, they are a well known car company with well known models and known, established price points.


I disagree. That MachE is stupidly expensive for a car looking like a generic East Asian soft roader. But also way to expensive for the brand as a whole. On this side of the pond nobody in their right mind buys a Ford worth more than 40K let alone one that is more than 60K. It’s a ridiculous jump in market segment and customer target.

I just absolutely hate the design. And even owning a "real" (*snicker*) Mustang, I'm not at all bother by Ford using the brand equity of the Mustang name to create a sort of sub-brand, I just wish it looked better. I get that there's some "EV design language" we'll continue to see, you know, low drag, no front openings (no need for a radiator, etc.), but there are some terrible choices on the Mach-E.
 
  • Like
Reactions: bunnspecial
Thought I would jump back in this thread. Lease on my 440i xDrive Gran Coupé is maturing in June and I am beginning to search for a potential replacement. There is a slight chance that I buyout the lease, nothing in the market right now that I would be excited to get into for another 3 years and the 440i has been an excellent all-rounder not considering that I built this from factory exactly the way I wanted just in case I did want to buy out the lease.

If I decide to move on, it's likely I stay within BMWAG (have a 3 Series and MINI as beaters) and would likely be one of the following:

Used 2018+ M3/M4
M2 Competition
M340i
X3M
MINI GP3
 
Got a fair bit accomplished over the weekend.

First of all, some tuning stuff(old school) and general engine check-out to see how break-in is progressing.

Plugs out to make other stuff I was planning easier
IMG_2317.jpeg


There's a whole lot of information here, and I spent a while looking at it with a loupe to read all of it. I'm not a master plug reader, but can get by.

IMG_2316.jpeg


Unfortunately, this is telling me that I have a serious carb imbalance, since this one is too light and they get darker as you move toward the back of the engine(#1 is influenced almost entirely by the front carb, #4 almost entirely to the back, while #2 is probably 75% front 25% rear, and vice-versa on #3). BTW, this is not a "break down" issue but getting serious about getting things as close to perfect as I can and squeezing the most power out of a car where "tuning" means a lot of wrench turning(sometimes just fractions of a turn), then often going for a drive to see if what you did benefited. Gross changes are obvious at idle, while squeezing as close to ideal as possible means really being in touch with how the engine feels and sounds when driving under different conditions. As a side note, this plug shows that the timing probably needs to be tweaked a little bit too(the color tells you mixture, while the area of color change on the ground strap gives an indication of timing).

Next, checking break in progress. This is a phenomenal number to see, since book spec is 140-150. This number was also dead even across all 4 cylinders. That's what it "should" be, especially on a fresh, tight engine, but "should" and "is" aren't the same(10% variation between low and high is considered acceptable).

IMG_2319.jpeg


On the cosmetic front-several years ago I bought replacement door panels and they sat for a while. I finally got around to those, but it's stalled and I only did one side since I salvaged about 5 serviceable clips(of the 13 needed) and Autozone had 3 on the shelf. I ordered a full set of 26.

IMG_2321.jpeg


IMG_2324.jpeg


I spent a while polishing chrome on this door too, a tedious job but one long overdue.

Also, this change is probably polarizing since for folks who value absolute perfect cosmetic appearance will see this as a downgrade, while those who like originality and proper fit will see this as an improvement. I bought the car with a reproduction bumper, something I didn't realize at the time. Among other things, the repros don't wrap far enough around the front. One of the things I brought home last was a not perfect but really nice original bumper. I spent a while fitting it.

I'm showing from the side since that's where the main issue is on repros

Before

IMG_2325.jpeg


After
IMG_2329.jpeg


The gap at the side is from a lack of hardware. I need a bolt to hold it, and was going to head to the hardware store to grab it before someone on the MG forum pointed out to me that I need a rubber spacer also. Looks like another Moss order in my future...

This, along with the rear bumpers, will hopefully come off next winter and get sent off for a straighten/rechrome.

Last thing, and I wish I'd taken a photo and actually measured, but I fitted a headlight relay kit yesterday. The stock wiring routes the entire headlight current through the switch, which is both hard on the switch(why you're lucky to get a year out a repro, and why I spent a lot of money finding/buing an NOS Lucas one even though I hated beating it up too) and that long path of 18g wire zaps a lot of power. A gentleman up in Canada makes several relay kits for various parts that are beautifully set up with brackets and mounting hardware for the relays and wired with pre-terminated(with bullets or spades as appropriate) wires in colors consistent with the original wiring. Oh, by the way, they're inexpensive too-I think I paid $40 for the kit, and it quite literally took me 10 minutes to hook up. It took me longer to get the nylock nut on it, and I ended up having to remove the right front wheel to get to it. That was okay, since my caliper rebuild kit should be here today and I'm hoping to do the brakes. The lights are brilliantly bright white(they're halogens) when relayed.
 
Got a fair bit accomplished over the weekend.

First of all, some tuning stuff(old school) and general engine check-out to see how break-in is progressing.

Plugs out to make other stuff I was planning easier View attachment 1737104

There's a whole lot of information here, and I spent a while looking at it with a loupe to read all of it. I'm not a master plug reader, but can get by.

View attachment 1737106

Unfortunately, this is telling me that I have a serious carb imbalance, since this one is too light and they get darker as you move toward the back of the engine(#1 is influenced almost entirely by the front carb, #4 almost entirely to the back, while #2 is probably 75% front 25% rear, and vice-versa on #3). BTW, this is not a "break down" issue but getting serious about getting things as close to perfect as I can and squeezing the most power out of a car where "tuning" means a lot of wrench turning(sometimes just fractions of a turn), then often going for a drive to see if what you did benefited. Gross changes are obvious at idle, while squeezing as close to ideal as possible means really being in touch with how the engine feels and sounds when driving under different conditions. As a side note, this plug shows that the timing probably needs to be tweaked a little bit too(the color tells you mixture, while the area of color change on the ground strap gives an indication of timing).

Next, checking break in progress. This is a phenomenal number to see, since book spec is 140-150. This number was also dead even across all 4 cylinders. That's what it "should" be, especially on a fresh, tight engine, but "should" and "is" aren't the same(10% variation between low and high is considered acceptable).

View attachment 1737112

On the cosmetic front-several years ago I bought replacement door panels and they sat for a while. I finally got around to those, but it's stalled and I only did one side since I salvaged about 5 serviceable clips(of the 13 needed) and Autozone had 3 on the shelf. I ordered a full set of 26.

View attachment 1737113

View attachment 1737116

I spent a while polishing chrome on this door too, a tedious job but one long overdue.

Also, this change is probably polarizing since for folks who value absolute perfect cosmetic appearance will see this as a downgrade, while those who like originality and proper fit will see this as an improvement. I bought the car with a reproduction bumper, something I didn't realize at the time. Among other things, the repros don't wrap far enough around the front. One of the things I brought home last was a not perfect but really nice original bumper. I spent a while fitting it.

I'm showing from the side since that's where the main issue is on repros

Before

View attachment 1737117

After View attachment 1737118

The gap at the side is from a lack of hardware. I need a bolt to hold it, and was going to head to the hardware store to grab it before someone on the MG forum pointed out to me that I need a rubber spacer also. Looks like another Moss order in my future...

This, along with the rear bumpers, will hopefully come off next winter and get sent off for a straighten/rechrome.

Last thing, and I wish I'd taken a photo and actually measured, but I fitted a headlight relay kit yesterday. The stock wiring routes the entire headlight current through the switch, which is both hard on the switch(why you're lucky to get a year out a repro, and why I spent a lot of money finding/buing an NOS Lucas one even though I hated beating it up too) and that long path of 18g wire zaps a lot of power. A gentleman up in Canada makes several relay kits for various parts that are beautifully set up with brackets and mounting hardware for the relays and wired with pre-terminated(with bullets or spades as appropriate) wires in colors consistent with the original wiring. Oh, by the way, they're inexpensive too-I think I paid $40 for the kit, and it quite literally took me 10 minutes to hook up. It took me longer to get the nylock nut on it, and I ended up having to remove the right front wheel to get to it. That was okay, since my caliper rebuild kit should be here today and I'm hoping to do the brakes. The lights are brilliantly bright white(they're halogens) when relayed.
Looks like a productive weekends work. Good the pressures are even. Now just a bit more tinkering to fine tune the rest. It’s years since I’ve even looked at a spark plug.
The door cards look like a good upgrade. Should finish her off nicely. Any other internal changes planned? What are the seats like? Still original or have they been recovered?
 
  • Like
Reactions: Nütztjanix
The door cards look like a good upgrade. Should finish her off nicely. Any other internal changes planned? What are the seats like? Still original or have they been recovered?

The seats were recovered a few years before I bought the car, but they weren't refoamed. The seat covers aren't correct for the car year, but I like how they look. I'm planning on ordering a full set of foam and redoing that but keeping the covers.

I have a friend-in fact I visited him last week-who does MGB seats as a small business. His two main products are stock and Fiero seats, although he also does Miata seats(of course all modified for MGBs). He has Fiero seats in two of his cars, and I'm mixed on how much I like them. They're a lot more modern feeling than the MGB seats(and more comfortable), but look a bit out of place and sit a bit higher. He gets between $1K and $2K for a set of ready-to-bolt in Fieros customized to the customer's tasted(probably more than a complete Fiero is worth :p ) so I'm not sure if I want to go that route. The NA Miata seats supposedly sit about the same as stock MGB seats, and of course have a lot of the same perks of Fiero seats.

At this point, though, good quality foam(what Moss sells is well regarded), which still isn't exactly cheap, but fitted myself will probably be the choice. I need to fit headrests also, which a lot of folks delete because they don't like the appearance, but I like them for safety. Plus, they were stock on my year car.
 
I disagree. That MachE is stupidly expensive for a car looking like a generic East Asian soft roader. But also way to expensive for the brand as a whole. On this side of the pond nobody in their right mind buys a Ford worth more than 40K let alone one that is more than 60K. It’s a ridiculous jump in market segment and customer target.
I think Fords have a different appeal abroad, especially in the US. Here they are a cheap and affordable car that parts are cheap to source and they are fairly reliable. Indeed you wouldn’t sell a Ford for £60k in the UK unless it’s a company car first with a 30% mark down as a secondhand buy.

I’ll probably buy an EV in 2029 when I have no choice. I hate them with a passion and will hold out until the very last minute. If Ford are making them for 60 grand, then it shows how far off we are having them dominating our roads.
 
I’m not an avid follower of Porsche like @ autounion39 is, but the 2022 911 GT3 is just artwork.

Porsche has all the info here:


Basic specs

-$170,000
-4.0L
-502HP/346Tq
62C0341F-77AE-4143-8722-7BF49F9C4876.jpeg
D17D6C7F-0601-444B-8303-2C05ED8756AF.jpeg
D3E53C63-2473-4ED8-9813-4841FCBB38E5.jpeg
 
I’m not an avid follower of Porsche like @ autounion39 is, but the 2022 911 GT3 is just artwork.

Porsche has all the info here:


Basic specs

-$170,000
-4.0L
-502HP/346Tq
View attachment 1738125View attachment 1738126View attachment 1738127
A great track day car. But a bit pricey for that.
 
  • Like
Reactions: jeyf
A great track day car. But a bit pricey for that.
Yup, that’s exactly what it is. A track car. Nobody is spending $170,000 to drive a Gt3 to the grocery store and back. This One of those specialized vehicles that’s completely manufactured to be aerodynamic, lightweight and have razor sharp handling. Amazing looking car though.
 
Oh, hahaha, that definitely wasn't intended as "I told you so", just that s*** happens, I mean, I'm running a Flex tune, my motor could pop, technically it wouldn't be covered under warranty.

A fully built motor, with headwork/porting, upgraded cam, fuel system upgrades, it should be a beast. I'd figure they might discuss some additional options for your Whipple, since you could definitely go with more boost vs. a bone stock engine.

Hopefully, given that there is a warranty of sorts, they'll cut you a few breaks, and I'd imagine this is a pretty major project for them, so they'll be all in on doing a really good job.

Post as things develop, excited to see it!
Quick update, as it’s been a couple of months since my engine cratered.

Still waiting on parts. BetterBuilt didn’t have a block, and since mine is useless, National Speed sourced another, and is having it shipped to them for inspection. If it passes, they’ll send it on to BB, who will build my new engine and heads. The build will take four to six weeks, so I’m looking at April, and possibly early May, before I get my Charger back.

Turns out the Whipple had to be completely rebuilt, as some metal somehow found its way into it. Not as expensive as a new one, but the better part of the cost of new. That’s done, and NS has the Whipple back, along with the long-tube headers. The forged short block and the rebuilt heads are now the critical path items. This has been a much longer process than I expected. More expensive, too.

But, as you mentioned, this thing will be a beast. I am so looking forward to driving it again.
 
  • Love
Reactions: D.T.
Brake job. This one deserves a write-up, if that can be tolerated, but it's done other than bleeding. One caliper is one I rebuilt myself, while the other is a new replacement(and the story behind both of those is good in and of itself).

Also, I got lazy and opted not to change the rotors. It seems as though changing these actually involves breaking down the entire front spindle, and among other things I don't currently have a working 1/2" drive torque wrench to reassemble correctly. I should bite the bullet and just do it since that gives me a chance to regrease everything also, but it's probably a full day's job by itself.

Still, though, brakes are all done other than bleeding. Please excuse my awful rattle can paint job on the rebuilt one.


IMG_2363.jpeg


IMG_2364.jpeg
 
  • Like
Reactions: Nütztjanix
Brake job. This one deserves a write-up, if that can be tolerated, but it's done other than bleeding. One caliper is one I rebuilt myself, while the other is a new replacement(and the story behind both of those is good in and of itself).

Also, I got lazy and opted not to change the rotors. It seems as though changing these actually involves breaking down the entire front spindle, and among other things I don't currently have a working 1/2" drive torque wrench to reassemble correctly. I should bite the bullet and just do it since that gives me a chance to regrease everything also, but it's probably a full day's job by itself.

Still, though, brakes are all done other than bleeding. Please excuse my awful rattle can paint job on the rebuilt one.


View attachment 1739995

View attachment 1739996

HAH! My experience, having done many brake jobs, and swapped many rotors, is that for the axle, you just have to turn the nut until it feels tight, and then turn the rotor, and adjust until it's not overly tight. Turn it a few times, and keep tweaking the tension. The more you turn it, the less chance you have of having bearings that don't seat well. My first job, I was so scared I'd screw it up, I kept playing with the tension on the axle, and got it to what I thought was right. I locked everything down, and then checked it a week later, and it was still 'perfect'. Admittedly MY version of perfect. Don't fear pulling the rotors. Bearings are relatively cheap compared to a warped rotor, and brake failure. If you've gone new wheel cylinders, it's only a few ore steps to get the rotors off, and new ones on, and they will work that much better. But thise aren't ventilated rotors either. You could check the thickness, and runout, and probably get them turned for peanuts and have like new brakes (if there is any thicknessleft on them). I miss working on cars so much. Now I practically need a graduate degree to do anything on them. #RIGHTTOREPAIR!!!

I was doing a Datsun, and some Nissan trucks. They were surprisingly pretty easy to work on. YMMV... But ALWAYS check the thickness and runout. (JIC)
 
HAH! My experience, having done many brake jobs, and swapped many rotors, is that for the axle, you just have to turn the nut until it feels tight, and then turn the rotor, and adjust until it's not overly tight. Turn it a few times, and keep tweaking the tension. The more you turn it, the less chance you have of having bearings that don't seat well. My first job, I was so scared I'd screw it up, I kept playing with the tension on the axle, and got it to what I thought was right. I locked everything down, and then checked it a week later, and it was still 'perfect'. Admittedly MY version of perfect. Don't fear pulling the rotors. Bearings are relatively cheap compared to a warped rotor, and brake failure. If you've gone new wheel cylinders, it's only a few ore steps to get the rotors off, and new ones on, and they will work that much better. But thise aren't ventilated rotors either. You could check the thickness, and runout, and probably get them turned for peanuts and have like new brakes (if there is any thicknessleft on them). I miss working on cars so much. Now I practically need a graduate degree to do anything on them. #RIGHTTOREPAIR!!!

There's quite a bit of controversy over how to set up the front hubs on these, but the workshop manual and the guys still around who were trained to work on them are very specific about torquing the castle nut to 60 ft-lbs. If it's too loose or too tight at that torque setting, you adjust shims until you get it there.

I know I should bite the bullet and do it, but the weather now is saying "you should be driving." I'm not really fearing the job, more just getting in and knowing that I'm digging even deeper in and will spend a day chipping congealed grease out of them. Of course that's even more of a reason to do it.

I have replacement rotors on hand, and if I do dig into it, it goes back together with new ones. New, they are .344" thick(not very thick) and the minimum is .294". I did mic these and they are even on both sides at .322"(checked a few spots) so they're in spec.

And yes, I agree on modern cars. I appreciate knowing that when I turn the key on my modern car, it's going to start every time, but I like the sheer simplicity of what really fundamentally is a car that's not much advanced from 1950s technology. That's what makes me enjoy working on this car so much-you can see everything that's going on, and there's honestly not a ton there to go wrong. While I was waiting on the paint to dry today, I was tinkering with a ZS 175 carburetor, which was used on these cars from 1975-1980. SU carbs are not easy to fit with an automatic choke(the ones I'm familiar with that were used on some Jaguars and Big Healeys basically used a small auxilliary "cold start" carburetor, and I think Rolls Royce used a different system, but none of them are simple) so when California started requiring automatic in 1975, British Leyland went the route of sticking on a single carburetor that was easier to fit with an autochoke. The ZS carbs work like SUs, but the MGB ones have a water choke that is nearly always inoperable as found from 40+ years of being flooded with coolant. I feel sorry for the California guys, as even today they have to keep those auto chokes working(along with all the other failure-prone emissions parts like the smog pump and EGR valve) rather than just bolting on a manual choke conversion kit.

Carburetors...

I had a Datsun that needed a carb rebuild, but mosto f the jets were either not removable, or there were no sources for replacements. When I got the quote for a factory replacement, and after picking myself off the floor, I went looking for a different way to fix it. I found a Weber carb that 'could be made to fit', and was able to get an adapter machined for it, and an adapter plate, and welded an adapter to the stock air box and enjoyed the increased performance of that upgrade. It had a manual choke. People were always flummoxed by that knob sticking out of the dashboard. The dealer was impressed with my handiwork. The parts guy complained about the skimpy 'rebuild kit' for that original carb and looked over my solution. It worked... The only real problem I had was it iced up on a long road trip in early spring once. Never happened again.

Yeah, today's cars are all about maximizing dealer profit for repairs. Sad...

Ag tractors are worse though. I've got a Case tractor, and just try to get information on how to repair it, and parts too occasionally. John Deere is even worse! No access to shop manuals, even through the dealer! Grrr...
 
... Yeah, today's cars are all about maximizing dealer profit for repairs...
Down sized into an urban setting for my retirement. Dont regret it when i sold off the tractor

my next car will be a small EV with motors built into the wheels. Reference:

something like that...


a lot of talk on EV's but seems no manufacturer is really addressing the concept of reduced parts count.
 
Last edited:
Got a fair bit accomplished over the weekend.

First of all, some tuning stuff(old school) and general engine check-out to see how break-in is progressing.

Plugs out to make other stuff I was planning easier View attachment 1737104

There's a whole lot of information here, and I spent a while looking at it with a loupe to read all of it. I'm not a master plug reader, but can get by.

View attachment 1737106

Unfortunately, this is telling me that I have a serious carb imbalance, since this one is too light and they get darker as you move toward the back of the engine(#1 is influenced almost entirely by the front carb, #4 almost entirely to the back, while #2 is probably 75% front 25% rear, and vice-versa on #3). BTW, this is not a "break down" issue but getting serious about getting things as close to perfect as I can and squeezing the most power out of a car where "tuning" means a lot of wrench turning(sometimes just fractions of a turn), then often going for a drive to see if what you did benefited. Gross changes are obvious at idle, while squeezing as close to ideal as possible means really being in touch with how the engine feels and sounds when driving under different conditions. As a side note, this plug shows that the timing probably needs to be tweaked a little bit too(the color tells you mixture, while the area of color change on the ground strap gives an indication of timing).

Next, checking break in progress. This is a phenomenal number to see, since book spec is 140-150. This number was also dead even across all 4 cylinders. That's what it "should" be, especially on a fresh, tight engine, but "should" and "is" aren't the same(10% variation between low and high is considered acceptable).

View attachment 1737112

On the cosmetic front-several years ago I bought replacement door panels and they sat for a while. I finally got around to those, but it's stalled and I only did one side since I salvaged about 5 serviceable clips(of the 13 needed) and Autozone had 3 on the shelf. I ordered a full set of 26.

View attachment 1737113

View attachment 1737116

I spent a while polishing chrome on this door too, a tedious job but one long overdue.

Also, this change is probably polarizing since for folks who value absolute perfect cosmetic appearance will see this as a downgrade, while those who like originality and proper fit will see this as an improvement. I bought the car with a reproduction bumper, something I didn't realize at the time. Among other things, the repros don't wrap far enough around the front. One of the things I brought home last was a not perfect but really nice original bumper. I spent a while fitting it.

I'm showing from the side since that's where the main issue is on repros

Before

View attachment 1737117

After View attachment 1737118

The gap at the side is from a lack of hardware. I need a bolt to hold it, and was going to head to the hardware store to grab it before someone on the MG forum pointed out to me that I need a rubber spacer also. Looks like another Moss order in my future...

This, along with the rear bumpers, will hopefully come off next winter and get sent off for a straighten/rechrome.

Last thing, and I wish I'd taken a photo and actually measured, but I fitted a headlight relay kit yesterday. The stock wiring routes the entire headlight current through the switch, which is both hard on the switch(why you're lucky to get a year out a repro, and why I spent a lot of money finding/buing an NOS Lucas one even though I hated beating it up too) and that long path of 18g wire zaps a lot of power. A gentleman up in Canada makes several relay kits for various parts that are beautifully set up with brackets and mounting hardware for the relays and wired with pre-terminated(with bullets or spades as appropriate) wires in colors consistent with the original wiring. Oh, by the way, they're inexpensive too-I think I paid $40 for the kit, and it quite literally took me 10 minutes to hook up. It took me longer to get the nylock nut on it, and I ended up having to remove the right front wheel to get to it. That was okay, since my caliper rebuild kit should be here today and I'm hoping to do the brakes. The lights are brilliantly bright white(they're halogens) when relayed.

Looks awesome!

Compression testers still give me a heightened heart rate, as I had one that I was using, and the end had double threads, to fit in both smaller and larger bored spark plug holes. I tested the third cylinder, and went to check the fourth, and it wasn't threading in properly. I pulled it out, and looked at it. The damn small threaded part broke off in that last cylinder, and I had to really work to get that chunk of metal out. Had to remove a couple hoist rings, and some other stuff from the engine, and find a way to extract that chunk with an ez-out mounted on an array of extensions. It was Rube Goldberg, and took a lot of torque, which I couldn't figure out as it threaded in easily. I was hoping I wouldn't have to try to drill the hole out and helicoil it. What a freaky mess. I've never owned a compression gauge since. What a huge afternoon of intense drama, and borrowing cars to get parts and tools. I did get it out, and the threads weren't too badly damaged. I couldn't figure out how that thing got jammed in there...:oops:
 
Nice little 100-mile-ish round trip jaunt on this beautiful afternoon out along the Illinois river-a drive I always enjoy, but it's my first time doing it in the MG(since I've only had it here 2 months now). I don't know how it could have possibly happened that I had a completely enjoyable and trouble free trip, just like most of the times I drive the car anywhere, inspite of the fact that I've been informed it breaks down "literally" every time I take it out...

I'm missing the Ohio river as a photo backdrop, but the Illinois sort of works. It's unfortunate that I think a lot of the good places in here to get the Mississippi as a back-drop are places where I really don't want to go.

I'd have headed over to the confluence station/lock and dam, which is an equally fun place if it weren't for the fact that their busybody security guards hassle you every time you try to take photos there. Incidentally, it's 100% legal and permissible-the security guards will just avoid saying yes and instead will just bug you and get in your way to the point that it's impossible to actually get good shots.

_DSC5041.jpg
 
Nice little 100-mile-ish round trip jaunt on this beautiful afternoon out along the Illinois river-a drive I always enjoy, but it's my first time doing it in the MG(since I've only had it here 2 months now). I don't know how it could have possibly happened that I had a completely enjoyable and trouble free trip, just like most of the times I drive the car anywhere, inspite of the fact that I've been informed it breaks down "literally" every time I take it out...

I'm missing the Ohio river as a photo backdrop, but the Illinois sort of works. It's unfortunate that I think a lot of the good places in here to get the Mississippi as a back-drop are places where I really don't want to go.

I'd have headed over to the confluence station/lock and dam, which is an equally fun place if it weren't for the fact that their busybody security guards hassle you every time you try to take photos there. Incidentally, it's 100% legal and permissible-the security guards will just avoid saying yes and instead will just bug you and get in your way to the point that it's impossible to actually get good shots.

View attachment 1740479
How annoying. Finding decent places to take car photos is hard. Glad you enjoyed your drive.

Mine was less enjoyable. The petrol flap decided not to open again. It’s been fine for months since I ‘fixed’ it last time. Think I damaged the colour coded panel getting it off. Naturally I was running on fumes at the time.
 
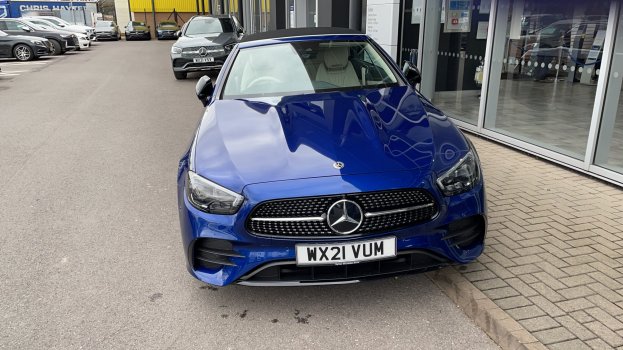
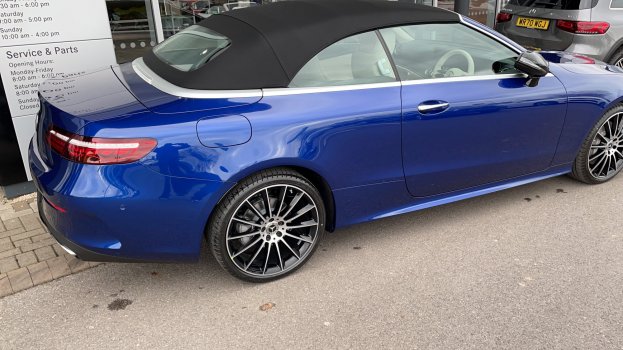
So the SL went and after seven months of waiting, i picked my new E class cabriolet up last Friday. The 2021 MBUX system is superb. I can’t see myself using CarPlay 🙂
 

Attachments

  • 0292EDA6-D0E8-4497-9960-7C3149CF688C.jpeg
    0292EDA6-D0E8-4497-9960-7C3149CF688C.jpeg
    509.5 KB · Views: 62
  • 8F097383-95DC-43C7-A7AF-DAFE9E4F8B81.jpeg
    8F097383-95DC-43C7-A7AF-DAFE9E4F8B81.jpeg
    473.1 KB · Views: 63
  • Like
Reactions: 44267547
2022 Jeep Wagoneer [Offered also in a ‘Grand’ variant]


Wagoneer model receives a 5.7l (392HP/404Tq) & Grand Wagoneer receives 6.4L (471HP/455Tq). Both have 8-speed auto.

Base Wagoneer-$60,000-$80,00

Grand Wagoneer-$89,000-$111,000

The ‘Grand’ Wagoneer is the luxury version of the standard Wagoneer, but they both share the same wheelbase.
1079D2E0-AD13-4B52-8B3D-CBB8AB6FA871.jpeg


2057EACB-7A05-47DA-BBCB-FDE82401B05E.jpeg
C300D4DD-C9E6-4D4C-A21A-274D0CEF9904.jpeg
78E32903-8466-4C22-9DB4-F1C63398184E.jpeg
B6501EF2-DC61-4925-8653-C01751C9AD99.jpeg

FB814CDA-07A0-407E-AA9C-946219C62875.jpeg

F0B13548-DB4A-4E69-8663-29FDCE2369B1.jpeg
 
2022 Jeep Wagoneer [Offered also in a ‘Grand’ variant]


Wagoneer model receives a 5.7l (392HP/404Tq) & Grand Wagoneer receives 6.4L (471HP/455Tq). Both have 8-speed auto.

Base Wagoneer-$60,000-$80,00

Grand Wagoneer-$89,000-$111,000

The ‘Grand’ Wagoneer is the luxury version of the standard Wagoneer, but they both share the same wheelbase.
View attachment 1743131

View attachment 1743117View attachment 1743119View attachment 1743120View attachment 1743121
View attachment 1743123
View attachment 1743122

My wife's family had a deluxe Jeep Wagoneer when I met her. That thing was such a piece of crap. The window in the rear door stopped working, the computer died repeatedly, it always seemed to run rough, and no one could fix it short of replacing the engine. The inside started falling apart. It was just a disaster. Its memories like that that make me so much less likely to trust that an American car company has figured out that they aren't selling the car now, but the next three that person is likely to buy over time. *sigh*
 
Another work post, for those so inclined to skip it.

BTW, I should also mention that most of what I've been doing to the car recently falls under the category of "routine maintenance" and not actual repairs. There's just a lot more to maintain on an old car than on a new car.

I wrote up the brake job a page or so back, but said I didn't want to tackle the rotors despite having them on hand.

For anyone who's done a brake job on a modern car, you know that changing the rotors isn't much more involved than just changing pads. Typically, you'll unbolt the entire caliper mounting bracket(which is normally two bolts separate from the ones you take out to just swap the pads) and move it out of the way. From the factory, a lot of cars will have a screw or two holding the rotors to the hub, but it's my understanding that their main function is to keep the rotors in place as the car moves through the assembly line. If something crazy happens like one strips out or is stuck, I've never stressed over replacing it if I had to drill it out. In any case, though, if those screws are present and removed, the rotor just pulls right off the wheel studs. In operation, it's held in place by being "sandwiched" between the hub and wheels and consequently just held on the studs by the lug nuts.

The MG uses an arrangement that I understand is common to older disk brake systems of any origin. Basically, rather than resting in front of the hub, the rotor is bolted to the back of it, and consequently replacing the rotor requires removing the hub.

This actually isn't a huge deal. If you've only dealt with newer cars, you've probably never serviced hubs, but maybe replaced them they wore really badly. On modern cars(and by modern I'm stretching back to probably the 80s on some designs-what was left mostly went away in the 90s), they're a sealed unit that is just replaced in its entirety if it ever wears out. In reality, unless something crazy happens to physically damage it, a sealed hub will easily make 400K+ miles.

There again, this isn't a setup unique to MGs, but is something that was used on American cars and I'm sure others from probably the 50s going forward. Basically, the entire hub assembly fits onto something called a "stub axle" that, in operation, is held under tension. Riding on the stub axle are a pair of tapered roller bearing races along with spacers and the like to keep everything where it should be. The hubs, in turn, have the outer bearing races pressed into them, so the hub turns on the bearings. The entire assembly is grease packed, so it's a good idea to occasionally break it down, clean out the old grease, and repack it with fresh grease. Replacing the rotors is a good time to do that since you're taking it apart anyway.

So, here's how all of this works:

Once the caliper is removed(in this photo I have it zip tied to the top of the suspension A-arm), the dust cap in the center of the hub needs to be removed also. This exposes a castle nut, also called a castellated nut, that is helded from turning by a cotter pin that fits in the grooves of the "castle" and through a hole in the stub axle. Notice also that there's a lot of grease in there.

IMG_2381.jpeg


After removing the cotter pin, the castle nut is unscrewed, and the hub pulled off. I didn't photograph everything, but basically you get these parts off

IMG_2385.jpeg


Not shown here are the bearing races, as I handled those separately. There are two, an inner and outer. Also, somehow or another, I missed photographing the spacer.

That leaves behind the stub axle. Normally the brake backing plate is here also, but I removed it to clean it up and paint it.

IMG_2382.jpeg


I'm showing it here with a grease gun attached to one of the Zerks(grease nipples) on the kingpins. The kingpins are the swiveling part of the steering knuckle, and need to be greased periodically. This is done by connecting a grease gun to each of the Zerks in turn and forcing grease in. As fresh grease is forced in, old grease will be seen oozing out of any joint it can find. When fresh, clean grease starts oozing out, you know you've added enough. There are 3 Zerks on this car's kingpin, and I opted to do them here since they're easy to access and see. I had a bit of a diversion in that when pumping grease into the center Zerk, I got a nice steady stream out of the bottom one. Fortunately, these are a generic part, and $3 bought a half dozen of the correct replacements from NAPA.

I spent a while working on intermediate steps that I didn't photograph, but basically I decided to wirebrush, de-rust, and paint both the backing plate and the hub. That took a while, but I'm happy with the results even with my messy rattle can paint job. I'm more going for rust prevention than anything.

IMG_2384.jpeg


The bearings need a bit of extra attention. First of all, I'd bought replacement outers at Autozone since they were $7 each. On advice, though, I opted instead to clean and reuse the original Timken "Made in England" bearings.

IMG_2383.jpeg


Timken invented this type of bearing, and these stay well enough greased that they're unlikely to go bad. Modern bearings, even those marked Timken, are of unknown origin and quality.

I cleaned these by soaking in kerosene and then blowing out with compressed air. Once clean and dry, they can be packed with grease. They can actually be packed by hand rather easily(you put grease in your palm and force it into the bearing), but why do that when there's a tool for it?

IMG_2388 2.jpeg


These are not very expensive, and basically hold the bearing while you use a grease gun to inject grease around the bottom of the race and through the top, the same way it would be done by hand.

Finally, I bolted the new rotor to the hub.

IMG_2386.jpeg


I opted for fresh hardware, which was another adventure. The bolts holding the rotor to the hub are 5/16 UNF(5/16-24). I went to the hardware store, and in general the only fine bolts they have are grade 8. Grade 8 fasteners are overkill, but at the same time I'm okay with using a fastener that's stronger than needed. I needed 1 1/4" long bolts, but the ones they had didn't have shoulder. The 1 1/2" ones did, but they only had 7 in stock(I need 8, 4 per side). I debated a bit and gambled on 1 3/4" not being too long, and fortunately I was correct.

As the repair manuals say, assembly is the reverse of disassembly

IMG_2390.jpeg


The most difficult part was getting the hub seal seated correctly, but fortunately it didn't take too much persuasion.

From there comes reinstalling the castle nut. On a typical American front suspension, the procedure for installing this is to tighten the nut until the hub locks, the back off until the cotter pin lines up. The workshop manual for the MGB specifies a bit of a different procedure-the nut should be torqued to 60 ft-lbs and checked for free rotation and also endplay. It should "tunk" slightly when pulled on. If it doesn't under this amount of torque, the shims between the bearings are adjusted. Too much freeplay requires removing shims, while too little requires adding them. Fortunately, mine was dead-on at 60 ft-lbs.
 
Register on MacRumors! This sidebar will go away, and you'll see fewer ads.