Got a tip for us?
Let us know
Become a MacRumors Supporter for $50/year with no ads, ability to filter front page stories, and private forums.
TRIM Support Enabler
- Thread starter Cindori
- Start date
- Sort by reaction score
You are using an out of date browser. It may not display this or other websites correctly.
You should upgrade or use an alternative browser.
You should upgrade or use an alternative browser.
Is the first post link being updated at each revision?
It wasn't earlier as I downloaded the first one thinking it was 1.1 too...
Try page 7
https://forums.macrumors.com/posts/12273354/
sudo chown root:admin /
sudo kextcache -system-prelinked-kernel
sudo kextcache -system-caches
This!
I used the v1.1 patcher and my boot times went up to ~38 seconds (measured over 3 boots). Ran these commands in the Terminal and boot time went down to 20 seconds (till desktop & all apps loaded)!
Thanks matwue and Cindori!
This!
I used the v1.1 patcher and my boot times went up to ~38 seconds (measured over 3 boots). Ran these commands in the Terminal and boot time went down to 20 seconds (till desktop & all apps loaded)!
Thanks matwue and Cindori!
the 1.1 patcher runs these commands ^^;
sure you didnt mistake?
Installed 1.1 on a 2011 Macbook Air with 128GB SSD and its working absolutely fine. Boot time consistently ~15 seconds. It wasn't long before, but I have an OCZ Vertex on my Macbook Pro that does its own TRIM which has kept performance throughout. Didn't want the Air running itself down 
Installed 1.1 on a 2011 Macbook Air with 128GB SSD and its working absolutely fine. Boot time consistently ~15 seconds. It wasn't long before, but I have an OCZ Vertex on my Macbook Pro that does its own TRIM which has kept performance throughout. Didn't want the Air running itself down
I thought the 2011 Macbook Air SSD sticks use sandforce controllers that have built-in garbage collection.
Does anyone found out if there will there be any performance increase if the drive already have built-in GC feature? And will adding TRIM on drive that already does GC have any negative effects?
All OWC SSD drives use Sandforce controllers with built-in GC, so that's why I'm curious after some people reporting "not working well with OWC drives" if there's a reason to that.
Does anyone found out if there will there be any performance increase if the drive already have built-in GC feature? And will adding TRIM on drive that already does GC have any negative effects?
They use the ones with their own "garbage collection" all over the place on windows computers which have TRIM, so I wouldn't think it matters unless windows sees that and handles it differently, but I doubt it does.
I thought the 2011 Macbook Air SSD sticks use sandforce controllers that have built-in garbage collection.
Does anyone found out if there will there be any performance increase if the drive already have built-in GC feature? And will adding TRIM on drive that already does GC have any negative effects?
All OWC SSD drives use Sandforce controllers with built-in GC, so that's why I'm curious after some people reporting "not working well with OWC drives" if there's a reason to that.
Ah, interesting, I didn't know that about the MBA's SSD. If that is so then I think that [logically] the downside may be the experience of shorted SSD life because of two TRIM processes being run across it.
Who knows for sure?
Ah, interesting, I didn't know that about the MBA's SSD. If that is so then I think that [logically] the downside may be the experience of shorted SSD life because of two TRIM processes being run across it.
Who knows for sure?
I really doubt it would worsen the drive's lifespan as TRIM and GC usually work together. In fact TRIM should help GC as OSX is now telling the drive ahead of time which sectors are deleted.
can somebody confirm if the latest revision works better for OWC Mercury Extreme Pro SSD?
I have an owc 240gb ssd in my 2007 mbp and I installed both of Cindori's patches. Both installed fine.
At first my boot time increased by 10 seconds but it seemed to fix itself overnight and was then just about 1 second longer.
The second patch didn't affect anything differently.
Beyond boot times, I have no idea how trim affects the computer. So far, I can't tell any difference in performance or stability.
I thought the 2011 Macbook Air SSD sticks use sandforce controllers that have built-in garbage collection.
Does anyone found out if there will there be any performance increase if the drive already have built-in GC feature? And will adding TRIM on drive that already does GC have any negative effects?
All OWC SSD drives use Sandforce controllers with built-in GC, so that's why I'm curious after some people reporting "not working well with OWC drives" if there's a reason to that.
The OEM MacBook AIR and Macbook Pro SSD drives do not have Sandforce controllers.
Thousands of Windows users have been running SSD with garbage collection like the Sandforce controlled drives (Vertex 2 probably one of the most popular) with no ill effects. I really doubt there will be any downside to having both present.
Correct me if I'm wrong, but first rebooting, etc, aside, isn't the effect of TRIM more of a longer term process to see any results? It seems like what people are seeing otherwise may just be the normal performance variations from one session to the next and maybe a bit of the placebo effect? 
The OEM MacBook AIR and Macbook Pro SSD drives do not have Sandforce controllers.
Thousands of Windows users have been running SSD with garbage collection like the Sandforce controlled drives (Vertex 2 probably one of the most popular) with no ill effects. I really doubt there will be any downside to having both present.
Ah, sorry I was wrong, I just found out the MBA use Toshiba controllers. I think the same one as Kingston.
Ah, sorry I was wrong, I just found out the MBA use Toshiba controllers. I think the same one as Kingston.
Actually, it was found that some MBAs ship with Samsung SSD that gets speed of up to 265MB/s.
To TRIM your SSD:
1. Open Disk Utility
2. Select your SSD from the right-hand-side bar
3. Click "Erase" tab
4. Select "Erase Free Space..."
5. Select the fastest method (no need to add extra write cycles by doing it multiple times) and click "Erase Free Space"
A guy in a Finnish forum tried this with his 160GB Intel G2 X25-M and his write speeds went up by ~15MB/s and read speeds went up by nearly 30MB/s, i.e. back to the level of a new drive.
I've seen some people asking about this so I thought I would add this here now, for future use. Of course there is no need to do this.
Correct me if I'm wrong, but first rebooting, etc, aside, isn't the effect of TRIM more of a longer term process to see any results? It seems like what people are seeing otherwise may just be the normal performance variations from one session to the next and maybe a bit of the placebo effect?
If people have been running their SSDs for a period of time with no TRIM, there is guaranteed to be blocks and pages on the SSD which are storing "deleted" data but the SSD has not yet been informed that this data is no longer needed. Therefore, once TRIM is enabled, the SSD suddenly can receive this data from the OS, and erase/shuffle data as needed to optimize the drive for performance. Therefore, there will be an immediate effect of increased performance (assuming that performance was degraded). With TRIM consistently enabled, the SSD will be able to maintain its performance as more files are erased and written over time.
Many Kudos to Cindori!
Do you guys realise a 19-old just gave us what we were expecting to get from Steve a long time ago ?!?! Awesome...
Anyway, instant success with v1.1 on three Macs with OCZ Vertex 2's. Same throughput speeds, all SSD's on latest firmware 1.32.
Cindori, where do we donate?
Do you guys realise a 19-old just gave us what we were expecting to get from Steve a long time ago ?!?! Awesome...
Anyway, instant success with v1.1 on three Macs with OCZ Vertex 2's. Same throughput speeds, all SSD's on latest firmware 1.32.
Cindori, where do we donate?
you can use the Zeus donation page to donate! thanks!!


Thanks! will add this to main post


To TRIM your SSD:
1. Open Disk Utility
2. Select your SSD from the right-hand-side bar
3. Click "Erase" tab
4. Select "Erase Free Space..."
5. Select the fastest method (no need to add extra write cycles by doing it multiple times) and click "Erase Free Space"
A guy in a Finnish forum tried this with his 160GB Intel G2 X25-M and his write speeds went up by ~15MB/s and read speeds went up by nearly 30MB/s, i.e. back to the level of a new drive.
I've seen some people asking about this so I thought I would add this here now, for future use. Of course there is no need to do this.
Thanks! will add this to main post
To TRIM your SSD:
1. Open Disk Utility
2. Select your SSD from the right-hand-side bar
3. Click "Erase" tab
4. Select "Erase Free Space..."
5. Select the fastest method (no need to add extra write cycles by doing it multiple times) and click "Erase Free Space"
A guy in a Finnish forum tried this with his 160GB Intel G2 X25-M and his write speeds went up by ~15MB/s and read speeds went up by nearly 30MB/s, i.e. back to the level of a new drive.
I've seen some people asking about this so I thought I would add this here now, for future use. Of course there is no need to do this.
Not sure whether this is actually a full TRIM - I think it's not.
In the Linux world there's support for a 'real' Secure Erase, ie. telling the SSD to let go of its entire contents, restoring to new. This is the method I used to use before Cindori got busy:
https://forums.macrumors.com/threads/841182/
A little bit more complicated, but it's an instant restore to new. The Disk Utility method isn't, as far as I'm aware. But I may be wrong and a lot of people including myself wasted a lot of precious time in the past
No go enjoy your blazing SSD speeds !!
THere is difference in deleting the whole disk and deleting free space
You should check the video in the first post if you havent already!
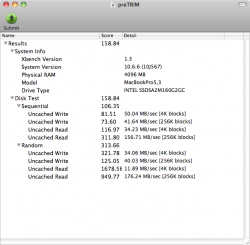
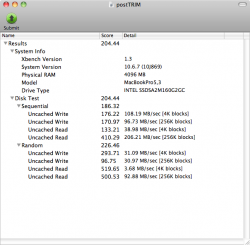
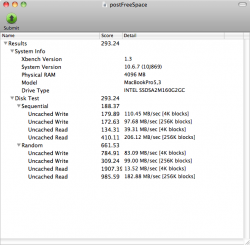
Okay, so I have some results that are a bit more comprehensive.
I had an Intel X-25M G2 160GB that was very worn out, meaning, I've filled it to the brink a couple of times so pretty much every cell had been used.
I have benchmarked performance just before enabling TRIM, right after enabling TRIM (after the reboot), and after wiping 34GB of free space with Disk Utility.
The results are attached. In a nutshell:
- This Works for Intel SSDs.
- Do erase your free space.
Attachments
Register on MacRumors! This sidebar will go away, and you'll see fewer ads.


