Thanks for all contributors in this thread. I have successfully replaced the SSD on my MacBook Pro 13” 2014 mid running High Sierra with a Sabrent Rocket NVMe SSD formatted in HFS+. I also cleaned and re-applied the thermal paste on the CPU die with Arctic MX-4. It’s like brand new now. There are some hints that might be helpful from my experience. I will share them in this post.
Before you start, I suggest getting a fast USB stick or portable drive, which could make you encounter less hassle and no need to re-install everything. It’s even better if you can grab an NVMe SSD enclosure, put your new NVMe SSD in it, and treat it as the external storage device I mention below.
To do the migration of macOS, you don’t need any paid software. All we need is the faithful Disk Utility.
Step 1: Clone the Mac boot volume to external storage
Boot into recovery by holding cmd+R when booting, and launch Disk Utility. With a fast external storage device, you can now “restore” (clone, effectively) the mac boot volume to it. You can refer to this great tutorial:
https://www.lifewire.com/back-up-startup-disk-utility-2260102
NOTE: If you cannot restore to your external storage, changing the scheme to GUID Partition Map should help. You can see how to do it in this How-To:
https://www.howtoturnitoffandonagain.com/2018/01/03/partition-usb-drive-macos-high-sierra/
After the process completed, you could try to boot from your external storage device with the option key pressed when booting. It should work.
Step 2: Replace the internal SSD
iFixit can help you to do this:
https://www.ifixit.com/Guide/MacBook+Pro+13-Inch+Retina+Display+Mid+2014+SSD+Replacement/27849
If you cloned the boot volume to the NVMe SSD enclosure at step 1, you are good to properly boot from your new NVMe SSD now! Just skip step 3.
Step 3: Clone the volume back to the new NVMe SSD
Like step 1 but in a reverse way. After the process completed you should be able to boot from the new NVMe SSD.
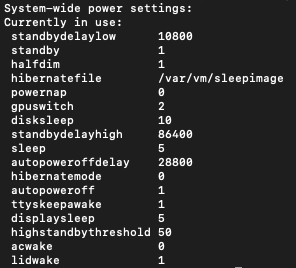
Step 4: Fix the hibernation problem (2013 and 2014 models)
“sudo pmset standby 0” is enough for me. I have tested the power consumption under some scenarios. You can check it before replacing the SSD.
All of the following results were tested without Time Machine (but some apps like Pocket and message apps opened in the background) and started tests from fully charged.
8 hours sleep with no external device connected: 1% drop
8 hours sleep with JetDrive Lite connected: 25% drop
8.5 hours sleep with an external monitor connected (via mini DP to VGA adaptor): 15% drop
7 hours sleep with an external monitor (via mini DP) and a bluetooth audio speaker connected: 4% drop
As you can see, more external devices connected makes more battery drain. The JetDrive Lite must be avoided, and any adaptors with an active IC chip (like the Apple genuine mini DP to VGA adaptor) should also be avoided to prevent the massive battery drain.
Now you have a renewed MacBook Pro. Enjoy!
===== =====
How about Boot Camp partition?
I tried the old-school “dd” command but failed to properly boot from Boot Camp partition. I always ended up with the BSOD screen. I tried to make an NTFS partition and dd, or install Windows with Boot Camp Assistant then dd, but both failed no matter how I adjusted the way I use dd. This article is what I refer to:
https://benchodroff.com/2017/02/15/backup-and-restore-boot-camp-on-a-new-mac-for-free/
Not to mention the cloning process, the installation of Windows is a pain itself on the new NVMe SSD. I always fail to get the stage of first-time configurations which should happen after the installation succeed even I had followed the instruction to change the registry value to 3. After all, only the instruction of the user
ycl90 is workable. The corresponding post is here:
https://forums.macrumors.com/thread...sd-to-m-2-nvme.2034976/page-143#post-27146189
I will explain the process below:
Step 1: Make an install disk with Boot Camp Assistant and a fast USB stick
You cannot untick the option to “Download the latest Windows support software from Apple“, but that’s fine. Just make sure you untick the last option. We are not going to install Windows immediately.
Step 2: Move the Windows support files
If you can find another USB stick, move the folders named “$WinPEDriver$”, “BootCamp”, and the file named “AutoUnattend.xml” to that USB stick. Make sure these files no longer exist in your install disk (the USB stick I mentioned in step 1).
Step 3: Partition internal disk with Disk Utility
Create a new NTFS partition with Disk Utility. The Boot Camp Assistant will not let you install Windows if your install disk does not contain Windows support files.
Step 4: Boot from the install disk and install Windows to the new NTFS partition
Hold the option key when booting.
Step 5: Change the registry after the first reboot
After the first reboot, press shift+F10 to launch command line window. Launch regedit and change the value of setup.exe to 3 under HKEY_LOCAL_MACHINE\SYSTEM\Setup\Status\ChildCompletion. After that, the installation process “might” show the BSOD screen later and reboot itself. I say “might” because I had it rebooted by entering “shutdown -r” command once without the BSOD screen. But either way ended up with the same result.
After rebooting, you should be able to set up the first-time configurations and get to the Windows desktop successfully.
Step 6: Install Windows support files
If you have copied the Windows support files to another USB stick in step 2, plug that USB stick and launch the Setup.exe under “BootCamp” folder to install all necessary drivers. I recommend you to copy these files to internal storage before you install them since you have a blazing fast NVMe SSD now.
Now you have a working Windows on your MacBook with the new NVMe SSD! But! You will notice that you cannot launch the Boot Camp manager successfully. Thus you cannot set the trackpad gestures, nor restart using macOS directly from the small icon in the toolbar. I have no clue to this problem, but the Windows itself is working, and it has been activated automatically since I had a valid Windows running on my machine before. Also, I can still switch between Windows and macOS by pressing the option key when booting (but the boot device name of Windows will be EFI boot or something similar), so I think it’s not a deal breaker.
Step 7: Adjust the power management on PCI Express device
I just follow the instruction from
ycl90’s post. I haven’t tried what would happen if the option is not changed.
Hope all these advice help.