Become a MacRumors Supporter for $50/year with no ads, ability to filter front page stories, and private forums.
Status
The first post of this thread is a WikiPost and can be edited by anyone with the appropiate permissions. Your edits will be public.
It has to be internal. Where the Mac OS Sata drive sits. And do this with the LCD off to make things simpler.

Spent more time yesterday learning the hard way that this is not easy. Seems a gotcha at evey step. I basically need a step by step showing how to install Windows 10 on the iMac. I get to a stage on the install then Windows must detect the gpu ( AMD) and the screen res switches. This is early in the setup so I do not even have a chance to try and stop this. Shortly after it crashes. How do I get this done? Seems impossible .
[doublepost=1548596219][/doublepost]At this point I would ask does anyone hear have a setup where they could easily flash the bios needed on the 780m? I could ship the card and would pay for a cheep dinner and a case of beer.
 
Maybe you could just measure the resistance across the pots once set to 13KHz / 50% duty?
Then people could set those values with a cheap MultiMeter instead of needing a scope.
You shouldn’t need to de-solder them but probably best measure without anything else connected.

It’s a real shame Apple didn’t use standard PWM fans in the iMacs, I was hoping
we could have hijacked one of the fan headers for software backlight control?

I can confirm the DosLabs DyingLight module works well in the iMac,
but the screen does blank out briefly as the brightness is adjusted,
maybe they could update the firmware to fix it but its no big deal.

You can just run the USB cable to an external port but I replaced the SD card reader instead
(the MiniPCIE doesn't have USB wired but you could do the same with the Bluetooth module)
and with the right cables there’s no need to cut wires or solder onto the iMac boards:

https://www.ebay.com/itm/DyingLight-Mk-II-Backlight-Control-Module/292891728547

https://www.ebay.com/itm/SD-CARD-RE...-2011-MC813-MC814-MD063-922-9850/303031911743

https://www.ebay.com/itm/6Pin-Male-...-Card-Power-Extension-Cable-20cm/201764196006

Here are the SD pinouts for the A1312 / A1311, good luck telling those wire colors apart !

View attachment 818329 View attachment 818330
Wow, I hadn't even thought of using DyingLight to control backlight brightness on an iMac, I'm actually pretty surprised Apple uses the same PWM brightness control implementation on the iMacs as well. I'll make some changes to the DyingLight firmware, and see if I can get rid of the screen flicker on brightness change issue.
 
Spent more time yesterday learning the hard way that this is not easy. Seems a gotcha at evey step. I basically need a step by step showing how to install Windows 10 on the iMac. I get to a stage on the install then Windows must detect the gpu ( AMD) and the screen res switches. This is early in the setup so I do not even have a chance to try and stop this. Shortly after it crashes. How do I get this done? Seems impossible .
[doublepost=1548596219][/doublepost]At this point I would ask does anyone hear have a setup where they could easily flash the bios needed on the 780m? I could ship the card and would pay for a cheep dinner and a case of beer.
I still think you are doing this in EFI mode. Try a windows 7 DVD at this point. The OS really doesn't matter as long as it was created on that iMac.
 
This is amazing considering I never use the SD Card slot. Which pin on the 6 Pin connector are we tapping PWM from? (Post #1354 from @wlagarde looks like lower right pin on female side?)
Thanks. Also When the iMac i started with the dying light module, does it remember what brightness level it was at or keep brightness at 100%? Just curious because I don't think there is software for this module in Windows.
EDIT: after watching @dosdude1 video it appears to AppleBacklightControl natively. So in theory with boot camp drivers installed in windows, we will have back-light control.

Yes, the PWM pin is bottom-right looking at the wired *back* of the female connector (with the bump at the top) just cut it off there and extend to the PWM pad on the DyingLight, I used shielded cable but it shouldn’t matter.

It defaults to full brightness on reset but the MacOS driver / app restores the brightness level at login, there are command line tools for Windows (& linux!) so maybe someone could throw a GUI slider together using those?

Wow, I hadn't even thought of using DyingLight to control backlight brightness on an iMac, I'm actually pretty surprised Apple uses the same PWM brightness control implementation on the iMacs as well. I'll make some changes to the DyingLight firmware, and see if I can get rid of the screen flicker on brightness change issue.

I was surprised to, but I guessed it was worth a shot! I think you might actually end up with more people using these with iMac graphics mods than with MacBooks. I found that the top third of the slider range gives smooth brightness reduction with no blinking, after that reducing it more slowly doesn’t seem to help at all.

A firmware update would be great, do you have an iMac on hand to test with? I’m happy to help test if possible,
is the micro’s EEPROM writable over USB or using a standard SPI programmer?

On an unrelated question, do you know how to put the iMacs into “firmware update mode” so Flashrom can write the full Bootrom, holding the power button does nothing, I found some hardware hacks that involve shorting pins on the HDAudio chip but I was hoping you might know a software solution.
 
Last edited:
Yes, the PWM pin is bottom-right looking at the wired *back* of the female connector (with the bump at the top) just cut it off there and extend to the PWM pad on the DyingLight, I used shielded cable but it shouldn’t matter.

It defaults to full brightness on reset but the MacOS driver / app restores the brightness level at login, there are command line tools for Windows (& linux!) so maybe someone could throw a GUI slider together using those?


I was surprised to, but I guessed it was worth a shot! I think you might actually end up with more people using these with iMac graphics mods than with MacBooks. I found that the top third of the slider range gives smooth brightness reduction with no blinking, after that reducing it more slowly doesn’t seem to help at all.

A firmware update would be great, do you have an iMac on hand to test with? I’m happy to help test if possible,
is the micro’s EEPROM writable over USB or using a standard SPI programmer?

On an unrelated question, do you know how to put the iMacs into “firmware update mode” so Flashrom can write the full Bootrom, holding the power button does nothing, I found some hardware hacks that involve shorting pins on the HDAudio chip but I was hoping you might know a software solution.
It's most like my 2012 Mac mini when it's ROM got corrupted and lost it's serial number. The only way I was able to rewrite EEPROM was was an SPI flasher. I'm debating whether or not I should buy a dying light module and do it now or wait for @dosdude1 to see if he could create a revision for the iMac. It's still such an amzing idea I plan to do to all 3 of my MXM swapped iMac's.
 
Last edited:
Wow, I hadn't even thought of using DyingLight to control backlight brightness on an iMac, I'm actually pretty surprised Apple uses the same PWM brightness control implementation on the iMacs as well. I'll make some changes to the DyingLight firmware, and see if I can get rid of the screen flicker on brightness change issue.

wow, that would be great dosdude1 !
 
It's most like my 2012 Mac mini when it's ROM got corrupted and lost it's serial number. The only way I was able to rewrite EEPROM was was an SPI flasher.

Yeh I just use a CH341 & test clip but being able to use Flashrom directly would be much easier.
I think DosDude’s APFS tool worked on some iMacs so I thought there might be a magic command,

Apple must be doing it somehow..?

BTW, to get the DyingLight working in Windows 10 I had to make a LibUSB driver using this:

https://downloads.sourceforge.net/project/libusb-win32/libusb-win32-releases/libusbK-inf-wizard.exe?r=https://sourceforge.net/projects/libusb-win32/files/libusb-win32-releases/libusbK-inf-wizard.exe/download&ts=1548702695

After installing the driver I just created two shortcuts to dyinglight.exe with the –u and -d switches
then set their shortcut keys to Ctrl+ Up / Down.

For anyone who doesn’t want to loose their SD reader you could use the USB pins from the IR sensor instead,
but it runs on 5v so you would have to reduce that somehow or just tap 3.3v off the green SD wire.

IR.png
 
Last edited:
  • Like
Reactions: ASentientBot
Yeh I just use a CH341 & test clip but being able to use Flashrom directly would be much easier.
I think DosDude’s APFS tool worked on some iMacs so I thought there might be a magic command,

Apple must be doing it somehow..?

BTW, to get the DyingLight working in Windows 10 I had to make a LibUSB driver using this:

https://downloads.sourceforge.net/project/libusb-win32/libusb-win32-releases/libusbK-inf-wizard.exe?r=https://sourceforge.net/projects/libusb-win32/files/libusb-win32-releases/libusbK-inf-wizard.exe/download&ts=1548702695

After installing the driver I just created two shortcuts to dyinglight.exe with the –u and -d switches
then set their shortcut keys to Ctrl+ Up / Down.

For anyone who doesn’t want to loose their SD reader you could use the USB pins from the IR sensor instead,
but it runs on 5v so you would have to reduce that somehow or just tap 3.3v off the green SD wire.

View attachment 818700
The way apple does EFI updates on newer Macs is by blessing the .scap file to the EFI partition. It's still nothing we can do because like newer laptops (first I encountered back in the day was the t430) have signed firmware updates. Meaning anything off by a byte and it won't program or could brick etc. The last Mac I know of that can go into program mode was the 2010 Mac Pro and 2009 Mac mini. My 2009 9,1 iMac refuses to enter programming mode and cannot be APFS patched. On the "Upgrading 2013/2014 Macbook Pro SSD to M.2 NVMe" thread we dump the rom add NVMe.dxe back to the dumped rom and reflash if that's something like what you need to do. However when you had your original MXM card in you should have installed 10.13.6 which gave the 2011 iMac native APFS support. What are your intentions of modifying the rom?

Back to the dying light module, can i see pics of where you installed it? Is the screw hole on the module able to screw in where the SD card reader was? What gauge wiring did you use? And is there any PWM flickering at the lowest backlight levels. Sorry if you put it back together already.
 
Thanks, I wasn’t expecting to be able to use the official update mechanism for modded firmware, but at some stage they unlock write protection in software so maybe we can spoof that, or use the same hacks as the PC:

https://papers.put.as/papers/firmware/2016/How_to_become_the_sole_owner_of_your_PC.pdf
https://github.com/projectara/flashrom/blob/master/Documentation/mysteries_intel.txt
https://www.win-raid.com/t3553f39-G...ite-Access-Permissions-for-SPI-Servicing.html

I actually injected APFS & NVME support with UEFI Tool some time ago,
it’s a shame the MiniPCIe slot is only 2.0 x1, so an M.2 adapter is limited to <500MB/s
but I tested a 32GB Optane module and it still beats my SATA drives on 4K IOPs

I’m hoping someone might be able to mod the bootrom for Ivy Bridge CPUs some day,
update the Microcode, Hybrid ME v8 etc, but that's a major over-haul, well beyond me I'm afraid.

At the moment I'm trying fix the HD Audio problem with Windows in UEFI mode,
(which is perfectly stable once you prevent Windows 10 loading the Intel HD graphics driver btw)

I’ve tried modding the HD audio driver inf and importing the registry keys from a legacy install but that didn’t work, so unless we want to start patching the windows HAL a firmware level fix seems like the only solution?

I’ve got the iMac back together now but will try and post some photos when I’m next in there, the SD screw fits just fine and the through-hole is grounded so you might get away without wiring that (but I would anyway)
I just used an old DVD-ROM SPDIF cable and grounded the shield, but any old wire should work for PWM.

I've not noticed any flickering at the lowest brightness levels.
 
Last edited:
  • Like
Reactions: SEJU
Thanks, I wasn’t expecting to be able to use the official update mechanism for modded firmware, but at some stage they unlock write protection in software so maybe we can spoof that, or use the same hacks as the PC:

https://papers.put.as/papers/firmware/2016/How_to_become_the_sole_owner_of_your_PC.pdf
https://github.com/projectara/flashrom/blob/master/Documentation/mysteries_intel.txt
https://www.win-raid.com/t3553f39-G...ite-Access-Permissions-for-SPI-Servicing.html

I actually injected APFS & NVME support with UEFI Tool some time ago,
it’s a shame the MiniPCIe slot is only 2.0 x1, so an M.2 adapter is limited to <500MB/s
but I tested a 32GB Optane module and it still beats my SATA drives on 4K IOPs

I’m hoping someone might be able to mod the bootrom for Ivy Bridge CPUs some day,
update the Microcode, Hybrid ME v8 etc, but that's a major over-haul, well beyond me I'm afraid.

At the moment I'm trying fix the HD Audio problem with Windows in UEFI mode,
(which is perfectly stable once you prevent Windows 10 loading the Intel HD graphics driver btw)

I’ve tried modding the HD audio driver inf and importing the registry keys from a legacy install but that didn’t work, so unless we want to start patching the windows HAL a firmware level fix seems like the only solution?

I’ve got the iMac back together now but will try and post some photos when I’m next in there, the SD screw fits just fine and the through-hole is grounded so you might get away without wiring that (but I would anyway)
I just used an old DVD-ROM SPDIF cable and grounded the shield, but any old wire should work for PWM.

I've not noticed any flickering at the lowest brightness levels.
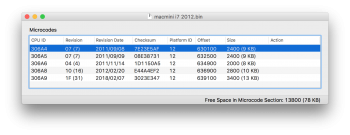
@dosdude1 Actually created a GUI program that allows you to add/remove Microcode to your rom (Apple Microcode Tool.zip) which was handy when the Mac pro rom .089 lost its microcode from a botched release. I had to use it to add my microcode back to my 5,1. Whether or not we can add Ivy bridge Microcode to our ROM and have it work is unknown by me. This is what my Mac Mini's rom looks like. His tool allows you to extract the modules and reapply them to other ROMs. I also had the crazy idea of dumping my iMac's ROM and adding the NVMe module to it. But i also figured x1 (removing the wifi card) wasn't worth it.

@tsialex said on another thread that ME region is different from Sandy to Ivy, so even if the machine did post chances are it would be slow/laggy due to non matching ME region.
 

Attachments

  • Screen Shot 2019-01-29 at 2.22.10 AM.png
    Screen Shot 2019-01-29 at 2.22.10 AM.png
    179.3 KB · Views: 344
  • ivy bridge microcodes mini.zip
    51.9 KB · Views: 251
Last edited:
  • Like
Reactions: Nick [D]vB
Thanks again, that looks very useful. The microcode should be pretty straight-forward then, and transplanting a few DXE drivers is easy enough, but the ME would definitely need updating to v8, and there’d be a ton of protocol dependencies / configuration stuff to debug.

I think it might actually be easier to cross-flash a 2012 iMac 13,2 bootrom and try to fix that up instead. That should make life easier with Mojave to, I might pick up an i5 3470 on eBay and give it a crack at some point,
I’ll keep you posted…
 
Last edited:
I still think you are doing this in EFI mode. Try a windows 7 DVD at this point. The OS really doesn't matter as long as it was created on that iMac.


Ok finally got Windows 8.1 pro installed. And I am able to remote in from chrome Remote Desktop. I have the 780m installed and trying to flash rom with nvflash. I get an error saying I am trying to use a 64bit app with a 32bit OS. That is not the case as OS is 64bit. Anyone know what may be going on.
 
  • Like
Reactions: highvoltage12v
Ok finally got Windows 8.1 pro installed. And I am able to remote in from chrome Remote Desktop. I have the 780m installed and trying to flash rom with nvflash. I get an error saying I am trying to use a 64bit app with a 32bit OS. That is not the case as OS is 64bit. Anyone know what may be going on.
Update

Flashed VBIOS and we are working. 780m card is working in my iMac. Thank you highvoltage12v

Now here is the next issue. I am on High Sierra. Want to go to Mojave but just
realized I cant see boot screens. Any Ideas?
 
  • Like
Reactions: highvoltage12v
Update

Flashed VBIOS and we are working. 780m card is working in my iMac. Thank you highvoltage12v

Now here is the next issue. I am on High Sierra. Want to go to Mojave but just
realized I cant see boot screens. Any Ideas?
That's great. You need to have the iMac Setup the way I have mine, High Sierra on the first partition and Mojave on the Second. The High Sierra Partition Doesn't have to be big, make it 40GB or so. High Sierra is Necessary so when Mojave Breaks (which it will because of platformsupport.plist) you can ALT-APPLE-P-R and reboot back into HS and use Startup Disk(system preferences) to boot back into the Flash Drive to re-run the patch. (http://dosdude1.com/mojave/) Also when running the Patch DO-NOT select "legacy video patch" or you will have choppy animations.
After you are in Mojave Download these HD3000 kexts (#1438) and drag all of them at once on top of kext utility(#1431), this will fix waking from sleep.

Also I recommend a flash drive with a flashing/status LED so you can see if the iMac is actually booting from the flash drive, because yes we are of course booting blind without seeing the status. I personally like to tap on the Caps Lock key after a few minutes and see if it responds.
 
Last edited:
That's great. You need to have the iMac Setup the way I have mine, High Sierra on the first partition and Mojave on the Second. The High Sierra Partition Doesn't have to be big, make it 40GB or so. High Sierra is Necessary so when Mojave Breaks (which it will because of platformsupport.plist) you can ALT-APPLE-P-R and reboot back into HS and use Startup Disk(system preferences) to boot back into the Flash Drive to re-run the patch. (http://dosdude1.com/mojave/) Also when running the Patch DO-NOT select "legacy video patch" or you will have choppy animations.
After you are in Mojave Download these HD3000 kexts (#1438) and drag all of them at once on top of kext utility(#1431), this will fix waking from sleep.

Also I recommend a flash drive with a flashing/status LED so you can see if the iMac is actually booting from the flash drive, because yes we are of course booting blind without seeing the status. I personally like to tap on the Caps Lock key after a few minutes and see if it responds.


Ok new issue. I partitioned and installed the Mojave installer from a USB drive. Installed said it was done and it was going to restart. I was going to get ready to boot back to USB once Mohave was working and install patches. Issue is nothing will boot now. When Mac restarted we had black screen for a few minutes then it just shut down. I have tried all I know to get it to boot but nothing works. I am thinking the partitioning of the SSD may have screwed somethings up. What is next move?
 
Last edited:
Ok new issue. I partitioned and installed the Mojave installer from a USB drive. Installed said it was done and it was going to restart. I was going to get ready to boot back to USB once Mohave was working and install patches. Issue is nothing will boot now. When Mac restarted we had black screen for a few minutes then it just shut down. I have tried all I know to get it to boot but nothing works. I am thinking the partitioning of the SSD may have screwed somethings up. What is next move?

That's because iMacs NVRam is now set to boot Mojave but the platformsupport.plist is stopping it. you have to PRAM reset (alt-apple-p-r) boot back into High Sierra. Go to System Preferences, change startup Disk to the Patched USB installer and patch the Mojave partition. Then in the installer quit it (command-q) choose startup disk and select Mojave. I explained all this in the last post to you.


You must PRAM reset to boot back to High Sierra. Most important part.
[doublepost=1549222578][/doublepost]
WOW! What is this flash?
He had to flash his Clevo 780m to a Alienware/Dell 780m. https://www.techpowerup.com/vgabios/142721/dell-gtx780m-4096-130418
 
  • Like
Reactions: codesoho
That's because iMacs NVRam is now set to boot Mojave but the platformsupport.plist is stopping it. you have to PRAM reset (alt-apple-p-r) boot back into High Sierra. Go to System Preferences, change startup Disk to the Patched USB installer and patch the Mojave partition. Then in the installer quit it (command-q) choose startup disk and select Mojave. I explained all this in the last post to you.


You must PRAM reset to boot back to High Sierra. Most important part.
[doublepost=1549222578][/doublepost]
He had to flash his Clevo 780m to a Alienware/Dell 780m. https://www.techpowerup.com/vgabios/142721/dell-gtx780m-4096-130418

I tried all that . This seems to be a coincidence but I believe my power supply has crapped out. I was able to get machine booted only to have it randomly shtut down. Frustrating
 
I tried all that . This seems to be a coincidence but I believe my power supply has crapped out. I was able to get machine booted only to have it randomly shtut down. Frustrating
You sure it's the power supply? You have a Snow Leopard DVD you can put it? hold C on startup. It won't show a display anything, but you should hear it read the DVD and stay on.
 
This is a weird question but anyone actually tried to downgrade their video card instead example 6970m to 5750 to 4850? Even though upgrading from the older to newer works. Since the 6970m is a ticking bomb and haven't heard much issues from owners with a 4850 or a 5750. My testing I couldn't tried it on an 2011 iMac with a hd 4850 since the traces may been scratched on the logic board,or the video card was dead, or the video cable was broken on mines etc I had on hand but basically it runs but no image or chime. Maybe it works worse cases it doesn't display any image.
 
Also I run the iMac now with removing the entire Superdrive assembly in theroy it should run more cooler with access to the disk slot as an vent slot and the Superdrive assemble did obstructed a small row of the gpu heatsink fins.
 
This is a weird question but anyone actually tried to downgrade their video card instead example 6970m to 5750 to 4850? Even though upgrading from the older to newer works. Since the 6970m is a ticking bomb and haven't heard much issues from owners with a 4850 or a 5750. My testing I couldn't tried it on an 2011 iMac with a hd 4850 since the traces may been scratched on the logic board,or the video card was dead, or the video cable was broken on mines etc I had on hand but basically it runs but no image or chime. Maybe it works worse cases it doesn't display any image.
You can probably go to an MXM card in a 2010 iMac because those used EDP in both the 21/27 inch. But in the 2009 the 21.5" used LVDS and the 27" used EDP. So if you use a 27" card from any of the 3 years you will have internal screen/EFI Boot screen. I can't speak for the 2 thunderbolt ports on the back. Most likely only one will have output.
[doublepost=1549248223][/doublepost]
Also I run the iMac now with removing the entire Superdrive assembly in theroy it should run more cooler with access to the disk slot as an vent slot and the Superdrive assemble did obstructed a small row of the gpu heatsink fins.
I just prefer to increase the fan RPM. Removing the super drive won't do much. If anything it creates a tunnel for the air to travel under.
 
  • Like
Reactions: FlorisVN
@Winston-

Yeah like @highvoltage12v said, just ramp up the fan speed of the optical drive fan, and the hdd fan.
I always run them at full speed anyway, and cpu fan also ramp it up will be good, also for the power supply.
 
recently I have put back new live in one of our 27" 2011 iMac computer.
special thx to @macnjack for donating his GTX765m and some DDR3 ram !

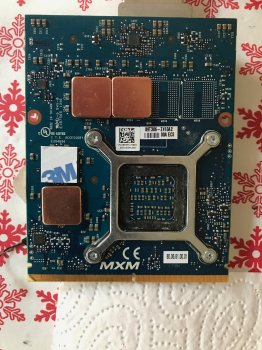
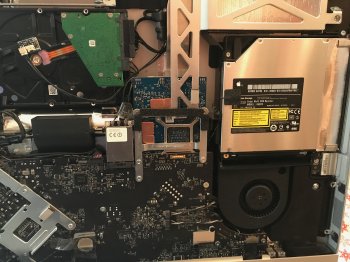
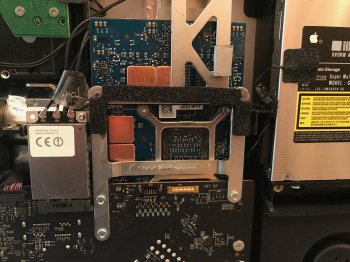
It all worked great, and i wanted to show you guys some pictures about the vram heatsink mod i did on the backside.
I put some 1mm coper on there (aliexpress), and used 3m thermal tape.
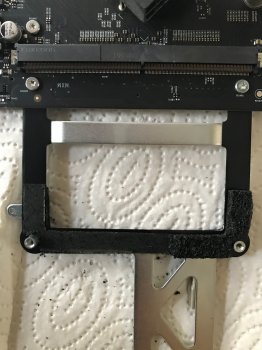
Also shown in the pictures i cut off some black foam on the backside of the mxm bracket, as shown in the picture.

The card fits perfectly inside the iMac, and no contact is made there is enough space between the heatsink mod of the backside vrm..
So no electrical shortage here..
Also used the original x-bracket with the GTX765m, (macnjack) already put on his x-bracket, and worked fine with the GTX765m !
no short contact is made with surrounding capacitors, i double checked with a multimeter..
so modding the x-bracket is not necessary then, and this confirms it for me..

Hope you guys can use my pictures as a guidline or something..
happy modding all of us, and let us use our old iMac's again ! ;)
 

Attachments

  • IMG_0213.jpg
    IMG_0213.jpg
    2.7 MB · Views: 499
  • IMG_0215.jpg
    IMG_0215.jpg
    2.2 MB · Views: 447
  • IMG_0233.jpg
    IMG_0233.jpg
    2.4 MB · Views: 519
  • IMG_0235.jpg
    IMG_0235.jpg
    2.7 MB · Views: 539
Hi Michael, I am a bit confused by the below. What do you mean by "So initially I ordered the 675m but when I received that card it had BIOS only drivers...so I ordered a DELL/Alienware 680M off ebay."?? I would think if you install the 675M into the system, OSX should just load the driver automatically? Why would the card come with OSX drivers as they are PC cards anyway?


The dell card is identical in every way except for the firmware on the card itself which must be flashed in order to get it working properly.


OPTIONS
I used one of the Dell / Alienware 2GB cards. These can still be got for under $200 on eBay. The Apple card is identical in every way except for the firmware.

This is the Dell / Alienware card here


EVVZSnVDSG3NMaTA.standard


MHi5CSV36RHDNREC.standard


Grab the Apple ROM file from here: https://www.techpowerup.com/vgabios/?arc... Pay attention to the VRAM size and get the correct file

Prepare the card by removing the Dell metal bracket that the heatsink screws into on the back of the card. You will need to transfer the bracket from the Apple card. Transfer anything else that might be needed.

On the card, with the MXM connector facing downwards and the ATI chip facing you. There are 2 small black chips to the top left of the ATI chip. (one above the other) You need to flash the top one as shown


pelAVuGIBTgaSTD2.standard


You will need a way to interface with the chip on the card. I used a Raspberry Pi with a SOIC 8 clip.

Install Flashrom on the rPi. Use the guide here.

https://tomvanveen.eu/flashing-bios-chip...

Connect the rPi, the clip and plug it in. I have my Pi setup as an access point with its own Wifi network. This way, It is portable and can be run of a power bank

scp the file onto the pi. "scp filename pi@ipaddress:/home/pi"

Backup the existing ROM first,

Flash the card and the card works perfectly as a genuine Apple card. I flashed the 1GB VBIOS version first before realising that I had the 2 GB card and had to dismantle the iMac again to reflash the card with the correct ROM. (I repeat, CHECK YOU HAVE THE CORRECT FILE)


oBdEXIS5Vk5QZGCk.standard


After flashing the correct file it should look like this


Gtb2VxDaPfMvfh6m.standard


You will get proper boot screen. No Kext hacking etc. The card works with full acceleration and passes Apple Service Diagnostics


Xg6gVFWgOd5tSsSO.standard


2xJsq3sI2BMLOZmq.standard
 
Register on MacRumors! This sidebar will go away, and you'll see fewer ads.