Become a MacRumors Supporter for $50/year with no ads, ability to filter front page stories, and private forums.
Status
The first post of this thread is a WikiPost and can be edited by anyone with the appropiate permissions. Your edits will be public.
Ladies and gentlemen, I need your expertise:
iMac 12,2 mid-2011 27" was upgraded to Sequoia with OpenCore.
After that, the owner encountered issues related to the GPU, and so an AMD WX1450 was installed. Allegedly the GPU came pre-flashed with an appropriate BIOS. The machine starts and works, but it fails to recognize the GPU and display and it's extremely slow.

System report for the GPU lists it as an AMD with no kext installed, and only reports 14Mb VRAM.

The owner tried using the USB Stick BIOS flash, but nvflash does not detect the GPU either. However, when OpenCore runs a post-install root patch, it reads the GPU as AMD Polaris and offers to install patches for that card.

What should be done?
I fixed it!

1. The fact that OpenCore saw the GPU meant that everything was fine with the GPU's BIOS and the card was reporting correctly.
2. With that in mind, the issue was related to the OpenCore settings so I re-installed Sequoia with a correct set of patcher settings. Most importantly:
  • SMBIOS: MacPro6,1.
  • GPU Support: Enable Metal acceleration for AMD Polaris; also AMD injection enabled
3. After re-install, the OS recognized the GPU correctly, everything seems to be functioning well.
 
Ladies and gentlemen, I need your expertise:
iMac 12,2 mid-2011 27" was upgraded to Sequoia with OpenCore.
After that, the owner encountered issues related to the GPU, and so an AMD WX1450 was installed. Allegedly the GPU came pre-flashed with an appropriate BIOS. The machine starts and works, but it fails to recognize the GPU and display and it's extremely slow.

System report for the GPU lists it as an AMD with no kext installed, and only reports 14Mb VRAM.

The owner tried using the USB Stick BIOS flash, but nvflash does not detect the GPU either. However, when OpenCore runs a post-install root patch, it reads the GPU as AMD Polaris and offers to install patches for that card.

What should be done?
Did you install root patches? That's your first thing to try.
Lol I see your post, I hadn't refreshed the thread yet :)
 
I used the VBIOS file from 04/11/2019. Version 015.050.003.000.000000 (see attached file) And I upgraded to Sequoia, now I experience less crashes than with Sonoma, but Sequoia works allot slower and after 2 weeks it crashed again panic(cpu 2 caller 0xffffff8018fd976f) (see other attached file)

so now I might try Ventura, a bit older but maybe it 'll run faster and crash less

I'm aware of three reported incidents of the exact panic, "zone_require_ro...element improperly aligned" in process WindowServer. All three are different machines, one was 2011 Mac mini, and mine is a MacOS VM with Radeon RX560 passthrough, and the last is your iMac.

The first guy was quite sure it only happened to him/her after upgrading to Sonoma. Mine started in autumn 2023 too. But that's around the time I started using the MacOS VM setup as a daily driver. Perhaps the panic indeed started with Sonoma. All three has one thing in common i.e. running OpenCore.

Digging into the panic message, the exact location is here in the XNU kernel: https://github.com/apple-oss-distri...57b9f54c2f6d4a15585/osfmk/kern/zalloc.c#L7313

It fails the 'z_align_magic' check. That led me to believe that when the panic happens (around once per month or once per ~50 reboots), some how the memory was corrupted. Since it happens inside process 'WindowServer', I have reason to believe that it's related to the GPU or its driver or some of the OC config attributes.
 
Hey Guys - Need a sanity check, please...

I've got a 2011 iMac 12,2 which had an 6770M 512mb and was working great. I purchased a WX3200 off eBay and once in I performed the mods by soldering on the pair of 0 resistors and removing the other two. Once done, I swapped it out and everything seemed to fit well. Plugged it back up and powered on and nothing - not even fans. I've reseated all cables with no change.

I disassembled again and it seems just diag LCD #1 stays on - no changes when power button is pressed. Is this a potential issue due to a bad GPU / mod done incorrectly or probably something unrelated? Plan to reinstall 6770M tonight to see what happens.

Thanks

Double check clearance. wx3200 die is really low. I think MXM-A 6770M has a 2 pipe heat sink. I used a 0.5mm shim according to my post ( link ) I believe all the silver rectangles (inductors for various power rails) on the card have to clear to avoid a short. On 3 pipe heat sinks, I believe had to get closer to 1.5mm shim without grinding. If inductors bottoms out against the heatsink and tighten the X bracket, the GPU card can also wrap.

Don't know your soldering method. I removed a tiny resistor with hot air to measure value for someone that knocked theirs off (post #22098) and took quite a bit of heat. Position was on the backside of the GPU so may have merged some solder balls and damaged it as an installation failed with this card but not others. The 2 jumpers and 2 resistor to remove aren't under the GPU chip so shouldn't be a problem unless less skillful soldering/equipment.

Assuming X bracket came with the wx3200 came off without damaging the card? Not entirely easy. Easiest method I found is use 150C hot air to heat up bracket and loosen the sticky tape underneath, push out from the 4 screw holes with a pointy plastic spudger.

Already flashed the GPU with CH341A? or planned to do with GRML?
 
Last edited:
Hey Guys - Need a sanity check, please...

I've got a 2011 iMac 12,2 which had an 6770M 512mb and was working great. I purchased a WX3200 off eBay and once in I performed the mods by soldering on the pair of 0 resistors and removing the other two. Once done, I swapped it out and everything seemed to fit well. Plugged it back up and powered on and nothing - not even fans. I've reseated all cables with no change.

I disassembled again and it seems just diag LCD #1 stays on - no changes when power button is pressed. Is this a potential issue due to a bad GPU / mod done incorrectly or probably something unrelated? Plan to reinstall 6770M tonight to see what happens.

Thanks

Similar symptom to my WX4150 the second time I assembled to my iMac 2010.
My assumption was short-circuiting because the components on the MXM card touched the heatsink.
My fix at that time was re-assembling the card with 0.5mm copper sim and Kapton tape on the part I thought to be short circuit. Kapton tape was applied on the heatsink, not on the card.

But as you have modified the components on the WX3200 as well, now it's difficult to tell whether your mod caused the short circuiting or not.
Double check clearance. wx3200 die is really low. I think MXM-A 6770M has a 2 pipe heat sink. I used a 0.5mm shim according to my post ( link ) I believe all the silver rectangles (inductors for various power rails) on the card have to clear to avoid a short. On 3 pipe heat sinks, I believe had to get closer to 1.5mm shim without grinding. If inductors bottoms out against the heatsink and tighten the X bracket, the GPU card can also wrap.

Don't know your soldering method. I removed a tiny resistor with hot air to measure value for someone that knocked theirs off (post #22098) and took quite a bit of heat. Position was on the backside of the GPU so may have merged some solder balls and damaged it as an installation failed with this card but not others. The 2 jumpers and 2 resistor to remove aren't under the GPU chip so shouldn't be a problem unless less skillful soldering/equipment.

Assuming X bracket came with the wx3200 came off without damaging the card? Not entirely easy. Easiest method I found is use 150C hot air to heat up bracket and loosen the sticky tape underneath, push out from the 4 screw holes with a pointy plastic spudger.

Already flashed the GPU with CH341A? or planned to do with GRML?

Thanks for the replies, guys!

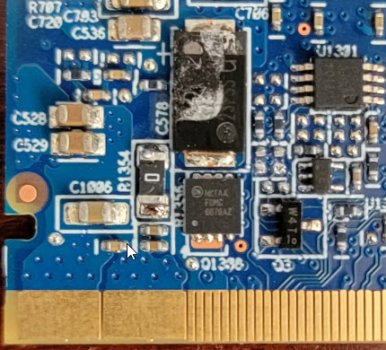
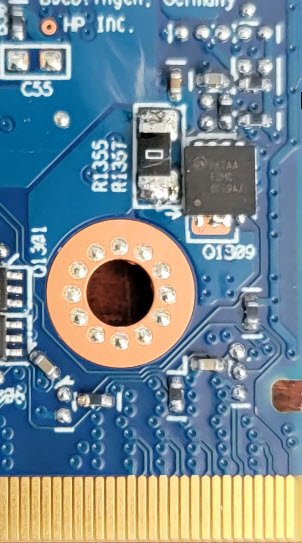
I reinstalled the 6600M last night and all came on just fine so that confirms its the new GPU. My soldering method isn't too advanced as only have a soldering iron with a fine tip to attach the new resistors mostly using solder that was already on the boards. For removing the two other resistors, I simply applied heat to them while lifting with tweezers and they came off easily. I did closely examine (the best I could) to make sure I didn't short anything out with rogue solder. Not going to win any awards, but tested ok. Attached are the best pics I could get.

The wx3200 didn't come with an X bracket and I used was the OEM one from the 6600M without further mods. I also used the OEM heatsink. That X bracket did attach securely but it shorting something out sounds like a definite possibility. I happen to have some kapton tape so am going to try it out as suggested - good idea.

Finally as for flashing, I haven't done anything yet. I do have OpenCore 2.2.0 already installed, but realized when reviewing the guide that I had forgotten to inject the Lexa patches - is it required I do that before trying to install the wx3200 again or can I patch afterwards? Per my understanding, flashing is only needed for more advanced features like brightness control and the default vbios will still get me to a desktop, right? I do want those features and had planned to flash using GRML since it only requires booting to a flash drive (to my knowledge).

Thanks Guys
 

Attachments

  • gpu1.jpg
    gpu1.jpg
    63.9 KB · Views: 48
  • gpu2.jpg
    gpu2.jpg
    57.5 KB · Views: 50
Last edited:
Thanks for the replies, guys!

I reinstalled the 6600M last night and all came on just fine so that confirms its the new GPU. My soldering method isn't too advanced as only have a soldering iron with a fine tip to attach the new resistors mostly using solder that was already on the boards. For removing the two other resistors, I simply applied heat to them while lifting with tweezers and they came off easily. I did closely examine (the best I could) to make sure I didn't short anything out with rogue solder. Not going to win any awards, but tested ok. Attached are the best pics I could get.

your resistor jumper(s) and removal looks fine.

The wx3200 didn't come with an X bracket and I used was the OEM one from the 6600M without further mods. I also used the OEM heatsink. That X bracket did attach securely but it shorting something out sounds like a definite possibility. I happen to have some kapton tape so am going to try it out as suggested - good idea.

Kapton + 0.5mm shim. As mentioned, even if you shield the power rail inductors to avoid short but they bottom out on the heatsink, card will warp after X bracket tightening. Can't be good for the card.

Finally as for flashing, I haven't done anything yet. I do have OpenCore 2.2.0 already installed, but realized when reviewing the guide that I had forgotten to inject the Lexa patches - is it required I do that before trying to install the wx3200 again or can I patch afterwards? Per my understanding, flashing is only needed for more advanced features like brightness control and the default vbios will still get me to a desktop, right? I do want those features and had planned to flash using GRML since it only requires booting to a flash drive (to my knowledge).

  • Never ran wx3200 without VBIOS flash so definitely do GRML flash.
  • USB installer stick OC won't boot unless you inject Lexa patches. Read my guide carefully.
  • Use VBIOS from github repository (more stable)
  • VBIOS is not EG and OCLP won't auto set Lexa patch when building OC even if running on the target iMac bricking EFI boot. For example, a future OCLP updates can brick the OC boot if don't manually check Lexa AMD injection. Make the OC boot CDR just in case to avoid needing to access the SSD in case EFI boot is bricked
  • Note the OCLP macOS installation hangs in the guide. Occurred on every one of the 4 wx3200 12,2 installs. If you use OCLP to install newer macOS + wx3200 OC EFI (with Lexa checked) + reverse root patch while still running original GPU, maybe installation is smoother.
 
Last edited:
Kepler + OCLP 2.2.0 + Sequoia 15.2 + 12,x Stable. Very usable.

Thanks to the dev's hardwork!!! I think good enough for most common use. Tried this again (last test in 9/2024 with some problems post #22001 ) This time very stable and completely usable for basic common use ( web browsing/youtube, icloud, Messages, Photos, Mail ) Haven't found any show stoppers yet
  • Hardware : 12,1 + k610m + 250GB WD Blue SSD (w/DRAM) + 8GB RAM
  • Initial Setup (and afterwards for awhile) is slower due to many MTLCompilerService tasks. I guess OCLP macOS is building the set of GPU shaders necessary for basic functions.
  • iCloud sync will cause some slowness until everything is synced
  • Edge (chrome+brave have random long pauses on macOS, Safari Fav Bar doesn't follow other browser standards) initially will have some slowness with helper tasks
  • Ventura+ System Settings are slower of course
  • Wifi icon on menu bar sometime shows grey but connected. Sometimes have difficulty connect after wakeup (dis/reconnect multiple times to reestablish) This is >= Monterey behavior in my experience.
Big Sur is faster and smoother for sure. However, Sequoia is quite fast and usable. Running edge browser with 8-9 tabs (including youtube) full screen (on 2nd desktop space) + Mail + Messages + Photos + Preview. Reasonably fast. CPU usage mostly < 10% after everything setup and while browsing (mostly static screens) other then edge helper whenever refresh/new page. RAM use 4+ GB.

Also been test a 2012 27" iMac (13,2) with GTX 660M 512MB Kepler GPU on OCLP Sequoia 15.2 and runs perfect. Seems a bit faster than the 12,x + k610m Kepler. Don't know why. 2012 Ivy Bridge has new CPU instructions F16C and RDRAND and built-in HD Graphics GPU (which is suppose to be un-used when paired with discreet GPU) System Info does show Metal 2 where as Kepler on 12,x shows just Metal.

Don't know how well <= 11,x will run without AVX2 instruction (started with 2011's Sandy Bridge CPU)
 
Last edited:
Did you install root patches? That's your first thing to try.
Lol I see your post, I hadn't refreshed the thread yet :)
I now have a different problem: the hard drive went bust after a power blackout. It looks like I need a new drive. When I replace the drive, what's the procedure to get up and running again? I have the new GPU installed so I am not sure how to proceed: do I need to put the old GPU back in, reinstall some old version of MacOS and then do OCLP patch as before?
 
I now have a different problem: the hard drive went bust after a power blackout. It looks like I need a new drive. When I replace the drive, what's the procedure to get up and running again? I have the new GPU installed so I am not sure how to proceed: do I need to put the old GPU back in, reinstall some old version of MacOS and then do OCLP patch as before?

You need a USB installer of Mac OS with OCLP EFI.
Normally, if the internal drive is blank, the iMac will boot from the USB flash drive. As already have OCLP EFI, it's supposed to proceed with the boot menu and you then just install Mac OS to the blank new drive as usual.

On the first reboot, you will still have to boot from the USB installer to get the boot menu, then select the new Mac OS volume. After getting into Mac OS desktop, the first thing you need to do is to run OCLP and apply the root patch.

Also, if possible, you can plug the new drive to another working Mac to install OCLP EFI on it first.
With the OCLP pre-install to the internal drive, OCLP boot menu will be displayed normally and on the first reboot after installing Mac OS file to the internal drive, you can boot directly to the internal drive (unplug the USB installer). Root patch is still advisable to be sure.
 
  • Like
Reactions: rukuku
I now have a different problem: the hard drive went bust after a power blackout. It looks like I need a new drive. When I replace the drive, what's the procedure to get up and running again? I have the new GPU installed so I am not sure how to proceed: do I need to put the old GPU back in, reinstall some old version of MacOS and then do OCLP patch as before?
You need a USB installer of Mac OS with OCLP EFI.
Normally, if the internal drive is blank, the iMac will boot from the USB flash drive. As already have OCLP EFI, it's supposed to proceed with the boot menu and you then just install Mac OS to the blank new drive as usual.

Per @Nguyen Duc Hieu, iMac will auto boot to USB installer (with OC EFI) when it detects no bootable volume on the new blank SATA drive. Then use USB installer to format new SATA drive and install macOS

This assumes new GPU has VBIOS already installed. If not, need to flash that first.

On the first reboot, you will still have to boot from the USB installer to get the boot menu, then select the new Mac OS volume. After getting into Mac OS desktop, the first thing you need to do is to run OCLP and apply the root patch.

I have been noticing no longer need to root patch after USB install recently. Latest OCLP version probably added an extra installation phase to root patch? When I try to root patch after macOS setup, its always say all patches are already installed. This is assuming the USB installer was built with the correct target machine + GPU settings.
 
Last edited:
Hi !

Quite a noob here, I'm in the process of preparing what I need to install the WX4130 I bought a while ago inside a 2011 21.5" iMac.

I read here that I'll need a 15x15mm copper shim at least 0.3 mm thick and at most 0.8 mm but when looking at the screen capture provided by post's author, it states he installed a 1mm thick one.
Also, reading a bit further he says he manages to have 2°C delta between GPU and heat sink while with a 0.5mm thick shim this goes up to 10°C, so I am a bit confused.

Since the post is quite old now, I suppose some experience has been accumulated on the mod, what would be my best option ?

Also, the author advises to use two different thermal pastes. I have none of them but instead I have "Thermal Grizzly Kryonaut" I used for another project. Would that be okay to use it for:
  • The RAM ?
  • The GPU ?
  • The coils ?
Or do I really need to buy something else ?

Thank you all for your help and your wisdom :) !
 
Hi !

Quite a noob here, I'm in the process of preparing what I need to install the WX4130 I bought a while ago inside a 2011 21.5" iMac.

I read here that I'll need a 15x15mm copper shim at least 0.3 mm thick and at most 0.8 mm but when looking at the screen capture provided by post's author, it states he installed a 1mm thick one.
Also, reading a bit further he says he manages to have 2°C delta between GPU and heat sink while with a 0.5mm thick shim this goes up to 10°C, so I am a bit confused.

Since the post is quite old now, I suppose some experience has been accumulated on the mod, what would be my best option ?

Installed 2x on 12,2 (27" 2011) and no shim on one and 0.5mm shim on the other. ( link ) 12,1 (21.5" 2011) could be different of course ( haven't done one )

On all my various installs (diff GPUs, diff iMacs) See > 2C delta between heatsink and GPU. Maybe closer to 5-10C. GPU heats up much faster during stress test of course. Maybe I didn't want long enough (like 20min) to equalize.

In any case, 4130 runs pretty cool. Smaller side 120mm^2 die, 14nm lithography, and 50W TDP. I don't recall seeing much greater than 50-60C under stress. Not much thermal issue to worry about as long as die + heatsink make good contact.

Also, the author advises to use two different thermal pastes. I have none of them but instead I have "Thermal Grizzly Kryonaut" I used for another project. Would that be okay to use it for:
  • The RAM ?
  • The GPU ?
  • The coils ?
Or do I really need to buy something else ?

Use none conductive for the RAM and Coils. Can just re-use the white stuff on the original card or use K5 Pro.
 
your resistor jumper(s) and removal looks fine.


Kapton + 0.5mm shim. As mentioned, even if you shield the power rail inductors to avoid short but they bottom out on the heatsink, card will warp after X bracket tightening. Can't be good for the card.


  • Never ran wx3200 without VBIOS flash so definitely do GRML flash.
  • USB installer stick OC won't boot unless you inject Lexa patches. Read my guide carefully.
  • Use VBIOS from github repository (more stable)
  • VBIOS is not EG and OCLP won't auto set Lexa patch when building OC even if running on the target iMac bricking EFI boot. For example, a future OCLP updates can brick the OC boot if don't manually check Lexa AMD injection. Make the OC boot CDR just in case to avoid needing to access the SSD in case EFI boot is bricked
  • Note the OCLP macOS installation hangs in the guide. Occurred on every one of the 4 wx3200 12,2 installs. If you use OCLP to install newer macOS + wx3200 OC EFI (with Lexa checked) + reverse root patch while still running original GPU, maybe installation is smoother.
Really appreciate the detailed reply. I've spent the past hour prepping for this but not 100% sure about some stuff. Below is what I plan to do to finish the project based on what I've read. All the below would take place on the 12,2 iMac I'm upgrading...
  1. Use currently installed OCLP 2.2.0 (with AMD GOP Injection checked & Graphics override set to AMD Lexa) to create a new USB installer for Sonoma 15.2
  2. Create 2nd flash with Flash-GRML image on it + copy over WX3200_GOP.rom from github
  3. Power down & physically install modded wx3200 (but now do so with kapton tape + shim) May also swap out SSD so if all goes south with install I can put current one + OEM GPU back in for backup)
  4. Power up, boot to Flash-GRML, backup rom then flash WX3200_GOP.rom
  5. Power off /on and boot to Sonoma 15.2 installer flash from step #1. Expect and address installation bugs listed in guide
  6. Once booted to disk, cancel automatic OCLP install prompt. Manually configure AMD GOP Injection + Lexa then install to boot SSD
Does this look like a sound plan or am I missing something? Thanks again!
 
  • Like
Reactions: howardc64
Looks good.

Really appreciate the detailed reply. I've spent the past hour prepping for this but not 100% sure about some stuff. Below is what I plan to do to finish the project based on what I've read. All the below would take place on the 12,2 iMac I'm upgrading...
  1. Use currently installed OCLP 2.2.0 (with AMD GOP Injection checked & Graphics override set to AMD Lexa) to create a new USB installer for Sonoma 15.2

You mean Sequoia

  1. Create 2nd flash with Flash-GRML image on it + copy over WX3200_GOP.rom from github
  2. Power down & physically install modded wx3200 (but now do so with kapton tape + shim) May also swap out SSD so if all goes south with install I can put current one + OEM GPU back in for backup)
  3. Power up, boot to Flash-GRML, backup rom then flash WX3200_GOP.rom

GRML will boot with internal SSD connected as long as SSD has no bootable volume. You can format to GUID+APFS

  1. Power off /on and boot to Sonoma 15.2 installer flash from step #1. Expect and address installation bugs listed in guide
  2. Once booted to disk, cancel automatic OCLP install prompt. Manually configure AMD GOP Injection + Lexa then install to boot SSD
Does this look like a sound plan or am I missing something? Thanks again!

Good luck :) I guess if GRML boots, then probably already proven no more GPU short.
 
As you can see in my signature block below, I recently converted my 2011 27 inch iMac into a standalone 2K display. The WX7100 GPU modification and OpenCore gave me an additional 4.5 years of superb operation of this machine. The only reason I decided to convert it to a display was some ongoing conflicts with some proprietary software I use for my job that is not supported well in OpenCore without workarounds. As a result, I am shifting to using the M1 MBP as my main everyday computer using the converted 27" iMac display as an external monitor.

As such, I will be selling as many of my 2011 27 inch iMac components as possible. This includes the main logic board, CPU, RAM, and the AMD Radeon Pro WX7100. Here is a link to my post from 4.5 years ago showing the successful conversion and to the WX7100 card itself before I installed the heat sink.

Below are pics I just took of the logic board, CPU, and video card fully assembled.

If you are interested in purchasing these components, please PM me. I will also be listing them soon on eBay.

Thanks to all the key people who started and supported this thread over the years (and to the OpenCore developers!)

IMG_2481.jpeg


IMG_2480.jpeg
 
  • Like
Reactions: SergAlex
You need a USB installer of Mac OS with OCLP EFI.
Normally, if the internal drive is blank, the iMac will boot from the USB flash drive. As already have OCLP EFI, it's supposed to proceed with the boot menu and you then just install Mac OS to the blank new drive as usual.

On the first reboot, you will still have to boot from the USB installer to get the boot menu, then select the new Mac OS volume. After getting into Mac OS desktop, the first thing you need to do is to run OCLP and apply the root patch.

Also, if possible, you can plug the new drive to another working Mac to install OCLP EFI on it first.
With the OCLP pre-install to the internal drive, OCLP boot menu will be displayed normally and on the first reboot after installing Mac OS file to the internal drive, you can boot directly to the internal drive (unplug the USB installer). Root patch is still advisable to be sure.
Thank you!

I tried different OCLP EFI configurations before it actually started installing Sequoia. The interesting part is that the original EFI config that I had did not work properly and ended up in a black screen with support.apple.com/setup/ link under a white crossed circle sigh as did multiple other EFI configurations. Finally, I just checked all Secure boot options, and that seemed to work. I'm not sure which one of the many options was the culprit though as I carpet bombed instead of doing precision strikes :)
 
Per @Nguyen Duc Hieu, iMac will auto boot to USB installer (with OC EFI) when it detects no bootable volume on the new blank SATA drive. Then use USB installer to format new SATA drive and install macOS

This assumes new GPU has VBIOS already installed. If not, need to flash that first.


I have been noticing no longer need to root patch after USB install recently. Latest OCLP version probably added an extra installation phase to root patch? When I try to root patch after macOS setup, its always say all patches are already installed. This is assuming the USB installer was built with the correct target machine + GPU settings.
Thank you very much! I'll report on my progress. It seems to be working after a bit of trial and error with the EFI settings (the original installer and EFI did not work for the new install)
 
Thank you very much! I'll report on my progress. It seems to be working after a bit of trial and error with the EFI settings (the original installer and EFI did not work for the new install)
Just some background here: on 2011 27" iMac12,2 GPU was upgraded to a pre-flashed AMD Radeon Pro Polaris (WX4150), and initially after upgrade MacOS Sequoia was OCLP'd onto it, and everything worked until the hard drive failed.

After reinstalling the hard-drive, the original installation USB would not work. All re-install attempts ended in a crossed out circle with a link to Apple support page.

Long story short: when building the EFI from OpenCore, removing the flag on AMD injection solved the problem. So for this particular machine, AMD injection should not have been included. Also, SMBIOS is spoofed to MacPro6.1 level with minimal spoofing - all other spoofing levels failed.

In verbose load mode, the machine would stall on this after selecting "Install MacOS [whatever]" disk from the boot menu:
OCB: matching <>/0[0] on args 2


ChatGPT thinks that:
The message OCB: matching <>/0[0] on args 2 indicates that OpenCore Bootloader (OCB) is trying to locate the operating system or bootloader on the specified drive but is unable to proceed. This issue can occur due to incorrect settings in the OpenCore configuration or issues with the disk or macOS installation.
I am not sure about locating the bootloader part, but it was broadly correct about opencore config issues. After some trial and error, only removing the AMD Injection option and building the EFI that way allowed the installation to proceed past this blocker. The machine is now running MacOS Monterey with no issues.
 
Looks good.

You mean Sequoia

GRML will boot with internal SSD connected as long as SSD has no bootable volume. You can format to GUID+APFS

Good luck :) I guess if GRML boots, then probably already proven no more GPU short.
Well, I got my shims in and gave it a go. It isn't working - however - I got a different result as last time. When powering on, fans start spinning and it starts to POST (I assume.) All but the 3rd diag LED (last time only the first one was lit.) Is it required that I flash the GPU prior to powering on perhaps? (I don't have the hardware to do so currently)

To note, the OEM X clamp we thought may be shorting it out did already have a non-conductive covering on the board facing side which I tested with a multimeter. I still added a layer of Kapton tape just in case. The only difference between the last two tests now besides that is the addition on the 0.5mm shims. I put one on each of the chips (5 total) with artic silver on both sides. Perhaps the absence of the shims caused a short in the prior tests causing the difference in results.

What do you think? Thanks again for your help!
 
Well, I got my shims in and gave it a go. It isn't working - however - I got a different result as last time. When powering on, fans start spinning and it starts to POST (I assume.) All but the 3rd diag LED (last time only the first one was lit.) Is it required that I flash the GPU prior to powering on perhaps? (I don't have the hardware to do so currently)

Yes, not going to show display until VBIOS flashed. So try to GRML now.

To note, the OEM X clamp we thought may be shorting it out did already have a non-conductive covering on the board facing side which I tested with a multimeter. I still added a layer of Kapton tape just in case. The only difference between the last two tests now besides that is the addition on the 0.5mm shims. I put one on each of the chips (5 total) with artic silver on both sides.

Only 1 copper shim btw GPU die and heatsink. VRAM and inductors use just non conductive thermal (K5 pro) or nothing. Probably no harm with copper shim on the 4x VRAMs but could mess with the GPU die clearance (it needs to make the best contact) And probably want to get rid of the silver thermal paste on the VRAMs in case they short out anything below. So just remove the copper shims on VRAMs and clean up the thermal paste there.
 
Last edited:
Yes, not going to show display until VBIOS flashed. So try to GRML now.


Only 1 copper shim btw GPU die and heatsink. VRAM and inductors use just non conductive thermal (K5 pro) or nothing. Probably no harm with copper shim on the 4x VRAMs but could mess with the GPU die clearance (it needs to make the best contact) And probably want to get rid of the silver thermal paste on the VRAMs in case they short out anything below. So just remove the copper shims on VRAMs and clean up the thermal paste there.
Thanks again for the info -

I must be missing something on VBIOS flashing. How am I supposed to flash it if I have no display? I thought maybe the display would be blank when posting but may come up on boot of GRML-FLASH so unplugged the SSD then powered on with flash drive in (which I tested prior to GPU swap.) The boot sound played but never get anything on the display. I could try the commands blind, but surely that isn't the suggested route.

As for the shims, I'll take a look. Thought the 4 RAM chips were at the same height as GPU and all OEM ones had thermal paste which is why I did it that way.

Thanks!
 
Thanks again for the info -

I must be missing something on VBIOS flashing. How am I supposed to flash it if I have no display? I thought maybe the display would be blank when posting but may come up on boot of GRML-FLASH so unplugged the SSD then powered on with flash drive in (which I tested prior to GPU swap.) The boot sound played but never get anything on the display. I could try the commands blind, but surely that isn't the suggested route.

GRML VBIOS flash is done via remote login since screen is blank ( link )

As for the shims, I'll take a look. Thought the 4 RAM chips were at the same height as GPU and all OEM ones had thermal paste which is why I did it that way.

VRAMs don't get too hot. Lots of cards have VRAM on the other side of the board with no cooling at all. Anyway, 1 shim on GPU die and K5 pro thermal paste on VRAM + inductors which is standard installation.
 
** NVIDIA Quadro K4100M Mac Edition ROM **
Genuine Native Boot Screen & Brightness Control


View attachment 942198


After much testing and research, I've put together a ROM for the NVIDIA Quadro K4100M which will allow:
  • Genuine native brightness control
  • Genuine ‘gray’ early-boot screen
  • Genuine macOS bootloader compliance

Requirements:
BACKUP YOUR ORIGINAL ROM before doing anything!

iMac12,2 (27-inch Mid 2011) Mac-942B59F58194171B (Tested machine)
BootROM: 87.0.0.0.0. Please use High Sierra to update your BootROM to latest version.

GPU Variant: N15E-Q3-A2
Dell K4100M vbios: 80.04.E8.00.1D
HP K4100M vbios: 80.04.E8.00.22

tested card with the following vram:
View attachment 1729324 View attachment 1743819

This ROM does not require a 3rd party bootloader like OpenCore.
This is an alternative ROM and mainly for the audience that just want a “drop-in” answer to upgrading their video card on the iMac 2011. I appreciate the ongoing ROM testing done by @Ausdauersportler, @highvoltage12v. With their efforts we can expand its utility across multiple macOS versions and peripherals.

Brightness Control Stepping Modifcation:
-Turn computer on, hold down Command(⌘)-R
-Choose Utilities > Terminal
-Enter:csrutil disable
-Reboot
-MacOS Catalina: requires you to make root writeable: sudo mount -uw /
-You can download 'Hackintool v3.05' , navigate to View attachment 1823642 menu, use the View attachment 1823641 icon at the bottom to disable gatekeeper and mount the disk in read/write mode.
-Download and open 'Kext Utility v2.6.6'

-Navigate to S/L/E (System/Library/Extensions)
-Copy "AppleBacklight.kext" to Desktop
-Edit: AppleBacklight.kext/Contents/Info.plist
-Scroll down to: IOKitPersonalities > AppleIntelPanelA > ApplePanels
-There you find several Apple LCD profiles.
-For the iMac 2011 27" machine locate:
Code:
<key>F10Ta007</key>
<data>
ABEABgALABQAHAAnADMAPwBOAFwAZwBzAIEAkQClAL8A2wD/
</data>

-Change the <data> section to:
ABEAAgA3AF8AigCzAOsBJAFnAakB1AIJAlQCogL4A00DlgRpBGk=

-Drag your modded kext into Kext Utility, allow it correct permissions
-Applebacklight.kext.bak folder will be created
-Reboot

The above data pattern will allow for a wider span of steppings for the brightness control and utilizes more of the capacity of the HD3000. If you have a different machine, your panel ID can be found by going to System Preferences > Displays > Color > Open Profile > mmod

This rom does not require the use of an external EDID parser or a separate graphics core-console stack module, but I’ve left them in there for now. It uses a built in EDID_override_Protocol, a UGA_protocol and GOP_protocol. The rom is based on a TianoCore EDK2 build which houses its own generic video driver. During bootup, the efiROM is responsible for video rendering before the control is seamlessly transferred off to a different handle, the macOS video drivers. This is known as pre-boot configuration.

Caveats post-install/Bugs:
-16bit resolution glitch of UGA_DRAW_PROTOCOL - temporary solution: activate a sleep cycle and return, this should now clear the issue.

warning: as stated previously these cards are based on a WSON flash package and therefore are much more difficult to recover from a bad flash. Please take precautions and verify flashing.


In the words of Steve Jobs, “this is insanely great!

files:
K4100M_BR.rom - stable with mem:2000Mhz, TDP:862Mhz
K4100M_UGA.rom - overclocked with mem: 2200Mhz, TDP: 967Mhz
K4100M_AFR.rom - for -AFR based cards

******
UPDATE
******
09 02 2021: working on Catalina 10.15.7
07 02 2021: tested stability @2200Mhz & 967Mhz, thank you @Ri7 for testing, K4100M_UGA
09 08 2020: working on BigSur!
11 11 2020: working on High Sierra 10.13.6, security update 2020-006
24 09 2020: working on High Sierra 10.13.6, security update 2020-005
21 07 2020: working on Mojave 10.14.6, security update 2020-004 (18G6020)
20 07 2020: working on High Sierra 10.13.6, security update 2020-004
20 07 2020: working on Catalina 10.15.4

20 07 2020: working on Catalina 10.15.6 + kext mods
Thank you so much for this. I've got a card on order and I'm excited to upgrade my 2011 iMac from High Sierra to Catalina. :)
 
Register on MacRumors! This sidebar will go away, and you'll see fewer ads.