Become a MacRumors Supporter for $50/year with no ads, ability to filter front page stories, and private forums.
Status
The first post of this thread is a WikiPost and can be edited by anyone with the appropiate permissions. Your edits will be public.
Is it a Dell/Alienware version of the card ?
Maybe you can full post your card info here ?

Could be you need to reseat the gpu in the mxm slot and try again.
The way I used to test it, was by not installing the original screen back, but try a external screen first.
After that install iMac screen.
This is easier testing in my opinion..
One external display output should work..

Yes, I've confirm the card's version form dealer.
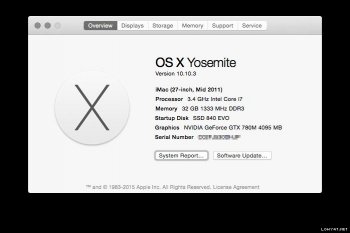
This card has device id 0x119f and bios version is 80.04.AF.00.03.
I notice that success case of install gtx780m on Yosemite, os version is 10.10.3.
Maybe I need to downgrade to 10.10.3 and try again?
 

Attachments

  • Screen_Shot_2015_05_27_at_11.49.33_PM.jpg
    Screen_Shot_2015_05_27_at_11.49.33_PM.jpg
    28 KB · Views: 343
The RX580 is actually the easiest because the WX7100 card should already come with a working vbios, you just need to do the back-light mod. Not sure what’s happening with the DyingLight but in the mean time you can do a basic “hot-wire” mod instead, I think I posted about that before, to re-cap… You can do this with a single wire, but a safer method uses a PCIE power extension cable between the PSU and LCD “inverter” board.

https://www.ebay.com/itm/8-6-pin-PC...Video-Card-Power-Extension-Cable/352463698131
https://www.ebay.com/itm/6Pin-Male-...-Card-Power-Extension-Cable-20cm/201764196006
https://www.amazon.com/Cable-Matters-2-Pack-Extension-Power/dp/B01DV1Z4EQ

You just cut the PWM wire on the extension (at the female/socket end) and feed ~3v into it to fire the back-light, you can tap 3.3v from the Bluetooth / SD reader cable, or just poke the wire into the right hole (!) on the back of the main PSU connector, & secure with a zip-tie. The PSU pin is SMB-SCL, not really a power rail, but it works.

Obviously all the usual health warnings apply, even when unplugged that power supply can give you a nasty jolt (take my word for it!) so don’t go poking anything on the back of the PSU PCB. Apple really should have insulated that, it’s almost as if they don’t want people opening these things… xD

I will try the TL494 PWM module trick (wlagarde post 1354) to drive the backlight in intensity as soon as my digital scope arrive using extension cable to make the hack reversible on my GT780M. Then i will wait for you to release your boot-screen mod or explain us how to do it before buying a RX580M.
Regards,
 
As an Amazon Associate, MacRumors earns a commission from qualifying purchases made through links in this post.
I will try the TL494 PWM module trick (wlagarde post 1354) to drive the backlight in intensity as soon as my digital scope arrive using extension cable to make the hack reversible on my GT780M. Then i will wait for you to release your boot-screen mod or explain us how to do it before buying a RX580M.
Regards,

Wait I think I have missed something here..
Someone here is creating a rom ?
 
Slightly off-topic: i have a 2010 21.5 iMac. Already ordered a k1100m. I want to upgrade to ssd too of course. Since this is Sata2, i should go with 2 SSD in raid-0, or its doesn't matter at all?
 
Nope... i tested it on a MacPro 3.1, and it is not that much faster as a single SSD. And the failing chance is higher.

Hm, are you sure? Because i believe its dual-channel between the hdd and the odd, so that would double the speed. For example:
Maybe the MacPro 3.1 is single channel? Or you used the two sata ports that are on the same channel.

SSDs are super cheap now so i might as well try it and see...
 
Ok so, i tested it. The system is a 2010 21.5" base model iMac, i3, 4GB ram and the original GPU with High Sierra and Blackmagic Disk Speed Test. Here are my results:

Storage devicePortWriteRead
500GB HDDSata 080.5 MB/s104.2 MB/s
240GB MX500 SSDSata 0250 MB/s267.8 MB/s
240GB MX500 SSDSata 1242.2 MB/s260.5 MB/s
240GB MX500 SSDRaid 0(Sata0+Sata1)450.2 MB/s503.5 MB/s

So, in short, it works twice as fast in Raid-0 as expected. I also tried with Trim enabled but the results were the same for all tests.

Btw: if you plan to install High Sierra on a Raid-0 disk(s), it won't let you select it as an installation destination. However, if you use the dosdude1's High Sierra patcher tool, that installer works fine. (you don't need to use the post install tool at all). Also, i was only able to create a disk using the patcher tool on High Sierra, it doesn't work on Mojave.
I'll try to install Mojave on Raid0 with the patcher tool and see if that works.

Edit: just installed Mojave onto the Raid-0 setup and got pretty much the same results, slightly better: 465MB/s write, 515MB/s read
 
Last edited:
Hey guys,

I'm going to attempt the gpu upgrade on my mid 2011 27" iMac. I got a gtx 780m from an Alienware on ebay.

I also want to clone the drives I have on this machine before proceeding with the upgrade. I bought a 2TB Seagate Barracuda and a 500gb Samsung SSD to replace the old drives I have on the iMac.

However, my gpu its dead and the iMac won't even boot in recovery mode.

I was wondering if there's a way to temporarily bypass the dGPU so I can get in recovery mode and clone the drives.

Thanks!

Try to boot into Ubuntu, i had that working for me with a dead gpu if i remember correctly. You could also try to bake the bad GPU, it might do the trick for a few days, just enough to do the install / cloning. If all else fails, i think the best you can do is to remove the existing drives and clone it using another computer. An external usb sata thing is pretty cheap.
 
Ill try it i have gtx 765 alienware dell card.Ill let you all know.
I can confirm Sleep is working.Putting your imac to sleep and woke with mouse move I have now Windows 10 and gtx 765m and Picture in internal screen Yay!!
 
Last edited:
I can confirm Sleep is working.Putting your imac to sleep and woke with mouse move I have now Windows 10 and gtx 765m and Picture in internal screen Yay!!

Maybe you could post here, the way you got win10 bootcamp working.. ?
That would be great, thx in advance
 
If you have working superdrive.Then you have to install windows 7 dvd version with bootcamp.After this you install windows 10 in windows 7.Then you have Legacy(bios) version windows 10.After this bootcamp software. (run this in compability mode win7)
And after this i swapped radeon to gtx765.You have to put external monitor to 2nd thunderbolt.When picture is coming to monitor then in power settings you put power button to sleep.Then push it it going to sleep mode.And move a mouse...and magic happends!!Sry english is not my main language.Win 10 version is 1607 and nvidia drivers are 391.25 windows 10 automatically installs graphics drivers.
 
Last edited:
Regarding the backlight mod, and the use of the TL494 PWM module, not having much success at setting the frequency and duty cycle, and was wondering if this module would also work,(https://www.aliexpress.com/item/32835541668.html) as you can see it as a onboard display so there is no need of a oscilloscope it say’s the output is 5~30mv. So if I use the 1.8K and 6.8K resistors the will the output be 3.25v or would a adjustable step-down module be a better option.

HTB1wPB8X6zuK1RjSspeq6ziHVXaF.jpg
 
Interesting....

Something different. I'm just writing a blog entry in German about this subject for my blog. Now I would like to place some Benchmark results there. So var I only tested the GTX 765m and the K1100M. Can you guys make some Benchmark test (Geekbench and Valley) and send me the results?

Thanks

27" i5 2400 with 780M
https://browser.geekbench.com/v4/cpu/13897037
https://www.dropbox.com/s/7g7b0n5sgpe1z5f/Unigine_Valley_Benchmark_1.0_20190715_1050.html?dl=0

I will soon post some before/after results from my 2010 21.5 iMac. I'm waiting for a k1100m and an i7 780s :)
 
Last edited:
@Roman78 my old card was broken :( (6870) ... I have remove my new ssd and install on other mac mojave via external ... Then i installed it but my mac wont boot from ssd ... And now i have buy an cheam (5670) gpu card and wait for comming after this i hope i can install and set my nvidia gpu back

try again with patched mojave installer. make sure it is the first partition on that drive. Do not select video patch. install it to 1st sata port which should be the original hdd port. middle port is port 3rd. original unoccupied sata port (top) is port 2nd. doing the PRAM reset always look for 1st sata port/1st partition. i know install from other mac work for mojave. GL
 
Maybe good to know, the catalina patcher from dosdude1 auto deselects legacy video patcher on 2011 iMac’s.
I think this is great for all of us out their who have upgraded to a metal compatible gpu in their iMac..
 
Maybe good to know, the catalina patcher from dosdude1 auto deselects legacy video patcher on 2011 iMac’s.
I think this is great for all of us out their who have upgraded to a metal compatible gpu in their iMac..

And i think it will pre-install the kext necessary to make wake from sleep work also.
 
  • Like
Reactions: FlorisVN
And i think it will pre-install the kext necessary to make wake from sleep work also.

Could be indeed, i have not tested catalina so far on the 2011 iMac.
Maybe you of someone else here can give some test results or running catalina beta with patcher..
 
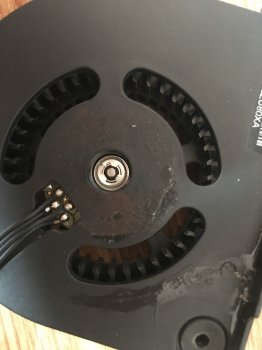
Slightly off topic: if you have a noisy fan in your iMac, its possible to replace the ball bearings inside them to make them quiet again.

For the big fans: 3X8X4mm
For the small fan(HDD): 2X5X2.5mm

IMG_1210.JPG


I bought these in a local shop, but its easy to find on Ebay for example.

The fan housing can be opened, its only held onto together with little plastic clips. Once you remove the sticker from the back, you can see a seeger ring, you need to remove that with a tweezer for example. After that theres two bearings on each side which you can replace.

IMG_1207.JPG


bearringlocations.jpg


On the smaller, HDD fan the shaft is not held in place with a seeger ring, but with a small piece of plastic ring. Its possible to remove this real gently, but if you fail to do so, you can replace with a similar seeger ring that you can see on the bigger fans. The part for this is DIN 6799 RA 1,5:
ra_1_5_20161017055123.jpg


Once assembled, replace the sticker on the back, it will keep the dust out from the bearings/fanshaft.
 

Attachments

  • IMG_1211.JPG
    IMG_1211.JPG
    1.9 MB · Views: 164
Register on MacRumors! This sidebar will go away, and you'll see fewer ads.