Become a MacRumors Supporter for $50/year with no ads, ability to filter front page stories, and private forums.

Populus

macrumors 603
Aug 24, 2012
5,865
8,339
Spain, Europe
All this material has to reach me ... now I am in Standby ... By the way the Gorilla Gloss glass does not avoid transmitting heat ... It has to be like the protectors of the car glass in summer, aluminum foil and foam .
Collons, nano, I’m thrilled with all of that and eager to see what you’ll achieve with it. Actually, that copper radiator/heat-sink was the first thing I thought about to properly cool this quad core CPU and the graphics chip.

I hope you achieve amazing results. Did you find that on Amazon?
 
  • Like
Reactions: srkirt

vyruzreaper

macrumors regular
Jul 19, 2015
121
116
Just got to wrapping mine up. Will do write up later. Quiick results post mod. No mods I was hitting 1100/3300 from idle and 950/2800 after 3 runs (approx). I'm going to run a few more runs now and see if it sustains. I never went over 80C. I used a thermal pad too.


I'll post 2/3rd run results in just a bit
1589856697886.png

[automerge]1589856989[/automerge]
2nd run kissed 90C. NO FANS AUDIBLE!!! Stayed below 3k RPM the whole time.

1589856965739.png

1589856980172.png

[automerge]1589857453[/automerge]
5th run back to back to back. Hit 100C, no fans above 4kRPM, results staying stable. This is the MBA i was hoping to get.

Now, I'll test real life usage with VC apps tomorrow. If those fans dont come on during my next Zoom call - ill be very very happy.

1589857378580.png
 
Last edited:

RiaKoobcam

macrumors regular
Apr 17, 2020
225
289
Just got to wrapping mine up. Will do write up later. Quiick results post mod. I was hitting 1100/3300 from idle and 950/2800 after 3 runs (approx). I'm going to run a few more runs now and see if it sustains. I never went over 80C. I used a thermal pad too.


I'll post 2/3rd run results in just a bit
View attachment 916532
[automerge]1589856989[/automerge]
2nd run kissed 90C. NO FANS AUDIBLE!!! Stayed below 3k RPM the whole time.

View attachment 916533
View attachment 916534
[automerge]1589857453[/automerge]
5th run back to back to back. Hit 100C, no fans above 4kRPM, results staying stable. This is the MBA i was hoping to get.

Now, I'll test real life usage with VC apps tomorrow. If those fans dont come on during my next Zoom call - ill be very very happy.

View attachment 916535

Nice dude! Glad all your patience paid off, great work. Did you take any photos during the modding process?
 

vyruzreaper

macrumors regular
Jul 19, 2015
121
116
Last test of for now. It was my 7th run while running a 4k video on YT and a few tabs open on Opera. Fans hit 3.3k RPM. Temps were about 95C. Performance went down a bit, but I'm ok with this. If I needed more, I would have gotten a MBP.


What I love about the shim+pad mod (SPM for short :p) is that single core perf always stays around the 1100-1200 range. Multicore seems to fluctuate between 3500-4000 (has anyone hit 4k MC GB5 results?). Temps quickly cool and take longer to heat up. And fans stay below 4k RPM.

VERY VERY HAPPY. For those on the fence -> took me about 1 hour and well worth it. You do not need any EE expertise. Just take your time and follow instructions :)

1589859290447.png
 

octoviaa

macrumors regular
Oct 19, 2013
172
88
I used MX4 because that is all I have seen mentioned. I did not do any independent research, so that is on me.

I will purchase Kryonaut and let you know what it does. I’ll take an extra 30% thermal transfer, and hope the heatsink can do something with it.

I definitely will not be going with liquid metal, because my p job is a mess.
Hi SeñorNewton, when you use the MX4, did you just use a pin drop or flatten / distribute it evenly on the surface manually? Also do you have to put quite some amount because it seems there are big gaps hence people are using shims?
 

octoviaa

macrumors regular
Oct 19, 2013
172
88
Last test of for now. It was my 7th run while running a 4k video on YT and a few tabs open on Opera. Fans hit 3.3k RPM. Temps were about 95C. Performance went down a bit, but I'm ok with this. If I needed more, I would have gotten a MBP.


What I love about the shim+pad mod (SPM for short :p) is that single core perf always stays around the 1100-1200 range. Multicore seems to fluctuate between 3500-4000 (has anyone hit 4k MC GB5 results?). Temps quickly cool and take longer to heat up. And fans stay below 4k RPM.

VERY VERY HAPPY. For those on the fence -> took me about 1 hour and well worth it. You do not need any EE expertise. Just take your time and follow instructions :)

View attachment 916547
Any specific instruction on opening and modding the MBA 2020?
 

RiaKoobcam

macrumors regular
Apr 17, 2020
225
289
  • Like
Reactions: octoviaa

DanSilov

macrumors regular
Sep 19, 2016
125
156
My guess is if this mod can be easily undone for sending in for warranty (which most of yours can be so far) then it shouldn't be an issue. My only concern is if something else happened in/around the CPU and they could tell new paste was used or something else, they might refuse it just because they can.
It's possible, but I think the chances are pretty slim. And if one finds a really thick graphite-based thermal paste, then it's virtually undetectable. Considering that the most of the modern MacBooks is unrepairable, I was pretty surprised how is easy this copper shim mod is.
 

RiaKoobcam

macrumors regular
Apr 17, 2020
225
289
It's possible, but I think the chances are pretty slim. And if one finds a really thick graphite-based thermal paste, then it's virtually undetectable. Considering that the most of the modern MacBooks is unrepairable, I was pretty surprised how is easy this copper shim mod is.

Yeah, I remember doing a speaker replacement on my MBA 2015 was like a crash course in microsurgery, with lots of ribbon-disconnection and adhesive removal. The 2018-2020s are remarkably easy to disassemble by comparison
 

DanSilov

macrumors regular
Sep 19, 2016
125
156
Here you go, courtesy of @Robotronic - https://forums.macrumors.com/threads/2020-air-heatsink.2227066/post-28409676

If you've got specific concerns about how to open and manouvre around the insides of the computer, watch some iFixit teardown videos or step-by-step guides so you feel comfortable knowing what's what

— You need a pentalobe screwdriver to remove the backplate.
— Backplate is additionally held by two clips right in the middle, so to remove it after you unscrew it you need to apply a tiny bit of force.
— Use a soft tissue to remove all the traces of the original thermal paste from the both CPU and the heatsink.
— I've used two 15x15x0.3mm copper shims, and cut one in half, exactly like in the linked post.
— I found it easier to apply new paste to the CPU first, then apply the paste separately to two shims and place the shims on the heatsink, not the CPU. Then place the heatsink with the shims in its place.
— When you screw the heatsink back, use the X pattern and repeatedly apply 0.25-0.5 turns to each screw until you feel the strong enough resistance (don't apply too much force).
[automerge]1589872418[/automerge]
Just got to wrapping mine up. Will do write up later. Quiick results post mod. No mods I was hitting 1100/3300 from idle and 950/2800 after 3 runs (approx). I'm going to run a few more runs now and see if it sustains. I never went over 80C. I used a thermal pad too.
Impressive multi-core result, well done!
 

DanSilov

macrumors regular
Sep 19, 2016
125
156
Hi SeñorNewton, when you use the MX4, did you just use a pin drop or flatten / distribute it evenly on the surface manually? Also do you have to put quite some amount because it seems there are big gaps hence people are using shims?
The thing with thermal paste is that you must use it as little as possible. The idea of the shim mod is to replace the original thick thermal paste with some copper, which is a much better heat conductor and doesn't dry out. So when you apply MX4 (or any other paste) the rule of the thumb is to put half a grain of rice on a small piece of carton and then spread it evenly across the CPU die.
 
Last edited:
  • Like
Reactions: octoviaa

srkirt

Suspended
Apr 12, 2020
257
179
Barcelona
[QUOTE = "Populus, publicación: 28480943, miembro: 730588"]
Collons, nano, estoy emocionado con todo eso y ansioso por ver qué lograrás con él. En realidad, ese radiador de cobre / disipador de calor fue lo primero que pensé en enfriar adecuadamente esta CPU de cuatro núcleos y el chip de gráficos.

Espero que obtengas resultados sorprendentes. ¿Lo encontraste en Amazon?
[/ CITAR]
Ali
 

RiaKoobcam

macrumors regular
Apr 17, 2020
225
289
Did someone try undervolting the MBA 2020?

I don't think Volta works with Catalina (someone correct me if I'm wrong). Not sure if there are other undervolting apps on MacOS.

On Windows, I undervolted using Throttlestop on the i5 and i3 2020, but the power draw in Bootcamp on the 2020 models is so extreme I didn't notice much of a difference.
 

octoviaa

macrumors regular
Oct 19, 2013
172
88
Did someone try undervolting the MBA 2020?
To my knowledge undervolt is not possible with MBA 2020.
I do limit the normal-power and turbo-power manually to 8W and 16W.

Below is my post on how to achieve that:
Please note the above post have 7W - 25W, for 8W to 16W just need to change the script.
8W ==> 040 (hex), 16W ==> 080 (hex)

or you can change to the value you wanted.
 

srkirt

Suspended
Apr 12, 2020
257
179
Barcelona
[QUOTE = "RiaKoobcam, publicación: 28480468, miembro: 1213283"]
No estoy tratando de discutir contigo, amigo.

I'm not trying to argue with you dude.

Dan Silov's post was about a copper shim and repaste on a 2018 MBA, Loog was the first to do a similar mod to a 2018 MBA in this thread. You've got a 2019. Comparing Loog's results to the ones Dan just posted makes sense - same model, very similar modding technique, and as such, very similar results.

You can happily claim to be the first person to do a lot of stuff to your 2019 Macbook Air (wind channels, Euro coins, finned heat sinks, the works), but you didn't invent CPU shims. Others have tried to point this out to you so there doesn't seem like much point derailing the thread again.
You do not understand what I write??? or don't you want to understand it ??? ON THIS THREAD I WAS THE FIRST TO DISASSEMBLE THE CPU ... Now you get me a 2018 ??? Start from line 1 to 53, read them all and you will see as the only one capable of having the audacity to dismantle a 2019, it was me.
[/CITAR]
 

Loog

macrumors regular
Apr 14, 2020
164
167
I've just helped my friend with MacBook Air 2018 to make this mod. Below are the results. The rules are the same — wait for the CPU to cool down to 40°C then run the test.

BeforeAfter
Geekbench661 / 1559797(+21%) / 1693(+9%)
Cinebench R20611672 (+10%)

And here are the load/thermal curves for both tests.

View attachment 916407

The aluminium heatsink surface that connects to the CPU is rough and not smooth. One of the things that's easy to do is polish it with a fine sandpaper to improve heat conductivity. It would be great, of course, to replace the heatsink itself with a copper one, but I don't think that's doable. Other than that the mod is fairly simple, reversible, and leads to a cooler, quieter system and 10% performance gain for MBA 2018.
@DanSilov, thank for these results, nice to compare like for like machines. I'm interested to know what thickness shim and thermal paste used here. I'm guessing from your other comment arctic silver and 0.3mm?

My base score was lower (597) vs 611 for Cinebench but higher post mod (698 then 702 heat pad) vs 672.

I used 0.5mm with MX4 thermal paste, there may be differences in components here along with machines but this still falls into the 10-15% sustained performance improvement which appears to be the maximum +- diminishing returns.

All intersting data.
 
  • Like
Reactions: DanSilov

DanSilov

macrumors regular
Sep 19, 2016
125
156
@DanSilov, thank for these results, nice to compare like for like machines. I'm interested to know what thickness shim and thermal paste used here. I'm guessing from your other comment arctic silver and 0.3mm?

My base score was lower (597) vs 611 for Cinebench but higher post mod (698 then 702 heat pad) vs 672.

I used 0.5mm with MX4 thermal paste, there may be differences in components here along with machines but this still falls into the 10-15% sustained performance improvement which appears to be the maximum +- diminishing returns.
Yes, I've used 0.3mm shims, and it's enough, because I could feel the adhesion between the heatsink and the CPU with the shims added (no adhesion without the shim, hence the wide gap). I used Arctic Silver, but I ordered Kryonaut, so it's possible I'll try one more time with the new paste.
 
  • Like
Reactions: octoviaa and Loog

srkirt

Suspended
Apr 12, 2020
257
179
Barcelona
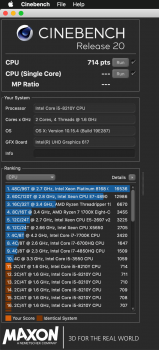
I am getting closer to the end ... I have beaten the maximum with 714. I have simply left my radiator with Artic and between the original cover and the radiator I have put the iPhone screen protector. This creates a tunnel and the heat incredibly does not reach the original cover !! I get the Artic pads and I am going to put on every component, maybe I will disassemble the board to put the Ram that is under the processor.
 

Attachments

  • Captura de pantalla 2020-05-19 a las 14.38.26.png
    Captura de pantalla 2020-05-19 a las 14.38.26.png
    327.6 KB · Views: 151

vyruzreaper

macrumors regular
Jul 19, 2015
121
116
Idle temps below 30C with the SPM (shim+pad mod).

1589895254884.png

[automerge]1589895574[/automerge]
Ran another Geekbench5 test -> I saw a spike to 250+ watts?!! glitch? lol (results were 1197/3890).

1589895529266.png

[automerge]1589895725[/automerge]
Imo, this mod is more about sustained power than it is about power increase. It does both but the sustained power makes this laptop a keeper. Glad I saved my money by not buying a MBP and I'll wait for mLED/14/ARM.
 
Last edited:

octoviaa

macrumors regular
Oct 19, 2013
172
88
— You need a pentalobe screwdriver to remove the backplate.
— Backplate is additionally held by two clips right in the middle, so to remove it after you unscrew it you need to apply a tiny bit of force.
— Use a soft tissue to remove all the traces of the original thermal paste from the both CPU and the heatsink.
— I've used two 15x15x0.3mm copper shims, and cut one in half, exactly like in the linked post.
— I found it easier to apply new paste to the CPU first, then apply the paste separately to two shims and place the shims on the heatsink, not the CPU. Then place the heatsink with the shims in its place.
— When you screw the heatsink back, use the X pattern and repeatedly apply 0.25-0.5 turns to each screw until you feel the strong enough resistance (don't apply too much force).
Hi @DanSilov thank you for the guide.
I'm a little bit concern about the 'clip' on the backplate so any suggestion you can give on how to 'handle' it to reduce the risk of breaking it after I remove the screws?
Thanks in advance
 
  • Like
Reactions: RiaKoobcam
Register on MacRumors! This sidebar will go away, and you'll see fewer ads.