Become a MacRumors Supporter for $50/year with no ads, ability to filter front page stories, and private forums.
Status
The first post of this thread is a WikiPost and can be edited by anyone with the appropiate permissions. Your edits will be public.
Sharing my success upgrade

Blade + HDD upgrade

Device: Retina 5K, Early 2019 - (i5-8500, 3.0 Ghz)
Blade upgrade: 24GB -> 1 TB Samsung 970 Evo Plus
HDD upgrade: 1TB fushion drive -> 1 TB Samsung 870 Evo
CPU upgrade: N/A
Speed test: 2838 MB/s read, 2700 MB/s write
OS: Big Sur
Adapter: Sintech ST-NGFF2013C
Heatsink: Eluteng M.2 2280 SSD Cooler
Issues after fresh OS install: no issues, the sleep issue is not present.

Thanks for all of you sharing all the configurations and which blade, heatsink and adapter to pick.

PRO TIP: When you glue back your screen together, make sure there is a hole for the Microphone! very important!

My previous setup went through Big Sur -> Monterey -> Ventura -> Now Sonoma.

I am happy to report back that my 1 TB Samsung 970 Evo plus is booting as fast as it was back in Big Sur.
Not sure if it is because I did a fresh install of Sonoma. I had a very slow boot up in Monterey. In Ventura, the issue got worst. It would restart at least 3 times in order to boot into the OS. I finally couldn't stand it. I back up via Time Machine and then did a fresh install of Sonoma. When I tried to wipe the 970 Evo plus with Ventura, it had a lot of issues with Disk Utility. It took a very long time to wipe the drive. I restarted disk utility a few times before I can wipe the drive.

No Changes in Hardware same as above.
OS: Sonoma
Speed Test: Write 2895 MB/s Read 2973 MB/s
 
  • Like
Reactions: Arashnik
My previous setup went through Big Sur -> Monterey -> Ventura -> Now Sonoma.

I am happy to report back that my 1 TB Samsung 970 Evo plus is booting as fast as it was back in Big Sur.
Not sure if it is because I did a fresh install of Sonoma. I had a very slow boot up in Monterey. In Ventura, the issue got worst. It would restart at least 3 times in order to boot into the OS. I finally couldn't stand it. I back up via Time Machine and then did a fresh install of Sonoma. When I tried to wipe the 970 Evo plus with Ventura, it had a lot of issues with Disk Utility. It took a very long time to wipe the drive. I restarted disk utility a few times before I can wipe the drive.

No Changes in Hardware same as above.
OS: Sonoma
Speed Test: Write 2895 MB/s Read 2973 MB/s
Well I have the same slow booting but dont wanna go throw all the hassle.. Did you put everything back from the backup and still you have the fast booting? I read somewhere that if you use the backup it will be slow again directly or after some time!
 
Well I have the same slow booting but dont wanna go throw all the hassle.. Did you put everything back from the backup and still you have the fast booting? I read somewhere that if you use the backup it will be slow again directly or after some time!
I did more of a cherry pick approach only get back what I need. I didn't want to restore the whole thing. At least I dont have any errors when I restart my computer. Previously, it's like a gamble whenever I restart my computer. It would restart like 3 or 4 times by itself. In total, the restart time would be like 15 min or something. Anyway I will report back maybe in half a year.
 
Ah ok then your system had a really bad issue. Mine is fine,Only booting time is longer than normal. By the way I did the upgrade on iMac 27 late 2015 with 2tb 970 evo plus and 2 tb sata ssd. And using open legacy patcher to install and use Sonoma etc.. I did the system test I am getting the highest score compare with standard late 2015 macs. So ssd upgrade and Sonoma os is helping with performance.
 
Ah ok then your system had a really bad issue. Mine is fine,Only booting time is longer than normal. By the way I did the upgrade on iMac 27 late 2015 with 2tb 970 evo plus and 2 tb sata ssd. And using open legacy patcher to install and use Sonoma etc.. I did the system test I am getting the highest score compare with standard late 2015 macs. So ssd upgrade and Sonoma os is helping with performance.
how long does your current set up boot up? Apparently, I read from a forum. People say it might fix the issue if you partition another free drive with 10% or more of the capacity. I allocated 10% free drive. I will observe if the trick works or not. I don't want to open up my iMac and switch the M.2 again just too much hassle.
 
Hi,
slow boot time issue is a common (non apple) nvme replacement problem.
Apparently, the trouble with the older imacs is linked with the firmware that was not properly updated with nvme third-party trim features.

As time goes by, the startup time deteriorates, you can monitor and follow the behavior with :

# log show --predicate "processID == 0" | grep spaceman | grep -i trim

Also take a look at macguru9999 advice here

 
i also have long boot times on my retina 27inch 2015 imac with apple non nvme 512GB ssd UXM8JA1Q
 
SSD upgrade by Terraaustralis

15/8/2023


Device: iMac 5K 27" 2019 - 19.1 - 3.7GHz i5-9600 6 core MRR12LL/A, EMC3194, A2115.
NVMe upgrade: 256GB Apple > 2TB WD Black SN770
Speed test: 2960 MB/s read, 2824 MB/s write Blackmagic
SATA upgrade: HDD > 2TB Samsung Evo 870 SSD
OS: Monterey then Ventura 13.6.3
FileSystem: APFS,
Boot Rom Version: 2020.40.3.0.0
Boot Time: Total system/data 1.2TB: 28 seconds.
Black Magic: Previous Fusion speed 700MB/s: Upgraded NVMe speed, Write 2783MB/s, Read 2983MB/s
Location: Australia
Issues after fresh OS install: See below.


Background:
I have no IT background but as an artist/craftsman am useful with my hands. I did successfully, upgrade the CPU of an Apple G4 last century, but I would never have embarked upon this exercise without having such detailed information available from the many Guru’s who contribute to this site. I thank you all heartily and with great sincerity. Apple charges AUD$1500 for a 2 TB NVMe SSD. The open market offers a 2TB SSD for AUD$200. Why would I not consider rising to the challenge of personally upgrading my iMac?

Technique:
1. Deciding on a suitable model NVMe was difficult. As a Samsung advocate, I tested the 980 Evo Pro against the WD Black SN770 and found the WD Black worked best. Articles on https://www.tonymacx86.com/threads/...or-your-macos-boot-drive.323479/#post-2350166 confirmed over time, the Samsung would accumulate problems as an internal boot drive and WD Black was recommended.

2. Although I tried the wheel, I chose to remove screen by slicing through the double-sided tape with a scalpel. Less strain on glass, but one must be very careful to tilt blade cutting edge away from glass otherwise black paint can be scratched off the glass. The blade should not be inserted more than 3-4mm deep. On the 2019 iMac, unlike other models, there are no cables projecting beyond the aluminium frame. Nevertheless, I was cautious in the camera area.

3. Stripping tape off using Isopropyl Alcohol is also a challenge. It is difficult to clean off all residue at the ‘chin’ - bottom, of the frame. Too much rubbing on the back margin of the screen can also remove the black paint.
I re-painted with Acrylic hobby paint.

4. Experience has taught me to respect static electricity and I now always wear surgical gloves. Wrist cables are something of an obstacle. I vividly remember opening a 2007 imac to replace HDD with SSD. On re-assemby there was no power. I absolutely had not touched the power unit. Although I wore a wrist cable, my studio floor is carpeted and the wrist clip was earthed to the aluminium iMac. Aluminium is a poor electrical conductor. I believe static must have jumped from me to the power unit. Now I never understimate the power of static electricity.

Problem 1:
On first re-assemby of iMac, screen was black. LED pilot lights showed 123&5 green and so I suspected a LCD cable or cable connector problem. I purchased a new LCD cable. Screen still black on re-start. Finally I took the iMac to a micro-soldering specialist who, two days and AUD$300 later, found the weak component on the logic board and replaced it. I was happy to have the problem resolved at relatively little cost.

5. As a precaution against any future failure, I decided to keep the screen sellotaped on for six months before considering the application of Apple tape.

Update 30/11/2023
Problem 2.

After three months of perfect operation, I booted into to a kernal panic. Absolutely no change in set up. But there it was! I was unable to boot into verbose mode or access any logs. I decided to replace SN770 NVMe with the original Apple blade. Advice from trs96, a moderator at tonymacx86 was that the Sintech adater is incompatible with the SN770, See: https://www.amazon.com/dp/B01CWWAENG?psc=1&ref=ppx_yo2ov_dt_b_product_details&tag=mrforums-20. Sintech is apparently not compatible for WD SN770 amongst several other NVMe SSD’s.

I have now replaced the Sintech adapter with a No-Name short adapter from AliExpress and reinstalled the SN770 as boot drive with Ventura 13.6.3. Restart is flawless and operating properly so far. I now hope the NVMe/adapter combination will pass the six month operations time test!

Would I have embarked upon this task knowing the potential for problems? Yes. I enjoy problem solving, it is essential to my business, and learned practical knowledge is an asset. I did spend more than I anticipated (1 x 2TB SN770 + 1 x 1TB Adata external, 1 x SATA Samsung SSD and adapters cables, tape etc - about AUD$700, plus repair AUD$300). I now have a 4 x faster and 4 x larger capacity machine and the confidence to fix problems arising.

Postscript:
Some readers posted comments to the effect that upgrading is easier by purchasing an external 4TB TB3 SSD unit and booting from it. In retrospect that may be so. But I hate desk clutter and already have 4 back-up drives etc. which take up too much space as it is. Upgrading internals may be more work - and risk, but the resulting boot speed and operational performance makes it all worthwhile for me and I keep my desk clear for creating art/craft work.
 
Last edited:
As an Amazon Associate, MacRumors earns a commission from qualifying purchases made through links in this post.
SSD upgrade by Terraaustralis

26/12/2023

Device:
iMac 12.2, 27" 3.4GHz i7-2600. 4 core MD063LL/A, EMC2429, A1312.
SATA HDD upgrade: 1TB HDD Apple > 2TB Samsung 870 Evo SSD
GPU replacement: AMD 6970 replaced with AMD 6770
OS: Lion 10.7.5 and Yosamite 10.10.5
File System: HFS+(journaled),
Boot Time: Total system/data 366GB - 21 seconds.
Location: Australia
Issues after fresh OS install: See below.

Objective:
After my 2007 iMac died, I required an old system to operate Adobe CS5 software. LED’s showed 1 only - mains source. My work does not justify upgrading to Adobe monthly leasing plan. This model iMac 12.2 will run all old systems (El Capitan and earlier) natively. However I wanted more speed and capacity and so replaced the Apple 1TB HDD with a 2TB Samsung 870 Evo SSD

Problem:
After purchasing this iMac in apparently good condition for AUD$150, all ran well for a month until the screen showed graphics card defect. This iMac contained a 2GB AMD 6970 GPU. Research established this card and many others of this generation had a manufacturing defect with high failure rate. Apple replaced them free up until 2014. It was evident that I was not the first to open up this iMac. I removed the GPU and found thermal paste in abundance. I cleaned and baked the card to see if its life could be extended. Upon replacement it worked properly for about six weeks after which it failed again. I repeated baking and got good results but only for another six weeks.

Solution:
Researching options, I obtained a used 1TB AMD 6770 from Ali Express and replaced the faulty GPU. So far the AMD 6770 has performed properly. Lower video cache capacity not an issue for me. The SSD makes this vintage computer very snappy and it feels like a contemporary model in use. Happy so far.

Postscript:
These old GPU’s, or the entire iMac for that matter cannot be relied upon going forward. I inevitably seek a solution where-bye I can use Adobe files in new Software on a recent Mac computer.

1. One solution is the Serif Affinity suite which I have purchased using Affinity Publisher and Affinity Design.

2. Use of VMware emulation software in which Version 13 Guest can host Lion 10.7.5. This solution works but importing data from Macos Lion to the VMware guest has so far eluded me do to changed os technology creating barriers to old os data imports. Instead of trying to import original files into Lion on VMware it seems I must rebuild Lion within VM ware using older applications, many of which are now deprecated.
 
Last edited:
  • Like
Reactions: mbosse
Blade + HDD upgrade

Device: 27 Retina 5K, Early 2019 - iMac19,1
Blade upgrade: 24GB -> WD Blue SN550 500G SSD -> WD Blue SN570 1TB SSD
HDD upgrade: 1TB fushion drive -> SanDisk SDSSDH3 1T00
Speed test: 2571 MB/s write, 3064 MB/s read,5G
OS: 13.6.3 / 14.2.1
Adapter: taobao迪奥科技 (The craftsmanship looks average, but I don't have many options to choose from.)
Heatsink: FinalCool 2280

IMG_8720.JPGIMG_8725.JPG

2 Small details:
I used High Temperature Resistant Tape to secure the SSD and Adapter in place.
The heat sink is secured using metal clips, without rubber rings.

7911703746435_.pic.jpg

It has been running smoothly for two months without encountering any issues, including sleep, trim, etc. Thanks to the forum and all the friends who shared their experiences. The successful upgrade wouldn't have been possible without your help.
 
  • Like
Reactions: mbosse
I have read quite a lot in that thread and still have two open questions:
Is the NVMe 128GB blade from the iMac 17,1 ( 27" late 2015) the same than the NVMe 128GB blade from the Macbooks 2015?
My current iMac 17,1 has a defective SSD blade and I have a pair of NVMe 128GB blade from the Macbooks 2015 in my drawers, will they fit?

Do you confirm that replacing the Apple blade with e.g. a regular Samsung 970 with an adapter board will work, but with longer boot times?
If this is the case I will stick to the 128GB blade (enough to hold the OS), else I would go for a larger SSD.
 
Hi,
slow boot time issue is a common (non apple) nvme replacement problem.
Apparently, the trouble with the older imacs is linked with the firmware that was not properly updated with nvme third-party trim features.
What about OpenCore legacy patcher, that is able to inject NVMe boot features?
Can't test, since my blade is defective...
 
Hi rin67630, OpenCore patcher, as I understand, looks as a tool used to be able to boot recent macos on unsupported old Macs hardwares; it claims "This means that we're able to achieve a near-native experience on many unsupported Macs."
I have no experience with as my iMac is still supported and therefore can't give an informed opinion about.
Yes, I know. But it replaces the EFI firmware by it's own. Maybe supporting the NVMe blades as well.
 
Need help with my iMac 27" 5K 2019. I installed a WD SN850X. I put everything back together and saw that one of the LEDs lighted up when I plugged in the power. However, when I press the power button, the computer won't turn on. Did I break something or forget a reconnect a part? Does anyone have any ideas about what might be the problem? Much appreciated.
To my disappointment, I found that I bent and even broken some pins to the CPU socket when I had stupidly thought I could dust and clean the area with a tissue. Luckily, I found a private repair person in Japan, which is where I live, to fix it for me. This person didn't replace the socket but repaired the pins themselves. He charges about $5 per bent pin and $40 for broken pins. So, in the end, I had to spend another $150 to complete the upgrade.

LESSON LEARNED: Be very careful with CPU pins, whether they're on the socket or on the CPU itself. Cover and protect them as soon as they become exposed when you remove the CPU from its socket. DON'T mess with them. When replacing the CPU, place it from top down. Don't slide it intomthe socket, as it may cause bents in the pins or even break them.
 
  • Like
Reactions: MacInTO and mbosse
Not really an upgrade, but a repair.
I have got an iMac 2015 27" Retina with a defective FD blade.
I replaced that blade with a 210GB NVME SSD that I got left from an upgrade of a Macbook 2015.
They are both identical.
Once repaired, i did not recreate a fusion drive.
Instead I installed macOS on the NVME 120GB drive and formatted the 3TB HDD as HFS+.
Finally I moved my home directory to the HDD.
That alternative setup works very well. The system boots in a breeze and the user data on the HDD are fast enough.
Everything is very snappy.
And MUCH safer than the unreliable FD.
 
Shouldn't there be a big warning about using amazon / ifixit / ebay screen adhesive tape? Quite of few of these iMacs locally all with cracked screens after SSD replacement. These tapes seems to be killing these iMac screens at a fairly rapid rate :(

Those tape are not up to adhesion spec.They are cut out in the right shape making the buyer think its designed for the purpose. But the tape itself appears no where close to provide good enough bond regardless how well the surfaces are cleaned and preped/primed. 27" suffers the most from being bigger and heavier.

I've worked on a bezelless 55"LCD TV (LCD double sided stuck onto the frame) Also lots of junk tape exist. The correct tape is 3M VHB (Very High Bond) tape for that application. But 3M doesn't make them in all widths so aftermarket seller need to have proper machines to cut to width (4mm in case of this TV) 3M VHB is foam substrate tape (can be cut open easily) but maybe too thick for these iMacs. Will need to inspect one closer for evaluation.

I've also used Tesa tapes for assembling iPad touch screens. Very challenging application with touch screen cable constantly pushing up on the screen and 1-2mm glue surface along that side. Tesa tapes works well. However, it is acrylic substrate which means cutting it open again makes a complete mess unlike foam cores. I've seen some youtube videos of pros using Tesa for iMac screens. Probably assuming not going to open it again. Buying genuine Tesa tape is also a challenge. Lots of Tesa/3M counterfeits. I purchase mine from a iphone/ipad repair supply distributor (requires a business license)

Am researching the correct tape to use. Correct adhesive is likely not cut like into pretty fitting shape for iMac but will bond much better. Saving these iMacs from the massive screen falling off destruction problem.

Until correct tape is found or using say 5-7mm wide Tesa and assume not opening it again (can open, just hard to open and mess to clean up) Best to wrap packing tape around the edges of the iMacs so the screen doesn't fall off.
 
Blade+HDD upgrade
Device:
iMac19,1 2019 – 27” - MRR02LL/A (3.1Ghz i5-8600, Fusion HDD+32GB blade)
Blade upgrade: 32GB Blade -> 1TB XPG SX8200 Pro
HDD upgrade: 1TB SATA Apple HDD -> 2TB SSD WD Blue SA510
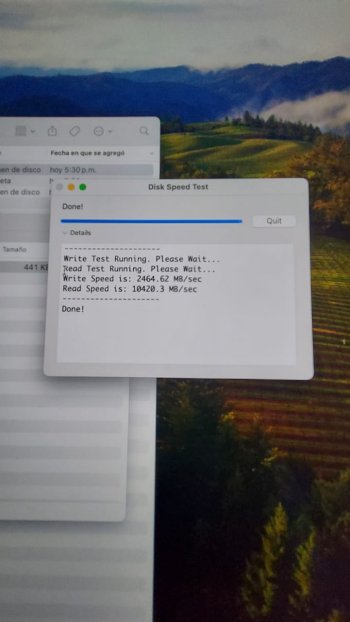
Speed test: 10420 MB/s read, 2464 MB/s write (app Disk Speed Test)
OS: Sonoma 14.2.1
File System: APFS
Boot Time: 40seg
Adapter: ST-NGFF2013-C (large)
Temperature sensor: none
Issues after fresh OS install: none
 

Attachments

  • Imagen de WhatsApp 2024-03-08 a las 12.22.44_82af4ccf.jpg
    Imagen de WhatsApp 2024-03-08 a las 12.22.44_82af4ccf.jpg
    61.4 KB · Views: 81
Blade+HDD upgrade
Device:
iMac19,1 2019 – 27” - MRR02LL/A (3.1Ghz i5-8600, Fusion HDD+32GB blade)
Blade upgrade: 32GB Blade -> 1TB XPG SX8200 Pro
HDD upgrade: 1TB SATA Apple HDD -> 2TB SSD WD Blue SA510
Speed test: 10420 MB/s read, 2464 MB/s write (app Disk Speed Test)
OS: Sonoma 14.2.1
File System: APFS
Boot Time: 40seg
Adapter: ST-NGFF2013-C (large)
Temperature sensor: none
Issues after fresh OS install: none
Did you put some heat sinks onto the blade? They can get quite hot without cooling.
MacOS is on the blade, right?
 
Did you put some heat sinks onto the blade? They can get quite hot without cooling.
MacOS is on the blade, right?
I bought the recommended 3mm heatsink but couldn't find a way to adjust it.

I explain how I used the ST-NGFF2013-C (the long one), the NVME is very tight and it was even tighter when using the 3mm one

Then only use the heatsink that XPG includes.

I would recommend using the short ST-NGFF2013 with the nvme SX8200 Pro

Use SX8200 Pro since I read right here that WD and Samsung give problems.


The system is in NVME and Sata SSD is for Data.
 
  • Like
Reactions: rin67630
HDD Removed, Blade installed + PRAM Battery replaced

Device: MID 2014 14,4 MF883LL/A EMC2805 (1.4Ghz i5-4260U)
HDD upgrade: 1 TB SATA HDD -> 500GB Western Digital Green (SN350 bought:11/21)
Speed test: around 700 MB/s read, 700 MB/s write
OS: Big Sur (the last supported OS on this machine)
Location: USA
Temperature sensor: Not used
Issues after fresh OS install: None.
( Applied: sudo pmset -a hibernatemode 0 standby 0 autopoweroff 0 )

Notes:
- This was originally an HD only machine, but it had a slot on the motherboard!
(Some references say there was no slot on this machine)
- WD Green under 500G is TLC nand,
above that, it is QLC NAND. Some reports state a problem with the QLC type.
- PRAM battery is type BR2032.
It's located on the motherboard and hard to get to.
I replace it since these can go bad after 10 years.
"BR" is a higher temperature and longer life then a CR2023, but not as readily available.
CR2032 can be used, but isn't optimal.
- RAM and CPU are soldered to the board and can't be replaced
- Used Sintech NGFF M.2 nVME SSD Adapter Card (short)
( A screw and washer are needed to hold the blade in place )
Note: make sure to push the connector FULLY in place!
- On the adhesive: I plan on using a THIN strip of carefully applied RTV glue. I think it should work well, and won't suffer the problems I've seen here using (bad) double sided tape. It might be harder to re-open the computer, and take a little bit more time to clean up, but, i think it's going to work... tbd.
 
Last edited:
  • Like
Reactions: mbosse
Device: late 2015 iMac 27"
NVMe upgrade: 32GB Apple > 2TB WD Black SN770 NVMe
NVMe Adapter: Sintech NGFF m.2
SATA upgrade: Retained Apple 1TB HDD (after split fusion)
OS: Monterey 12.7.4
FileSystem: APFS
Benchmark: Write 2756MB/s, Read 2865MB/s
Location: USA
Issues: none

Process was straight forward. Removing the connectors without forcing / breaking anything was the hardest part. Used Lefix foam strips for regluing display.

I spend an extra $10 on a USB to NVMe adapter to install and update the OS on the SSD before installing the card. Fresh installed all apps, restored all user data and files from time machine backup.

No issues with sleep. Machine is super snappy and fast, it's like buying a new computer.
 
  • Like
Reactions: MacInTO and OAK77uk
...formated hfs+?
Yes. I split the Fusion drive shortly before install, formatting the now split HDD with HFS+, the SSD obviously formatted with APFS.

Not that I care much for the HDD speed, I kept it mainly to avoid the iMac being unhappy. From what I read, you'd need to remove the SATA cable altogether, so why not leave it? I may use it for keeping additional backup copies of important work next to my external USB time machine backups.
 
Register on MacRumors! This sidebar will go away, and you'll see fewer ads.