Become a MacRumors Supporter for $50/year with no ads, ability to filter front page stories, and private forums.
Status
The first post of this thread is a WikiPost and can be edited by anyone with the appropiate permissions. Your edits will be public.
Further thoughts:
1. On my 2019 iMac with a 3.7 Intel 6 core i5, the Apple 256 NVMe is a fast reader at around 1200MB/ps but a slow writer at around 700MB/ps, if I remember my test figures correctly. So it is better used as a Fusion drive which is why it was specified that way. A 256GB Fusion NVMe should increase a Sata 500MB/ps to a better performance. I have not tested that Sata/NVMe combination to quote figures as I prefer using NVMe/Sata seperately to maximise native sm770 NVMe drive speed at around 3000MB/ps.

2. For faster internal NVMe, you may find a better priced PCIe 3.0 from older Samsung (careful with choice of model), WD Black or Crucial etc. as more people take up PCIe 4.0. Last time I looked, PCIe 3.0 was not discounted enough to attract me, but time passes and you may find better prices in Xmas/New Year sales.

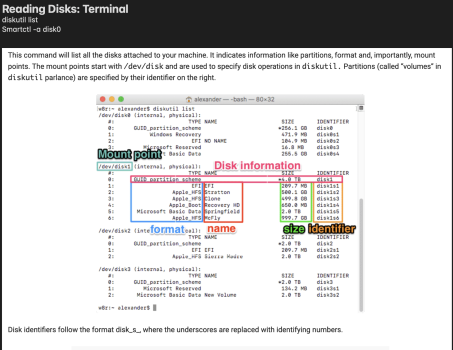
If considering a used SSD, essential to ask seller for a screenshot of SMART checklist to establish % of remaining life and condition before buying. This may be obtained via Terminal. See note below for Terminal instructions at top left of screen shot with "how to read" diagram below.

3. for speed and economy, I suggest you spend on an 1TB or 2 TB internal NVMe instead of spending on the internal Sata drive. Then buy a 4TB Barracuda 7200 HDD and create a Fusion drive. The Sata only maxes at 500MB/ps while Fusion should lift it to around 2000Mb/ps You will get better average speeds. Maybe less on a 2014 iMac?

That way you have fast NVMe drive space for many of you files and a faster 4TB HDD for your archive files or TM. However, you need to spend a minimum for the 4TB HDD if possible, to to get best economy in my opinion.

Alternatively, if you decide to keep each drive separate, a 7200 HDD will be slow at around 100Mb/ps while the NVMe will be 2500 - 3000 MB/ps depending upon Brand/model. This arrangement favours splitting off and allocating archive files and text files to slow HDD leaving images, hungry apps, video and games on the fast NVMe. It all depends upon your files and usage.

Finally check user experience in this blog to see brand and model NVMe for PCIe 3.0 that suits 2014 iMac on pages 1 to 3. Then you know what to purchase in NVMe 3.0. for your computer.

You know your file types, applications and speed objectives. Research prices and you best choice will become clear.

Cheers.
 

Attachments

  • Screenshot 2024-12-10 at 5.55.02 pm.png
    Screenshot 2024-12-10 at 5.55.02 pm.png
    835.1 KB · Views: 66
Last edited:
  • Like
Reactions: Turboman1971
Thanks. Speed would be nice, but at the moment I'm only using a normal platter hard drive so even standard SSD speeds will be a massive improvement. I don't need it to be blisteringly quick, but faster than the current disk would be great. Thanks for the advice!
 
Correction!

In my reference to SMART monitoring, I failed to explain I had downloaded and installed Homebrew into Terminal. Therefore instruction (Smartctl -a disk0) (add number according to diskutil) relies on Homebrew and will not work without it.

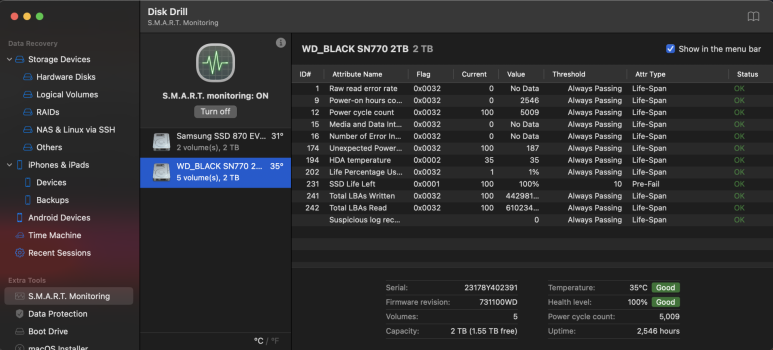
For a fast, free method of checking SMART status, download Disk Drill which offers indefinite free use for limited basic function. Install it and open up, click SMART status at Extra Tools (extreme left), highlight drive and smart status report opens for you.
 

Attachments

  • Screenshot 2024-12-11 at 12.26.56 pm.png
    Screenshot 2024-12-11 at 12.26.56 pm.png
    474.2 KB · Views: 38
Last edited:
Results: Samsung 980 Pro vs WD Black SN770 on OSX Ventura 2019 iMac.

I have been comparing performance of 2TB Samsung 980Pro versus 2TB WD Black SN770 on 2019 iMac running Ventura 13.5. which is limited to PCIE 3. These days the PCIE 4 NVME drives are cheaper than preceding PCIE 3 models.

Performance: Samsung; Read 3052 Mbps, Write 2960 - WD Black; Read 3038 Mbps, Write,2896 Mbps.
Boot Times of 200GB system heap: Samsung; 16-23 secs. WD Black; 15 secs.
(The variability of Samsung boot up time reflecting the initial incompatibility behaviour which seemed to settle down to 16 secs with use).

Which you prefer will depend upon Platform and o/s.
Both Samsung and WD Black use TLC, but Samsung has AES encryption, uses DRAM and is warranteed for longer life. Samsung offers considerably better sustained write performance. Samsung claim automatic Trim function through Elpis controller for Windows. https://www.tomshardware.com/reviews/samsung-980-pro-m-2-nvme-ssd-review

On Ventura 13.5 Samsung ran smoothly with one exception. At boot-up, the progress bar showed a marked hesitation 40% through completion. This suggested to me an initialisation conflict. Nevertheless once loaded the drive worked smoothly as the above Black Magic numbers indicate.

WD Black SN770 performance matched Samsung but lacks AES security and as a DRAM-less drive uses 64MB of host system RAM for the Controller. It is a very weak performer for sustained writes. In all other respects the drive was smooth and fast which recommends it for OSX.
https://www.tomshardware.com/reviews/wd-black-sn770-ssd-review/2

The absolute decider is Trim
Thank you trs96 for supplying exhaustive and valuable Trim information which I have included in my conclusions.
Given the reluctance of either Apple or Samsung to inform users on the handling of Trim It is reasonable to assume that despite its good performance over a short term test, the Samsung 980 Pro may well accumulate Trim related problems over time. However, according to Spaceman logs, both Samsung and WD Black trims where occurring regularly which appears to absolve doubts about Samsung, at least over the short term.

Apple only support Trim for their own drives. I understand Trim is on for Apple SSD but should be off for non-Apple SSD as many NVME controllers now instigate trim automatically. Which begs the question whether the Samsung Elpis controller is capable of garbage collection for several o/s. So far, Samsung remain silent repeating only the suitability of their drive for Windows 7 upward. This is utterly counterproductive and throws into relief the importance of independent tests and user feedback on sites such as this.

I enabled Ventura o/s trim which slowed the Samsung performance markedly. I also found that as an external boot drive the Samsung was slow with writes 1245 Mbps, Reads 2320Mbps.

For Mac user the WD Black SN 770 is the best choice. Apparently no trim issues. fast operation in external case also; but why, oh why does Western Digital omit AES security in all their drives, at this time when security is so critical?
Do I need an adapter to install the WD Black SN 770 into PCIE slot of my 2014 iMac 27”? Thanks for your response in advance
 
Do I need an adapter to install the WD Black SN 770 into PCIE slot of my 2014 iMac 27”? Thanks for your response in advance
Yes, you need an M.2 NVMe adapter NGFF to M key. Usually advertised as suitable for Macbook.

If you are intending to Use a WD Black sn770 do NOT buy Sintech NGFF as Sintech advises incompatibility with WD Black sn770. Sintech adapter will work but induces kernal panic issues after 6 months in my experience. Since changing to cheap adapter I have had no more kernal panics over 18 months.

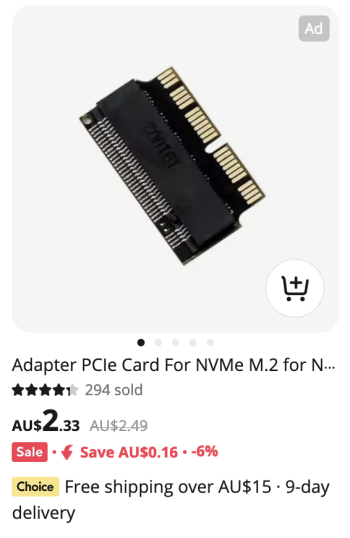
I use Ali Express short adapter (pictured below left), as the tight fit creates a rigid combination of SSD and adapter which can be screwed into motherboard to replace of the Apple ssd. Also lack of full length (2280) adapter offers less resistance to airflow for SSD cooling even though the sn770 is a one sided SSD and thus radiation is on the ’outside‘ of the SSD.

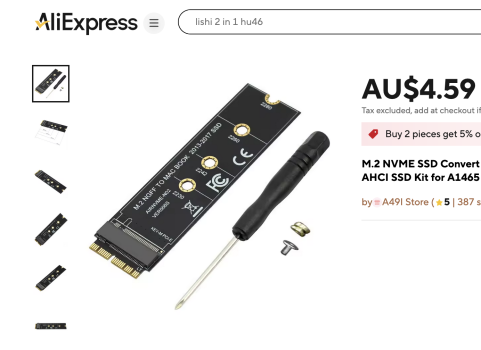
If you prefer the full length adapter, this 2280 looks safe with correct specs, (pictured below right). Suggest you contact seller and confirm it is not Sintech as brand name on reverse side is not shown. NFHK brand is good.

Good Luck
 

Attachments

  • Screenshot 2024-12-15 at 7.48.38 pm.png
    Screenshot 2024-12-15 at 7.48.38 pm.png
    168.7 KB · Views: 26
  • Screenshot 2024-12-15 at 8.13.13 pm.png
    Screenshot 2024-12-15 at 8.13.13 pm.png
    481.8 KB · Views: 24
Last edited:
3. for speed and economy, I suggest you spend on an 1TB or 2 TB internal NVMe instead of spending on the internal Sata drive. Then buy a 4TB Barracuda 7200 HDD and create a Fusion drive. The Sata only maxes at 500MB/ps while Fusion should lift it to around 2000Mb/ps You will get better average speeds. Maybe less on a 2014 iMac?
Definitively disagreeing.
Fusion drives are a horrible thing.
It is ways better to have the system on the 1TB or 2 TB internal NVMe and to format the 4TB Barracuda 7200 HDD to HFS+ where you leave the large files and the Time Machine stuff.
 
You are welcome to your opinion rin67630,

My suggestion was made because a 4TB 7200 HDD will be very slow (100MBps) and speed can be increased vastly with a Fusion set up using the 1TB or 2TB NVMe.
Why would you not want to increase overall operational HDD speed with Fusion?

In my experience Fusion is a very reliable feature.
Fusion was originally created in 2012, designed precisely to speed up internal HDD drives with small NVMe SSD at a time when SSD’s were very expensive. A low cost 128mb SSD improved HDD speed considerably.

Millions of users found Fusion to be reliable and good value. There were incidents when an HDD failed or an NVMe failed. Fusion itself was not at fault. According to my understanding, it was the HDD drives and NVMe wear which was responsible. (Writing to NVMe first was a Fusion priority so in some cases large file transfers and general usage wore out a small NVMe within a few years). If a TM back-up was available, data losses were few and could be recovered when a new drive was installed. If no TM, disk recovery software was unable to recover everything. Recently written data was lost when Fusion tried to write to failed drive.

So the lesson was to monitor your Fusion SSD with DriveDL, Disk Drill or Homebrew to monitor SMART reports of SSD health.

I have never experienced an HDD failure in 50 years as a Mac user. I invariably purchased moderate entry level Macs with small drive and memory. I soon upgraded them with Seagate Barracuda 2TB HDD drives and branded memory purchased from Ali Express. This avoided excessive Apple upgrade charges. I still have a 2007 dual core iMac running perfectly with those HDD/memory upgrades after 15 years of usage.

Now, with cheaper SSD prices, my 2019 iMac is upgraded with internal SATA 2TB Samsung 870 Evo SSD and
2TB SN770 NVMe running independently to get maximum NVMe SSD speed. Also a Zike z666 external case carries a 4TB Lexar NM790 with three volumes: one for TM and one for testing new Mac OS upgrades, the third as Photo/video project storage. I archive files to the SATA 2TB Samsung 870 Evo SSD. I am happy with performance and see no point in upgrading to Apple M series at this stage. My graphics work uses occasional video or sound recording data.
I appreciate fast image rendering with 6 core i5 which I find sufficient.

The external z666 with true USB4.0 runs at 3800/3900MBps, faster than the internal NVME at 2900/3100MBps. In real time operations, the difference is not noticeable.

I do not know how fast an iMac with a Fusion combination of 1TB sn770 and 7200 HDD will be and I would like to hear from anyone who has tried that type of combination.

Of one thing I am certain, there is nothing “horrible” about the Fusion drives or my suggestion.

It is a matter of understanding the role played by hardware/software, their interactions; and what you wish to achieve at what price.

Cheers,
 
Last edited:
The most SSD´s have no Problems.

There is a problem related to APFS formatted NVME Samsung with the Phison Controller and Trim.
This results in long Boot Times after some Time.
Bash:
log show --predicate "processID == 0" | grep spaceman
If you use HFS this Problem is not present.

This is true for Mac Hardware and Hackintosh.

In addition many NVME Drives do not work with Apple´s implementation of the Drive´s Power States.
This leads to Heat and High Battery Drain.

The Crucial P5 which runs on Hackintosh has drained constant 9W even in an external Case.
For older Hardware the Crucial P2 was a good Choice and i have upgraded multiple 2014 MacMini or MBP with it.

As of Today i would try to use a WD SN570 because of the Lanes and PCIe Version it makes mostly no sense to use a WD 850 or x or even a WD SN 770 and for older Hardware i would try to find a Crucial P2 or sometimes if possible just use an SSD as the Crucial MX500 which is a Mac Darling and works forever.

The Crucial P3 has proven to be a bad choice for both Hackintosh and Mac.

There are several NVME running "somehow" in older Mac when formatted before but also most are not able to realise Firmware Updates so better do this before upgrading and save the Original.

First success does not implicate work on the long run.

I do not have old Hardware anymore but use WD SN 570 / 770 / 850 in an Hackintosh and 2 WD SN 770 in external enclosures @ my MBA M2.

I have upgradet many Mac´s with NVME and they are mostly running till Today.
Good information genexx.

Your point about using PCIe 3.0 NVMe lanes is perfectly valid. I referred to PCIe 4.0 models only because PCIe 3.0 prices remain disproportionately high in my opinion. And many PCIe 3.0 models such as the SN570 or Crucial P2 are hard to find. Retailers quickly dispose of old stock and fill the shelves with the next generation products. A buyer may just as well purchase PCIe 4.0 on the basis that is backwards compatible and in future the SSD can be re-used in an external case or fitted to a new machine.
 
Last edited:
Hi Turboman 1971,
I think you should have posted prior to committing to your purchases to get wider comment.

Given you plan to put your 4TB SSD in a caddy, and maximise the 4TB SSD speed may I suggest you look at the external Zike Drive as it seems like the only drive with a chip capable to offer PCI 4.0 speeds in an external container. Plenty of reviews have confirmed it is faster and cheaper than any other external at time of writing. https://ziketech.com/products/zikedrive-usb4-40gbps-nvme-m-2-ssd-enclosure-z666

Read all the user feedback. It probably will not include your Fanxiang so contact Zike and get their tech support to confirm compatibility.
Regarding price of Zike drive, I find the company very flexible. I placed the drive in the trolley and left it there without paying. A few days later an email arrived offering me a 20 percent discount. I ignored it. a few days passed by and another email arrived offering a 30 percent discount. I accepted and paid $135 for a drive advertised at $189 at the time. Current price is advertised at $169. I reckon with patience you will get that price reduced.

You say you also intend to replace the internal Nvme ssd. What is the replacement you propose? I can say that it probably needs to be a WD Black for trouble free performance. The best value for money is the PCIe 4.0 WD Black 770, particularly as you have plenty of ram to support the Host Memory Buffer. I installed a 2TB SN770 a year ago in a 2019 iMac with PCIe 3.0. AJA gives me write 2921Mb/ps and read 3079Mb/ps. and the computer runs flawlessly. Should you need in future to transfer the 770 NVMe to an external you will benefit from increased PCIe 4.0 speed depending on the choice of caddy.

Otherwise your plan seems sound with one small detail. I took advice and used a strip of Kapton tape over the exposed contact pins of the NVMe in the PCIe slot as there have been cases of shorting between contacts and metal shield. It may not be necessary but it seems sensible to me to prevent a possible problem. Be sure to firmly insert NVMe SSD in the PCIE slot as failure to do so is a recurring theme in these posts.

Read page one of this blog to see which NVMe SSD options are proved to be compatible with your 2014 iMac. before installing your SSD. Which Brand and model do you have?

Cheers,
Another point Turboman 1971,

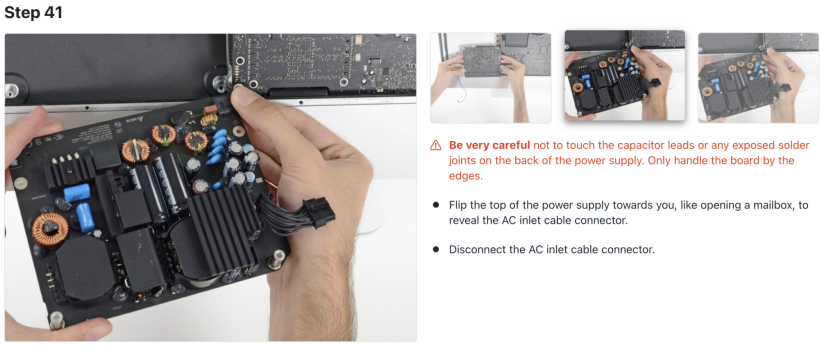
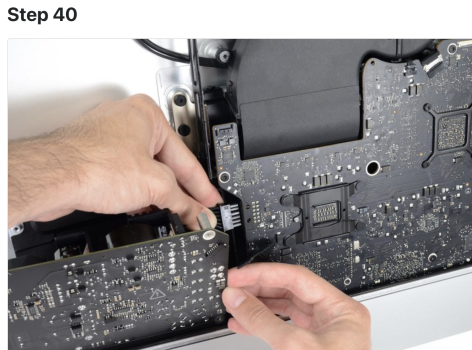
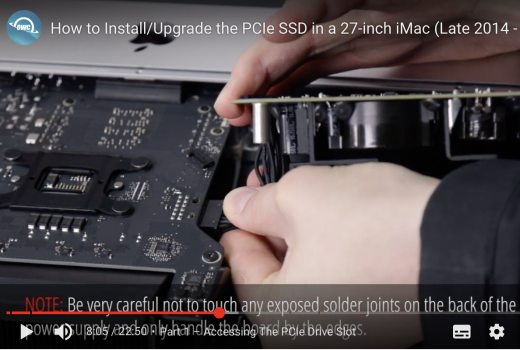
I am not familiar with the specific internals of 2014 iMac but it may be useful for me to mention that in the few iMacs I have dealt with, the Power to Motherboard AC connection is hard to unhook which risks inadvertent damage to your components. The MacFixit and OWC video’s make disconnection look easy but it is not.

On my 2011 iMac and 2019 iMac - and the same plug design may be common to all intel iMacs, (I may be corrected on that). However, beneath the power/motherboard is a rectangular power socket secured with a moulded plastic strip with a barbed hook at the end. You must release the hook in order to pull the socket apart. To release the hook you need to press down in the centre of the plastic strip to raise the barb and then pull the socket apart at the same time.

I did not have the physical strength in my fingers to do that. Often the barb does not lift clear and you cannot pull the the socket apart. The socket is very tight. Space is very restricted at this connection point and accidents can happen.

My solution
Do not be cavalier and use bare hands. Very important to wear surgical gloves for this exercise as your body static can easily blow the power board capacitors, even with no contact - static jumps. Surgical gloves also offer good grip.

I work with the iMac flat on its back. I loosen and remove all retaining screws, lift the entire power board to expose the connector plug so I can see what I am doing. The power cables are short so you will find lifting the power board involves careful manipulating of the board and cables to avoid damage. Once you can see the AC plug and understand the issue, lift the barb with a small plastic or metal spatula, (I have used the edge of a nail file), and try to pull apart the connector a wee bit. Then use the edge of your tool to lever the plug and socket apart while being careful not to damage the moulding with excessive force.

The MacFixit image shows the underside of the powerboard with projecting off the board at right of image. The other part of the socket under the motherboard is not shown. The description does not prepare you for the reality.

If you are lucky, once loosened the plug comes apart fairly easily. If it is tight, use gloved fingers to waggle the plug apart. This is perhaps the most difficult part of iMac disassembly. Be careful and be patient.

May the Force be with you young Skywalker.
 

Attachments

  • Screenshot 2024-12-20 at 11.11.45 pm.png
    Screenshot 2024-12-20 at 11.11.45 pm.png
    1.1 MB · Views: 37
Last edited:
  • Like
Reactions: Turboman1971
Blade upgrade

Device:
Late 2015 - 17.1 - (4.0GHz i7-6700k, Fusion Drive)
Blade upgrade: 32GB Apple -> 2TB Patriot m.2 P300
Speed test: 3200 MB/s read, 3000 MB/s write
OS: Sonoma 14.7.2 (with OCLP)
Location: USA
Adapter: Generic eBay - Link
Issues after fresh OS install: no issues, but did not check sleep before patching with OCLP. Sleep works fine so far

Could you elaborate on the “patching with OCLP” part of your process? I’ve never heard of that. Please and thanks.
 
Could you elaborate on the “patching with OCLP” part of your process? I’ve never heard of that. Please and thanks.
OCLP is a set of patches for macOS that allows you to run hardware on unsupported macOS versions, and vice versa. I can put Sequoia on a Mac Pro 5,1 using the patcher. How it works is you build the macOS install USB drive using the utility included with the patcher, then patch the drive and install your OS. Once the OS is installed, you patch the system drive and install the root patches. The initial patch is a bootloader that loads after macos boot picker, then the root patches install drivers for hardware that isn't supported in the OS version
 
Last edited:
  • Like
Reactions: B_Boss
OCLP is a set of patches for macOS that allows you to run hardware on unsupported macOS versions, and vice versa. I can put Sequoia on a Mac Pro 5,1 using the patcher. How it works is you build the macOS install USB drive using the utility included with the patcher, then patch the drive and install your OS. Once the OS is installed, you patch the system drive and install the root patches. The initial patch is a bootloader that loads after macos boot picker, then the root patches install drivers for hardware that isn't supported in the OS version

Ahhh I see, thanks for the explanation 🍻.
 
Hi all. I've now got a blade NVME that will format ok with my Mac, so I'm good to go with my upgrade!
Couple of questions though if anyone can help? I have a 2014 iMac 27"

Firstly, the drive I've got is a Crucial P3 M.2 2280 which has formatted as APFS no problem. It's a 4tb drive, so I'm intending on replacing both parts of the fusion setup I have, which is a 256gb NVME and a 3tb standard Platter drive, with this 4tb NVME. I'll not need a platter drive as well, just the 4tb as that's plenty of space.
Will I need to do something with the fan control if there isn't a drive plugged into the SATA connection, and I just leave the SATA connection unplugged? Or do I take the SATA wire off the main board completely?
I don't want it spinning all the fans as there is no drive there for it to detect the temperature of.

Secondly, I was planning on installing the OS on the new 4tb NVME drive in an external caddy, then boot to it and restore all my data to it off a time machine backup, all while plugged into the USB.
I know it'll be slow like that, but I'd just like to make sure I can put the OS on and restore everything and that disk be working fine before I then fit it internally. Does that sound the right way to go? And when I take it out of the external caddy and replace the internal drive with it, should it then just work or do I need to do anything else as it's now an internal drive?
Cheers in advance.
 
Hi Turboman.

Regarding questions:
1. No need to worry about disconnecting SATA temperature sensor as Macs Fan Control can be downloaded and will take over fan/temperature operation entirely. It is more flexible than OSX fan control alone.
After completing OSX installation etc. if you have fan problems simply open fan Preferences in Macs Fan Control and choose suitable speed settings. End of fan problem!

2. Since you intend to run OSX on your Crucial P3 you do not need Fusion. Better without Fusion

3. Installing procedure you describe should work as you expect. However that means you make your external caddy a boot drive. The catch I see is that assuming you create your new OSX NVMe and it runs fine as a start-up disk, once you erase the host imac drives you loose access to Disk Recovery. I have used your procedure successfully. However, in the unlikely event a glitch occurs on your P3 OSX, you will only find out AFTER installing the NVMe into the iMac. And then you have a lot of work before you!

A faster and more reliable method, preserves more control over software installation process so only a step need be repeated instead of the whole process.

Download Mist. https://github.com/ninxsoft/Mist/releases Under Assets > Click Mist.0.20.1.dmg or choose Mist.0.20.0.pkg This is the fast, safe, way to download your preferred OSX Installation software. Download to a 16GB USB drive. This Installer USB will ensure you can create your preferred OSX on any drive which is good insurance.

Disassemble iMac and install NVMe. I am assuming you have not done this previously, VERY IMPORTANT - wear surgical gloves and take precautions to avoid static electricity from your body damaging power unit. Do not be cavalier and be deceived by video’s showing people disassembling with bare hands. Your situation is unlike theirs and you are handling sensitive electronics. Release static from your body, (https://www.sciencing.com/rid-static-electricity-body-5862942/), Static can blow a power unit just by proximity! Better safe than sorry. Surgical gloves also make for better grip undoing plugs etc. Take great care not to open screen too far and pull fine cables out of sockets damaging them in the process. After releasing screen, I prefer to have the iMac on its back. Others work with iMac standing.

Caution Power/Motherboard connector: The Male/female socket connection between power board and motheboard is difficult to detach. There is a hook like a fishing barb holding the two halves together. It is concealed beneath the socket which is in turn beneath the motherboard/powerboard. The hook is released by pressing down the arm of the barb in the centre were it bridges two saddles and raises the hook end. Being tight, it may not fully release.

Working by touch requires experience a beginner does not have. Best solution is to release screws for both powerboard and motherboard. Release motherboard from USB sockets etc. Then both motheboard and powerboard can be raised to reveal the plug so you can see what you are doing.

Image 40. MacFixit shows the powerboard with plug already separated (White male end). Image OWC shows the socket under the technicians left thumb.These photos do not assist in explaining the difficulties of the detachment process but they do show how easily static can be relayed to pPowerboard condensers or circuitry and the importance of raising the circuit boards to see how to disconnect.

When iMac is reassembled and you power up, Crucial P3 will be automatically recognised. If an ssd is incompatible, iMac will describe it as such. If you see no P3 disk icon, or you see the P3 icon but OSX Installer fails, throwing up an Error message, that suggests the P3 has not been installed properly. This is common. Go back, disassemble, clean terminals with Isopropyl Alcohol if you have not already done so. Use vacuum cleaner nozzle to ensure no minute debris inside adapter opening. Make sure the NVMe is clean and fully inserted into the adapter. Having read this, you can act accordingly first time you insert the NVMe and avoid the problem.

With disk recognised, you can drag and drop OSX Installer from your USB to desktop and install OSX from desk top. This will be fastest as it uses your Crucial P3 NVMe. Alternatively you can install directly from the USB but it will be a slower process. With OSX installed, you can format P3 as APFS then continue through OSX registration using Migration Assistant to transfer all your TM data reliably.

Hang on to your hat, you now have a very fast iMac!

Good Luck.
 

Attachments

  • Image 40.png
    Image 40.png
    1.3 MB · Views: 9
  • Image OWC.png
    Image OWC.png
    1.2 MB · Views: 8
Last edited:
  • Like
Reactions: Turboman1971
Hi all. I've now got a blade NVME that will format ok with my Mac, so I'm good to go with my upgrade!
Couple of questions though if anyone can help? I have a 2014 iMac 27"

Firstly, the drive I've got is a Crucial P3 M.2 2280 which has formatted as APFS no problem. It's a 4tb drive, so I'm intending on replacing both parts of the fusion setup I have, which is a 256gb NVME and a 3tb standard Platter drive, with this 4tb NVME. I'll not need a platter drive as well, just the 4tb as that's plenty of space.
Will I need to do something with the fan control if there isn't a drive plugged into the SATA connection, and I just leave the SATA connection unplugged? Or do I take the SATA wire off the main board completely?
I don't want it spinning all the fans as there is no drive there for it to detect the temperature of.

Secondly, I was planning on installing the OS on the new 4tb NVME drive in an external caddy, then boot to it and restore all my data to it off a time machine backup, all while plugged into the USB.
I know it'll be slow like that, but I'd just like to make sure I can put the OS on and restore everything and that disk be working fine before I then fit it internally. Does that sound the right way to go? And when I take it out of the external caddy and replace the internal drive with it, should it then just work or do I need to do anything else as it's now an internal drive?
Cheers in advance.
You should not have an issue with fans - that was mainly with the 2009-2011 iMacs which relied on Apple's firmware on the Apple drives to correctly read drive temperature. Could be mitigated by (i) software like Mac Fan Control, (ii) a special cable (such as from OWC), or (iii) the el cheapo hack with an Apple DVD Drive temperature cable (which worked at a least for some models).

The 2012ff slim iMac models are quite resilient to exchanging the drives. I never had issues with fans if I replaced any of the drives myself and never needed to use software to tame fans. OWC still sells/sold a special SATA cable for these iMacs but this is quite unnecessary in my experience.
 
Last edited:
  • Like
Reactions: Turboman1971
Hi Turboman.

Regarding questions:
1. No need to worry about disconnecting SATA temperature sensor as Macs Fan Control can be downloaded and will take over fan/temperature operation entirely. It is more flexible than OSX fan control alone.
After completing OSX installation etc. if you have fan problems simply open fan Preferences in Macs Fan Control and choose suitable speed settings. End of fan problem!

2. Since you intend to run OSX on your Crucial P3 you do not need Fusion. Better without Fusion

3. Installing procedure you describe should work as you expect. However that means you make your external caddy a boot drive. The catch I see is that assuming you create your new OSX NVMe and it runs fine as a start-up disk, once you erase the host imac drives you loose access to Disk Recovery. I have used your procedure successfully. However, in the unlikely event a glitch occurs on your P3 OSX, you will only find out AFTER installing the NVMe into the iMac. And then you have a lot of work before you!

A faster and more reliable method, preserves more control over software installation process so only a step need be repeated instead of the whole process.

Download Mist. https://github.com/ninxsoft/Mist/releases Under Assets > Click Mist.0.20.1.dmg or choose Mist.0.20.0.pkg This is the fast, safe, way to download your preferred OSX Installation software. Download to a 16GB USB drive. This Installer USB will ensure you can create your preferred OSX on any drive which is good insurance.

Disassemble iMac and install NVMe. I am assuming you have not done this previously, VERY IMPORTANT - wear surgical gloves and take precautions to avoid static electricity from your body damaging power unit. Do not be cavalier and be deceived by video’s showing people disassembling with bare hands. Your situation is unlike theirs and you are handling sensitive electronics. Release static from your body, (https://www.sciencing.com/rid-static-electricity-body-5862942/), Static can blow a power unit just by proximity! Better safe than sorry. Surgical gloves also make for better grip undoing plugs etc. Take great care not to open screen too far and pull fine cables out of sockets damaging them in the process. After releasing screen, I prefer to have the iMac on its back. Others work with iMac standing.

When iMac is reassembled and you power up, Crucial P3 will be automatically recognised. If an ssd is incompatible, iMac will describe it as such. If you see no P3 disk icon, or you see the P3 icon but OSX Installer fails, throwing up an Error message, that suggests the P3 has not been installed properly. This is common. Go back, disassemble, clean terminals with Isopropyl Alcohol if you have not already done so. Use vacuum cleaner nozzle to ensure no minute debris inside adapter opening. Make sure the NVMe is clean and fully inserted into the adapter. Having read this, you can act accordingly first time you insert the NVMe and avoid the problem.

With disk recognised, you can drag and drop OSX Installer from your USB to desktop and install OSX from desk top. This will be fastest as it uses your Crucial P3 NVMe. Alternatively you can install directly from the USB but it will be a slower process. With OSX installed, you can format P3 as APFS then continue through OSX registration using Migration Assistant to transfer all your TM data reliably.

Hang on to your hat, you now have a very fast iMac!

Good Luck.
I don't understand your last point: 'With OSX installed, you can format P3 as APFS then continue through OSX registration using Migration Assistant to transfer all your TM data reliably.'

Shouldn't one format the drive first before installing? Otherwise you wipe your fresh installation? So the sequence would be:
  1. start from USB
  2. open utilities
  3. format NVMe SSD
  4. copy installer to SSD
  5. start again, from SSD
 
  • Like
Reactions: Turboman1971
Hi folks, posting here instead of creating a new thread hoping you can help.
I purchased a 2017 21.5" 4k iMac a few years ago for my senior mother. It was perfect for her at the time (Netflix, Facebook messenger/chat, YouTube, Email). Unfortunately now the machine is so slow. I think the fusion drive has been degrading. It takes like 10-15 mins to restart the mac, and opening apps like Safari can even take 1-2 minutes. It's so bad that even she noticed.

So I bought her an SSD for christmas and followed a guide to install it. But when I try to boot macOS from the SSD it asks for some root password which I have no idea what it is. I think since i purchased this mac slightly used for her, the previous owner must have set this root password. I tried emailing the person I purchased it from back in 2019 but they have not responded.

After doing some research it seems like Apple will not over-ride this root password without a proof of purchase. Are we out of luck? I am debating buying her an M1 iMac to replace this one, if there is no way around the root password. Apparently some mac repair shops can replace the EFI chip inside it but it's very expensive ($400), if we were to go that route we may as well upgrade the RAM for another $100 but at that point we are halfway to the cost of an M1... which I think will last her longer and be able to run on the latest macOS.

Thanks for any advice, sorry for the block of text
 
  • Like
Reactions: Turboman1971
I don't understand your last point: 'With OSX installed, you can format P3 as APFS then continue through OSX registration using Migration Assistant to transfer all your TM data reliably.'

Shouldn't one format the drive first before installing? Otherwise you wipe your fresh installation? So the sequence would be:
  1. start from USB
  2. open utilities
  3. format NVMe SSD
  4. copy installer to SSD
  5. start again, from SSD
Yes mbosse, I was getting my wires crossed. Your sequence is of course, correct, except that Turboman1971 states he has already formatted his P3 as APFS. So with the USB Installer inserted, he can go ahead installing OSX. There was actually no need for me to mention formatting at that stage. My mistake.

Thank you for pointing that out.

Cheers.
 
Last edited:
Hi folks, posting here instead of creating a new thread hoping you can help.
I purchased a 2017 21.5" 4k iMac a few years ago for my senior mother. It was perfect for her at the time (Netflix, Facebook messenger/chat, YouTube, Email). Unfortunately now the machine is so slow. I think the fusion drive has been degrading. It takes like 10-15 mins to restart the mac, and opening apps like Safari can even take 1-2 minutes. It's so bad that even she noticed.

So I bought her an SSD for christmas and followed a guide to install it. But when I try to boot macOS from the SSD it asks for some root password which I have no idea what it is. I think since i purchased this mac slightly used for her, the previous owner must have set this root password. I tried emailing the person I purchased it from back in 2019 but they have not responded.

After doing some research it seems like Apple will not over-ride this root password without a proof of purchase. Are we out of luck? I am debating buying her an M1 iMac to replace this one, if there is no way around the root password. Apparently some mac repair shops can replace the EFI chip inside it but it's very expensive ($400), if we were to go that route we may as well upgrade the RAM for another $100 but at that point we are halfway to the cost of an M1... which I think will last her longer and be able to run on the latest macOS.

Thanks for any advice, sorry for the block of text
Hi Espresso,
If I understand you correctly, the new SSD is external and you intend to use it instead of the OSX on the iMac drive.

How did you load OSX onto it? Have you cloned the OSX with Mum’s data across to the SSD or did you download a new OSX from Apple and use Migration Assistant to transfer Mum’s data across? I assume Mum has an Account password and it did not work on the external SSD boot drive? Which OSX version is being used? Is the password described as ‘Root Password’ or is that your term. Specific info needed.

If the password is, as I suspect, the previous owners Account password it can be eliminated. A previous user account may have been deleted improperly and the Account password remains a residual presence in the OS via icloud. Solution varies slightly according to which OSX.

Tell us exactly what steps you made in creating the boot SSD.
 
Last edited:
Hi Espresso,
If I understand you correctly, the new SSD is external and you intend to use it instead of the OSX on the iMac drive.

How did you load OSX onto it? Have you cloned the OSX with Mum’s data across to the SSD or did you download a new OSX from Apple and use Migration Assistant to transfer Mum’s data across? I assume Mum has an Account password and it did not work on the external SSD boot drive? Which OSX version is being used? Is the password described as ‘Root Password’ or is that your term. Specific info needed.

If the password is, as I suspect, the previous owners Account password it can be eliminated. A previous user account may have been deleted improperly and the Account password remains a residual presence in the OS via icloud. Solution varies slightly according to which OSX.

Tell us exactly what steps you made in creating the boot SSD.

Hi Terra, thank you for your reply. I downloaded a new version of OSX from apple (the latest supported on the 2017 21.5" 4k is Ventura). I followed steps to turn the SSD into a apple boot drive (backed up all of her data on a usb stick lol, so migration assistant wasn't even needed). When checking this again for you, it is actually a black screen asking for a "firmware password". Not a root password like i incorrectly stated. My mum's account password does not work for this firmware password. When I called a mac specialist in my area, he stated that apple is very strict on these and it would require a new EFI chip. It's unfortunate because I think with a nice new SSD, it would still be a perfect computer for her with a nice 4k screen.
 
OK Espresso. I believe that refers to hardware security which locks the iMac.

If I understand you correctly, the password problem occurs when you start up your boot drive.
I do not understand why it does not pop up on the iMac? A firmware lock prevents the iMac being accessed by anyone unless they have the correct password. A firmware lock is designed to prevent boot up from any unauthorised drive.

Try this on the iMac OSX.
• Close iMac then re-open into Recovery mode (hold down Command R and restart holding down the keys until the Recovery progress bar runs).
• Go to Utilities menu bar choose ‘Firmware Password Utility’
• If Firmware password is shown as On, Turn it Off. This should solve the problem.

If Firmware Password Utility is already On and you need a password to turn it off, your best option is to contact the seller again for the Firmware password or, if he has forgotten, ask him if he has the old Bill of Sale.

If that is not available ask him to write a statement giving your name as the legitimate purchaser of the iMac citing seller name, address and Apple ID associated with the sellers iMac (include serial number). He needs to sign the letter and have a friend or relative witness his signature giving their name and address as well. Same as signing any legal document.

This should satisfy Apple who can check their records for authenticity. When Apple is satisfied, they can bypass the lock with their magic tools. There will be no charge.

Personally, I would assume Firmware Password is Off. Which in turn makes me wonder how it can be required for your external SSD if it is not required for the iMac. Could it be an incompatible caddy or cable? Is the caddy advertised as Mac compatible? Something very weird going on here. I would be very interested to read comments by readers more experienced than me.

Cheers.
 
Last edited:
Hello friends.

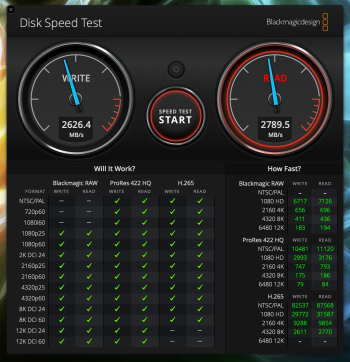
Device: iMac (Retina 5K, 27 pulgadas, finales de 2015) (3,2 GHz Intel Core i5 4 núcleos, HDD only)
Blade upgrade: None -> Samsung 2TB 990 EVO PCIe 4.0 x4/5.0 x2 NVMe M.2
Speed test: 2.500 MB/s read, 2.700 MB/s write
OS: Monterrey 12.7.6
Location: Spain, Europe
Adapter: Ali Express short adapter NFHK
Issues after fresh OS install: NONE, except due to inexperience and believing in the ease of the process when watching YouTube videos, I completely destroyed my screen, having to buy another one on eBay that shows some pink edges.:mad:

Another aspect to highlight is that I bought my iMac as a "Fusion Drive", however, when I disassembled the computer to install the 2Tb NVME Samsung Evo, there was nothing in the PCI-e port of the Apple board, it was empty.

After the installation, I removed the 1Tb HDD and the wire that connects it to the board since I have only left the 2Tb Samsung Evo with the adapter.

I would also like to highlight that the device's turn-on time is approximately 1 minute.
 

Attachments

  • Captura de Pantalla 2025-01-19 a las 13.47.56.png
    Captura de Pantalla 2025-01-19 a las 13.47.56.png
    1.1 MB · Views: 7
Last edited:
Register on MacRumors! This sidebar will go away, and you'll see fewer ads.