Got a tip for us?
Let us know
Become a MacRumors Supporter for $50/year with no ads, ability to filter front page stories, and private forums.
A list of successful iMac 27" (2012-2019) SSD upgrades
- Thread starter dobrink
- WikiPost WikiPost
- Start date
- Sort by reaction score
You are using an out of date browser. It may not display this or other websites correctly.
You should upgrade or use an alternative browser.
You should upgrade or use an alternative browser.
- Status
- The first post of this thread is a WikiPost and can be edited by anyone with the appropiate permissions. Your edits will be public.
Thanks to everyone who contributed to the upgrades, tips and major help….truly.
I successfully upgraded my iMac 27” Retina-5k. A few upgrades specifically:
Core i5 > Core i9-9900k
40gb > 64gb 2666mhz RAM
Removed stock blade and 1tb HDD and installed: WD Blue SN580 1tb NVMe SSD & WD Blue SA510 SATA SSD. I simply did and do not want to take such a risk using any Samsung Drives whatsoever unfortunately.
Absolutely no issues whatsoever with anything. Loads amazingly fast, sleeps and wakes perfectly, etc.
Bent some pins the first time and followed rsx0’s absolutely wonderful guide (with many other member’s tips) and spent careful and cautious time straightening the pins and went at the motherboard install again but after straightening the tension plate somewhat and it was absolutely a breeze as rsx0 mentioned.

HDD + Blade Upgrade
Device: Retina 5K, 27", 2019 iMac- 19,1 - MRQY2LL/A (3.0Ghz i5-8500, 1TB Fusion Drive)
Blade upgrade: 32GB SSD -> 2TB Corsair P3 Plus PCIe 4.0 NVMe M.2 SSD (CT2000P3PSSD8)
Adapter: Sintech NGFF M.2 NVMe SSD Adapter Card
HDD upgrade: 1 TB SATA HDD -> 2TB SSD OWC Mercury Electra 6G SATA HDD
Speed test: ~1850 MB/s Read, ~2400 MB/s Write
OS: macOS Sequoia 15.3.1
Location: US
Temperature sensor: None
Issues after fresh OS install: None. Don't use the OWC foam tape for the display; it started separating and almost caused my display to fall off. Instead buy the correct set from Amazon; it's the same one Apple uses (even the internal part number is the same) Amazon link here.
As an Amazon Associate, MacRumors earns a commission from qualifying purchases made through links in this post.
Good work Lolkthxbai, and thanks for the tip regarding Screen tape.
The two iMac 19.1 in our house still sellotaped on after the upgrades eighteen months ago. I am being over cautious in case I find a problem.
The two iMac 19.1 in our house still sellotaped on after the upgrades eighteen months ago. I am being over cautious in case I find a problem.
Hello, All Thank you for help
I have succseful upgrad of Imac 27 late2015
Device: Late 2015 - 17.1 - MK462LL/A (3.2Ghz i5-6500, HDD only)
Blade upgrade: none -> 500GB WD BLACK SN750 NVMe SSD
HDD upgrade: stock apple hdd 1TB SATA HDD
CPU upgrade: i5-6500 -> i7-6700K 4.00 GHz Unlocked Quad Core Skylake
Speed test: 2900 MB/s read, 2600 MB/s write
OS: Monterey 12.7.6
Adapter: noname most cheap allii
Temperature sensor: stock
Issues after fresh OS install: I make fresh instal of OSX on external SSD before upgrade all work fine. On windows machine PC I make a clone of external SSD to M.2 Sn7500 nvme drive. Before install M.2 ssd inside of iMac, I put in M.2 SSD in M.2 to USB adapter and boot from external with no problem. After upgrade all work fine, hibernate and sleep no issue all is perfect.
Regards
First post, as I investigate a replacement for my failed Apple 2TB SSD in my 2019 27" iMac 19,1 bought July 2020:
I'm an economic analyst, and build large Excel models, which needs some grunt for recalculation, but I don't do Video or gaming.
The iMac screen broke some time ago (face planted on my desk while I was moving some cables), but has been working fine with a large crack (3" long) and impact crater (3/8" circle) on the left of the display, but I've ordered a new display as I think it unlikely to survive its removal for the SSD replacement.
I'm just looking through the thread for the moment, and will come back with my strategy, but I'm looking for the best NVME options. I've ordered a screen install kit (tape and tools) from iFixit and a NVME converter from PCIE to Blade, and plan to buy the NVME SSD off the shelf by the time those arrive next week.
However, first, I have a question...
lokkthxbai
If I put that model number into Google I get: https://www.crucial.com/ssd/p3-plus/ct2000p3pssd8
If I look at the drive statistics database, https://docs.google.com/spreadsheet...pJKHkOf-Oi1DbuuQva2gT4/edit?pli=1&gid=0#gid=0 there are no Corsair models with a two character letter/numeric model code, but Crucial does have these. So, am I right and this is not a Corsair but a Crucial, or did you enter the wrong model number and model name, but got the manufacturer correct?
| 27-inch iMac with Retina 5K display |
With the following configuration:
|
I'm an economic analyst, and build large Excel models, which needs some grunt for recalculation, but I don't do Video or gaming.
The iMac screen broke some time ago (face planted on my desk while I was moving some cables), but has been working fine with a large crack (3" long) and impact crater (3/8" circle) on the left of the display, but I've ordered a new display as I think it unlikely to survive its removal for the SSD replacement.
I'm just looking through the thread for the moment, and will come back with my strategy, but I'm looking for the best NVME options. I've ordered a screen install kit (tape and tools) from iFixit and a NVME converter from PCIE to Blade, and plan to buy the NVME SSD off the shelf by the time those arrive next week.
However, first, I have a question...
- HDD + Blade Upgrade
Device: Retina 5K, 27", 2019 iMac- 19,1 - MRQY2LL/A (3.0Ghz i5-8500, 1TB Fusion Drive)
Blade upgrade: 32GB SSD -> 2TB Corsair P3 Plus PCIe 4.0 NVMe M.2 SSD (CT2000P3PSSD8)
...
lokkthxbai
If I put that model number into Google I get: https://www.crucial.com/ssd/p3-plus/ct2000p3pssd8
If I look at the drive statistics database, https://docs.google.com/spreadsheet...pJKHkOf-Oi1DbuuQva2gT4/edit?pli=1&gid=0#gid=0 there are no Corsair models with a two character letter/numeric model code, but Crucial does have these. So, am I right and this is not a Corsair but a Crucial, or did you enter the wrong model number and model name, but got the manufacturer correct?
Last edited:
First post, as I investigate a replacement for my failed Apple 2TB SSD in my 2019 27" iMac 19,1 bought July 2020:
27-inch iMac with Retina 5K display
I'm an economic analyst, and build large Excel models, which needs some grunt for recalculation, but I don't do Video or gaming.
The iMac screen broke some time ago (face planted on my desk while I was moving some cables), but has been working fine with a large crack (3" long) and impact crater (3/8" circle) on the left of the display, but I've ordered a new display as I think it unlikely to survive its removal for the SSD replacement.
I'm just looking through the thread for the moment, and will come back with my strategy, but I'm looking for the best NVME options. I've ordered a screen install kit (tape and tools) from iFixit and a NVME converter from PCIE to Blade, and plan to buy the NVME SSD off the shelf by the time those arrive next week.
However, first, I have a question...
lokkthxbai
If I put that model number into Google I get: https://www.crucial.com/ssd/p3-plus/ct2000p3pssd8
If I look at the drive statistics database, https://docs.google.com/spreadsheet...pJKHkOf-Oi1DbuuQva2gT4/edit?pli=1&gid=0#gid=0 there are no Corsair models with a two character letter/numeric model code, but Crucial does have these. So, am I right and this is not a Corsair but a Crucial, or did you enter the wrong model number and model name, but got the manufacturer correct?
Hi lolkthxbai, Regarding the speeds of your recent upgrade, would you mind sending screen shots of your internal P3 Corsair speeds and your SATA speeds.HDD + Blade Upgrade
Device: Retina 5K, 27", 2019 iMac- 19,1 - MRQY2LL/A (3.0Ghz i5-8500, 1TB Fusion Drive)
Blade upgrade: 32GB SSD -> 2TB Corsair P3 Plus PCIe 4.0 NVMe M.2 SSD (CT2000P3PSSD8)
Adapter: Sintech NGFF M.2 NVMe SSD Adapter Card
HDD upgrade: 1 TB SATA HDD -> 2TB SSD OWC Mercury Electra 6G SATA HDD
Speed test: ~1850 MB/s Read, ~2400 MB/s Write
OS: macOS Sequoia 15.3.1
Location: US
Temperature sensor: None
Issues after fresh OS install: None. Don't use the OWC foam tape for the display; it started separating and almost caused my display to fall off. Instead buy the correct set from Amazon; it's the same one Apple uses (even the internal part number is the same) Amazon link here.
I am assuming the cited Read 1850MB/ps and write 2400/MBps are backwards and apply to P3 Corsair.
As an Amazon Associate, MacRumors earns a commission from qualifying purchases made through links in this post.
Hi Ruadh,
Interesting story. I am assuming your 2TB Apple is your internal boot drive and was fitted at time of purchase. That an Apple SSD of that size is burnt out after six year suggests either you work your computer hard or that you have simply been unlucky.
Life of an ssd is in large part determined by the number of refresh each ‘page’ of cells in the Flash. Bigger SSD’s are desirable to reduce the work (refresh frequency) on each individual page/blocks and is generally referred to as ‘endurance’. Higher refresh rates (particularly with QLC (at 4 bits per cell) eventually burn out the SSD faster than TLC (three bits per cell). Welcome to the world of IT detail.
Before starting, read this article https://www.tonymacx86.com/threads/choosing-a-compatible-nvme-ssd-for-your-macos-boot-drive.323479/ and https://www.purestorage.com/knowledge/qlc-vs-tlc.html
The maximum SSD speed you can achieve with your 2019 iMac is limited to PCIe 3.0 which will give you around 3000MB/ps with a WD Black SSD. I have been getting these speeds for eighteen months now. Even though the WD Black 770 is PCIe 4.0, the PCIe slot on the motherboard determines maximum speed at PCIe 3.0. PCIe 3.0 SSD are nearly the same price as PCIe 4.0 SSD’s which suggests it is better insurance to buy a PCIe 4.0., perhaps to run as an external to a newer iMac at a future date.
If you have not already done so, go to rsx0:
https://forums.macrumors.com/thread...d-nvme-ssd-upgrade-pitfalls-and-tips.2177812/ and familiarise yourself with the process. See the Ifixit or OWC video’s but be aware there are traps which the video’s do not reveal.
For example:
1. My studio has a carpeted floor which means it is very difficult to earth myself to eliminate static electricity. Earth to the iMac aluminium is the best I can do. In the past I have blown an iMac power unit without touching it; due to static electricity jumping from my arm. Now I always wear surgical gloves. They insulate, keep perspiration off sensitive parts and ensure better grip for safer working practice.
2. The 2019 iMac powerboard sits snugly adjacent to the Motherboard and the powerboard must be removed before you can remove the Motherboard. This is a delicate task. After unscrewing the powerboard you must release a tight socket and clip carrying several short cables linking the two units. To move the power board away from the motherboard you are fighting the pressure of connecting cables which unite the two boards. With experience I have learned to straighten the cables carefully thus enabling me to place the powerboard upright against the computer ‘chin’. Of course all the condenser and soldering is exposed hence need to exercise great care.
To release the socket, press the middle of the short bar hard towards the body of the socket. This should raise the barb upwards - if it is not too tight. While applying this pressure, grip the two halves of the socket one in each hand, and work them apart. Not easy. I used the edge of a nail file first to lift the barb, then to lever the two halves slightly apart. Once they move a little, the separation becomes easier. With experience it becomes easier to lift the entire power unit up and rest it. The socket is then revealed and you can see what you are doing.
All the while you are doing this the power unit and your hand bump against each other. Now you see the value of surgical gloves for insulation. Nowhere have I read anyone offering a caution regarding this aspect of disassembly and the video’s do not show actual the socket separation process. That the technicians use bare hands leaves me amazed at their cavalier approach.
If you feel competent to handle the above you should find the procedure straight forward. First time around, I had the OWC video on the monitor of a second computer while I worked on the first. I prefer to work with the iMac on its back rather than standing. Take care to lift the screen a couple of inches only as you must carefully unplug the screen connector cable from the motherboard and similarly a cable connecting the monitor inverter, before you can remove the screen.
I have an 2019 iMac i5 3.7GHz 6core with same graphics card as your i9. I inserted a WD Black sn770 PCIe 4.0 with the results below.
May the ‘Force’ be with you.
Attachments

Last edited:
Yes, an Apple factory install.I am assuming your 2TB Apple is your internal boot drive and was fitted at time of purchase.
I don't use the SSD's hard. The main load on my machine is processing power and RAM, with large spreadsheet models, as I mentioned above. Unlike some analysts, I don't process massive data sets, and certainly not video.That an Apple SSD of that size is burnt out after six year suggests either you work your computer hard or that you have simply been unlucky.
So, I was just unlucky.
PCIe 3.0 SSD are nearly the same price as PCIe 4.0 SSD’s which suggests it is future insurance to buy a PCIe 4.0. to run as an external to a newer iMac.
I've looked around, and PCIE 3 are hard to find anyway, so I agree with this strategy.
Thanks, I've actually got some more time to educate myself, as I miscalculated the delivery time of my blade-NVME converter, which doesn't arrive to the beginning of next month. So, I'll continue to work through this.If you have not already done so, go to rsx0:
So, my repair desk is wood on wooden floor, removing the plastic floor protector while I'm working. I've used an anti-static wrist strap in previous Mac repairs. I have latex and vinyl gloves, the latter are closer to what you mean?Earth to the iMac aluminium is the best I can do.
If you feel competent to handle the above you should find the procedure straight forward.
I've done a number of OWC and other upgrades to a previous MacBooks, MacBook Air and iMac. I've only blown up a motherboard once (think I short circuited two connectors with a casually swiped screwdriver. A red spot glowed and then all was dead!)
Given the effort in getting this done, I've thought I should also do the following:
- Install a 1TB OWC 6G 2.5" SSD that I've pulled out of my dead MacBook. I've ordered the appropriate SATA cable. I know I could do this externally, but I already have an External drive and my hub slots are full.
- Replace the thermal paste on the chips. Risky in terms of bending pins, but I won't get another chance, and this is heading for six years old.
- General dust clean in fan and chassis.
Last edited:
Good thinking Ruadh,
A few points:
1. Work for an SSD is entirely different to work for a CPU. The NVMe flash cell life-span is determined the cycle of write erase re-write in bytes per cell/per page/per block. A high volume reduces lifespan while a lesser volume extends the life-span. That is why large capacity SSD’s are recommended. The NVMe Flash controller includes a wear levelling formulae which distributes storage bytes throughout the whole drive very efficiently. According to number of write/erase cycles, a lifetime may be the difference between seven to ten years. It is important to track SSD health. https://www.extremetech.com/gaming/210492-extremetech-explains-how-do-ssds-work
I use a free version of Disk Drill to quickly establish Smart status. For more depth you can install Homebrew and use Terminal to track Smart health. Or you can subscribe to DriveX which offers a host of criteria for measuring SSD health. Self maintenance also means when problems occur a tool such as EntreCheck is valuable in identifying causes of low performance or worse. These tools are valuable.
2. If you intend using a WD Black NVMe, which is recommended as compatible with Apple, do not buy a Sintech converter, it is not compatible with WD Black. Buy cheap short converter as below. The long, 2280 Sintech converter will work but I like the fact air cooling is available to both sides of the SSD with the small converter. After six months, when I got kernal panics, a moderator pointed out to me the Sintec could be the cause and referred me the WD Black site. The SSD/converter/PCIe slot are all a tight fit so the unit becomes quite rigid. Do ensure your components are pushed fully together, particularly PCIe slot to converter.
3. I originally used a wrist strap but found the cable a nuisance catching on things. More freedom with surgical gloves.
4. For SATA ssd I used the Sabrent SATA mount. No additional cables needed as the existing iMac SATA socket goes straight onto the mount. Should you want a second SATA drive another socket is available beneath the motherboard. Of course, you will need a tray for carrying two SATA SSD’s.
No heat sensor needed either. Like many other upgraders, I installed Macs Fan control, a free application that entirely manages and regulates cooling once your upgrade is finished.
5. With your experience you will not bend CPU pins. It is about being careful and methodical. Judging the amount of thermal paste is always a bit tricky. I have yet to find a ‘Goldilocks’ formula. If anyone knows one please tell me.
Enjoy your research,
Cheers.
PS. I believe surgical gloves are made of latex. Highly recommended.
Attachments

Last edited:
First post, as I investigate a replacement for my failed Apple 2TB SSD in my 2019 27" iMac 19,1 bought July 2020:
27-inch iMac with Retina 5K display
I'm an economic analyst, and build large Excel models, which needs some grunt for recalculation, but I don't do Video or gaming.
The iMac screen broke some time ago (face planted on my desk while I was moving some cables), but has been working fine with a large crack (3" long) and impact crater (3/8" circle) on the left of the display, but I've ordered a new display as I think it unlikely to survive its removal for the SSD replacement.
I'm just looking through the thread for the moment, and will come back with my strategy, but I'm looking for the best NVME options. I've ordered a screen install kit (tape and tools) from iFixit and a NVME converter from PCIE to Blade, and plan to buy the NVME SSD off the shelf by the time those arrive next week.
However, first, I have a question...
lokkthxbai
If I put that model number into Google I get: https://www.crucial.com/ssd/p3-plus/ct2000p3pssd8
If I look at the drive statistics database, https://docs.google.com/spreadsheet...pJKHkOf-Oi1DbuuQva2gT4/edit?pli=1&gid=0#gid=0 there are no Corsair models with a two character letter/numeric model code, but Crucial does have these. So, am I right and this is not a Corsair but a Crucial, or did you enter the wrong model number and model name, but got the manufacturer correct?
My apologies! It is in fact a Crucial SSD Blade, not Corsair. And yes, the test results are for the SSD Blade, not the SATA Drive. I'll update my post shortly!Hi lolkthxbai, Regarding the speeds of your recent upgrade, would you mind sending screen shots of your internal P3 Corsair speeds and your SATA speeds.
I am assuming the cited Read 1850MB/ps and write 2400/MBps are backwards and apply to P3 Corsair.
Hello,
I have succsefully upgrade my Imac 27 late 2011
Device: Mid 2011 - 12.2 - 2.7Ghz i5-2500S, HDD only
Blade upgrade: none -> replace wifi card with 1To crucial P3+ NVMe SSD
HDD upgrade: disconnected
CPU upgrade: i5-2500S 2.7 Ghz-> i7-2700K 3.5 GHz
GPU upgrade: radeon HD6770 512Mo -> radeon pro WX4150 4Go
Speed test: not tested
OS: Monterey 12.7.6 with opencore
Adapter: aliexpress mini pcie to M2 M key
Temperature sensor: mac fan control
Issues after fresh OS install: I make fresh instal of OSX with opencore. No sleep issue all is perfect.
Last edited:
Hello,
I have succsefully upgrade my Imac 27 late 2011
Device: Late 2011 - 12.2 - 2.7Ghz i5-2500S, HDD only
Blade upgrade: none -> replace wifi card with 1To crucial P3+ NVMe SSD
HDD upgrade: disconnected
CPU upgrade: i5-2500S 2.7 Ghz-> i7-2700K 3.5 GHz
GPU upgrade: radeon HD6770 512Mo -> radeon pro WX4150 4Go
Speed test: not tested
OS: Monterey 12.7.6 with opencore
Adapter: aliexpress mini pcie to M2 M key
Temperature sensor: mac fan control
Issues after fresh OS install: I make fresh instal of OSX with opencore. No sleep issue all is perfect.
Interesting upgrade, well done!
Congratulations on your upgrade.Hello,
I have succsefully upgrade my Imac 27 late 2011
Device: Mid 2011 - 12.2 - 2.7Ghz i5-2500S, HDD only
Blade upgrade: none -> replace wifi card with 1To crucial P3+ NVMe SSD
HDD upgrade: disconnected
CPU upgrade: i5-2500S 2.7 Ghz-> i7-2700K 3.5 GHz
GPU upgrade: radeon HD6770 512Mo -> radeon pro WX4150 4Go
Speed test: not tested
OS: Monterey 12.7.6 with opencore
Adapter: aliexpress mini pcie to M2 M key
Temperature sensor: mac fan control
Issues after fresh OS install: I make fresh instal of OSX with opencore. No sleep issue all is perfect.
I am particularly interested as I have been in two minds about reviving my 3.5Ghz i7 2700 iMac 12.2.
Given there is no PCIe bus in this model, I would appreciate you explaining which card/connection did you use to connect the Crucial NVMe to logic board. A product link about the card would be helpful.
I am also pleased you found a better GPU with the WX4150.
Well done.
imac 2011 has a mini pcie slot for wifi cardCongratulations on your upgrade.
I am particularly interested as I have been in two minds about reviving my 3.5Ghz i7 2700 iMac 12.2.
Given there is no PCIe bus in this model, I would appreciate you explaining which card/connection did you use to connect the Crucial NVMe to logic board. A product link about the card would be helpful.
I am also pleased you found a better GPU with the WX4150.
Well done.
I have removed wifi card to install this adaptor
Last edited:
imac 2011 has a mini pcie slot for wifi card
I have removed wifi card to install this adaptor
Very interesting! Do you have a photo of your installation? Thanks!
Tell me Tucdual,Very interesting! Do you have a photo of your installation? Thanks!
Since we loose WiFi and Bluetooth I assume you USB cable to connect keyboard and mouse?
As you have installed a Crucial P3, I assume this iMac 12.2 supports PCIe 3.0. Is that correct?
While I can see the 2280 NVMe is safely screwed to the PCIe adapter card, is there support for the adapter card/NVMe other than just the PCIe socket? Is the adapter card resting on the SATA SSD or supported in some other way?
Thinking about that, When the iMac is closed and upright, I appreciate gravity directs the weight of the NVMe/adapter card vertically down through the PCIe socket fixed into the logic board. Therefore no significant lateral strain on socket.
But the old WiFi card was screwed in. The PCIe adapter card is not (?) I like your idea, but am inclined to rig up support for the adapter card somehow to assure no lateral strain to the PCIe socket when resting iMac on its back. Not a big issue if one is gentle. Just me being cautious.
Last edited:
only wifi is removed, bluetooth on a separate cardTell me Tucdual,
Since we loose WiFi and Bluetooth I assume you USB cable to connect keyboard and mouse?
As you have installed a Crucial P3, I assume this iMac 12.2 supports PCIe 3.0. Is that correct?
While I can see the 2280 NVMe is safely screwed to the PCIe adapter card, is there support for the adapter card/NVMe other than just the PCIe socket? Is the adapter card resting on the SATA SSD or supported in some other way?
Thinking about that, When the iMac is closed and upright, I appreciate gravity directs the weight of the NVMe/adapter card vertically down through the PCIe socket fixed into the logic board. Therefore no significant lateral strain on socket.
But the old WiFi card was screwed in. The PCIe adapter card is not (?) I like your idea, but am inclined to rig up support for the adapter card somehow to assure no lateral strain to the PCIe socket when resting iMac on its back. Not a big issue if one is gentle. Just me being cautious.
sadly imac 12.2 is only PCIe 2.0
The adapter card is secured with the same screw as the original wifi card.
So, I had already bought the Sintech. I wasn't aware of the issue when I ordered. Having read the links you provided and other material I've now bought the:If you intend using a WD Black NVMe, which is recommended as compatible with Apple, do not buy a Sintech converter, it is not compatible with WD Black.
Western Digital WD Blue SN580 2TB PCIe Gen 4.0 NVMe M.2 2280 SSD
For about AUD190 (USD119) it seemed the best value that I could get here in Oz. I had looked for the SN570, as per the recommendation for PCIE 3 motherboards, but the only one I could get was a AUD50 reconditioned one, and took the alternative advice to go up to PCIE 4 anyway.
I've also got the Glo Trends Heat Sink.
I have bought this cable to connect my 1TB OWC 6G SATA SSD. I only have that one spare OWC SSD, so no need for a second SATA socket or dual tray. I'm not exactly sure what I'll see in terms of screws and mounting for SATA SSDs when I open up the 19,1 27" iMac, so I've left mounting to work out then. I notice that some of the OWC installs for pre-2019 SSDs use thermal pads to mount the SSD to the iMac case.For SATA ssd I used the Sabrent SATA mount. No additional cables needed as the existing iMac SATA socket goes straight onto the mount. Should you want a second SATA drive another socket is available beneath the motherboard. Of course, you will need a tray for carrying two SATA SSD’s.
Anyway, I'm ready to go, but for the alternative converter, but thoughts welcome.
Last edited:
Good budget SSD choice. You said your OWC was a 2.5" SSD drive. You will be removing a 4" x 5.5" HDD so you need the adapter frame I earlier recommended. It comes with screws and is easy to fit.So, I had already bought the Sintech. I wasn't aware of the issue when I ordered. Having read the links you provided and other material I've now bought the:
Western Digital WD Blue SN580 2TB PCIe Gen 4.0 NVMe M.2 2280 SSD
For about AUD190 (USD119) it seemed the best value that I could get here in Oz. I had looked for the SN570, as per the recommendation for PCIE 3 motherboards, but the only one I could get was a AUD50 reconditioned one, and took the alternative advice to go up to PCIE 4 anyway.
I've also got the Glo Trends Heat Sink.
I have bought this cable to connect my 1TB OWC 6G SATA SSD. I only have that one spare OWC SSD, so no need for a second SATA socket or dual tray. I'm not exactly sure what I'll see in terms of screws and mounting for SATA SSDs when I open up the 19,1 27" iMac, so I've left mounting to work out then. I notice that some of the OWC installs for pre-2019 SSDs use thermal pads to mount the SSD to the iMac case.
Anyway, I'm ready to go, but for the alternative converter, but thoughts welcome.
On lifting/opening screen - care with the cables; long tweezers - and possibly a torch, are useful to see the fitting clearly. Work upright to remove glass.
Placing safety first as a first time around experience, Keep computer upright, tape the screen to the iMac chin temporarily, while opening it to remove cable. Objective being to prevent upright screen slipping off the chin and falling. After removing glass, I prefer to place computer on its back, place support under open screen to remove cables then lift/remove screen. You will figure out what suits you.
May ‘The Force’ be with you.
Last edited:
Well, no, though I've not seen inside yet to know what adapter frame or other hardware might be in place, I do know that I won't be removing an existing HDD. I bought the SSD only setup:You said your OWC was a 2.5" SSD drive. You will be removing a 4" x 5.5" HDD so you need the adapter frame I earlier recommended. It comes with screws and is easy to fit.
iMac (Retina 5K, 27-inch, 2019) Technical Specifications
- 3.7GHz
- 2TB Fusion Drive
- Configurable to 3TB Fusion Drive or 512GB, 1TB, or 2TB SSD
At great expense, and then my SSD failed after five years of use!
So, I'm presuming that the SSD is the Apple NVME blade and that there's a space where my SATA SSD would have been, with some T8 screw posts and that's it. But we'll see...
Another question if I may? I have only ever replaced the PRAM battery in one of my Macs, a MacBook Pro, even though I've kept them for over 10 years. In fact, the computer that I'm typing this "on" (the screen anyway - screen sharing with my M1 MacBook Air) is 16 years old, a 2009 iMac and the clock still holds its time. However, I notice that some people recommend changing the battery after five years if you're opening up your computer anyway, given how difficult it is to do. With my SSD dying so young, I've suddenly become a bit gun shy of things having shorter than expected lives...
Do you recommend this? What is the PRAM battery spec for a 19,1 iMac? I can't find it on any of the spec pages, or in the iFixit guide.
Last edited:
You will probably find it is the BR2032. You can replace it with CR2032 if you can't source BR2032.people recommend changing the battery after five years if you're opening up your computer anyway
Supposedly BR2032 is a "long-life" version.
Word of caution. I would suggest NOT to remove heatsink (to redo thermal paste). It is a bad design and it is clumsy to reinstall heatsink, risking damage to CPU.
Hi Ruadh,
Regarding battery, yes. Cheap to buy, easy to do.
Regarding internal SSD/HDD I am still confused. If you have one 2TB SSD that died, I expect it to be a 2TB NVMe boot drive. Unless you ordered a 2TB SATA SSD. Since ‘Fusion’ is in your drive description I suspect you have a standard HDD in there.
Fusion is a hybrid of two drives whose icons are visible on your desktop. One which you name, and the other by default is named ‘Mackintosh HD’. That would be the HDD. If only one drive icon is on the desktop, that would be your solo 2TB SSD. Can you remember the number of desktop drive icons?
If no HDD, damned if I understand why the misleading description ‘Fusion’ is specified.
It seems the only sure way is to open the iMac, look inside and then order what you need.
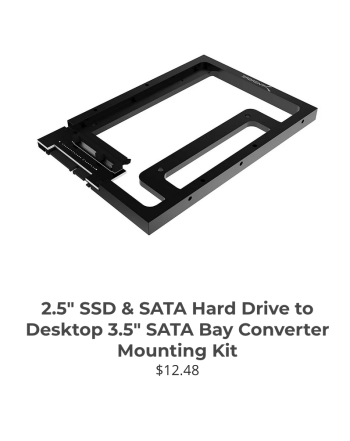
Internal HDD or not, you will need the Sabrent adapter or similar to fit the 1TB 2.5" OWC SATA SSD to existing HDD lugs moulded into iMac case to carry HDD.
Cheers.
PS. Regarding mwidjaya CPU comment. I am inclined to agree. If it ’aint broke, don’t fix it.
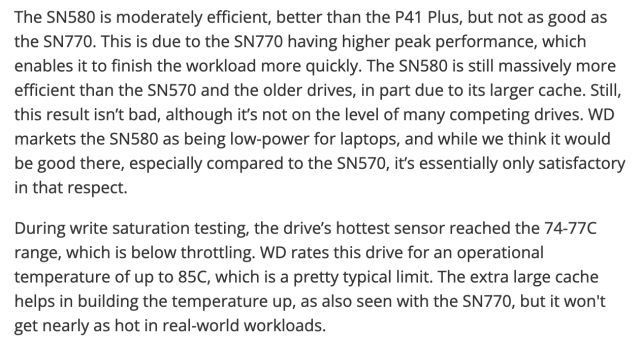
PPS. For your information: https://www.tomshardware.com/reviews/wd-blue-sn580-ssd
Excerpt:
Regarding battery, yes. Cheap to buy, easy to do.
Regarding internal SSD/HDD I am still confused. If you have one 2TB SSD that died, I expect it to be a 2TB NVMe boot drive. Unless you ordered a 2TB SATA SSD. Since ‘Fusion’ is in your drive description I suspect you have a standard HDD in there.
Fusion is a hybrid of two drives whose icons are visible on your desktop. One which you name, and the other by default is named ‘Mackintosh HD’. That would be the HDD. If only one drive icon is on the desktop, that would be your solo 2TB SSD. Can you remember the number of desktop drive icons?
If no HDD, damned if I understand why the misleading description ‘Fusion’ is specified.
It seems the only sure way is to open the iMac, look inside and then order what you need.
Internal HDD or not, you will need the Sabrent adapter or similar to fit the 1TB 2.5" OWC SATA SSD to existing HDD lugs moulded into iMac case to carry HDD.
Cheers.
PS. Regarding mwidjaya CPU comment. I am inclined to agree. If it ’aint broke, don’t fix it.
PPS. For your information: https://www.tomshardware.com/reviews/wd-blue-sn580-ssd
Excerpt:
Attachments
Last edited:
Register on MacRumors! This sidebar will go away, and you'll see fewer ads.