Become a MacRumors Supporter for $50/year with no ads, ability to filter front page stories, and private forums.
Status
The first post of this thread is a WikiPost and can be edited by anyone with the appropiate permissions. Your edits will be public.
Attach the drive as explained in the article. Attach Windows.iso image downloaded from Microsoft.

I've tried following your instructions, so apologies for whichever silly mistake I've made(!), but having attached the drive, and then the .ISO (I *think*, not sure if the Virtual Media Manager is correct?) when I try to start the VM I just get a "Failed to open a session for the virtual machine Win10." error, plus some 'NOT_SUPPORTED' and 'ACCESS_DENIED' type errors.

Any clue as to what I'm doing wrong here? I followed the VirtualBox Hard Drive guide (I think!) and the hard drive is formatted to NTFS with GUID partition map.
Start Virtualbox with:
Sudo virtualbox, but before that make sure all partitions on the drive are unmounted in disk utility.
 
Start Virtualbox with:
Sudo virtualbox, but before that make sure all partitions on the drive are unmounted in disk utility.
Yes, did both those things.
 

Attachments

  • Screenshot 2020-06-11 at 05.14.59.png
    Screenshot 2020-06-11 at 05.14.59.png
    21.8 KB · Views: 118
Does this make any difference for gaming or is it strictly for video encoding/decoding?
Video decoding and decoding are done by ASICs, VCE for the encoding and UVD for the decoding, and not by the GPU CUs.

Gaming or 3D are not improved by enabling AMD hardware acceleration, nothing else uses the ASICs besides the encoding and decoding of video.
 
  • Like
Reactions: h9826790
Yes, did both those things.
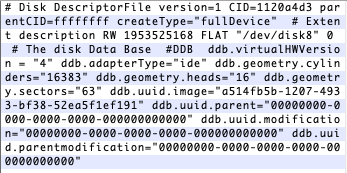
If you rebooted the operating system after you created the VM there is a very high chance the physical disk has been assigned a different disk number. Open the virtual machine file with Hexfiend and verify/change to the correct disk number as displayed in disk utility. Use sudo to open virtual box:
1591876193244.png
 
If you rebooted the operating system after you created the VM there is a very high chance the physical disk has been assigned a different disk number.

The disk as reported by diskutil is disk8. Looking at Hexfiend, the disk number appears to be correct.
 

Attachments

  • Screenshot 2020-06-11 at 13.05.49.png
    Screenshot 2020-06-11 at 13.05.49.png
    31.9 KB · Views: 104
The disk as reported by diskutil is disk8. Looking at Hexfiend, the disk number appears to be correct.
What are the errors? Can you make a screenshot? Also keep the disk utility open and make sure the drive does not automount.
 
Ok let me document all the steps and their order, as I understand them, and let me know if you see where I'm going wrong?

1. Format target drive as NTFS. As it stands it's an external FireWire drive. Does that make a difference? Does it need to be USB or internal SATA to work?

2. Disk identifier is /disk8 partition identifier is /disk8s2
Screenshot 2020-06-11 at 13.20.55.png

3. Launch VirtualBox GUI, click 'New' and create a VM with 'Do not add a virtual hard disk' option
Screenshot 2020-06-11 at 13.24.48.png

4. Unmount target disk

5. In Terminal enter sudo VBoxManage internalcommands createrawvmdk -filename ~/RawWinDisk.vmdk -rawdisk /dev/disk8

6. Terminal reports file created successfully

7. Unmount target disk again

8. Check .vmdk file with Hexfiend and verify it references the correct disk identifier /disk8

9. In VirtualBox GUI select VM, click 'Settings', click 'System', check 'Enable EFI'

10. Click 'Storage', next to 'Controller: SATA' click 'Add hard disk', click 'Add', select 'RawWinDisk.vmdk'

Now, for some reason, while this step worked last night, and attached the VM, I'm now getting this:
Screenshot 2020-06-11 at 13.40.28.png

Any ideas? I really appreciate the time you've taken to help me so far!
 
Did you start virtualbox with sudo sudo VirtualBox? Make sure you have read/write access to the file. Add your user name with read/write access. I just opened NVME (external drive) in virtual box. Also keep watching the drive in disk utility if it auto mounts.
 
Did you start virtualbox with sudo sudo VirtualBox?
You mean right from the start? As in, right back at the start of the Serverwatch article where it's telling you how to use the VirtualBox GUI to create the VM in the first place?
 
You mean right from the start? As in, right back at the start of the Serverwatch article where it's telling you how to use the VirtualBox GUI to create the VM in the first place?
no from Terminal. It always needs to be started from terminal with sudo.
 
So this may have been answered somewhere but I cant seem to find a definitive, when running the listed solution for hardware encoding/decoding using open core, can SIP be re-enabled on the system and if so, can NVRAM still be reset using the keyboard commands? Thanks in advance.
 
no from Terminal.
Yeah, I get that. Your original instructions say to follow the Serverwatch guide, which just says to use the VirtualBox GUI, no mention of any special way to launch. You don't mention using sudo VirtualBox in your instructions until the VM has already been created:
Next, start virtualbox with sudo

So I think that may be where it went wrong. So, for complete clarity, VirtualBox should *always* be launched from the Terminal with sudo VirtualBox ?
[automerge]1591883720[/automerge]
no from Terminal

Progress!!

Ok, all went well that time - starting VB using sudo right from the very first step was key, so I don't know if it's worth amending your original instructions to make that more clear for others?

So… now the VM started up and I'm in the EFI shell. Should it not have tried booting from the attached .iso ?
 
Last edited:
So… now the VM started up and I'm in the EFI shell. Should it not have tried booting from the attached .iso ?
I updated the instructions. Make sure the DVD is before HDD in the boot order. There should be a message for a few seconds before booting to UEFI shell:
"press any key to boot from CD or DVD........?
1591885640086.png
 
Last edited:
  • Like
Reactions: h9826790
That message is only few seconds. If you miss it exit shell, go to Boot Manager and select CD ROM:

No, I'm not getting the DOS shell, it's the EFI shell. I'm familiar with the DOS "Hit any key to boot…" but I'm not getting that. I just tried downloading the Win 10 ISO again (v2004 instead of v1909) and it does the same thing.
It's like the VM isn't seeing the disk image or even the optical drive.
As I said exit UEFI shell by typing "exit" and select the CD drive from the boot manager.
 
  • Like
Reactions: mave1969
Ahhhh… ha haaa… Sorry, I apologise. I misunderstood and didn't realise you meant just type 'exit'!

That worked, I got the boot manager as you described. Windows 10 installing now…

Thanks again for your patience and kind assistance. It's much appreciated!
 
  • Like
Reactions: h9826790
So this may have been answered somewhere but I cant seem to find a definitive, when running the listed solution for hardware encoding/decoding using open core, can SIP be re-enabled on the system and if so, can NVRAM still be reset using the keyboard commands? Thanks in advance.
I can confirm that you can re-enable SIP. Tried it on my setup (OC 5.9 Cat 15.5) and no problems so far.

I have not needed to do a NVRAM reset and leaving well alone as it is all working very well so far. However, see no reason why CMD+OPT+P+R should not work. There is a mention in the OC manual. Certainy CMD+R works for recovery.
 
Last edited:
Just looking to uninstall and try again at a later date, followed the 0.5.9 install. I removed from the APFS EFI partition the two folders but am unable to boot correctly. I'm guessing that I was supposed to backup the Apple folder in the EFI partition? Should I just reformat the drive from my recovery partition and and Time Machine restore? Thanks
 
Just looking to uninstall and try again at a later date, followed the 0.5.9 install. I removed from the APFS EFI partition the two folders but am unable to boot correctly. I'm guessing that I was supposed to backup the Apple folder in the EFI partition? Should I just reformat the drive from my recovery partition and and Time Machine restore? Thanks
If all you did was just remove the OC and BOOT folders, it should not affect your original installed macOS. OpenCore never really touch any system file.

As usual, please simply try NVRAM reset, or boot into recovery partition, etc to see if that help.
 
Register on MacRumors! This sidebar will go away, and you'll see fewer ads.