Become a MacRumors Supporter for $50/year with no ads, ability to filter front page stories, and private forums.

davidg5678

macrumors regular
Dec 5, 2020
128
108
Thanks David. That is amazing advice.

Can you by any chance post a link to the board you used? Did you get it from eBay or Ali express?

Is this the board we’re looking for? 🤖

The link you provided looks right to me. To clarify, you'll need to buy the $189 driver board, not just the $9 power supply. Be sure to select the correct model of LCD panel. I sent a picture of the label on the back of my LCD to the seller so that they could confirm I picked the right one.

I recommend that you buy your own higher-quality power supply separately, rather than getting the bundled one from Aliexpress. I bought a 24V 8A PSU, but since you won't need the T18 to charge a laptop over USB-C, a 24V 6A should be plenty.


Also, be sure to buy a DisplayPort 1.4 to USB-C cable so that 5K video works properly. If you use a USB-C to USB-C cable or an HDMI cable, these only seem to support 4K resolution with the T18.

 
  • Like
Reactions: michaelsft

3quid

macrumors newbie
Aug 5, 2023
12
8
The link you provided looks right to me. To clarify, you'll need to buy the $189 driver board, not just the $9 power supply. Be sure to select the correct model of LCD panel. I sent a picture of the label on the back of my LCD to the seller so that they could confirm I picked the right one.

I recommend that you buy your own higher-quality power supply separately, rather than getting the bundled one from Aliexpress. I bought a 24V 8A PSU, but since you won't need the T18 to charge a laptop over USB-C, a 24V 6A should be plenty.


Also, be sure to buy a DisplayPort 1.4 to USB-C cable so that 5K video works properly. If you use a USB-C to USB-C cable or an HDMI cable, these only seem to support 4K resolution with the T18.

Thanks again David.

I have ordered that board as well as a 24v 6A PSU and a 2m DP1.4 to USBC (up to 8k) cable.

Silkland USB C to DisplayPort 1.4 Cable [8K@60Hz, 5K@60Hz, 4K@144Hz/120Hz, 2K@240Hz] Thunderbolt 3/4 to DP 1.4 Cable 6ft/2m 32.4Gbps, Compatible for Mac Studio, 2021 MacBook Pro M1, XPS 15 https://amzn.eu/d/eYCm8vR

24V 6A Power Supply Adapter,100-240V AC to DC 24V 6A 144W Power Adapter Converter Charger 5.5mm x 2.1mm DC Output Jack 24V Volt AC Power Supply for 5050 3528 LED Strip Light LED Driver https://amzn.eu/d/9lDXWyO

Board won’t arrive for 2 weeks. I will report back here when it’s all done which will hopefully help out other prospective modders :)
 

michaelsft

macrumors newbie
Nov 25, 2019
21
8
I have ordered that board as well as a 24v 6A PSU and a 2m DP1.4 to USBC (up to 8k) cable.

Hi 3quid, I just did the same as you, deciding to take the plunge and see what happens! Looks like we're going on this journey together!
 

3quid

macrumors newbie
Aug 5, 2023
12
8
Hi 3quid, I just did the same as you, deciding to take the plunge and see what happens! Looks like we're going on this journey together!
Nice! Keep me posted.

I guess I best order the new mini too!

I am planning to go M2, 16 Ram, 512 SSD. Normally the middle of the range is best. Unless anyone reckons a different option is better?

Also need to get an external drive for storage … anyone got any recommendations for that?
 
Last edited:

michaelsft

macrumors newbie
Nov 25, 2019
21
8
Nice! Keep me posted.

I guess I best order the new mini too!

I am planning to go M2, 16 Ram, 512 SSD. Normally the middle of the range is best. Unless anyone reckons a different option is better?

Also need to get an external drive for storage … anyone got any recommendations for that?

I got the M2 Pro with 32GB Ram to future proof it a bit as it's my last computer for quite a while. I'm sure your option will be good but your best bet with Apple is always to get the most you can afford at any time as you can't upgrade anything later on.

For an external drive I use the following one for my time machine and it seems pretty good to me. I'm no expert but it's pretty cheap at the minute... https://www.amazon.co.uk/Crucial-CT...samsung+2tb+external+ssd,aps,165&sr=8-17&th=1
 

Croke

macrumors newbie
Sep 9, 2021
1
0
Nice! Keep me posted.

I guess I best order the new mini too!

I am planning to go M2, 16 Ram, 512 SSD. Normally the middle of the range is best. Unless anyone reckons a different option is better?

Also need to get an external drive for storage … anyone got any recommendations for that?
Don’t buy the 512 ssd. They’re speed crippled. Even if you plan on external storage, second-hand value will be a problem if you plan on moving it later. I’m looking at for used mini and I won’t touch any with entry level specs.
 

3quid

macrumors newbie
Aug 5, 2023
12
8
Don’t buy the 512 ssd. They’re speed crippled. Even if you plan on external storage, second-hand value will be a problem if you plan on moving it later. I’m looking at for used mini and I won’t touch any with entry level specs.
Oh! In what way are they speed crippled? and why?
 

MrMacJonas

macrumors newbie
Aug 10, 2023
2
0
I also got some generic backlight power cables with my R9A18 V1 board instead of one suited to my model of panel (LM270QQ1 SD A2.) After a lot of squinting at photos on AliExpress, I was able to put one together on my own that works great. I removed the matching connector from the iMac logic board so I could attach it to the panel's cable. I trimmed off the useless ends of the supplied power cables and soldered the wires in what I hoped were the right places on the salvaged connector. Seems like I got it right because the screen lights up and is nice and bright.

The R9A18 V1 board has two matching backlight power connectors. The LCD connector is divided into three pairs of wires for the right side and three pairs for the left. I assumed the board connectors were intended to be left and right sides, so each connector powers half of the LCD. The odd thing is that all of the cable photos showed only LED1 getting power on the left and right. The LED2 and LED3 pins were all connected to ground. Not what I would have expected, so I'm glad I spent some time looking at the pictures. (You can also see it in the post from PaulD-UK just above where there are two red wires and 10 black.)

It looks something like this (I can post pictures if it would be useful to someone. The screen is taped in place at the moment, but I'll have it opened up again now that the adhesive strips have arrived.):

R9A18 board LCD
JP11 (In the corner) Backlight Connector
Gnd-------------------> Pins 10, 11, 12
Gnd-------------------> Pins 8, 9
Pwr------\_________> Pin 7 (both power lines tied together)
Pwr------/

JP14 (To the right of JP11)
Gnd-------------------> Pins 4, 5, 6
Gnd-------------------> Pins 2, 3
Pwr------\_________> Pin 1 (both power lines tied together)
Pwr------/

Looking at the picture of the LCD backllight connector from PaulD-UK above, what I'm calling Pin 1 would obviously be the red wire on the right side and Pin 7 is the other red wire near the middle.

Some previous posts have talked about the backlight being too dim. I wonder if that's because many of the cables included with the R8A19/R1811 boards only attach to one of the two backlight power connectors, so they're only getting half of the needed current? I saw lots of posts about using an additional DZ-LP0818 constant current power board, but maybe rewiring the supplied cable to use both connectors would be a simpler solution?


I'd also like to get the R8A19 V1 firmware and installation tool from you. Mine came with V001, so it drops all the settings when I pull the power cord out. Very annoying. I'll PM you once I've posted enough to do that.
I did the wiring the same way, but my full Screen Image is oddly split down the Middle.
I guess it hase nothing to do with the wiring at all because it is only to Power up the Backlight.


I attached a Windows PC and a Macbook Pro 2018 over 1 HDMI or DP, on both i have the same problem. In the Settings i have not found a better Setting for Full Screen ( The Seetings Menu is also Splitted in half and in Chinese what does it make a bit complicate). Using one Display for 2 Screens works completly fine.


What am i doing wrong ?
If you need more Infos just let me know what.
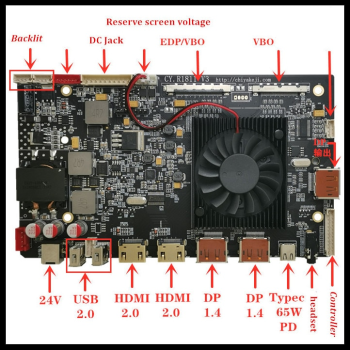
Board: bk - r1811 v4 ( Attached Image )
 

Attachments

  • MicrosoftTeams-image (2).jpg
    MicrosoftTeams-image (2).jpg
    249.7 KB · Views: 178
  • MicrosoftTeams-image (3).png
    MicrosoftTeams-image (3).png
    750.2 KB · Views: 180

PaulD-UK

macrumors 6502a
Oct 23, 2009
870
469
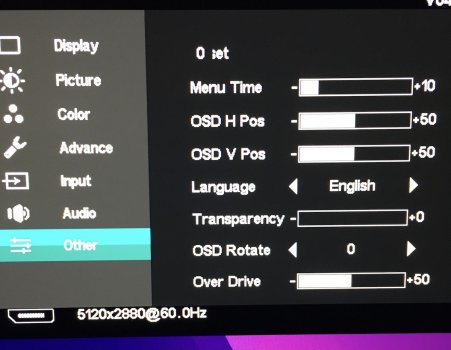
For the R1811 (v04 firmware) that I have, the Language setting toggle is:
Bottom position on the left pane - 3 horizontal lines icon
5th from top on the right pane - the Chinese pictogram is 语言 (Language). The choice is Chinese or English.

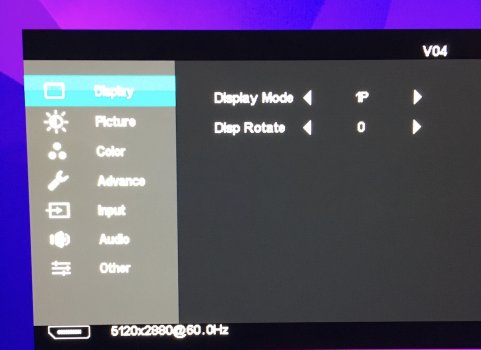
Maybe your Display (left pane - top) choice is set to something other than 1P?
 
Last edited:
  • Like
Reactions: Regulus67

3quid

macrumors newbie
Aug 5, 2023
12
8
Hi 3quid, I just did the same as you, deciding to take the plunge and see what happens! Looks like we're going on this journey together!

I have now bought and waiting for delivery of my M2 Pro, 10/16 with 16GB and 1TB

The power supply and cable are here. I await delivery of the AW18 board which has now been shipped from china.
 
  • Like
Reactions: michaelsft

MrMacJonas

macrumors newbie
Aug 10, 2023
2
0
For the R1811 (v04 firmware) that I have, the Language setting toggle is:
Bottom position on the left pane - 3 horizontal lines icon
5th from top on the right pane - the Chinese pictogram is 语言 (Language). The choice is Chinese or English.

Maybe your Display (left pane - top) choice is set to something other than 1P?
Thank you for the Language setting, the Display is set to 1P. Even the Settings Menu is splitted in half on.
 

wolfcry911

macrumors newbie
Mar 2, 2023
7
0
MA
I'm up and running but want to get the stock speakers to work, even if not optimal. Hoping someone can help with the wiring. I believe the two speakers (on each side) should be run in series, but how to tell which wire is which?
 

Regulus67

macrumors 6502a
Aug 9, 2023
521
494
Värmland, Sweden
Thanks to everybody giving advice in this thread.
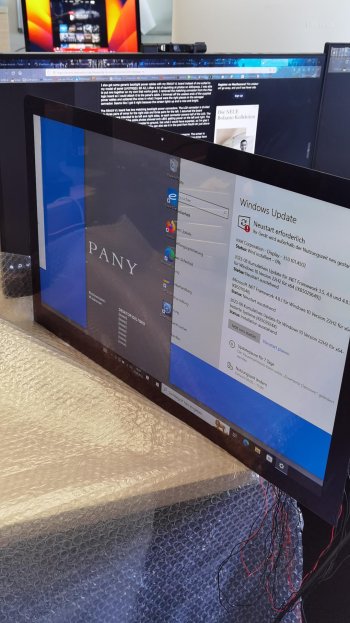
I am in the process of trying to revive an old 27" iMac Late 2015 that died a few months ago.
The R1811 v4 board was my choice.
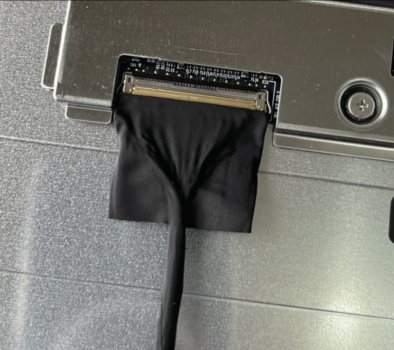
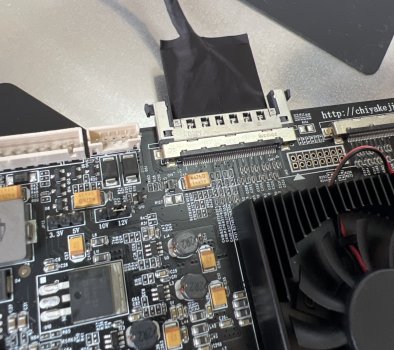
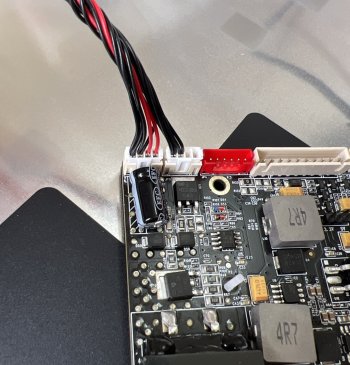
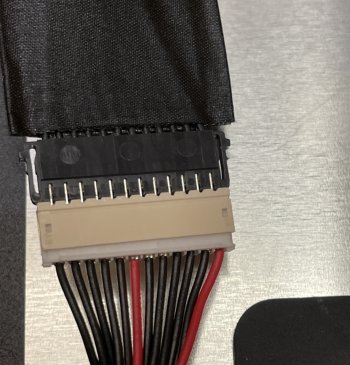
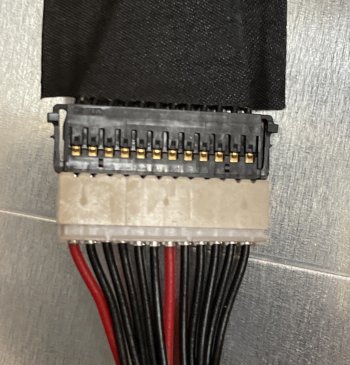
StoneTaskin has provided me with a very high resolution Cable instruction manual.
I bought the board from AliExpress.

Here are some close up photos from the instruction manual.

edit: They have been amazing providing me with information. And keeping me updated on shipping, and just generally very helpful
 

Attachments

  • DP cable in.jpg
    DP cable in.jpg
    439 KB · Views: 176
  • DP cable out.jpg
    DP cable out.jpg
    633.8 KB · Views: 175
  • backlight board.jpg
    backlight board.jpg
    534.7 KB · Views: 180
  • backlight circles.jpg
    backlight circles.jpg
    492.8 KB · Views: 207
  • backlight connect.jpg
    backlight connect.jpg
    507 KB · Views: 163
Last edited:
  • Like
Reactions: PaulD-UK

kstereo

macrumors newbie
Aug 18, 2023
6
0
Does anyone have instructions on how to save color settings on the R1811? Each time I power off the display, the color format reverts to YUV from RGB. I have the input set to use DP1.
 

Regulus67

macrumors 6502a
Aug 9, 2023
521
494
Värmland, Sweden
I am so happy!
Today I had a delivery of a DP-cable replacement. The original melted in the ribbon that connects to the R1811.
I don't know what caused the failure. If I had damaged it or not. I do not wish to blame the company for the fault.
They were happy to send me the replacement for shipping cost.
I am telling you this. So that you know that they give superb support and service.

This time I was very, very careful, when installing the cables. And the screen booted up on the first try.
Having checked that it functioned, I connected it to my Mac Pro 7.1, and booted it up.

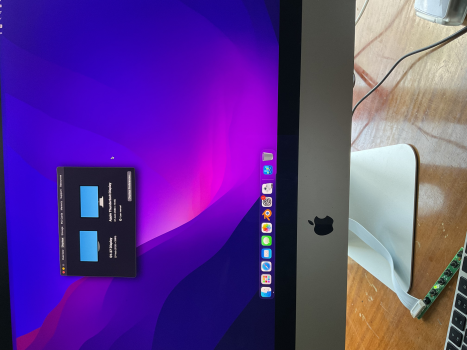
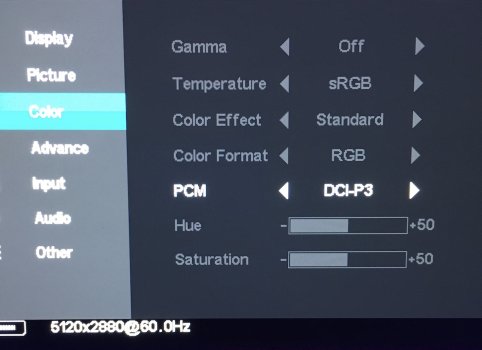
From what I can tell, comparing it to the 27" Thunderbolt Display, also plugged into the Mac Pro, the screen looks superb. With full resolution and P3 colour space. I can clearly see the difference compared to the Thunderbolt Display.

I ordered the R1811 for LM270QQ1.


I am very grateful to Wang Feng, and Chen Lu, who guided me and offered such superb service.

The only other company I have been in contact with, that went out of it's way to guide and help, is Istvan Csanady, from Shapr3d.

They are in a class of their own, and they should be proud of what they offer to their customers


edit: In hindsight, I would not try to connect the DP-cable before the card is securely in place. There is probably some risk of it bending, or scratching the cable on some sharp parts. Which most likely happened in my case. Because there was no problem at all, when I connected the new cable carefully. Everything else was already secured in a fixed position.
 

Attachments

  • tempImageIndl1e.png
    tempImageIndl1e.png
    3.3 MB · Views: 103
Last edited:
  • Like
Reactions: PaulD-UK

Regulus67

macrumors 6502a
Aug 9, 2023
521
494
Värmland, Sweden
I had a look in the menu settings on the R1811 card.
It has DCI-P3, Adobe, SRGB etc.
And PiP, split screen, etc.

You can also choose language, Chinese or English.
Also the separate control, with the on-off LED, and control buttons

edit: Thank you PaulD-UK, you set me in the right direction. Searching the menu
 

Attachments

  • Controls.jpg
    Controls.jpg
    266.8 KB · Views: 97
  • Display mode.jpg
    Display mode.jpg
    279.5 KB · Views: 104
  • Language setting.jpg
    Language setting.jpg
    317.8 KB · Views: 99
  • Colour scheme.jpg
    Colour scheme.jpg
    292.9 KB · Views: 106
Last edited:
  • Like
Reactions: PaulD-UK

3quid

macrumors newbie
Aug 5, 2023
12
8
I have now bought and waiting for delivery of my M2 Pro, 10/16 with 16GB and 1TB

The power supply and cable are here. I await delivery of the AW18 board which has now been shipped from china.

The Mac arrived quite a few days ago. Yesterday the board finally made it after waiting over a week in UK customs (had to pay £35 in tax).

Opened up the Mac today, pulled everything out. Plugged everything in - bit of a faff with the backlight cable. It wasn't;t obvious which way round it was supposed to go. 50/50 chance and I got it wrong but switched it round and it jumped into life!

So. Shut it all down. Moved it all back to my office. Plugged it in and it was all good until it suddenly started flickering on and off really rapidly. Turned the power off. Untaped the screen to have a look and jiggle some cables. Came back on again. Then same flickering happened again. Turned off, opened it up. Jiggled about and then the screen slipped and hit the desk causing a 50mm crack in the bottom edge. It's annoying but can barely see it when using so I'll get over it.

All seems fine now and am typing this on my new Mac!

Now, I have a question about display resolution...

I went to go set it up on 5120x2880 as that is the top res but that also makes all of the UI go tiny small. Is there a way to harness the Retina UI with the top res using the screen like this? Maybe I am being dumb?

Any help gratefully received
 

PaulD-UK

macrumors 6502a
Oct 23, 2009
870
469
Apple's definition of "retina" is 218pixels/inch using 4 actual (behind the glass) display screen pixels to make up each apparent (visible) raster pixel of the displayed image.

So if you set the screen resolution to 'Default for Display' on a 27" 5k retina display you get a 2560x1440 screen resolution - which is what the OS UI is designed for - and calls "retina".

You can slightly tweak the Menu Bar size in System Settings>Accessibility. But not by very much, not enough to natively work at full 5K settings. You can change the icon size in 'Show View Settings' (right click on desktop).
 
Last edited:
  • Like
Reactions: Regulus67 and 3quid

michaelsft

macrumors newbie
Nov 25, 2019
21
8
The Mac arrived quite a few days ago. Yesterday the board finally made it after waiting over a week in UK customs (had to pay £35 in tax).

Opened up the Mac today, pulled everything out. Plugged everything in - bit of a faff with the backlight cable. It wasn't;t obvious which way round it was supposed to go. 50/50 chance and I got it wrong but switched it round and it jumped into life!

So. Shut it all down. Moved it all back to my office. Plugged it in and it was all good until it suddenly started flickering on and off really rapidly. Turned the power off. Untaped the screen to have a look and jiggle some cables. Came back on again. Then same flickering happened again. Turned off, opened it up. Jiggled about and then the screen slipped and hit the desk causing a 50mm crack in the bottom edge. It's annoying but can barely see it when using so I'll get over it.

All seems fine now and am typing this on my new Mac!

Now, I have a question about display resolution...

I went to go set it up on 5120x2880 as that is the top res but that also makes all of the UI go tiny small. Is there a way to harness the Retina UI with the top res using the screen like this? Maybe I am being dumb?

Any help gratefully received
Glad you got yours in the post and up and running. Mine's been stuck on 'In Transit' on the Royal Mail app for ages now. Starting to wonder if I'll ever get it! I don't suppose you took any pictures of the installation of the cables - seems like everyone has trouble putting the cables in!
 

3quid

macrumors newbie
Aug 5, 2023
12
8
Glad you got yours in the post and up and running. Mine's been stuck on 'In Transit' on the Royal Mail app for ages now. Starting to wonder if I'll ever get it! I don't suppose you took any pictures of the installation of the cables - seems like everyone has trouble putting the cables in!
Mine was stuck in customs for over a week and then suddenly updated and arrived the same day.

I didn't take any pictures as I was doing it. The cables to connect the board to the screen were all quite simple except for the backlight which could connect either way. If I get a chance later I'll open it up and take a pic or two as I still haven't taped it up properly. No punishment (as far as I know) for getting it the wrong way round though - which I did - so just trial and error. Hopefully you win the coin flip :)

I am now trying to mount the old hard drive (1TB was running Big Sur ... I think) in an external USB3 enclosure so I can get some files across but it will not mount. Disk Utility sees it but Finder won't mount it. Anyone who knows anything about why that night be the case?
 

davidg5678

macrumors regular
Dec 5, 2020
128
108
Mine was stuck in customs for over a week and then suddenly updated and arrived the same day.

I didn't take any pictures as I was doing it. The cables to connect the board to the screen were all quite simple except for the backlight which could connect either way. If I get a chance later I'll open it up and take a pic or two as I still haven't taped it up properly. No punishment (as far as I know) for getting it the wrong way round though - which I did - so just trial and error. Hopefully you win the coin flip :)

I am now trying to mount the old hard drive (1TB was running Big Sur ... I think) in an external USB3 enclosure so I can get some files across but it will not mount. Disk Utility sees it but Finder won't mount it. Anyone who knows anything about why that night be the case?
Any chance your computer actually had a fusion drive and not just a standard hard drive? This would mean some of your data exists on a separate SSD drive plugged into the motherboard. Presumably it's possible to recover the fusion drive data if both the SSD and HDD are connected simultaneously, but I don't know the specifics.

If you saved the original computer parts you could try Frankensteining together just enough to get the bare motherboard powered on and using target disk mode with both the SSD and HDD connected. This idea might be a bit too crazy though.
 

3quid

macrumors newbie
Aug 5, 2023
12
8
Any chance your computer actually had a fusion drive and not just a standard hard drive? This would mean some of your data exists on a separate SSD drive plugged into the motherboard. Presumably it's possible to recover the fusion drive data if both the SSD and HDD are connected simultaneously, but I don't know the specifics.

If you saved the original computer parts you could try Frankensteining together just enough to get the bare motherboard powered on and using target disk mode with both the SSD and HDD connected. This idea might be a bit too crazy though.
Yes. Originally it did have a fusion drive. It failed though and was replaced a couple of years back... I (clearly wrongly) that my data was all on that new drive

I still have all the parts... Am I going to have to rebuild it!? Not even sure how I can work out if this is the case or not without rebuilding it?
 

3quid

macrumors newbie
Aug 5, 2023
12
8
I am assuming that if I bought this (looking past the fact that is stupid expensive) and had it plugged in as well as the physical hard drive, it wouldn't work like it did originally?

PCI External Enclosure

Just a thought to save me having to rebuild the entire iMac again haha
 
Register on MacRumors! This sidebar will go away, and you'll see fewer ads.