Become a MacRumors Supporter for $50/year with no ads, ability to filter front page stories, and private forums.
Status
The first post of this thread is a WikiPost and can be edited by anyone with the appropiate permissions. Your edits will be public.
Hey guys.

Ive read a good portion of the posts here, and am getting ready to pull the trigger. I have a late 2015 27" iMac with
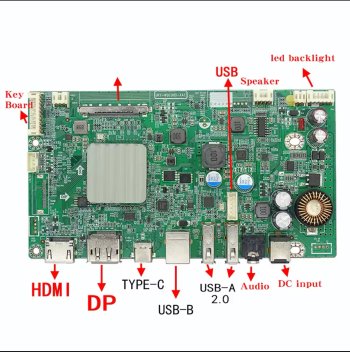
LM270QQ1(SD)(B1) panel. After weighing up all the options I am leaning towards the JRY-W9RQUHD-SA1. I am looking at purchasing from here. My only concern is it doesn't list my specific panel model, just 'LM270QQ1', so my assumption is it supports all variations ? Im also looking at this crossover. Ive never ordered from AliExpress before so im a little anxious. I am planning purchasing this cable to connect to my Macbook Air M1. Does anyone see any issues with what I am considering?
Many sellers request you to provide the exact display model when you order. Be sure to read the seller’s ordering details fully.

When you go through the ordering process, look for a place to provide comments or additional information to the seller. In this section, provide your display model number.
 
As an Amazon Associate, MacRumors earns a commission from qualifying purchases made through links in this post.
Update: I've completed the conversion. Thanks to @Xarl-li and @PaulD-UK and all who have contributed to this thread.

All Photos - 1 of 1.jpegimac2asd - 11 of 11.jpegimac2asd - 10 of 11.jpeg
 
Looks quite cool. Could you provide some details on PSU and fan control, if there is any? What kind of PSU did you piick and does it emit audible noise while idling or on load?
 
Wow -- 2,353 posts?

So I have this 27" 2017 iMac that I want to make into a display for my new Mac mini M4.

The 27" is perfectly fine. It'd be a shame to waste the power supply and speakers.

I'd love to find an affordable control board that could use the pre-existing power supply and the speakers.

Any ideas?
 
New here. Pardon me if my posting skills are not correct.

Damnation. Late 2015 27” iMac.

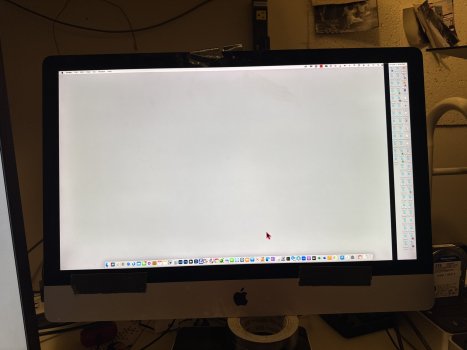
I think I did something stupid. I was removing my screen to find the serial numbers so I could order the correct control board kit and then put the iMac back together as I like the screen profile for final editing of photos. But when I put it back together I got this black band on the right side. What did I do wrong? Big screw up I assume.

I need you guys help in a big way.
 

Attachments

  • image.jpg
    image.jpg
    272.9 KB · Views: 31
Last edited:
@Sean3D, looks very nice!

I believe you're using the SA1 board, correct? Could you please indicate how you mounted the board? Also, what are the 2 two blue items near the top of the iMac housing?

In one of your previous ports you indicated that you'd be removing one of the standoffs that were on the way, did you'd up doing that?
 
@Kgitti " I got this black band on the right side."

I'm sorry. probably not good news.
You have pushed something into the top of the screen where the black line is when you were removing the screen panel.
This has damaged the very fragile ribbon cable to the screen, where the screen is black.
There is a YT video about this:

iMacScreenDamage.png


Anyone else reading this, only use the pizza wheel cutter or very blunt guitar picks to cut the adhesive, and don't poke too far in...
 
Last edited:
@pnwkayaker "what are the 2 two blue items near the top of the iMac housing?"

They are audio grade capacitors for the crossover to feed the tweeters, which are used with the two air-core inductors to feed the main speaker drivers.

@Sean3D Very nice conversion. What value capacitors/inductors did you use?
 
...
You have pushed something into the top of the screen where the black line is when you were removing the screen panel.
This has damaged the very fragile ribbon cable to the screen, where the screen is black.
...
Anyone else reading this, only use the pizza wheel cutter or very blunt guitar picks to cut the adhesive, and don't poke too far in...
First of all. These displays have such elegant technological solutions. Never saw one of these dismantled with such detail.

Now, more than ever, I think it is fabulous that we can rebuild them and continue enjoy using them 🥰
I hope I never have to rebuild my iMac Pros, though 😆
 
Don't know if this is the right place for this, but I noticed some 5k monitors on Alibaba that claim to be mini led at 70hz. Has anyone heard any rumors about something like that being developed?
 
Seems like the fins were wide enough that there's some natural convection going on. As far as performance, I don't know how much I can really attribute to the heatsink vs the not dried thermal past. It's likely that as long as there's a bit of airflow you could get away with a low profile aluminum heatsink and decent paste, but I've got no empirical data on that.
Currently it's disassembled as I'm trying to kitbash it with a broken cintiq drawing tablet. Learning cad software/machining!
 
  • Like
Reactions: PaulD-UK
Hey everyone, new here so forgive any cardinal sins. I’ve been reading through the thread from the start and learning a lot of good stuff, but am stumped trying to figure out which board I’ve got - R9A18, R1811, T18, T19… - and figured I’d ask before getting through the rest of the thread (only at page 22 so far)

Is anyone able to help me identify it? The board I bought: https://a.aliexpress.com/_msHukfp

It’s arrived already, has a Chinese language OSD which can only be navigated when there is video input (like the T18), and was showing at 5K60 on my 2015 iMac display via single USB-C from a 2021 MBP.

My plan is to keep it fairly simply, and only:
- use original power button
- use original speakers (AFAIK I’ll need a crossover)
- replace webcam with some combo of cam and mic
- run extensions for all inputs / power outside through the ram port
- mount the controller board externally

Thanks!
 

Attachments

  • IMG_8550.jpeg
    IMG_8550.jpeg
    934 KB · Views: 15
Last edited:
That’s a JRY-W9CUHD-AA1 - in the OSD the Chinese pictogram is 语言 (Language). The choice is probably Chinese or English.
 
Last edited:
  • Like
Reactions: cliaz
Looks quite cool. Could you provide some details on PSU and fan control, if there is any? What kind of PSU did you piick and does it emit audible noise while idling or on load?
I ordered this power supply so I could charge my MacBook Pro through the T5 connections:

It is quiet and there is no noise or interference sounds.

This is the fan controller I used:

It didn't come with any documentation for what the dip switches do, but I found a data sheet here:
 
As an Amazon Associate, MacRumors earns a commission from qualifying purchases made through links in this post.
@Sean3D, looks very nice!

I believe you're using the SA1 board, correct? Could you please indicate how you mounted the board? Also, what are the 2 two blue items near the top of the iMac housing?

In one of your previous ports you indicated that you'd be removing one of the standoffs that were on the way, did you'd up doing that?
I am using the SA1 board. I started with a board I had printed using @Xarl-li SLI file. At first the only modification I thought I'd make was to cut some of the top left off the board so that I could capture part of the iMac stand off for support, and remove most of the lower left stand off on the iMac. When I first test fitted the display glass, I discovered that the glass was not seating flat in the are where the board was - due perhaps to the USB ports sticking up too far. I made some additional cuts to the board to get it sit a little lower.
board2.jpg

The two blue item at the top of the case are capacitors for the cross over. Ultimately I found that the sound from the speakers isn't satisfactory and I am continuing to use the computer speakers and supwoofer at my desk. Great that the MacBook Pro has an headphone jack!
 
@Sean3D Very nice conversion. What value capacitors/inductors did you use?
0.15 mH 19 AWG Air Core Inductor.15mhl
10 mfd PX Range Polypropylene Cap

I was not impressed with the sound from the built in amp on the board, so I thought I'd try a small amp board and use the headphone out...but I was picking up a lot of interference from the thunderbolt cable. So I removed the board and I'm just using the headphone jack on the MacBook Pro to the computer speakers on my desk that were originally hooked up to my iMac.
 
  • Like
Reactions: PaulD-UK
I'm trying to wrap my head around this setup. I've ordered a JRY-W9RQUHD-SA1 and am awaiting delivery. For power, I'm considering the Mean Well LRS-200-24. Ideally, I'd like a clean build and would prefer to use the original Mac power cable to supply the PSU. I recall seeing a guide on this but can't seem to find it.

Since the SA1 board uses a 2.1mm barrel jack and the Mean Well PSU has screw terminals, I've been looking at possible connectors. However, I'm not an electrician and want to ensure I’m making a safe choice. My concern is that the barrel jacks I found are rated for 12V, whereas the Mean Well PSU outputs 24V (which the SA1 board requires), with a max of 5A, im also unsure of what gauge wire I would need.

Am I on the right track? Or does anyone have a complete parts list for powering the SA1 board? Any guidance would be greatly appreciated. Thanks in advance!
 
As an Amazon Associate, MacRumors earns a commission from qualifying purchases made through links in this post.
@UniqueUserName1234
I think the SA1, like all the other boards, use a 2.5mm barrel jack, as this is best suited to higher currents.
The 12v rating is only nominal, the barrel jacks can do 24v perfectly well.
But there are low current barrel jacks, up to 2A, and there are higher rated ones, 6A or more.
You need to find a higher rated one, with the connecting cable thick enough for the higher current.

The centre connection of the barrel jack is wired, with a red wire, to the 24v + screw terminal on the PSU.
The outer sheath of the barrel is wired, with a black wire, to the Ground or – screw terminal on the PSU.
The colours of the wires are convention, any other colours will do...
The thickness can be 22-24AWG, or the equivalent for multi-strand wires,, preferably not higher.

The mains power connection wires coming into the iMac need extending to the input of the new PSU.

The original plug that connects to the original iMac PSU input socket has the L (live) wire furthest from the edge of the PSU,
and the N (neutral) connection nearest to the edge of the PSU.

You extend these wires to the L and N input screw terminals of your new PSU, maintaining the polarity the same. L and N.
 
Last edited:
That’s a JRY-W9CUHD-AA1 - in the OSD the Chinese pictogram is 语言 (Language). The choice is probably Chinese or English.
Ahhh, if only I'd continued reading, literally the next page (pg 23) of this thread mentions / shows the board I have. Thanks for identifying it!

Now that I know that, and referencing the terrific board comparison table in post #2051, I think I'll return the board I bought.
Noting my goals / use cases of :
  1. using original power button
  2. using original speakers (AFAIK I’ll need a crossover)
  3. replacing webcam with some combo of cam and mic
  4. avoiding an internal fan
  5. using 1x USB-C cable to connect to M4 Mac Mini, and send video / audio through that cable
  6. using mac keyboard to control screen brightness / audio
  7. end product to be used for coding / web browsing / occasional gaming / movies
It looks like the JRY-W9RQUHD-SA1 board is the right one for me, yes?
I think the AA1 would almost be good enough with 8-bit for my use case, but I read in this thread somewhere that it doesn't support keyboard brightness / volume control through USB-C.
 
  • Like
Reactions: SubDriver
@cliaz
Noting my goals / use cases of :
  1. using original power button
  2. using original speakers (AFAIK I’ll need a crossover) - You may want to also consider a small 5-10W amplifier due to how small the amplifier is on SA1 board. If you have separate powered computer speakers on your desk, you could also run a line from the headphone jack on the LCD driver board to those speakers - the sound will almost certainly be better than the internal speakers. Lots of mixed results on the sound quality when the internal speakers are driven from these boards.
  3. replacing webcam with some combo of cam and mic - If you have an iPhone, the simplest thing to do would be to use the Continuity Camera functionality, which lets you use the iPhone as your webcam via your 2021 MBP. No wiring required!
  4. avoiding an internal fan
  5. using 1x USB-C cable to connect to M4 Mac Mini, and send video / audio through that cable
  6. using mac keyboard to control screen brightness / audio. - You will need a separate app to achieve this. Better Display and Monitor Control are a couple of options.
  7. end product to be used for coding / web browsing / occasional gaming / movies
It looks like the JRY-W9RQUHD-SA1 board is the right one for me, yes? - It would certainly support what you are looking for. And it might give you some flexibility the AA1 board would not in case you want to change your plans a little bit
I think the AA1 would almost be good enough with 8-bit for my use case, but I read in this thread somewhere that it doesn't support keyboard brightness / volume control through USB-C. - I am not familiar with this, but someone else might be.

Good luck!
 
  • Like
Reactions: cliaz
Thanks for your reply, lots of good ideas there!
  1. ...
  2. I figure the main reason I want inbuilt speakers is to get notification pings when I'm not directly at my desk, but yea good call with an an amplifier. On that note, I saw in a recent post from Xarl-li that he used a Crossover YLY-2088. That seems quick n easy to throw in series with the speakers, is that worthwhile? For the $5 a crossover kit costs from ali express, it's kinda 'why not' territory...
  3. Ooo that's footy smarts, good idea.
  4. ...
  5. ...
  6. Thanks, will take a look!
  7. ...

Looking forward to it!
 
Does anyone know if the JRY-W9CUHD-SA1 USB C port can provide both display, audio and power. Ultimately, I would like one cable running from my macbook air m1 to my iMac 5k, this cable would provide video, audio and charge my laptop at the same time. Is this possible ?
 
@UniqueUserName1234 Yes. If you connect a MBP to the SA1 using a USB-C cable then the screen will work perfectly, with audio to the amp on the SA1, and the MBP will be charged - if your monitor’s PSU is powerful enough.
Audio and screen brightness will need an App on the Mac for keyboard control from the Mac.
 
Register on MacRumors! This sidebar will go away, and you'll see fewer ads.