Become a MacRumors Supporter for $50/year with no ads, ability to filter front page stories, and private forums.
Status
The first post of this thread is a WikiPost and can be edited by anyone with the appropiate permissions. Your edits will be public.
The 27" is perfectly fine. It'd be a shame to waste the power supply and speakers. I'd love to find an affordable control board that could use the pre-existing power supply and the speakers. Any ideas?
How to make use of the existing PSU is explained here
https://forums.macrumors.com/threads/diy-5k-monitor-success.2253100/post-33143392
While the audio amplifier of 2 x 10 W included on the R9A18 board has not been put to service in that setup, this should be fairly straightforward. Plan for two passive crossover networks and conduct audio tests to make sure speaker polarities are correct before final assembly.
 
@Kgitti " I got this black band on the right side."

I'm sorry. probably not good news.
You have pushed something into the top of the screen where the black line is when you were removing the screen panel.
This has damaged the very fragile ribbon cable to the screen, where the screen is black.
There is a YT video about this:

View attachment 2480270


Anyone else reading this, only use the pizza wheel cutter or very blunt guitar picks to cut the adhesive, and don't poke too far in...
Go it. Reassembling the iMac it’s permanent but usable-now like a 25” with a workaround. 😩🙃
 
Hi everyone!

I'm working with the LM270QQ1(SD)(C1) and looking for a controller that also supports the built-in speakers. Ideally, I'd like to use the existing power supply too.

Does an all-in-one solution exist at an affordable price? If not, what’s the best way to get the speakers working?

While I'm at it, what’s your favorite instructional video? I've watched so many mediocre ones.

Thanks so much!
 
I dont believe there is an all-in-one solution unfortunately.

There are the following options:

To use the internal PSU you would need to choose a 12v board.

To use speakers you will ned to use crossovers such as

Personally, I chose the JRY-W9RQUHD-SA1 as it supports 10 bit color, has USB-C which I can use for Power Delivery and is fan-less. However, needs a 24v PSU such as https://www.amazon.co.uk/dp/B0CFQCTN6Q/

Thats my understanding anyway, im new to this and still learning myself (waiting on delivery of my SA1 board)
 
As an Amazon Associate, MacRumors earns a commission from qualifying purchases made through links in this post.
@ItsAShaunParty
The best choice if you want to use the internal iMac speakers, and want to use the original 12v PSU, is the R9A18 board., with its 10 watt audio amplifier - the same as the top-of-the-line R1811.

Here is an example from @Kaeslin showing how to meet its requirement for two DP 1.2 input cables, and use the internal iMac PSU.
It needs a TB3 to Dual DP 1.2 adapter.
And there is enough space to keep the original iMac speakers, and fit everything else in.

The JRY--FA1 will work at 12v, but there are reports that it really works better using 19-24v.
The Haijing T18 works very well at 12v, but the audio amplifier is less capable.

Any board with a USB-C input (and which supplies power to a laptop) needs 24v to work.

As to YT videos, no one has made a 'good' video of the conversion process.
YT influencers are on a treadmill of fast, constant video production, so they rush through the build and then pass on to the next video project.
A good DIY conversion is a longer process and needs attention to detail to give a good result. :D
 
Last edited:
@ItsAShaunParty
Further to PaulD-UK's advice to go for the R9A18 if you want to use the original 12 V PSU, please be informed there exists a report claiming to have achieved 5K @ 60 Hz over a (single) HDMI cable which surpasses the official specs of the board:
DIY "Studio Display" Apple iMac 27" Umbau als externer 5K Monitor verwenden (in German @ 11:10) The author also found that attempting to do the same via a DisplayPort connector did not work.

As I had always planned to work with Thunderbolt 3 over one USB-C connector and never attempted to use any of the HDMI inputs in my own project, I am unfortunately not in a position to further comment on this finding.
 
@Kaeslin Most likely at 8 bit 4.2.2 or 4.2.0 YCbCr (YUV).

Which is fine for video and TV, but a problem for image editing, where RGB 4.4.4 is needed for full colour space.

This is the same as single cable DP, as in Luke Miami’s YT video.
His OSD showing YUV is briefly visible.

 
Last edited:
Hello. Could you answer a few questions about your build

1. Are the imac speakers after the crossovers connected to the JRY-W9QUHD-SA1 board ? As I understand the sound in the board is built-in and is detected by macbook automatically and switched to it? How much this audio sound and speakers are more comfortable than macbook speakers or worse (louder/quieter) ?
2. If there is a delay when macbook comes out of sleep mode with external monitor connected? How much of a delay is it? Are there any glitches or bugs when macbook comes out of sleep that you have to turn off the display or disconnect/re-connect?
3. Are you using the power supply inside the display, is there any noise from it? Is it audible in a quiet room?
4. Does the board glitch often in general so that you have to reboot it?
5. Have you been able to connect display brightness and speaker volume control from the keyboard?

Thank you very much for your answers. Regards.
1. Yes, I have them connected with crossovers. I don't actually have a mac book, but my Windows and Linux machines detect them and switch to them automatically. I don't have the measuring tools to determine exact volume, but I can say it is a fair bit louder than my laptop's built in 2W speakers. I don't notice any degradation in sound quality.
2. Yes, when my computer sleeps the monitor turns off because it doesn't detect any display input.
3. Yes, my power supply is contained within the chassis, but I hear no noise from it. Even in a quiet room, I hear no noise, probably because there is no fan.
4. Not as such, most days the sleep issue is resolved by just turning the monitor on again.
5. Volume control yes, brightness control, not yet.
 
Last edited:
1. Yes, I have them connected with crossovers. I don't actually have a mac book, but my Windows and Linux machines detect them and switch to them automatically. I don't have the measuring tools to determine exact volume, but I can say it is a fair bit louder than my laptop's built in 2W speakers. I don't notice any degradation in sound quality.
2. Yes, when my computer sleeps the monitor turns off because it doesn't detect any display input.
3. Yes, my power supply is contained within the chassis, but I hear no noise from it. Even in a quiet room, I hear no noise, probably because there is no fan.
4. Not as such, most days the sleep issue is resolved by just turning the monitor on again.
5. Volume control yes, brightness control, not yet.
5. I should specify, I can control the OS's volume control from the keyboard, if I want to change the acutal monitors volume setting I would need to navigate with the control board buttons, same goes for brightness.
 
Hey, does anybody know how much heat the FA1 produces if it is supplied with only 12v? Wondering if i have to add a fan!
 
Hey, does anybody know how much heat the FA1 produces if it is supplied with only 12v? Wondering if i have to add a fan!
Been using mine being fed 12v almost daily for a few months with no fan and no issues. It does get warm inside but I suspect not as warm as with the original iMac motherboard.
 
@ItsAShaunParty
The best choice if you want to use the internal iMac speakers, and want to use the original 12v PSU, is the R9A18 board., with its 10 watt audio amplifier - the same as the top-of-the-line R1811.

Here is an example from @Kaeslin showing how to meet its requirement for two DP 1.2 input cables, and use the internal iMac PSU.
It needs a TB3 to Dual DP 1.2 adapter.
And there is enough space to keep the original iMac speakers, and fit everything else in.

The JRY--FA1 will work at 12v, but there are reports that it really works better using 19-24v.
The Haijing T18 works very well at 12v, but the audio amplifier is less capable.

Any board with a USB-C input (and which supplies power to a laptop) needs 24v to work.

As to YT videos, no one has made a 'good' video of the conversion process.
YT influencers are on a treadmill of fast, constant video production, so they rush through the build and then pass on to the next video project.
A good DIY conversion is a longer process and needs attention to detail to give a good result. :D
Thanks so much for your help—I really appreciate it!

I'm looking for directions (or a video) on how to use the speakers. I’ve decided not to use the power supply anymore, so I’m wondering if I should still gut the Mac completely or leave some components in place to help stabilize the speakers. And how do they connect to the board?

Any guidance would be greatly appreciated!

Thanks in advance!
 
@ItsAShaunParty
The speakers are held in place by the two original bolts retaining each unit.
Everything else can be removed, or left, as you wish.

The simplest way to wire up the speakers is to buy a crossover kit from eBay or AliExpress:
https://stonetaskin.com/ms/products/stonetaskin-high-quaility-treble-bass-speaker-crossover-divider-for-imac-27-inches-a1219-a2115-speaker-board-r1811-r9a18-sa1-fa1?

Or do as most people used to do, which is to remove the speaker wires from the plug on each speaker, and (having marked which wire is which) then solder the speaker's wires to an extension cable with a JST PH 4-pin plug which can be connected to the new video driver board.

The larger more expensive crossover unit is not really a good match for the iMac's speakers, and will work slightly better with R1811/R9A18 boards as they have a more powerful amplifier chip.

The wires used to push into the speaker plugs are JST XH 6-pin plug/sockets, with the socket mounting prongs pushed into the speaker plugs. So you could make a solder-less connection without buying the crossover kit (at an inflated price).

Each crossover needs an audio quality 10microFarad bipolar capacitor in series with the Tweeter,
and a 0.15 milliHenry air-cored inductor in series with the Main speaker driver.

This appears to be what the first, cheaper, AliE crossover consists of.
So I think the cheaper crossover unit is likely to give the best sound...

The more expensive crossover has an iron-cored inductor which is too high an inductance for the iMac's 4 ohm speakers - it's more suited to 8 ohm speakers.
But people buy it because the connections are very easy to use.....
 
Last edited:
@ItsAShaunParty
The speakers are held in place by the two original bolts retaining each unit.
Everything else can be removed, or left, as you wish.

The simplest way to wire up the speakers is to buy a crossover kit from eBay or AliExpress:
https://stonetaskin.com/ms/products/stonetaskin-high-quaility-treble-bass-speaker-crossover-divider-for-imac-27-inches-a1219-a2115-speaker-board-r1811-r9a18-sa1-fa1?

Or do as most people used to do, which is to remove the speaker wires from the plug on each speaker, and (having marked which wire is which) then solder the speaker's wires to an extension cable with a JST PH 4-pin plug which can be connected to the new video driver board.

The larger more expensive crossover unit is not really a good match for the iMac's speakers, and will work slightly better with R1811/R9A18 boards as they have a more powerful amplifier chip.

The wires used to push into the speaker plugs are JST XH 6-pin plug/sockets, with the socket mounting prongs pushed into the speaker plugs. So you could make a solder-less connection without buying the crossover kit (at an inflated price).

Each crossover needs an audio quality 10microFarad bipolar capacitor in series with the Tweeter,
and a 0.15 milliHenry air-cored inductor in series with the Main speaker driver.

This appears to be what the first, cheaper, AliE crossover consists of.
So I think the cheaper crossover unit is likely to give the best sound...

The more expensive crossover has an iron-cored inductor which is too high an inductance for the iMac's 4 ohm speakers - it's more suited to 8 ohm speakers.
But people buy it because the connections are very easy to use.....
Awesome! Thank you! I'd love to find a video...

Question...

Earlier, you instructed:
The best choice if you want to use the internal iMac speakers, and want to use the original 12v PSU, is the R9A18 board., with its 10 watt audio amplifier - the same as the top-of-the-line R1811.
Now that I've decided not to bother to use the original power, do you still recommend these boards?


Thanks!
 
@ItsAShaunParty
The R1811 is the updated version of the R9A18 with the same audio amplifier, and has more advanced firmware features.

The JRY-W9RQUHD-FA1 or -SA1 only have low power audio, and less advanced firmware features, and no IR remote control, but are a lot cheaper.
 
Welcome newcomer.
I apologize for my English, it is not my native language.

I decided to try to cut the damaged glass. I did everything according to the advice of experienced people from this thread. Still turned out with the affected corner. I don't know how it happened, apparently when I started the wire, I hit the wrong layer. It's hard to aim there and I think it's a matter of chance - lucky or not. I wasn't lucky. Maybe someone knows how to glue this corner?

I cut it with 0.1 mm thread. I heated it. Removed the glue with a sticker cleaner.

For those who are thinking of repeating it - better not to do it, it is not worth it, the result is not predictable.
 

Attachments

  • photo_2025-02-15 13.54.47.jpeg
    photo_2025-02-15 13.54.47.jpeg
    93.6 KB · Views: 20
  • photo_2025-02-15 13.54.55.jpeg
    photo_2025-02-15 13.54.55.jpeg
    97.3 KB · Views: 19
  • photo_2025-02-15 13.54.25.jpeg
    photo_2025-02-15 13.54.25.jpeg
    127.3 KB · Views: 19
  • photo_2025-02-15 13.54.59.jpeg
    photo_2025-02-15 13.54.59.jpeg
    87.9 KB · Views: 20
  • photo_2025-02-15 13.54.40.jpeg
    photo_2025-02-15 13.54.40.jpeg
    128.5 KB · Views: 18
  • photo_2025-02-15 13.54.34.jpeg
    photo_2025-02-15 13.54.34.jpeg
    106.7 KB · Views: 18
  • photo_2025-02-15 13.54.30.jpeg
    photo_2025-02-15 13.54.30.jpeg
    114.6 KB · Views: 19
@ItsAShaunParty
The R1811 is the updated version of the R9A18 with the same audio amplifier, and has more advanced firmware features.

The JRY-W9RQUHD-FA1 or -SA1 only have low power audio, and less advanced firmware features, and no IR remote control, but are a lot cheaper.
I'm sorry for asking so many questions. I really appreciate your patience! I'm sure many people will find these answers helpful.

That said... another question...

What's the deal with these other boards? For example, this one at Aliexpress or this one?
 
I'm sorry for asking so many questions. I really appreciate your patience! I'm sure many people will find these answers helpful.

That said... another question...

What's the deal with these other boards? For example, this one at Aliexpress or this one?
These are identical boards JRY-W9CUHD-AA1 , you can search the thread for the key JRY-W9CUHD-AA1 to find all posts with this board.
 
@ItsAShaunParty "What's the deal with these other boards? For example, this one at Aliexpress or this one?"

They are both the same, the JRY-W9CUHD-AA1, which is a lower spec board with a earlier video controller chip.
1. Only 5K/60 8 bit over DP.
2. Only 5K/30 8 bit over HDMI.
3. No DDC keyboard control of brightness or audio level from the Mac (with additional software).
You have to use the button strip.

One further caution is that some of the cheap AA1 boards being sold are 'second hand', having been removed from the m Chinese brand monitors they were originally in.
These ones seem new, and are cheaper because its mostly the more recent better-specced boards that are being ordered in US/EU/UK.
 
Do most of you feel it is worth it to do this conversion? I found a deal on a broken video card 2015 5k iMac for €160. I can't confirm the screen is working, but I'm a little tempted to try.

Usually, I enjoy projects like this, but I'm guessing it's 40 hours of work and research in order to save €600.

What are your thoughts?
 
I am doing this project understanding that I would indeed save just several hundred of EUR. I, however, have very little experience with electrical projects so I see this is like a nice opportunity to learn something new. Plus, you can do it in the simplest possible way - gut your old iMac, put the new controller board inside and route cables to the outside via RAM access door. Or you may want to get a nicer solution but that will require some extra effort.
 
  • Like
Reactions: Regulus67
Do most of you feel it is worth it to do this conversion?
Considering there are almost 2400 post in this discussion. I would rather have asked:
Is there any good reason not to go ahead and do this conversion? ;)

Best reason not to do it, in my opinion is, if you do not already own one, and the asking price is to high. And also how old it is, of course. Makes less sense with the later models for now
 
Last edited:
  • Like
Reactions: razmanugget
I don't already own the iMac and I'd be taking a big risk with the one I am looking at because the ad doesn't show it on and it is being sold for parts.

I'm also a bit worried about the time commitment. I've been building/taking apart electronics for years, so this would be fun for me. On the negative side, I have a list of 61 home remodeling projects that my wife bugs me about and this isn't one of them... but maybe if I keep it simple like you are saying with the wires passing through the RAM access door, it wouldn't be so bad

Completely agree with you that if I already had the iMac, this would be a no-brainer :)
 
@razmanugget "Do most of you feel it is worth it to do this conversion?"

I don't think there would be 588K views and 2K+ replies to this topic without it having real value. :)
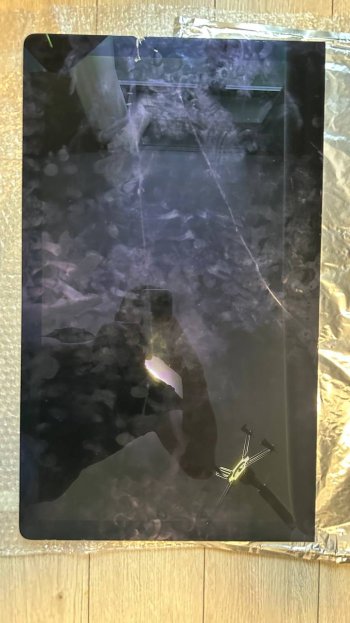
"I found a deal on a broken video card 2015 5k iMac for €160. I can't confirm the screen is working..."

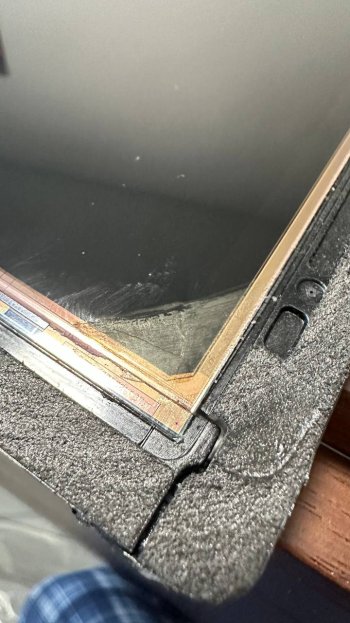
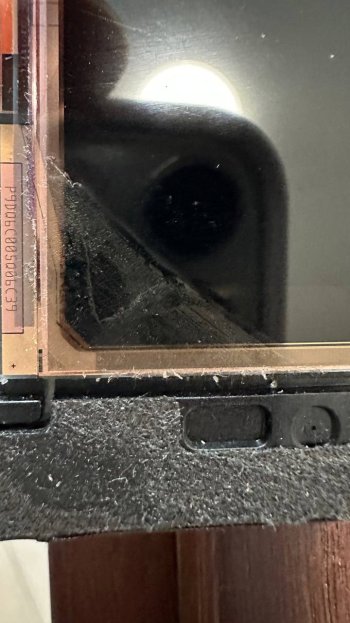
That is a bit of a risk as you haven't seen if the screen works, and if there are any visible signs of aging, which the 2015 Mac screens are known to suffer from.

However using a 2015 iMac DIY monitor is certainly worthwhile if everything is working as it should, though later screens can give even better results...

"Usually, I enjoy projects like this, but I'm guessing it's 40 hours of work and research in order to save €600."

That's for you to decide. Most probably the saving is even more, and the quality and viewing experience of the iMac screen is SO much better than cheap/mid-price 4K screens...

Most of the research has already been done by the previous 2K contributors here. 😃

My personal view is:
Later 2017 onwards screens are better, and less old, so probably have a longer future life.
Consequently, if you wish to build the best 5K monitor you can, start with a later screen.

So, for an older screen, choose a cheaper video driver card to fit in it.
Like a R9A18, or a JRY-W9RQUHD-FA1.
If you need USB-C PD power for a laptop, then a JRY-W9RQUHD-SA1 has a USB-C input port.

For anyone with a late-2014 screen, then it would be quite reasonable to choose the most basic video board, the JRY-W9CUHD-AA1.

@mmyk "I, however, have very little experience with electrical projects so I see this is like a nice opportunity to learn something new."

👍 That is indeed the basis of undertaking this type of project.
And buying the tools needed if the conversion needs them, if you don't already have them.

Edit:
€160 is a fair price for a 10 year old iMac screen in good condition, without pink edges etc...
If you trust the vendor then there is no real problem.
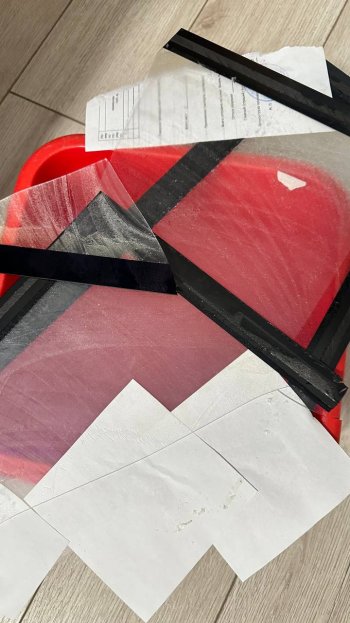
But a broken 2015 iMac is not exactly a valuable commodity.
Who else will buy it?
Only someone who is prepared to take the risk. ;)
 
Last edited:
  • Like
Reactions: razmanugget
Register on MacRumors! This sidebar will go away, and you'll see fewer ads.