Become a MacRumors Supporter for $50/year with no ads, ability to filter front page stories, and private forums.

surfbro

macrumors newbie
Aug 24, 2021
1
0
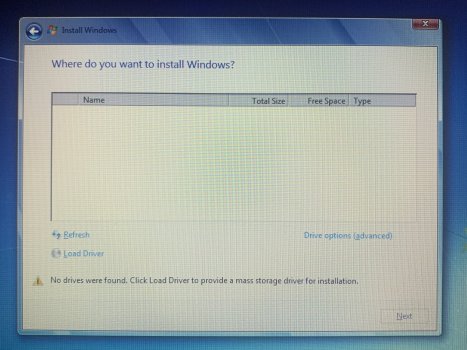
Well, I don't mean to bring such an old thread back from the grave, but I've tried to actually get this working on my MBA Early 2015 and so far, I've used VGAShim and a fork of it both working fine (not really relevant for what I'm going to say) to me. When I get to the setup part, I can move my cursor and all of that but the setup does not recognize my drive, neither does diskpart within the installer.


Anyone know what to do from here?

Thanks!
I wish I could help you, but I will revive this old thread with you since this is super critical for me to try to figure out. I want to purchase an early 2015 MB Air, and give Windows 7 a whirl.

Hopefully someone else can help chime in, but either way I will be hunting ebay for a older model, since having W7 and the portability of a macbook would be great!
 

v_t_h

macrumors newbie
Sep 4, 2021
1
0
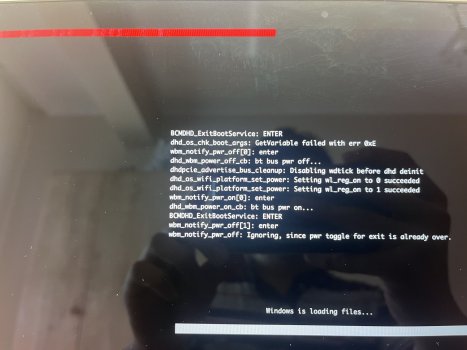
Does anyone had experience with Macbook Air 2017? I'm trying to boot Win7 but no luck: my system successfully completed first part of installation but hangs on black screen on part 2. VgaShim seems to be ok, I even can select safe mode of Win7.
In Safe Mode Windows either stuck on disk.sys loading or reboots immediately after disk.sys.
 

diorisdash

macrumors newbie
Jan 31, 2023
3
0
Foreword
  1. As far as I am aware this is the first successful attempt at getting Windows 7 to natively run on Air Early 2015.
  2. What I present here really is a case of standing on the shoulders of giants and would not be even remotely possible without several projects and individuals credited at the end of this post. Hats off to them for sharing their knowledge and code with others!
  3. This is not the solution. It is not even a solution but more of a workaround. It is a little hacky, requires some computer literacy to pull off, comes with a few caveats, and could be a lot more elegant. While it worked for me it may not work for you (diferent hardware or firmware) or will not work for the future you (if Apple updates its firmware to shut the door once and for all). Set your expectations accordingly.
  4. Needless to say, this method is not supported by Microsoft or Apple. I will try to help as much as I can but I no longer have the Air or other recent Apple machines to test.
  5. This works on MacBook Air 13" Early 2015 A1466 i5-5250U. I aimed to make it as general as possible so it should work for all configurations in the Early 2015 family and perhaps other models. While we may be able to tweak the binaries to work with other models, I personally have no other machines to test.
  6. TL;DR: you'll be far better off upgrading to Windows Spy Edition 10 :)
Background (or "why am I here")
Apple Intel and recent PC computers use a newer incarnation of BIOS called (U)EFI. When Windows 7 was released in 2009, (U)EFI was still new technology; it can understand most of what is going on with one exception: very early in the boot process it tries to communicate with the graphics card using 1980s calls. Most PCs and earlier Macs have a compatibility layer that accommodate these calls but Apple decided enough is enough and removed this legacy code from its recent machines. Unable to initialize graphics the old way, Windows 7 hangs.

(See a more thorough explanation by @d3vi1 here.)

The Workaround
I wrote a little app that:
  1. Pretends to Windows 7 the initialization stuff it wants to do gets done.
  2. Responds to Windows 7's legacy queries about video mode enabling it to draw stuff on screen.
  3. Displays Windows boot animation.
For a more technical explanation see the GitHub repo.

Requirements
  1. Two pendrives (8GB or more for El Capitan, 6GB or more for Windows).
  2. Access to OS X 10.6 or later (can be the one you want to install Windows on).
  3. Access to Windows where you can get local admin rights.
  4. Windows 7 SP1 x64 install CD or ISO.
  5. VgaShim (download a release from GitHub or build from source).
Steps
By following this guide you should end up with a dual booting OS X + Windows setup where Windows gets assigned the majority of HDD space. If you need a different config, modify accordingly. The guide is pretty detailed to enable as many people as possible to follow; sorry if it's too verbose for your level.

Prepare an OS X install USB
  1. Download El Capitan installer from the Mac App Store and follow any of the many available guides to create a bootable USB installer. (I had luck with method one in this guide. If you have a more recent OS X you should also be able to use DiskMaker X.)
  2. Make sure it boots before proceeding.
Prepare a Windows 7 install USB
  1. Download the required files:
    1. Latest Intel USB 3.0 Windows 7 x64 drivers (v4.0.4.51 at the time of writing).
    2. Hotfix KB2775511 (this makes Windows happy about Apple Bootcamp drivers' digital signature) from Microsoft or web (google the exact filename AMD64-all-windows6.1-kb2775511-v2-x64_ec18cc10e27faf443c17e7a8073c9eba773eb13e.msu).
    3. do_boot.wim.bat.txt and do_install.wim.bat.txt attached to this post; remember to remove the .txt extension.
  2. Prepare folders and files for integrating USB 3.0 drivers and the above hotfix into Windows 7:
    1. Create a C:\inject, C:\inject\drivers and C:\inject\hotfixes folders.
    2. Copy AMD64-all-windows6.1-kb2775511-v2-x64_ec18cc10e27faf443c17e7a8073c9eba773eb13e.msu to C:\inject\hotfixes.
    3. Unzip USB 3.0 drivers somewhere and copy contents of Drivers\HCSwitch\x64 and Drivers\Win7\x64 to C:\inject\drivers.
    4. Copy sources\boot.wim and sources\install.wim from your Windows 7 SP1 x64 CD or ISO to C:\inject.
    5. Copy do_boot.wim.bat and do_install.wim.bat to C:\inject.
    6. Your C:\inject folder structure should now look like in the screenshots.
  3. Perform actual integration:
    1. Make note of the size of your boot.wim and install.wim files.
    2. Right click do_boot.wim.bat and run it as administrator.
    3. Right click do_install.wim.bat and run it as administrator. You will be asked which of the Windows 7 install images (Home, Professional, etc) stored inside install.wim you want to modify. The script will also try to copy bootmgfw.efi to your desktop which you will need later.
    4. Make sure the size of boot.wim increased by about 10MB and that of install.wim by about 250MB.
  4. Prepare an EFI-compatible pendrive:
    1. Connect your pendrive.
    2. Open administrative command prompt.
    3. Run diskpart
    4. list disk
    5. Check what number was assigned to your pendrive by looking at disk sizes.
    6. select disk <number>
    7. clean
    8. convert gpt
    9. create partition primary
    10. format fs=fat32 quick
    11. exit
  5. (Finally!) Copy the right files on your pendrive:
    1. The entire contents of your Windows 7 CD with the exception of sources\boot.wim and sources\install.wim.
    2. C:\inject\boot.wim and C:\inject\install.wim to sources.
    3. Copy bootmgfw.efi from your desktop to efi\microsoft\boot.
    4. Rename VgaShim.efi to bootx64.efi, VgaShim.bmp to bootx64.bmp and copy both files to efi\boot (you will need to create this folder).
    5. Create an empty file or copy a small file of a known name to the root of your pendrive. It is there only so that you can easily recognize your pendrive just by looking at a file listing. (I created a file named HELLO.)
Disable OS X System Integrity Protection
May not be necessary but this is what I did at the very beginning. Follow any of the many guides on the web; I used this one.

Partition Mac Hard Drive
  1. Make sure you've backed up all your data on the target MacBook.
  2. Boot from your OS X install media.
  3. Run Utilities > Disk Utility.
  4. Click Partition.
  5. Configure your drive to have two partitions: one for OS X, formatted as "OS X Extended (Journaled)", and one for Windows also formatted "OS X Extened (Journaled)". This is important because if you format it as FAT32, Disk Utility will create a hybrid MBR and Windows 7 will refuse to install on a non-pure-GPT. (See screenshots.)
Install Windows
  1. Boot from your Windows 7 install media.
  2. It will show a blank screen for the first 30 seconds as it loads the WindowsPE environment but should then display the familiar setup welcome screen.
  3. If your touchpad or keyboard do not work you did not integrate USB 3.0 drivers correctly — both devices are internally sitting on the USB bus.
  4. Do not press any installer buttons but Shift+F10 to bring up a command line window. We will need to tell setup where your install.wim file is located because otherwise it complains about not being able to find it; this is where the empty HELLO file will come in handy.
  5. Run dir c: to list files on this volume. If you do not see your magic file, try dir d:. If that does not work you can run diskpart and then list volume to list all available letters.
  6. Run setup /installfrom:<your letter>:\sources\install.wim
  7. Choose your language, accept license, select Windows version you want to install and then Custom (advanced) to access disk partitioning.
  8. Select the Windows partition you created earlier using Disk Utility.
  9. Click Drive options (advanced) to see all options and then Format the partition.
  10. Click Next and watch Windows copy and unpack files.
  11. When it reboots immediately press left option key so that you do not let Windows finish installation at this point. We have some business to take care of first.
Install OS X
  1. Remove your Windows 7 install media, plug OS X install media and boot from it.
  2. Install OS X on the OS X partition you created earlier using Disk Utility.
  3. When it asks you for password, do specify one — otherwise Terminal will complain when you try to run commands as superuser.
Put VGA Shim In Place
  1. Boot into OS X.
  2. Open Terminaland mount the hidden ESP partition which holds the boot loader:
    1. mkdir /Volumes/esp
    2. sudo mount -t msdos /dev/disk0s1 /Volumes/esp
  3. Plug your Windows 7 install media.
  4. In Finder copy the efi\boot folder from Windows 7 install media to the EFI folder on the ESP volume you just mounted.
  5. In the Terminal window run sudo bless --mount /Volumes/esp --setBoot
Finish Windows 7 Installation
  1. Reboot your computer, this time not holding any option keys. You should see the Windows flag quickly animate (this is VGA Shim doing its business in the background) and then Windows completing the installation, eventually booting into desktop.
  2. Install latest Intel HD 6000 (v15.40.10.4300 at the time of writing) and then all other Bootcamp drivers. You can find a list of what I used below.
Drivers
You can download the entire pack here. Alternatively, Bootcamp 5.1.5769 may be downloaded from Apple website; Bootcamp 6.0.6133 is unfortunately only available via the Boot Camp Assistant OS X app or on torrent sites. Either way, this is what I installed on MacBookAir7,2:
  • Apple Null Driver v5.1.4.0 from Bootcamp 6.0.6133
  • Apple Camera v5.0.22.0 from Bootcamp 5.1.5769
  • Apple Keyboard v5.1.6160.0 from Bootcamp 6.0.6133
  • Apple SD Card Reader v1.0.0.1 from Bootcamp 6.0.6133
  • Apple Trackpad v5.1.5900.0 from Bootcamp 6.0.6133
  • Cirrus Audio CS4208 v6.6001.3.24 from Bootcamp 6.0.6133
  • Broadcom USB Bluetooth v6.0.6100.0 from Bootcamp 6.0.6133 $WinPEDriver$ folder, v12.0.1.700 should also possibly work
  • Broadcom BCM4360 wifi v7.12.39.28 from the web
  • Intel Chipset INF Update v10.1.1.14 from Intel website
  • Intel HD 6000 v15.40.10.4300 from Intel website
  • Intel Management Engine v11.0.0.1202 from Intel website
  • Boot Camp Control Panel (BootCamp.msi) v5.1.5769 from Bootcamp 5.1.5769
Known Problems
  1. As on many other EFI computers, hibernation does not work.
  2. Full screen DOS apps may not work anymore (say bye to Prince of Persia).
  3. You will need to be careful when updating GPU drivers.
  4. Not sure if Microsoft memtest works, did not try.
Additional Info
  • Boot animation. The supplied bootx64.bmp boot animation was pulled from Windows 7's bootres.dll. It can be:
    • Replaced with any other animation. The file is assumed to have floor(long_side / short_side) frames of size short_side × short_side. Frames can be stacked either top-to-bottom or left-to-right. Each frame is displayed for approx. 20ms. File has to be a 24-bpp, uncompressed Windows bitmap.
    • Replaced with a square logo. File has to be a 24-bpp, uncompressed Windows bitmap.
    • Removed, and then a built-in static logo (final frame of the supplied bootx64.bmp) will be displayed.
  • Debug mode. If you keep 'v' (for 'VGA Shim') pressed aduring boot, you will enter debug mode that will tell you what the program is doing. Can be useful if it does not seem to work correctly or when we try to make it work on machines other than MacBook Air Early 2015.
  • Safe Mode. Works as expected but you need to keep pressing F8 even though you see the boot animation being played. The program will detect the F8 keypress, display a message and switch to text mode to enable Windows Boot Manager to display its prompts.
Credits
  • my wife for her patience over many coding evenings
  • ReactOS for sharing code that helped me understand what Windows is trying to do
  • Tianocore / EDK II / OVMF for making EFI app development possible and source of a similar workaround
  • @d3vi1 for essential initial research
  • @rockinrobstar for his DISM wiki
  • @Pockets69 for accompanying me along the way
  • Microsoft and Apple for for making this enjoyable journey necessary :)
to let everyone know. if install.wim cannot go there. use rufus and make it GPT. it will be a UEFI:NTFS fat12 partition w/ a ntfs partition w/ windows 7 install. replace the efi's with vgashim and etc. afterwards add it to ur esp and ur all set.
if u get could not prepare windows for the next phase. take out ur ext media excluding ur install media. enjoy windows
 

diorisdash

macrumors newbie
Jan 31, 2023
3
0
Does anyone had experience with Macbook Air 2017? I'm trying to boot Win7 but no luck: my system successfully completed first part of installation but hangs on black screen on part 2. VgaShim seems to be ok, I even can select safe mode of Win7.
In Safe Mode Windows either stuck on disk.sys loading or reboots immediately after disk.sys.
fix: add to ur esp via another OSX disk or linux. copy the efi/boot folder from ur install media to (EFI) on ur esp. also add the bootx64 (the vgashim) w/ the bmp to the efi/boot/microsoft folder
 

diorisdash

macrumors newbie
Jan 31, 2023
3
0
Hello there,

Recently I found about this workaround for booting Windows 7 together with GOP. But there's one problem, I really don't have Mac Air 2015 or any other Mac product, I have Acer E5-573G, but most important part is that I have dual graphics, one Intel HD 5500 and other Nvidia 940M.

Since there is no other place where to write an input, I didn't have any other choice than to post here (sorry again that I don't have Mac :p )

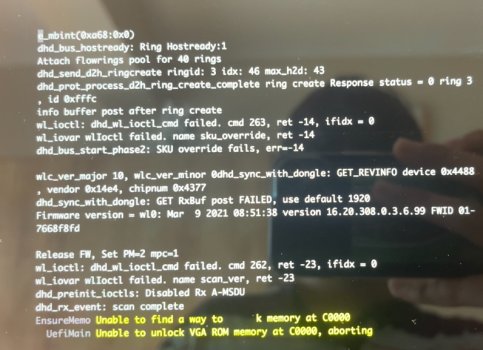
I tried this vgaShim but I've ran into trouble with it, I'll preview my issue in the debug pciture:
qE2mVed.jpg


I've checked in AIDA 64 and I can confirm that VBIOS (but it's NVIDIA's one since Legacy Boot switches to that one) should be present in C0000...
Even tried to change the address in the source and compile, still same issue.

Any solutions if possible, I can use Legacy Boot but I'm really fed up from formatting my drive from GPT to MBR and vice versa, if not I'll just continue using Windows 10.

EDIT: Additional info (picture) attached, hope it helps.
don't think its gonna work w/ out a macbook. cant help u there but just use rufus and install 7 via there.
 

vinceluvzcatss

macrumors newbie
May 21, 2023
1
0
Foreword
  1. As far as I am aware this is the first successful attempt at getting Windows 7 to natively run on Air Early 2015.
  2. What I present here really is a case of standing on the shoulders of giants and would not be even remotely possible without several projects and individuals credited at the end of this post. Hats off to them for sharing their knowledge and code with others!
  3. This is not the solution. It is not even a solution but more of a workaround. It is a little hacky, requires some computer literacy to pull off, comes with a few caveats, and could be a lot more elegant. While it worked for me it may not work for you (diferent hardware or firmware) or will not work for the future you (if Apple updates its firmware to shut the door once and for all). Set your expectations accordingly.
  4. Needless to say, this method is not supported by Microsoft or Apple. I will try to help as much as I can but I no longer have the Air or other recent Apple machines to test.
  5. This works on MacBook Air 13" Early 2015 A1466 i5-5250U. I aimed to make it as general as possible so it should work for all configurations in the Early 2015 family and perhaps other models. While we may be able to tweak the binaries to work with other models, I personally have no other machines to test.
  6. TL;DR: you'll be far better off upgrading to Windows Spy Edition 10 :)
Background (or "why am I here")
Apple Intel and recent PC computers use a newer incarnation of BIOS called (U)EFI. When Windows 7 was released in 2009, (U)EFI was still new technology; it can understand most of what is going on with one exception: very early in the boot process it tries to communicate with the graphics card using 1980s calls. Most PCs and earlier Macs have a compatibility layer that accommodate these calls but Apple decided enough is enough and removed this legacy code from its recent machines. Unable to initialize graphics the old way, Windows 7 hangs.

(See a more thorough explanation by @d3vi1 here.)

The Workaround
I wrote a little app that:
  1. Pretends to Windows 7 the initialization stuff it wants to do gets done.
  2. Responds to Windows 7's legacy queries about video mode enabling it to draw stuff on screen.
  3. Displays Windows boot animation.
For a more technical explanation see the GitHub repo.

Requirements
  1. Two pendrives (8GB or more for El Capitan, 6GB or more for Windows).
  2. Access to OS X 10.6 or later (can be the one you want to install Windows on).
  3. Access to Windows where you can get local admin rights.
  4. Windows 7 SP1 x64 install CD or ISO.
  5. VgaShim (download a release from GitHub or build from source).
Steps
By following this guide you should end up with a dual booting OS X + Windows setup where Windows gets assigned the majority of HDD space. If you need a different config, modify accordingly. The guide is pretty detailed to enable as many people as possible to follow; sorry if it's too verbose for your level.

Prepare an OS X install USB
  1. Download El Capitan installer from the Mac App Store and follow any of the many available guides to create a bootable USB installer. (I had luck with method one in this guide. If you have a more recent OS X you should also be able to use DiskMaker X.)
  2. Make sure it boots before proceeding.
Prepare a Windows 7 install USB
  1. Download the required files:
    1. Latest Intel USB 3.0 Windows 7 x64 drivers (v4.0.4.51 at the time of writing).
    2. Hotfix KB2775511 (this makes Windows happy about Apple Bootcamp drivers' digital signature) from Microsoft or web (google the exact filename AMD64-all-windows6.1-kb2775511-v2-x64_ec18cc10e27faf443c17e7a8073c9eba773eb13e.msu).
    3. do_boot.wim.bat.txt and do_install.wim.bat.txt attached to this post; remember to remove the .txt extension.
  2. Prepare folders and files for integrating USB 3.0 drivers and the above hotfix into Windows 7:
    1. Create a C:\inject, C:\inject\drivers and C:\inject\hotfixes folders.
    2. Copy AMD64-all-windows6.1-kb2775511-v2-x64_ec18cc10e27faf443c17e7a8073c9eba773eb13e.msu to C:\inject\hotfixes.
    3. Unzip USB 3.0 drivers somewhere and copy contents of Drivers\HCSwitch\x64 and Drivers\Win7\x64 to C:\inject\drivers.
    4. Copy sources\boot.wim and sources\install.wim from your Windows 7 SP1 x64 CD or ISO to C:\inject.
    5. Copy do_boot.wim.bat and do_install.wim.bat to C:\inject.
    6. Your C:\inject folder structure should now look like in the screenshots.
  3. Perform actual integration:
    1. Make note of the size of your boot.wim and install.wim files.
    2. Right click do_boot.wim.bat and run it as administrator.
    3. Right click do_install.wim.bat and run it as administrator. You will be asked which of the Windows 7 install images (Home, Professional, etc) stored inside install.wim you want to modify. The script will also try to copy bootmgfw.efi to your desktop which you will need later.
    4. Make sure the size of boot.wim increased by about 10MB and that of install.wim by about 250MB.
  4. Prepare an EFI-compatible pendrive:
    1. Connect your pendrive.
    2. Open administrative command prompt.
    3. Run diskpart
    4. list disk
    5. Check what number was assigned to your pendrive by looking at disk sizes.
    6. select disk <number>
    7. clean
    8. convert gpt
    9. create partition primary
    10. format fs=fat32 quick
    11. exit
  5. (Finally!) Copy the right files on your pendrive:
    1. The entire contents of your Windows 7 CD with the exception of sources\boot.wim and sources\install.wim.
    2. C:\inject\boot.wim and C:\inject\install.wim to sources.
    3. Copy bootmgfw.efi from your desktop to efi\microsoft\boot.
    4. Rename VgaShim.efi to bootx64.efi, VgaShim.bmp to bootx64.bmp and copy both files to efi\boot (you will need to create this folder).
    5. Create an empty file or copy a small file of a known name to the root of your pendrive. It is there only so that you can easily recognize your pendrive just by looking at a file listing. (I created a file named HELLO.)
Disable OS X System Integrity Protection
May not be necessary but this is what I did at the very beginning. Follow any of the many guides on the web; I used this one.

Partition Mac Hard Drive
  1. Make sure you've backed up all your data on the target MacBook.
  2. Boot from your OS X install media.
  3. Run Utilities > Disk Utility.
  4. Click Partition.
  5. Configure your drive to have two partitions: one for OS X, formatted as "OS X Extended (Journaled)", and one for Windows also formatted "OS X Extened (Journaled)". This is important because if you format it as FAT32, Disk Utility will create a hybrid MBR and Windows 7 will refuse to install on a non-pure-GPT. (See screenshots.)
Install Windows
  1. Boot from your Windows 7 install media.
  2. It will show a blank screen for the first 30 seconds as it loads the WindowsPE environment but should then display the familiar setup welcome screen.
  3. If your touchpad or keyboard do not work you did not integrate USB 3.0 drivers correctly — both devices are internally sitting on the USB bus.
  4. Do not press any installer buttons but Shift+F10 to bring up a command line window. We will need to tell setup where your install.wim file is located because otherwise it complains about not being able to find it; this is where the empty HELLO file will come in handy.
  5. Run dir c: to list files on this volume. If you do not see your magic file, try dir d:. If that does not work you can run diskpart and then list volume to list all available letters.
  6. Run setup /installfrom:<your letter>:\sources\install.wim
  7. Choose your language, accept license, select Windows version you want to install and then Custom (advanced) to access disk partitioning.
  8. Select the Windows partition you created earlier using Disk Utility.
  9. Click Drive options (advanced) to see all options and then Format the partition.
  10. Click Next and watch Windows copy and unpack files.
  11. When it reboots immediately press left option key so that you do not let Windows finish installation at this point. We have some business to take care of first.
Install OS X
  1. Remove your Windows 7 install media, plug OS X install media and boot from it.
  2. Install OS X on the OS X partition you created earlier using Disk Utility.
  3. When it asks you for password, do specify one — otherwise Terminal will complain when you try to run commands as superuser.
Put VGA Shim In Place
  1. Boot into OS X.
  2. Open Terminaland mount the hidden ESP partition which holds the boot loader:
    1. mkdir /Volumes/esp
    2. sudo mount -t msdos /dev/disk0s1 /Volumes/esp
  3. Plug your Windows 7 install media.
  4. In Finder copy the efi\boot folder from Windows 7 install media to the EFI folder on the ESP volume you just mounted.
  5. In the Terminal window run sudo bless --mount /Volumes/esp --setBoot
Finish Windows 7 Installation
  1. Reboot your computer, this time not holding any option keys. You should see the Windows flag quickly animate (this is VGA Shim doing its business in the background) and then Windows completing the installation, eventually booting into desktop.
  2. Install latest Intel HD 6000 (v15.40.10.4300 at the time of writing) and then all other Bootcamp drivers. You can find a list of what I used below.
Drivers
You can download the entire pack here. Alternatively, Bootcamp 5.1.5769 may be downloaded from Apple website; Bootcamp 6.0.6133 is unfortunately only available via the Boot Camp Assistant OS X app or on torrent sites. Either way, this is what I installed on MacBookAir7,2:
  • Apple Null Driver v5.1.4.0 from Bootcamp 6.0.6133
  • Apple Camera v5.0.22.0 from Bootcamp 5.1.5769
  • Apple Keyboard v5.1.6160.0 from Bootcamp 6.0.6133
  • Apple SD Card Reader v1.0.0.1 from Bootcamp 6.0.6133
  • Apple Trackpad v5.1.5900.0 from Bootcamp 6.0.6133
  • Cirrus Audio CS4208 v6.6001.3.24 from Bootcamp 6.0.6133
  • Broadcom USB Bluetooth v6.0.6100.0 from Bootcamp 6.0.6133 $WinPEDriver$ folder, v12.0.1.700 should also possibly work
  • Broadcom BCM4360 wifi v7.12.39.28 from the web
  • Intel Chipset INF Update v10.1.1.14 from Intel website
  • Intel HD 6000 v15.40.10.4300 from Intel website
  • Intel Management Engine v11.0.0.1202 from Intel website
  • Boot Camp Control Panel (BootCamp.msi) v5.1.5769 from Bootcamp 5.1.5769
Known Problems
  1. As on many other EFI computers, hibernation does not work.
  2. Full screen DOS apps may not work anymore (say bye to Prince of Persia).
  3. You will need to be careful when updating GPU drivers.
  4. Not sure if Microsoft memtest works, did not try.
Additional Info
  • Boot animation. The supplied bootx64.bmp boot animation was pulled from Windows 7's bootres.dll. It can be:
    • Replaced with any other animation. The file is assumed to have floor(long_side / short_side) frames of size short_side × short_side. Frames can be stacked either top-to-bottom or left-to-right. Each frame is displayed for approx. 20ms. File has to be a 24-bpp, uncompressed Windows bitmap.
    • Replaced with a square logo. File has to be a 24-bpp, uncompressed Windows bitmap.
    • Removed, and then a built-in static logo (final frame of the supplied bootx64.bmp) will be displayed.
  • Debug mode. If you keep 'v' (for 'VGA Shim') pressed during boot, you will enter debug mode that will tell you what the program is doing. Can be useful if it does not seem to work correctly or when we try to make it work on machines other than MacBook Air Early 2015.
  • Safe Mode. Works as expected but you need to keep pressing F8 even though you see the boot animation being played. The program will detect the F8 keypress, display a message and switch to text mode to enable Windows Boot Manager to display its prompts.
Credits
  • my wife for her patience over many coding evenings
  • ReactOS for sharing code that helped me understand what Windows is trying to do
  • Tianocore / EDK II / OVMF for making EFI app development possible and source of a similar workaround
  • @d3vi1 for essential initial research
  • @rockinrobstar for his DISM wiki
  • @Pockets69 for accompanying me along the way
  • Microsoft and Apple for for making this enjoyable journey necessary :)
When doing do_install.wim.bat, the bootmgfw.efi doesnt land on desktop. Even when it says "copied to desktop."
 

Baltazar3s

macrumors newbie
Mar 28, 2021
1
0
Hello. I have a MacBook Air 11, early 2015. I do everything according to the instructions. Doesn't see ssd. Please help me! Thanks!
 

Attachments

  • IMG_3138.jpeg
    IMG_3138.jpeg
    855.9 KB · Views: 20
Register on MacRumors! This sidebar will go away, and you'll see fewer ads.