Become a MacRumors Supporter for $50/year with no ads, ability to filter front page stories, and private forums.
@amedias tested lots of fans, including different Noctuas.
I've tested a few Noctua's too and these I'm still using with satisfaction :
PCI: NF-A 9 FLX no issues whatsoever , runs officially up to 1600rpm, but in real life reaches ~1700 rpm.
PSU:NF-A 12x25 ULN no issues, runs up to ~ 1250 rpm.

The Intake/exhaust and PSU fans are the same, so I'm planning on replace the Intake/exhaust by the NF-A 12 ULN too.
They're extremely silent (12dB! )

Note that these fans can not run the max rpm of the original Delta fans, so if the rpm range is sufficient for your setup, depends on the load , GPU, single or dual CPU etc...

I've tested the NF-A 12x25 FLX too, but the min rpm leads to issues (not recommended ).

Hello everyone,

I also took this path yesterday:

PCI: NF-A9 FLX
PSU/Exhaust/Intake: NF-A12x25 ULN
+ Northbridge: NF-A4x20

Thanks to this thread, I was able to connect all the fans (3pins): they are working as they should, in silence! For Intake and Exhaust, maximum RPM (1230) is a bit low (I can't cool the Northbridge TDiode below 70°C - that's why I have the small Noctua), but it's OK for what I do with my cMP (mail/internet/photos/music/ms office/vmware for Windows 10/minecraft).

Again, thank you for all your enlightening comments!
 
Could anyone point me to where I can find the part numbers for the original Delta fans in a 2010 5,1 Mac pro. My issue is noise rather than temperature and I suspect the 80mm fan in the heat sink is the cause. That's the one I particularly need confirmation of the number of so I can get one ordered before I pull the heat sink.

I suspect it is a Delta FFB0812EHE or FFB0812EHE-HS . These are available at low cost but I guess that Apple may have had them wired differently. If anyone knows whether they used the standard wiring as supplied by Delta for that part number or had them wired differently I'd be grateful if you could let me know.
 
Hello everyone,
just registered here to thank for your information and great research work. My Mac Pro CPU Heatsink fan (BOOSTA) got noisy and made a steady tone, even at lowest RPM (controlled by Macs Fan Control).
I ordered a used second complete heatsink from ebay for safety reasons but now put a cheap Sunon KD1208PTB3 80x80x25mm fan inside with the pin swap, connecting GND, Tacho and VCC to CNTRL signal. Works like a charm! Wouldn't have thought that this simple fan could run stable at 800rpm but it does. So the range is from 800 to 2500rpm which always was enough for my needs. The fan is abolutely inaudible up to 1200rpm in the Mac Pro. The temperatures also haven't changed as I always monitor my CPU and Northbridge Diode Temps.

GREAT WORK! ;)

Cheerio,

Ben :)
 
  • Like
Reactions: KeesMacPro
Hello everyone,

I also took this path yesterday:

PCI: NF-A9 FLX
PSU/Exhaust/Intake: NF-A12x25 ULN
+ Northbridge: NF-A4x20

Thanks to this thread, I was able to connect all the fans (3pins): they are working as they should, in silence! For Intake and Exhaust, maximum RPM (1230) is a bit low (I can't cool the Northbridge TDiode below 70°C - that's why I have the small Noctua), but it's OK for what I do with my cMP (mail/internet/photos/music/ms office/vmware for Windows 10/minecraft).

Again, thank you for all your enlightening comments!

Hi Remedylane,

I saw your post re the NF-A4x20 for the NB and it inspired me to do the same. I registered an account here to report it!

I wanted to see if I could achieve the same result using the built in fan headers on the motherboard for a cleaner look.

I purchased an NF-A4x20 as well as the NA-SYC1 y split cable and plugged it into the rear exhaust fan header. I decided on the rear header as the airport card doesn’t allow much room for cable management. It also allows to store much of the cable slack behind the backplate. All of this can be done by simply removing the CPU tray. No additional disassembly is required. The left notch on the y split plug needs to be cut off with a knife in order to fit into the exhaust fan header. The exhaust fan uses the 4 pin socket while the NF-A4x20 uses the 3 pin socket. Due to the pin layout the NF-A4x20 only gets 12V and ground which isn’t too much of an issue as it will run at a constant rate. I found that after removing the exhaust fan cable it was easier to plug in the split cable, then plug in the exhaust fan and tuck the cables behind the metal back plate. The other end of the cable is routed from the exhaust fan, behind the centre beam and loops back to the NB. The length of the y split cable, the low noise adapter and the cable on the fan has enough slack to put the fan in position while the CPU board is out of the case.

When reinserting the CPU tray just ensure that the cable is either tucked along the bottom of the back plate or arched so that it doesn’t interfere with the tray.

So far there doesn’t appear to be any issues sharing the exhaust fan header.
 
Had an hour or so spar this morning, made a couple of fan adapter cables up for pin swap method to make my testing easier and reduce stress on the LoBo connectors from all the plugging and unplugging. So now this adapter cable does the pin swap and no need to mod each fan to test.

Also.... my Voltage -> PWM converter boards arrived from China, had a preliminary play and.... SUCCESS!! I can use 4-pin PWM fans with SMC control. And you get the full RPM range of whatever fan you fit, so you can use fans with a min RPM above the SMC min default. Need to test more fan models obviously as I only hd 4 PWM fans here to play with but they all worked fine on initial testing. Need to do some more sleep/wake tests etc. to make sure it all still works as expected there.

The converter boards aren't big or difficult to wire up but they are bulkier than a pin swap so I'll probably keep using the pin-swapped 3-pin fans on my own machines but this is an option for people who want to use un-modified 4-pin PWM fans, the boards cost under $5 each. These could be the solution for those of you wanting to use the higher RPM Noctuas.

I'll do some more testing once I get my hands on some of those fans, just waiting till I have some spare cash as they're not cheap fans!

What a fantastic thread! thanks amedias!
Can I ask what is the analog/pwm converter so I can order them?
how the trimmer on it should be adjusted?
A miniaturised converter fitted in adapter cables would be marvellous for mac pro fans easy replacements...
I guess despite the size these little tools looks to be the best in order to go as low as possible rpm and be somewhat 100% compatible
with Apple fan management.
Thanks again ;)
 
Hi All,
Stumbled across this fascinating thread. I have a 2012 Mac Pro 5,1 and the rear exhaust fan is suddenly stuck on high. The repair shop has given up, as every sensor tests OK, and he says there's no obvious reason the CPU and the fan can't communicate. TGPro any Macs Fan Control just tell me the fan has "failed". I need a quiet computer for my music work, and the repair guy doesn't want to disconnect the fan for me. Would any of you take pity on a poor musician who doesn't do anything harder than swap out the occasional graphics card and point me in the right direction for help in disconnecting the rear fan??

And if anyone has any idea of anything else that might help to restore communications with the fan, please let me know. I've done all the obvious stuff (SMC reset, etc.) to no avail.
 
I had a crack at this over the weekend as well and can report as with others in this thread that the NF-S12B Redux 1200 works fine with the pin swap.

Amazon Canada Noctua shop seems to have stopped carrying the NFA-12x25ULN, so I opted for the NF-S12B. It's a lot nicer on the wallet as well! Overall pretty straight forward, I glued nylon nuts into the fan and use nylon screws to fasten the fan. Will have to swap out the Intake/Exhaust fan soon as well as PCIE. Now to do something about this pesky Vega 56 blower.
 
This is a fantastic thread! I just started doing the pin swap on my 120mm Noctua NF-A12x25 ULN fans. Can someone confirm whether or not I have it right? TIA

90778DB5-9F58-4300-A7EC-A9760957A7BB.jpeg
 
Would any of you take pity on a poor musician who doesn't do anything harder than swap out the occasional graphics card and point me in the right direction for help in disconnecting the rear fan??

Hi, theoretically you could disconnect the rear fan by removing the CPU tray, disconnect the cable from the header on the backplane ( close to the bluetooth card ) and slide the CPU tray back in...
Note that the Temps in the CPU compartment will go up so I'd highly recommend to look for a replacement OEM fan (Delta) or an aftermarket alternative .
The rear/front CPU fan can be replaced by removing the CPU case.
This is a link for the Technician Guide to get an idea about how to do this the correct way (and for maintenance, troubleshooting etc.):
 
I've done this mod on a single CPU tray mid 2009 Mac Pro 5,1, thank you very much for the tips in the forums.

I used:

1 x Noctua 92 x 92 x 25mm NF-B9 redux-1600
3 x Noctua 120 x 120 x 25mm NF-S12B redux-1200
1 x Noctua 80 x 80 x 25mm NF-R8 redux-1800

Much more silent now under a heavy load compared to stock fans and temps are perfect. Very enjoyable. The only audible thing during idle is the Radeon VII in the box, so I'm drawing considerable power already.

Some things I learned:

- Intake and exhaust fans are super easy to change once you learn how to take the tray out and disconnect speaker & two fan cables
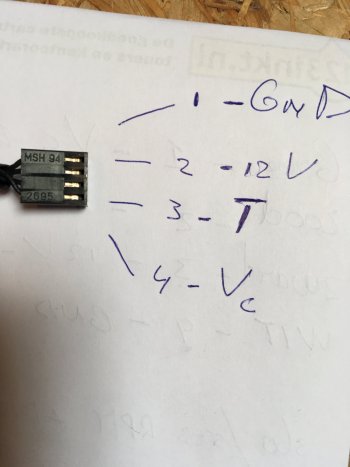
- CPU 6-pin connector could have a pinout mapping here to help others out: I discovered GND starts from the third pin from the left, after the two thermal monitor cables. Other pins from left to right are the same in order as for EX/IN/PSU but in reverse
- New thermal paste makes wonders to CPU temps
- GND is 1st pin for EX/IN/PSU from the right
- PCI is easy to install if you use screws to put the fan in and cut out the rubber legs
- For PSU, you do not have to remove motherboard to change it. Just disconnect the old fan from the motherboard, remove the cable under the motherboard and install the new one through the same route as the motherboard power connector goes (through the DVD compartment, behind the plate)
- PSU rubber legs are easily reused if you put them back in reverse (first in the fan, then in the box)

Probably some adapter cables in the future would make this whole process extremely fast to complete.
Hi @tar1na ,

I just ordered the exact same fans to put in my Single CPU Mac Pro.
How hard was replacing the Booster fan? I'm a bit nervous to get it out, especially with the cables and all. I don't feel like breaking anything in there.

Thanks !
 
I've read through this thread and looking forward to replacing at least a couple of the oem fans, starting with the intake and exhaust.
Has the Noctua NF-S12A FLX (3-pin) been tested yet with SMC or TGP pro to meet the minimum speed requirement?
(unless I missed it, I don't see that fan mentioned)

Thanks to all that contributed to this! anxiously waiting for some quiet :)
 
Has the Noctua NF-S12A FLX (3-pin) been tested yet with SMC or TGP pro to meet the minimum speed requirement?
AFAIK this one hasnt been tested/confirmed...

Looking at the specs (e.g.rpm max 1200) My guess is : it will work running at 600rpm minimum.
To be on the save side, you could get the NF-A12X25 ULN ,which is confirmed by several people, including myself, to work flawlessly...
Both fans have a rpm max of 1200.
 
  • Like
Reactions: smallwonder
OFF TOPIC :

For those wishing to replace the 4,1 or 5,1 cMP's PSU fan . . it can be done. I did it.

These two threads should be 100% read prior and be warned that the Backplane must be removed.
I included a video in the first thread re: this.

Thread #!

Thread #2

NOTE : I installed the Noctua fan speed controller. Info on that is in Thread #2.
The Noctua fan speed controller is wonderful for effortless Summer / Winter PSU temp control.

Well worth the effort.
 
  • Like
Reactions: smallwonder
OFF TOPIC :

For those wishing to replace the 4,1 or 5,1 cMP's PSU fan . . it can be done. I did it.

These two threads should be 100% read prior and be warned that the Backplane must be removed.
I included a video in the first thread re: this.
Dear MIKX,

The principal idea of this thread was to find a way to replace the OEM Delta fans by aftermarket fans and maintain all the virtues of controlling them by the SMC ...
So, indeed , your post is off-topic...

I admire your work and effort to post it.
It just is a completely different approach, i think...

Regards
 
Last edited:
  • Like
Reactions: hwojtek
Great work from you guys.

How hard is it to replace the Boost fan in a single CPU Mac Pro? I bought the 80mm Noctua. Will I need to solder it or is there another way?
 
Great work from you guys.

How hard is it to replace the Boost fan in a single CPU Mac Pro? I bought the 80mm Noctua. Will I need to solder it or is there another way?


Note that afaik there's no aftermarket fan with an rpm range (800-5200 !) as wide as the OEM CPU boost fan, which means practically:
-a replacement fan that runs fine at min rpm (800) but limited to e.g. 2000 rpm ( depends on the workload if this sufficient for cooling).
- a replacement fan that runs faster , but will not work properly at min rpm (800)...

You'll have to remove the heatsink, remove the OEM fan , find a way to identify the 4 cables while the MP is running (with the heatsink attached again!), and solder 3 of them to the new fan.
The above is assuming you bought a 3-pin voltage regulated fan.

Sorry if I disappoint you but personally i wouldnt recommend to replace the CPU Boost fan for an aftermarket one.
 
Last edited:
Just replaced the Intake, Exhaust, and PSU fans in my MacPro5,1 with Noctua A12x25mm ULN fans. The PSU fan was very easy to replace without removing the backplane. Just cut the connector off and pull the wire through from behind the board and re-route the new fan cable through the optical bay.
 
  • Like
Reactions: KeesMacPro
Just replaced the Intake, Exhaust, and PSU fans in my MacPro5,1 with Noctua A12x25mm ULN fans. The PSU fan was very easy to replace without removing the backplane. Just cut the connector off and pull the wire through from behind the board and re-route the new fan cable through the optical bay.
Re-routing the PSU fan cable is definitely a smart move .
Good to post it, a few people discovered that but i'm not sure it was mentioned in some thread..
 
Note that afaik there's no aftermarket fan with an rpm range (800-5200 !) as wide as the OEM CPU boost fan, which means practically:
-a replacement fan that runs fine at min rpm (800) but limited to e.g. 2000 rpm ( depends on the workload if this sufficient for cooling).
- a replacement fan that runs faster , but will not work properly at min rpm (800)...

You'll have to remove the heatsink, remove the OEM fan , find a way to identify the 4 cables while the MP is running (with the heatsink attached again!), and solder 3 of them to the new fan.
The above is assuming you bought a 3-pin voltage regulated fan.

Sorry if I disappoint you but personally i wouldnt recommend to replace the CPU Boost fan for an aftermarket one.
Thanks for your feedback. I ordered a replacement heatsink/fan combination to experiment and it is definitely not an easy replacement. I'll start with intake/exhaust and PSU and hope that this will already reduce noise. I have an irritating hum, so I'm just hoping it's not coming from the CPU fan.
 
Thanks for your feedback. I ordered a replacement heatsink/fan combination to experiment and it is definitely not an easy replacement. I'll start with intake/exhaust and PSU and hope that this will already reduce noise. I have an irritating hum, so I'm just hoping it's not coming from the CPU fan.
I assume replacing the PSU and intake/exhaust fans will reduce the noise significantly.
Normally the CPU Boost fans are very silent , unless the bearings are worn, of course..
 
Register on MacRumors! This sidebar will go away, and you'll see fewer ads.