I've been testing and testing the entire day, and come up with these two bulletproof ways bellow to update from PB1 to PB2 on a fresh install of macOS Sierra PB1 pacthed with
@dosdude1 's tool.
First of all I would like to say that
there is no reason to change the urls of the software update catalog, and it's also not to change all "return false" with "return true". These things might be why you keep having the update showing up.
Secondly I don't know if it will work on a already used installation where you've tried a lot of things in order to get the update to work, but the guide bellow does work on a fresh clean and patched PB1 install (method 2 might also work for an already running installation). I've confirmed that 5-6 times in a row now, so it should work.
Method 1 - Login at the Apple Store under install of macOS Sierra PB1
- On first boot allow the Mac to run its stuff after you start the OS for the first time. It will create the folders and files needed in order to update.
- After this is done the App Store icon in the dock shows that 1 update is ready. This is an update to the recovery tool. Just keep the App Store closed for now. We'll open it later. Also ignore the two notifications about that there is an update and about enabling automatic updates.
- After this go to this folder:
/private/var/folders/zz/zyxvpxvq6csfxvn_n00000s0000068/C/softwareupdated/com.apple.SoftwareUpdate.SUCatalogDataManager/r/031-68146
(note that the folders C and softwareupdated are locked and you have to give them read/write access)
- In the above folder (031-68146) there is a .dist file. It's named 031-68146.*.dist (the * is the language of your macOS installation). In the file you delete your Mac in the "nonSupportedModels" array. In my case it is the MacBookPro 5,1. You also need to add your board ID in the "boardIds" array. In my case it is Mac-F42D86A9. It is important that you keep the syntax, so make sure that your entries follows the same pattern as the ones allready there. If you don't know your board ID you can find it with the Terminal command:
sysctl hw.model | awk '{ print $2 }'
ioreg -l | awk -F\" '/board-id/ { print $4 }'
(note that the number of files in the folder com.apple.SoftwareUpdate.SUCatalogDataManager shouldn't be increasing when you edit the .dist file as it then might be overwritten later. It apparently taskes a while after software update check before the entire process has completed)
- Next step is to use Terminal to trigger the update to appear. In the terminal use the command:
sudo softwareupdate --list
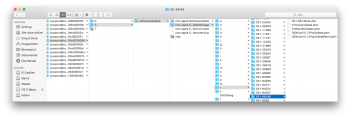
- Notice how 4 files appear after a while in the 031-68146 folder from before (see thumbnail). When the command finishes in Terminal it should list the update to PB2.
- You can close the Terminal now and open the App Store and update like you normally would have done.
Method 2 - Login at the Apple Store after install of macOS Sierra PB1
- On first boot of the Mac open the App Store and let it look for updates. It will only find the recovery tool update, and it is perfectly fine for now. The step is necessary as It will create the folders and files needed in order to update.
- When the check for software updates has finished, you can close the App Store. (Ignore the notification about enabling automatic updates)
- After this go to this folder:
/private/var/folders/zz/zyxvpxvq6csfxvn_n00000s0000068/C/softwareupdated/com.apple.SoftwareUpdate.SUCatalogDataManager/r/031-68146
(note that the folders C and softwareupdated are locked and you have to give them read/write access)
- In the above folder (031-68146) there is a .dist file. It's named 031-68146.*.dist (the * is the language of your macOS installation). In the file you delete your Mac in the "nonSupportedModels" array. In my case it is the MacBookPro 5,1. You also need to add your board ID in the "boardIds" array. In my case it is Mac-F42D86A9. It is important that you keep the syntax, so make sure that your entries follows the same pattern as the ones allready there. If you don't know your board ID you can find it with the Terminal command:
sysctl hw.model | awk '{ print $2 }'
ioreg -l | awk -F\" '/board-id/ { print $4 }'
(note that the number of files in the folder com.apple.SoftwareUpdate.SUCatalogDataManager shouldn't be increasing when you edit the .dist file as it then might be overwritten later. It apparently taskes a while after software update check before the entire process has completed)
- Next step is to use Terminal to trigger the update to appear. In the terminal use the command:
sudo softwareupdate --list
- Notice how 4 files appear after a while in the 031-68146 folder from before (see thumbnail). When the command finishes in Terminal it should list the update to PB2.
- You can close the Terminal now and open the App Store and update like you normally would have done.
[doublepost=1469196615][/doublepost]
@LarrikinAus - how did you find out what the update identifier was for the PB2 update? It would be nice to know so that it is easy for us to update when the PB3 comes out
")