Become a MacRumors Supporter for $50/year with no ads, ability to filter front page stories, and private forums.
Status
The first post of this thread is a WikiPost and can be edited by anyone with the appropiate permissions. Your edits will be public.
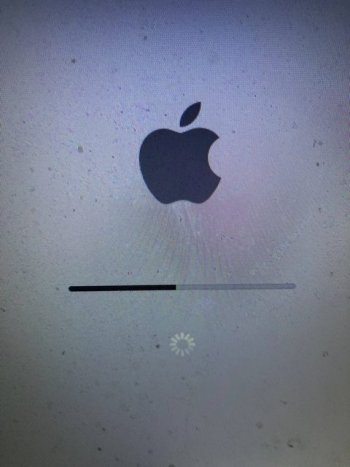
One more stupid question. Early 2011 MBP (8,1) Mojave 10.14.6 (18G103)

I tried to update to 18G9323 using the 2021-005 security update and now it won't boot. Is there any way to fix it or do I have to reinstall the OS?

Excuse the dirty screen.
 

Attachments

  • V3kl.jpg
    V3kl.jpg
    39.4 KB · Views: 130
One more stupid question. Early 2011 MBP (8,1) Mojave 10.14.6 (18G103)

I tried to update to 18G9323 using the 2021-005 security update and now it won't boot. Is there any way to fix it or do I have to reinstall the OS?

Excuse the dirty screen.
did you apply the post install patches-you have to do that after updates!
 
  • Like
Reactions: jpr281
Hi all

Like every year, with the release of the new Apple OS, our unsupported macs, which are still under macOS Mojave patched with the excellent @dosdude1 patcher, will display the new OS update in system preferences and display a red badge on the Dock icon.

View attachment 1878267

In order to get rid of this, for those who have downgraded their SoftwareUpdate.framework (because "Ignore" command is deprecated since 18G5033) here is a script to run in the Terminal, (to be used with "sudo").

Otherwise here are the 5 command lines to be executed one by one in the Terminal.
Code:
sudo softwareupdate --ignore "macOS Monterey"
sudo defaults delete /Library/Preferences/com.apple.SoftwareUpdate.plist LastRecommendedMajorOSBundleIdentifier
defaults delete com.apple.preferences.softwareupdate LatestMajorOSSeenByUserBundleIdentifier
defaults write com.apple.systempreferences AttentionPrefBundleIDs 0
killall Dock

For those who have NOT downgraded their "SoftwareUpdate.framework" the following 4 lines are to be executed each time the system has checked for updates and displays the red badge on the System Preferences icon in the Dock.
Code:
sudo defaults delete /Library/Preferences/com.apple.SoftwareUpdate.plist LastRecommendedMajorOSBundleIdentifier
defaults delete com.apple.preferences.softwareupdate LatestMajorOSSeenByUserBundleIdentifier
defaults write com.apple.systempreferences AttentionPrefBundleIDs 0
killall Dock

EDIT:
I also created an application with Applescript that executes the 4 commands above, so no more need to open Terminal and run the .sh script, nor to copy/paste the command lines one by one.
Caution: this application does not run the command sudo softwareupdate --ignore "OS NAME".

I tested, this application works very well in Mojave but also in Big Sur, so I think it should work in Catalina too.
View attachment 1884326
Thanks, this worked for me. However, once I click Check for Updates - it comes back. Ran terminal once again to get rid of it, but any way to get rid of it permanently?
 
Thanks, this worked for me. However, once I click Check for Updates - it comes back. Ran terminal once again to get rid of it, but any way to get rid of it permanently?

In a Finder window in /Applications, create an alias for "System Preferences.app". Rename the alias "System Preferences". Drag the alias into the dock. Remove the System Preferences app from the dock. Done.

(There's a little arrow on the alias, but it's barely noticeable, I think. "Aliases don't need no steenkin' badges.")
 
I'm not sure if anybody wants this information, but I might as well share it. I never use the automated macOS downloaders. Since day one I just downloaded the files from the software catalog by hand. (I just got beta 4 this way.) If anybody else wants to know how to do that...


1. Download the software catalog. This year's is https://swscan.apple.com/content/ca...n-lion-snowleopard-leopard.merged-1.sucatalog but they always follow the same pattern. Next year's will just be ...index-10.15seed-10.15-10.14... so you can do what I do and grab a copy the moment it's released to developers without waiting for somebody to upload the beta access utility.

2. Open it in a text editor.

3. Search for InstallAssistantAuto.smd and go to the last instance of that.

4. From the point you're at, find the next instance of RecoveryHDMetaDmg.pkg and download that link.

5. Do the same for InstallESDDmg.pkg and InstallAssistantAuto.pkg. They should all be close together inside a "Packages" dict.

6. Extract the contents of the packages and the payload of InstallAssistantAuto.pkg (use a pbzx parser). You should end up with the install app, InstallESD.dmg, and RecoveryHDMeta.dmg.
Edit for anyone who comes across this post in future -- don't bother with the pbzx parser, just use the undocumented pkgutil --expand-full! Much easier.

7. Show package contents on the app and go to Contents/SharedSupport. Copy InstallESD.dmg into here.

8. Mount RecoveryHDMeta.dmg and copy the contents of the virtual disk into SharedSupport too.


These steps, without fail since at least macOS Sierra, will produce a functioning copy of the install app without needing an Apple ID, developer ID, or supported Mac.

Since there are now automatic download scripts, there's no real reason to follow these steps. I figured I'd share them for academic purposes only, if anyone wants to make their own automated downloader or whatever.

Edit: I've never actually looked at the code for the automated downloaders. I assume that they use this same process, though.
Quite a bit off topic, but this doesn't work anymore. After extracting InstallAssistantAuto.pkg, I found the the install app is for Catalina with a modified date of October 28, 2020. Yes I downloaded the new sucatalog file. https://swscan.apple.com/content/ca...n-lion-snowleopard-leopard.merged-1.sucatalog As well as https://swscan.apple.com/content/ca...n-lion-snowleopard-leopard.merged-1.sucatalog
 
  • Like
Reactions: TimothyR734
that should run, I have a MacBook Air 2010 and Mojave runs excellent!
there is a list of macs on the first page the patch will work with, graphics cards and all that fun info.
the install is easy and the Sox runs 32bit app as well as syncing well with other  products.

I've used the process before to run Monterey on a 2014 MacBook Pro. I'm going to try installing it on an external SSD to play around with and then install it on the internal HDD if all goes well. My only concern is how it runs on the HDD as the newer macOS versions are designed for SSDs. It's possible that the large amount of RAM on the system effectively negates the performance issues with the HDD.
 
I've used the process before to run Monterey on a 2014 MacBook Pro. I'm going to try installing it on an external SSD to play around with and then install it on the internal HDD if all goes well. My only concern is how it runs on the HDD as the newer macOS versions are designed for SSDs. It's possible that the large amount of RAM on the system effectively negates the performance issues with the HDD.
You're right - APFS performance is not good with HDDs, and the user experience suffers a lot.
Generally, more than 8 GB of RAM will not improve the performance when not using lots of applications in parallel or "professional" (or rather inefficiently implemented) applications.
 
  • Like
Reactions: TimothyR734
Can anyone help with display brightness on my early 2008 MBP 4,1? I cannot get it working, either by the F1/F2 keys, through the Displays preference pane, or with the Brightness Slider menu bar app from the App Store. However, i have observed some very odd behavior.

With either the Displays preference pane slider or the F1/F2 keys, I can adjust the slider, or press the Fn keys, and it shows that brightness is being adjusted - but it's not. Nothing actually changes. The only variability in brightness I can get with either of those methods is: (1) very dim, no matter where the slider sits; or (2) complete darkness, if I move the slider all the way to the left or hold down the F1 key.

With the Brightness Slider app, here's where the really odd behavior comes in: If I adjust the slider in the app, the screen will brighten momentarily and seems to approximate the correct brightness for the position on the slider - but it only lasts for a brief moment, then reverts to very dim. The slider itself will revert to the full brightness position, while the screen remains very dim. This happens every time I try to use the slider in Brightness Slider. It's as though Brightness Slider is momentarily able to gain control of the hardware, but the OS takes it right back.

All the above persists no matter whether I have the Displays preference pane set to adjust brightness automatically or not. I've tinkered with every setting I can think of, nothing seems to make a difference.

But now, here's the kicker: I just recently bought this MBP, and it came with Mojave pre-installed via @dosdude1's patcher. The seller said as much, and when I got it, it was so. He had already installed Mojave on it and - brightness controls work! But I don't really like using someone else's OS installation, I want to start fresh. Unfortunately, I cannot repeat his success with the brightness controls, and he doesn't remember how he did it.

I stilll have his installation on a separate drive, so I can compare the differences between the two if someone can tell me where to look. If anyone has a suggestion how to fix this problem, I'd really appreciate that!
When you reinstalled macOS Mojave did you apply the the post install patches for your Mac ?
 
  • Like
Reactions: Raging Dufus
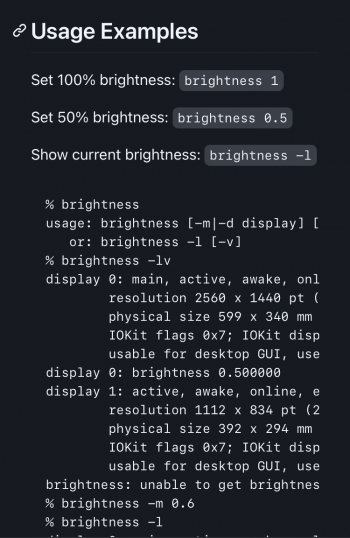
Did you open the terminal and enter brightness 1
Nope, missed that part, sorry.

Ok, so I did that, and now I can get brightness control with the Brightness Slider menu bar app. But it seems I can't get more than 90%, because if I move the slider all the way up the screen reverts to very dim. And although my F1/F2 keys work with Brightness Slider, they still don't work like they should without it. Also, the settings don't persist on reboot, I have to use the slider again to get brightness.

This isn't great, but it's a definite improvement. Thanks for your help!
Well I’m trying to save for another iMac mine went belly up but I used another app from the App Store and it’s free as well called quick shade :)
 
  • Like
Reactions: Raging Dufus
Can anyone help with display brightness on my early 2008 MBP 4,1? I cannot get it working, either by the F1/F2 keys, through the Displays preference pane, or with the Brightness Slider menu bar app from the App Store. However, i have observed some very odd behavior.

With either the Displays preference pane slider or the F1/F2 keys, I can adjust the slider, or press the Fn keys, and it shows that brightness is being adjusted - but it's not. Nothing actually changes. The only variability in brightness I can get with either of those methods is: (1) very dim, no matter where the slider sits; or (2) complete darkness, if I move the slider all the way to the left or hold down the F1 key.

With the Brightness Slider app, here's where the really odd behavior comes in: If I adjust the slider in the app, the screen will brighten momentarily and seems to approximate the correct brightness for the position on the slider - but it only lasts for a brief moment, then reverts to very dim. The slider itself will revert to the full brightness position, while the screen remains very dim. This happens every time I try to use the slider in Brightness Slider. It's as though Brightness Slider is momentarily able to gain control of the hardware, but the OS takes it right back.

All the above persists no matter whether I have the Displays preference pane set to adjust brightness automatically or not. I've tinkered with every setting I can think of, nothing seems to make a difference.

But now, here's the kicker: I just recently bought this MBP, and it came with Mojave pre-installed via @dosdude1's patcher. The seller said as much, and when I got it, it was so. He had already installed Mojave on it and - brightness controls work! But I don't really like using someone else's OS installation, I want to start fresh. Unfortunately, I cannot repeat his success with the brightness controls, and he doesn't remember how he did it.

I stilll have his installation on a separate drive, so I can compare the differences between the two if someone can tell me where to look. If anyone has a suggestion how to fix this problem, I'd really appreciate that!
dosdude1 created a backlight control patch (bkltpatch10.14.2) that's worked PERFECTLY on my 17" CCFL-based display in my Early 2008 MBP 4,1 running Mojave 10.14.2 to 10.14.6 !!! My backlight buttons work properly again... and reboots now preserve the previous backlight setting.


I rebooted connected to AC power and again on battery power to confirm it was working correctly.

dosdude1, THANKS AGAIN FOR ALL YOUR AMAZING HARD WORK !!! Everybody here REALLY appreciates it !!!
 
Last edited:
Can anyone help with display brightness on my early 2008 MBP 4,1? I cannot get it working, either by the F1/F2 keys, through the Displays preference pane, or with the Brightness Slider menu bar app from the App Store. However, i have observed some very odd behavior.

With either the Displays preference pane slider or the F1/F2 keys, I can adjust the slider, or press the Fn keys, and it shows that brightness is being adjusted - but it's not. Nothing actually changes. The only variability in brightness I can get with either of those methods is: (1) very dim, no matter where the slider sits; or (2) complete darkness, if I move the slider all the way to the left or hold down the F1 key.

With the Brightness Slider app, here's where the really odd behavior comes in: If I adjust the slider in the app, the screen will brighten momentarily and seems to approximate the correct brightness for the position on the slider - but it only lasts for a brief moment, then reverts to very dim. The slider itself will revert to the full brightness position, while the screen remains very dim. This happens every time I try to use the slider in Brightness Slider. It's as though Brightness Slider is momentarily able to gain control of the hardware, but the OS takes it right back.

All the above persists no matter whether I have the Displays preference pane set to adjust brightness automatically or not. I've tinkered with every setting I can think of, nothing seems to make a difference.

But now, here's the kicker: I just recently bought this MBP, and it came with Mojave pre-installed via @dosdude1's patcher. The seller said as much, and when I got it, it was so. He had already installed Mojave on it and - brightness controls work! But I don't really like using someone else's OS installation, I want to start fresh. Unfortunately, I cannot repeat his success with the brightness controls, and he doesn't remember how he did it.

I stilll have his installation on a separate drive, so I can compare the differences between the two if someone can tell me where to look. If anyone has a suggestion how to fix this problem, I'd really appreciate that!

Here's my instructions I created to install this Backlight Patch:


1. make sure bkltpatch10.14.2 folder is on Desktop

2. launch Terminal

3. cd /Users/OldMBPPro/Desktop/bkltpatch10.14.2

4. ./install.sh

5. ignore all the error messages

6. wait for Backlight Patch to finish installing. Last 2 lines in Terminal should be:

KernelCache ID: 1F0C5C558362E93DAC0C6A53B961E0E9
MacBook-Pro-2:bkltpatch10.14.2 OldMBPPro$

7. Restart
 
  • Like
Reactions: Raging Dufus
Register on MacRumors! This sidebar will go away, and you'll see fewer ads.