Become a MacRumors Supporter for $50/year with no ads, ability to filter front page stories, and private forums.
Status
The first post of this thread is a WikiPost and can be edited by anyone with the appropiate permissions. Your edits will be public.
As I understand,
Martin added clover configurator to easy mount EFI
And I am also very comfortable using this application.
you can very quickly mount efi, edit efi folder


Screen Shot 2023-08-11 at 16.13.24.png
 
I have a 2010 Mac Pro 5,1 with a Radeon RX 580 8 GB graphics card. I have been using Martin's opencore for 3 years, upgrading to Mojave and then to Catalina back when I started.

I just added a drive and anticipated updating to Monterey and ran into a bit of a snag. Reading the various posts on this forum has given me some ideas, but no fix.

I got the "a required firmware update could not be installed" error upon trying to instal Monterey onto a new drive. I am able to install Big Sur, but not Monterey.

I am using opencore 0.9.3 and I did alter the config.plist by a change the cpuid1mask (the A to C), and UpdateSMBIOS to false.

I have searched the forums and found - You need to "update" the firmware features in PlatformNVRAM (see Complete your setup>Spoofing and enabling missing features in post #1) - so I looked at post #1, spoofing and enabling missing features, and then under - For a better experience when installing and updating Monterey, you'll also need to "update" the firmware features: - , but I couldn't understand what lines needed to be changed and what the lines need to be changed to.

Some of the choices were:

Find ⠀ ⠀ ⠀ ⠀ ⠀ ⠀ ⠀ ⠀ ⠀ ⠀ ⠀ ⠀ ⠀ ⠀ ⠀ ⠀ ⠀ ⠀ ⠀ ⠀ ⠀ ⠀ ⠀ ⠀ ⠀ ⠀Replace ⠀ ⠀ ⠀ ⠀ ⠀ ⠀ ⠀ ⠀ ⠀ ⠀ ⠀ ⠀ ⠀ ⠀ ⠀ ⠀ ⠀ ⠀ ⠀ ⠀ ⠀ ⠀ ⠀ ⠀
<key>PlatformInfo</key>
<dict>

<key>PlatformNVRAM</key>
<dict>

<key>FirmwareFeatures</key>
<data>
</data>

<key>FirmwareFeaturesMask</key>
<data>
</data>


<dict/>

<key>UpdateNVRAM</key>
<false/>

<key>PlatformInfo</key>
<dict>

<key>PlatformNVRAM</key>
<dict>

<key>FirmwareFeatures</key>
<data>
A1QMwAgAAAA=
</data>

<key>FirmwareFeaturesMask</key>
<data>
P/8f/wgAAAA=
</data>


<dict/>

<key>UpdateNVRAM</key>
<true/>

I wasn't sure if I am supposed to find the line that show in the replace section and make it look like the find section or the other way around.

My apologies for the long post. I would really like to find a way to get to Monterey on my mac, seeing how this may be my last upgrade

Thank you for any assistance.
follow this link to install monterey. the reason why you got firmware error is because you didnt do this.
 
Open Core Configurator does this and also OC configuration and .plist validation:)
tried to find it on google
some non-trusted download resources that I definitely can't trust with my security
I don't understand how to download on github
until I understand the benefits, I will use the clover from Martin's package
 
The Dumper had made some progress what imo is very useful for OpenCore troubleshooting:

It reads the bootvars and bootorder out of the nvram content of a firmware dump it makes.

Where possible it gives the path and storage product name and type, reads OS Version out of Preboot's SystemVersion.plist and .contentDetail string.

Examples:
Code:
BootOrder: 1:Boot0080
Boot0001: OpenCore |EFI|disk3s1 (SATA Bay 3:ST1000DM003-1ER162)|EFI|EFI\OC_OCLP031\OpenCore.efi
Boot0080: Mac OS X |Apple_APFS|disk2s2 (SATA Bay 1:Samsung SSD 850 PRO 256GB)|\x-EC79-4675-96B4-786E627FCA06\System\Library\CoreServices\boot.efi
Boot0080 is MacOs 10.14.6, label: Mojave
Boot0081: Recovery OS \x-98B6-49D7-9BAF-0E6A2928C527\boot.efi
Boot0082: |Apple_APFS|disk2s2 (SATA Bay 1:Samsung SSD 850 PRO 256GB)|\x-EC79-4675-96B4-786E627FCA06\System\Library\CoreServices\boot.efi
Boot0082 is MacOs 10.14.6, label: Mojave
BootFFFF: |EFI|disk3s1 (SATA Bay 3:ST1000DM003-1ER162)|EFI|\EFI\BOOT\BOOTX64.efi
OCBtOrder: 1:OCBt0080
OCBt0080: Mac OS X [USB] \x-9D33-4C33-86EE-B3C893C0C765\System\Library\CoreServices\boot.efi
OCBt0081: Mac OS X \x-66D5-4532-99D9-7711AAE353F5\System\Library\CoreServices\boot.efi

So in this example one can read that OpenCore is _not_ the blessed bootloader
because BootOrder: 1:Boot0080

Boot0080 is Mac OS X, in format: Apple_APFS, actual path: disk2s2, living in (SATA Bay 1
on a Samsung SSD 850 PRO 256GB)
It is MacOs 10.14.6 and the disk is shown in the boot picker as "Mojave"

--------------------------------------------------

the next example: this time as a screenshot:

Bootvars with physical positions.png


here we can read that we have OpenCore in Boot0001, the ESP is living in a SM0256 Apple SSD blade, the actual path is disk0s1

But as BootOrder is [Boot0080, Boot0001] the OS in Boot0080 is loaded first.

This is ok on this machine as Boot0080 is MacOs 10.11 living in Sata Bay 1 on a Maxtor 6Y160M0 drive.

For OpenCore it should be BootOrder: Boot0001
...as OCBt0080 is a Mac OS X, OpenCore would load OCBt0080 from the Apple Blade on disk 0s2


thanks to @joevt for the dumpbootvars scripts where I adapted some code and gathered a lot of knowledge from.


What I guess, also helps: The included little script "Mount ESP from list". I made it for mounting the ESPs showing also drive type and position.

After we know from dumping the firmware / the bootvars we may know the path and drive types:
Mount ESP from list.png


the link to the Dumper:
 
Last edited:
Why would Martin attach Clover configurator to his Open Core editions? Do you mean Open Core Configurator? It is a standalone product from a different developer.

For easier mounting the EFI.
His build was not working for the stock blue-tooth board in Mac Pro 2010. When the OpenCore Legacy Patcher was introduced. I moved to that immediately and the stock blue-tooth works out just fine and abandoned his build ruthlessly.
 
For easier mounting the EFI.
His build was not working for the stock blue-tooth board in Mac Pro 2010. When the OpenCore Legacy Patcher was introduced. I moved to that immediately and the stock blue-tooth works out just fine and abandoned his build ruthlessly.
Bluetooth only works with OCLP because of patches.
and abandoned his build ruthlessly.
Huh?
 
For easier mounting the EFI.
His build was not working for the stock blue-tooth board in Mac Pro 2010. When the OpenCore Legacy Patcher was introduced. I moved to that immediately and the stock blue-tooth works out just fine and abandoned his build ruthlessly.
Opencore configurator has nothing to do with OCLP. It is the same as clover configurator but for OpenCore. And it mounts the EFI partitions the same way. It also shows which EFI partition has booted the OpenCore if there are multiple partitions even with OC.
 
Why would Martin attach Clover configurator to his Open Core editions?
To prevent users to use the configurator to edit the config file (if OpenCore configurator is used). As we know OC changes frequently and the OC configurator catches up a little bit later.
 

ESP Tools​


What ESP is blessed one can see when dumping the firmware with the Dumper.


To mount ESP Partitions one can use my ESP tools:

what's in?


the copy ESP tool:
- select source ESP from a list with bootloader flavor, drive's made, type, interface, physical position
- select destination ESP from same list
- it copies the ESP from source to destination, asks for confirmation if destination ESP has a bootloader
- also can copy to a folder for archiving. Folder name contains bootloader flavor and a time stamp
- copies archived bootloaders back


the tools for mounting the ESPs:
- mount all ESPs: just dumb mount all ESPs found on all volumes
- mount ESP from list: shows a list with drive's made, type, interface, physical position
- mount ESP from list & show bootloader: same as mount ESP from list plus list the bootloader flavor
- Automount ESP with bootloader: Mounts the ESP with the blessed bootloader. Works or not, it depends...

- unmount all ESPs: just unmount all mounted ESPs

- open all ESPs: it does just what the name says


for don't just show "EFI Boot" in the bootpicker:
- Label all bootloader ESPs: reads all ESPs, prompts you to rename to whatever you want, default is the ESP flavor
- Label mounted bootloader ESP: Same as Label all bootloader ESPs, but just for the single mounted one

(hint: if the rendered name is white on white / black on black then you may set automatic light / dark mode and a system setting is not written. If you once change to dark mode and back to automatic mode this setting is corrected.

I just added a button to overwrite that since version 20-2-2024.)


for identifying the mounted ESPs:
- Tag all ESPs: Places a null bytes file in the root of the ESP with drive's made, type, interface, physical position
- Check ESPs for MS certificates: It checks the ESPs for a bootloader containing Microsoft Uefi Windows certificates


Blessing:
- Bless OpenCore ESP: Bless (set the bootvar to it) the selected ESP


Preboot fixer and renamer:
- Not exactly a ESP tool, this let you rename the Boot Picker entry for the OS. If your entries suddenly change to xyz - data you suffered from High Sierra overwriting Preboot volumes of newer OS.
In OpenCore you will see a mismatched High Sierra
icon. This is due overwritten SystemVersion.plist. Also invalid board ID / the forbidden sign can happen.
This tool also repairs these issues.

(hint: if the rendered name is white on white / black on black then you may set automatic light / dark mode and a system setting is not written. If you once change to dark mode and back to automatic mode this setting is corrected.

I just added a button to overwrite that, this will be in the next release after 17-2-2024.)

1 select source ESP.png

2 select destination ESP.png

3 confirm to delete destination ESP.png

4 copied.png

5 destination ESP with tag.png

------------------------------------------------------------------------------------------------------------------------------
an archived ESP folder, DosDude APFS loader ESP is the flavor, next is the time stamp:
5 there is the folder.png


Screenshot 2023-09-05 at 23.46.05.png

mount ESP from list & show bootloader
4 ask for deactivate Windows ESP.png

Prevent UEFI Windows from booting directly without OpenCore / RefindPlus protection


labels in bootpicker.jpg

Labeled ESPs, normally they all show "EFI Boot"
(the custom icons for RefindPlus are not handled by the script, that was the former method to separate them for me)

Screenshot 2023-09-24 at 22.21.04.png

Screenshot 2023-09-24 at 22.21.41.png

These are for setting a custom name instead of "EFI Boot" what the boot picker shows


The ESP Tools are part of the Dumper. To ease administration I decided to link the whole Dumper.
One can find it in /Readme & other tools/ESP Tools/


downloader for the Dumper package (disk image password is: rom):
https://www.dropbox.com/s/t5k7j4gxj8n9pj2/Download Macschrauber's CMP Rom Dump.zip?dl=1


main post for the Dumper:
 
Last edited:
some non-trusted download resources that I definitely can't trust with my security
Look into "About Clover Configurator" and you will see that it comes from the same developer who does Open Core Configurator...
Regarding security: did you download the Clover Configurator directly from the developer? No. You trusted someone else (Martin) it is safe. Why do you not trust the actual person who did the Clover Configurator and not use the Open Core Configurator from his web page you have been provided with? Bizarre.
 
thanks Macschrauber, I tried it - useful app
hwojtek: as for trust
as for the opencore configurator: google offers some sites for downloading - which I can't trust
as to github (according google search) : the configurator was updated 4 years ago -
besides, i need to generate a program (which I obviously don’t know how to do)
for interest, I launched the x-code - a program that was absolutely incomprehensible to me was opened - there is no mount efi, no edit config
I'm talking about this - I'm not a developer - I'm a user, I can't find where to download the app
Therefore, I use what is recommended by macrumors

now again for information:
my input data:
I have a OC on sata samsung 840 instead of dvd - I can configure it at any time on my macbook
macos i have only monterey 2tb nvme bay 3
I also have a rescue ssd with mojave - it will disconnect
I also have 1tb sata m2 windows - a special adapter nvme + sata two ssd on one adapter - I transfer data via a cable connected to dvd2
I also have a 4xnvme raid adapter - there I have 2 evo plus in raid0 - working files for working on macos, also evo plus with 3d libraries and a nvme crucial for working with windows

windows installed according to instructions (a few years ago)
checked: secure boot was set to true

this weekend i booted into windows
updated windows
updated radeon pro driver
worked all day in windows with renderings in twinmotion (using path tracer option - available only for radeon RX6xxx)

yesterday booted into macos and surprises began (for almost an hour the processes could not stop)
Screen Shot 2023-08-15 at 14.49.02.jpg


again multiple times resetting nvram and smc, rebooting into recovery and again resetting smc and nvram
finally got mds and kernel task to work correctly
there was a secd process at 20% - searched in Google - followed the recommendations - disconnected from iCloud - the process disappeared

I think-
my computer shows bugs when apple indexing disks - it's probably a syncretic patch can't fix
and other bugs appear when Apple services work with apfs and probably with avx
 
Last edited:
To prevent users to use the configurator to edit the config file (if OpenCore configurator is used). As we know OC changes frequently and the OC configurator catches up a little bit later.
This is why the Open Core Configurator has two modes of operation - it defaults to the current OC build mode but you can switch it to future OC major version mode. The .plist semantics are well known ahead of the launch so with that approach it can cater even for versions that are still in development.
 
Appendix: Native boot screen support

This part of the guide provides instructions for adding EnableGop to your Mac's firmware.

☠️ If performed incorrectly, some the operations in this part of the guide can turn your Mac into a brick! Carefully read through all the instructions first. If you are unsure about something, do not proceed.
Do I understand correctly:
that this manual is needed only for cards that are supported by mojave (for example, RX580 and other polaris)
And, if I use the RХ6800, then it is useless for me, since I still won’t be able to boot into mojave, and for Monterey I already need opencore, which already gives me a bootscreen?

Because it provides native boot-screen support, EnableGop is super useful for everyone with a “standard” upgraded graphics card. In other words, you’ll be able to access the actual Apple Startup Manager by holding Option (or Alt) during startup just like with a Mac-EFI (OEM or flashed) card.

The entire guide (post #1) is written with the possibility of having native boot-screen support (look for “If your Mac has native boot-screen support”). You’ll find that certain steps become much easier.

Your card has been tested with EnableGop (see Supported hardware in the EnableGop thread), and while Mojave lacks the required drivers, it should still work unaccelerated (even when booting natively) with EnableGop.
thanks, I'll try
I have a clean ROM generated by tsialex
should i just edit it by adding the lines about gpu? I'm right?
 
Thanks to cdf and bmju and to everyone who took part in writing the program
today I did the flash EnableGop procedure
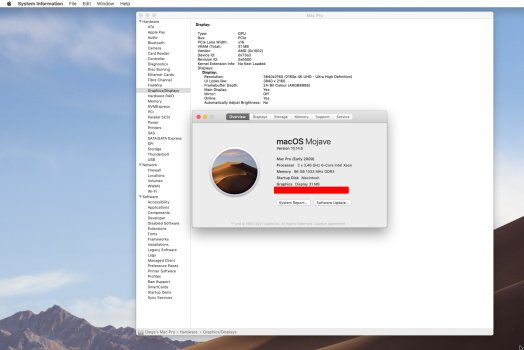
now I was able to boot into mojave without changing my RadeonPro W6800 gpu to a supported one (RX580 for example)
Of course, I did not expect from this procedure the result that in Mojave my RadeonPro W6800 GPU would work completely adequately (the screenshot shows that instead of 32GB it is recognized as 31MB)
Regarding monterey- I still load it by opencore bootpicker- and I don’t observe the functionality of enable gop (only a completely gray screen appears before loading opencore menu- and I experimented on the recovery- all the same, the recovery does not behave the same as in mojave- recovery monterey still loads by opencore - even checked with gpu rx580 - so monterey is still controlled by opencore) as I expected, obviously all the benefits should apply only to mojave or highsierra

for inexperienced users, I will briefly describe the nuances of the procedure that are not given in both manuals (cdf and bmju)
firstly, I did the flashROM procedure many times on both of my CMPs, so the procedure itself is familiar to me almost to automatism (thanks to tsialex for the detailed manual)
to make a dump and then a flash, you need to remove everything - all PCIe, all ssd and hdd.
leave only the boot disk with mojave or high sierra in sled 1 (OPENCORE MUST BE DISABLED or completely removed before the procedure)
before the procedure, I changed the GPU to one compatible with Mojave (RX580) and booted into Mojave (Mojave should not be patched - like dosdud1 - but should be native)
rebooted into recovery and disabled SIP
did the procedures from the last paragraph of the manual in post#1
The only thing I want to add to the manual:
after the dump and running the terminal of all commands, after rebooting before the flash, I checked the status of csrutil - for some reason it turned out to be enabled,
I had to reboot again in recovery and disable sip, then boot back into flash ROM mode.
probably cdf needs to be added to the manual, that before the flash procedure, you need to check the csrutil status, and if it is enabled, then reboot into the recovery and turn off the sip, otherwise suddenly the cmp will become a brick
 

Attachments

  • Mojave_w6800.jpg
    Mojave_w6800.jpg
    271.1 KB · Views: 95
to make a dump and then a flash, you need to remove everything - all PCIe, all ssd and hdd.
leave only the boot disk with mojave or high sierra in sled 1 (OPENCORE MUST BE DISABLED or completely removed before the procedure)
before the procedure, I changed the GPU to one compatible with Mojave (RX580) and booted into Mojave (Mojave should not be patched - like dosdud1 - but should be native)
rebooted into recovery and disabled SIP
did the procedures from the last paragraph of the manual in post#1
The only thing I want to add to the manual:
after the dump and running the terminal of all commands, after rebooting before the flash, I checked the status of csrutil - for some reason it turned out to be enabled,
I had to reboot again in recovery and disable sip, then boot back into flash ROM mode.
probably cdf needs to be added to the manual, that before the flash procedure, you need to check the csrutil status, and if it is enabled, then reboot into the recovery and turn off the sip, otherwise suddenly the cmp will become a brick

I think you overcomplicate things. Dump it, add EnableGop, flash it.

Its done in 10 minutes. The Dumper helps checking things and indicating the injection of the EnableGop module.
 
Last edited:
  • Like
Reactions: NC12 and MacNB2
Appendix: Native boot screen support

This part of the guide provides instructions for adding EnableGop to your Mac's firmware.

☠️ If performed incorrectly, some the operations in this part of the guide can turn your Mac into a brick! Carefully read through all the instructions first. If you are unsure about something, do not proceed.


My cmp is in a very inconvenient place and has a lot of connected peripherals.
I have to disconnect everything and change gpu
I am very careful about processes that can damage the hardware and strictly follow the recommendations
How to flash with ROMTool:
----------------------------------
If you use OpenCore, remove the drive that have the EFI folder and boot completely vanilla/standard. Don’t ever flash with OpenCore running. Please don’t use a hacked install, only flash or dump from completely supported macOS installs. Remove all your other disks - specially any UEFI Windows install - from PCIe/USB/FW/RAID/etc, just keep your fully macOS supported disk with SATA bay 1.
To flash the BootROM image you will use ROMTool and SIP needs to be disabled.
First enter Firmware Programming Mode correctly.

  1. Shutdown your Mac,
  2. Press and keep pressed the power button,
  3. You will hear a loud beep, keep pressed,
  4. You will hear the startup chime (if your Mac still has it, some Macs lost the chime with MP51.0087.B00), release the power button when it ends or when starts loading macOS (if your Mac lost the chime).
  5. After you login, you can proceed to the flashing process with ROMTool
if such strict instructions are written, then I prefer to do everything with great care
but even if I could bring the procedure to automatism, it would still take me at least an hour
 
probably cdf needs to be added to the manual, that before the flash procedure, you need to check the csrutil status, and if it is enabled, then reboot into the recovery and turn off the sip, otherwise suddenly the cmp will become a brick

Why it becomes a brick? Maybe your are not expressing yourself correctly here or your install require a specific csr-active-config value?
 
  • Like
Reactions: NC12
Why it becomes a brick? Maybe your are not expressing yourself correctly here or your install require a specific csr-active-config value?
of course I was misunderstood
just before such an important procedure, I have to constantly double-check whether everything was done by me according to the instructions
I was surprised that after dump and create the new ROM, I booted into the flash mod and before the flash started, I decided to check csrutil status - and for some reason it turned out to be enabled, I had to turn off sip again and boot into the flash mod again
the procedure itself was successful.
I am completely satisfied with the result - now I can load Mojave without replacing current GPU with a GPU from the compatible list
 
  • Like
Reactions: N008
Appendix: Native boot screen support

This part of the guide provides instructions for adding EnableGop to your Mac's firmware.

☠️ If performed incorrectly, some the operations in this part of the guide can turn your Mac into a brick! Carefully read through all the instructions first. If you are unsure about something, do not proceed.

You seem to have taken that comment by @cdf out of context. It is not related to disabling CSR but general warning relating any kind flash programming.

When, flashed my Mac ROM with EnableGop I seem to recall it took ~5 minutes and I do not recall having to disable CSR.
 
  • Like
Reactions: NC12
Register on MacRumors! This sidebar will go away, and you'll see fewer ads.