Become a MacRumors Supporter for $50/year with no ads, ability to filter front page stories, and private forums.
Status
The first post of this thread is a WikiPost and can be edited by anyone with the appropiate permissions. Your edits will be public.

cyberish

macrumors member
Oct 26, 2013
47
9
For those searching for a more reliable, useful solution to their otherwise unsupported ATI Radeon X1600 equipped Mac (iMac, MacBook Pro etc.), I gave Windows 10 64 Bit a whirl on our 2006 iMac 5,1 machine and after doing some homework, I'll be darned how exceptionally well it runs. Not a thing crippled functionally about it...fully operational and working with accelerated/beautiful graphics, SATA AHCI drivers for an SSD Hard Drive and Trim enabled, HD Audio, built-in iSight, Wireless, Ethernet, Bluetooth etc.

You'll need access to a PC w/ the app "ImageBurn" in order to build a custom Windows 10 64 Bit install disc as well as a combination of bootcamp drivers from v4, v5, and the latest BootCamp 6. Googling ATI Radeon X1600 for Windows 10 will instruct you how to get graphics working. I suppose you could install the View attachment 620433 32 Bit version and avoid some work however constructing the 64 Bit install disc allows of course the operation of a 64 bit system while also the ability to install Windows 10 without the bootcamp assistant app (you install the bootcamp drivers manually).

AMAZING. Could you eventually give us a more detailed "How to"? thx
 

Riwam

macrumors 65816
Jan 7, 2014
1,095
244
Basel, Switzerland
AMAZING. Could you eventually give us a more detailed "How to"? thx
*****
You will no doubt get the answer to your question from this talented forum member.
Just a mention that in YouTube there is a short film showing a way to install Windows 10 not directly with BootCamp but instead using reFind as a boot manager, Tuxera to format a part of the inner drive (partition for Windows) in NTFS and later adding manually Apple drivers from Bootcamp.
Interesting to see and for some people useful as well.
I followed more or less the idea in that video and managed to install Windows 10 in an old MacBook 4.1 early 2008 which should only allow Windows 7 according to Apple (but BootCamp didn't accept my Windows 7 for reasons I ignore).
Ed
 

TMRJIJ

macrumors 68040
Original poster
Dec 12, 2011
3,530
6,712
South Carolina, United States
OS X Patcher Beta 2

Changes:
  • Added options for Yosemite, Mavericks, and Mountain Lion Scripts
  • Fixed confusion with flat and bundle distribution within the Installer.
  • Kexts are updated in parallels with OS X Extractor 1.32
Known Bugs:
  • Some users report that other OSs besides El Capitan become greyed out due to System Configuration
  • El Capitan has issues installing the Rootless Disable kext.
[doublepost=1457717373][/doublepost]
*****
You will no doubt get the answer to your question from this talented forum member.
Just a mention that in YouTube there is a short film showing a way to install Windows 10 not directly with BootCamp but instead using reFind as a boot manager, Tuxera to format a part of the inner drive (partition for Windows) in NTFS and later adding manually Apple drivers from Bootcamp.
Interesting to see and for some people useful as well.
I followed more or less the idea in that video and managed to install Windows 10 in an old MacBook 4.1 early 2008 which should only allow Windows 7 according to Apple (but BootCamp didn't accept my Windows 7 for reasons I ignore).
Ed
Do you have a link to that youtube video? I was hoping to dust off my BootCamp Patcher after I finish with OSXE1.32-3 and OSXPB3 development.
 

Attachments

  • OS X Patcher B2.zip
    45.1 KB · Views: 448

Riwam

macrumors 65816
Jan 7, 2014
1,095
244
Basel, Switzerland
OS X Patcher Beta 2

Changes:
  • Added options for Yosemite, Mavericks, and Mountain Lion Scripts
  • Fixed confusion with flat and bundle distribution within the Installer.
  • Kexts are updated in parallels with OS X Extractor 1.32
Known Bugs:
  • Some users report that other OSs besides El Capitan become greyed out due to System Configuration
  • El Capitan has issues installing the Rootless Disable kext.
[doublepost=1457717373][/doublepost]
Do you have a link to that youtube video? I was hoping to dust off my BootCamp Patcher after I finish with OSXE1.32-3 and OSXPB3 development.
**********
Hello TMRJIJ :)

I think I found the video I used in my MB 4.1.
You will find it in YouTube with this title:
"Install bootable Windows 7,8,10 on your Mac without Bootcamp Assistant, bootable USB or Disc"
Gepostet 08.10.2015
Running time: 13.11

(I am not sure if the author suggests to copy the Windows files to the NTFS partition what I didn't but
run the setup from the disk).
Have a nice week end :)
Ed
 

Sunapeelakers

macrumors newbie
Mar 11, 2016
13
0
Hey guys, I'm trying to get Yosemite on my MacBook 4, 1; but I can't find a copy of the Install Yosemite.app anywhere. I can't get it from my friends MBP because they've never had it. Does anyone have a copy of that so I could use it with MCPF to get it on my MacBook? I'm trying to get Xcode 7.2.1, and obviously I can't download it with Lion. Any help would be huge!
 

Riwam

macrumors 65816
Jan 7, 2014
1,095
244
Basel, Switzerland
[doublepost=1457717373][/doublepost]
Do you have a link to that youtube video? I was hoping to dust off my BootCamp Patcher after I finish with OSXE1.32-3 and OSXPB3 development.[/QUOTE]
**********************

TO TMRJIJ

Did you find the video TMRJIJ ?
Ed
[doublepost=1457765749][/doublepost]
Hello TMRJIJ
Did you find the video in YouTube?
Have a nice week end!
Ed
 

Riwam

macrumors 65816
Jan 7, 2014
1,095
244
Basel, Switzerland
Anyone who has a copy of the Yosemite Installer - Can you pm me? I'm trying to find a copy. Thanks!
*******
Such large files cannot be sent as mail attachments, as you know by yourself.
Do you have a cloud to which it might be uploaded?

Weaselboy has kindly helped people looking for installs who sent him a USB stick (according to his posts), but it depends of course if you live in his country or somewhere else.
Ed
 

Sunapeelakers

macrumors newbie
Mar 11, 2016
13
0
*******
Such large files cannot be sent as mail attachments, as you know by yourself.
Do you have a cloud to which it might be uploaded?

Weaselboy has kindly helped people looking for installs who sent him a USB stick (according to his posts), but it depends of course if you live in his country or somewhere else.
Ed

I have Dropbox, if someone might be able to share a link to it on their Dropbox with me so I could download it... I really want to get my MacBook upgraded, but I've seemingly searched everywhere for a copy of the Yosemite installer and can't find a working link...
 

cupofcoffee25

macrumors newbie
Mar 13, 2016
1
0
Hi!
I have a late 2007 macbook 3,1 (Core 2 Duo 2,2 GHz, Intel GMA X3100, OS X 10.7) and trying to install Yosemite. But, when I start MacPostFactor 1.0.1 - everything is ok till the moment, when I type my password. Then program stays at the same point "Waiting for administrator rights". But at the same time files are copying to the necessary partition. After few hours - program has the same state, but partition with Yosemite is not changing anymore. When I try to boot from it - I see only Apple logo and nothing else.

Creating a USB is ok, but I still can't boot from it. The same problem - only Apple logo on screen.

SFOTT also didn't help. I can't boot from USB key, I see folder with question mark icon, then system boots into Lion.
Help me, please!
 

gpatpandp

macrumors 6502
Aug 16, 2010
309
11
AMAZING. Could you eventually give us a more detailed "How to"? thx

Firstly, know and commit to memory that throughout the entire process Google is your ally in answering questions and finding solutions. If a certain explanation isn't making sense to you, there are bound to be another tutorials posted online describing the same procedure. As the following link indicates (http://www.tenforums.com/drivers-ha...-driver-macbook-pro-15-inch-glossy-issue.html), the set-up that I am outlining here is nothing new or ground breaking.

Among all the current options available, I consider this to be the most effective way of making a very competent piece of computer hardware equally current OS wise in the modern era. And while I cannot state this with absolute certainty, I do not believe that this option is exclusive only to machines possessing ATI Radeon X1600 graphics as 64 bit drivers may very well exist for both the GMA 950 & the X3100.

1.) Building Windows 10 64 bit Boot DVD:

http://www.jowie.com/select-cd-rom-boot-type

http://www.gopulls.com/blog/2009.08...a-mac-beat-the-select-cd-rom-boot-type-error/

2.) Enabling ACHI SATA in Windows:

https://forums.macrumors.com/threads/tutorial-enable-sata-ahci-mode-in-windows-7-8-8-1-10.1908034/

For the next two steps google and learn "How to update/install drivers in Windows manually"

3.) For Audio, download the "IDT Sigmatel" Driver located among the provided drivers in Bootcamp 4.0.4033:

https://support.apple.com/kb/DL1630?locale=en_US

In my experience, running the executible initially fails though the package w/ the 64 bit driver will expand and be saved in: C:\Program Files\IDT

...from your acquired knowledge, update/install the driver manually. You will need to Direct Windows to the "WDM" folder and specifically the STWRT64.INF file inside of it.

4.) For Video, download and install the ATI Radeon Mobility X1600 driver described here:

https://www.linkedin.com/pulse/ati-x1600-hp-nc8430-windows-10-igor-lacko

...again from your acquired knowledge, update/install the driver manually. (NOTE: the blogger line item lists manual driver step instructions within his link)

5.) For Built-in iSight & Bluetooth

https://support.apple.com/downloads/bootcamp and again contained in Bootcamp v4.0.4033.

6.) For the latest Intel Chipset drivers

either get your hands on the latest Bootcamp v6 or research your motherboard and CPU and go to the Intel site and download them directly

Similarly to installing Yosemite, your going to want to also disable password login as well as turn off a feature in Windows called "fast start-up" located in the Power Options - System settings.
 

cyberish

macrumors member
Oct 26, 2013
47
9
THANK YOU for sharing !!

Firstly, know and commit to memory that throughout the entire process Google is your ally in answering questions and finding solutions. If a certain explanation isn't making sense to you, there are bound to be another tutorials posted online describing the same procedure. As the following link indicates (http://www.tenforums.com/drivers-ha...-driver-macbook-pro-15-inch-glossy-issue.html), the set-up that I am outlining here is nothing new or ground breaking.

Among all the current options available, I consider this to be the most effective way of making a very competent piece of computer hardware equally current OS wise in the modern era. And while I cannot state this with absolute certainty, I do not believe that this option is exclusive only to machines possessing ATI Radeon X1600 graphics as 64 bit drivers may very well exist for both the GMA 950 & the X3100.

1.) Building Windows 10 64 bit Boot DVD:

http://www.jowie.com/select-cd-rom-boot-type

http://www.gopulls.com/blog/2009.08...a-mac-beat-the-select-cd-rom-boot-type-error/

2.) Enabling ACHI SATA in Windows:

https://forums.macrumors.com/threads/tutorial-enable-sata-ahci-mode-in-windows-7-8-8-1-10.1908034/

For the next two steps google and learn "How to update/install drivers in Windows manually"

3.) For Audio, download the "IDT Sigmatel" Driver located among the provided drivers in Bootcamp 4.0.4033:

https://support.apple.com/kb/DL1630?locale=en_US

In my experience, running the executible initially fails though the package w/ the 64 bit driver will expand and be saved in: C:\Program Files\IDT

...from your acquired knowledge, update/install the driver manually. You will need to Direct Windows to the "WDM" folder and specifically the STWRT64.INF file inside of it.

4.) For Video, download and install the ATI Radeon Mobility X1600 driver described here:

https://www.linkedin.com/pulse/ati-x1600-hp-nc8430-windows-10-igor-lacko

...again from your acquired knowledge, update/install the driver manually. (NOTE: the blogger line item lists manual driver step instructions within his link)

5.) For Built-in iSight & Bluetooth

https://support.apple.com/downloads/bootcamp and again contained in Bootcamp v4.0.4033.

6.) For the latest Intel Chipset drivers

either get your hands on the latest Bootcamp v6 or research your motherboard and CPU and go to the Intel site and download them directly

Similarly to installing Yosemite, your going to want to also disable password login as well as turn off a feature in Windows called "fast start-up" located in the Power Options - System settings.
 

s4keru

macrumors member
Mar 15, 2016
38
5
Hello, successfuly installed OSX Yosemite and having partially working graphics on macbook 3.1 (system recognizes Intel X3100, no animation or system glitches, video on youtube is fine even in 720p) but working with anything that uses even a little of graphics acceleration is terrible. Is there any option to get Open GL/QE enabled? I don't need transparency or things like that but I need working Paint 2 with my graphics tablet.
 

Sonikkkk

Suspended
Mar 15, 2016
6
1
Hello. I'm trying to install Yosemite on my old Macbook 4,1. My macbook is a 4,1 ,2,4 ghz , 4 gb ram and gma x 3100 graphic.I tried to make the bootable Usb with Sfott. I found tutorials showing different ways to prepare the Usb with Sfott. Some tutorials using Yosemite official release , some others using beta or renaming official to beta. Anyway I didn't reach the goal to get Yosemite installed.
In all that different methods I finish to prepare the Usb and I get the message that everything is gone well and the Sfott Usb is ready. When I try to boot from Usb Sfott key I get this screen.

https://derflounder.files.wordpress.com/2014/08/screen-shot-2014-08-11-at-9-02-14-pm.png

I tried also to boot the Usb in my Macbook pro to check but even there is not possible to boot. Maybe because making the usb I have to choose Macbook 4,1.

Can someone help me to solve my problems? What's the right way to do it? Sfott?? Postfactor??
Can someone explanes to me how to do it or where I can get the right tutorial?

Thanks to all in advance.
 
  • Like
Reactions: Teutone

s4keru

macrumors member
Mar 15, 2016
38
5
Hello. I'm trying to install Yosemite on my old Macbook 4,1. My macbook is a 4,1 ,2,4 ghz , 4 gb ram and gma x 3100 graphic.I tried to make the bootable Usb with Sfott. I found tutorials showing different ways to prepare the Usb with Sfott. Some tutorials using Yosemite official release , some others using beta or renaming official to beta. Anyway I didn't reach the goal to get Yosemite installed.
In all that different methods I finish to prepare the Usb and I get the message that everything is gone well and the Sfott Usb is ready. When I try to boot from Usb Sfott key I get this screen.

https://derflounder.files.wordpress.com/2014/08/screen-shot-2014-08-11-at-9-02-14-pm.png

I tried also to boot the Usb in my Macbook pro to check but even there is not possible to boot. Maybe because making the usb I have to choose Macbook 4,1.

Can someone help me to solve my problems? What's the right way to do it? Sfott?? Postfactor??
Can someone explanes to me how to do it or where I can get the right tutorial?

Thanks to all in advance.


So. I installed Yosemite on MacBook 3.1 with MacPostFactor with the steps down here:

1. Copied Yosemite.app from supported Mac that I downloaded earlier to my MB 3.1 and placed it in Applications folder
2. Downloaded MacPostFactor from first post
3. Downloaded OSX Extractor for kexts (also from first post)
4. Run MacPostFactor
5. Selected OSX Yosemite (if you have Yosemite app only ML and Mavericks will be grayed out and you will be unable to choose them)
6. Selected partition that i made earlier especially for testing Yosemite (and this is step that I recommend for everyone to do when installing Yosemite) [If you have bootcamp partition - after installing Yosemite you will be unable to boot into that partition and there is a fix in first post in green frame https://discussions.apple.com/thread/6465316?tstart=0 ]
7. Clicked Install and install process began (you will wait about 10-15 minutes, depending on your mac speed)
8. After finishing the first part of process MacPostFactor asked to reboot (clicked yes)
9. Remembered to hold ALT/Option because you need to choose Second recovery HD that is created by MacPostFactor
10. When booting to recovery HD is finished you will see OSX Yosemite install screen and informations about where it will be installed etc.
11. Clicked install and waitad - a little longer for me it was 20-25 minutes to install (remember that progress bar don't move so you just have to wait, I recommend to leave it as it is and prepare some coffee :) )
12. After successful installation there is a screen with green "checked" mark informing you that Yosemite is installed and you need to reboot.
13. After clicking reboot button remember to hold ALT/Option and choose partition that you have choosen for install.
14. Then after some basic config done, log into Yosemite.
15. Remember that you've downloaded OSX Extractor? Search for it on your hard drive and choose Intel X3100 kext to install on Yosemite via KextUtility.
16. After installing, reboot your mac IN SINGLE USER MODE (Hold Command+S)
17. When you boot into single user mode enter this code:
sudo nvram boot-args="kext-dev-mode=1"

this step is necessary if you want to avoid graphics glitches and overall slowdown because of lacking graphics acceleration-this one help a little but you will still don't have Open GL/QE working because X3100 do not support newest ones.

18.After entering the command reboot to normal Yosemite and voila! Yosemite on your MacBook 4.1 is working!

Hope this little guide will help you, have fun with your new OS :D
 
Last edited:
  • Like
Reactions: miknos and canering

Sonikkkk

Suspended
Mar 15, 2016
6
1
So. I installed Yosemite on MacBook 3.1 with MacPostFactor with the steps down here:

1. Copied Yosemite.app from supported Mac that I downloaded earlier to my MB 3.1 and placed it in Applications folder
2. Downloaded MacPostFactor from first post
3. Downloaded OSX Extractor for kexts (also from first post)
4. Run MacPostFactor
5. Selected OSX Yosemite (if you have Yosemite app only ML and Mavericks will be grayed out and you will be unable to choose them)
6. Selected partition that i made earlier especially for testing Yosemite (and this is step that I recommend for everyone to do when installing Yosemite) [If you have bootcamp partition - after installing Yosemite you will be unable to boot into that partition and there is a fix in first post in green frame https://discussions.apple.com/thread/6465316?tstart=0 ]
7. Clicked Install and install process began (you will wait about 10-15 minutes, depending on your mac speed)
8. After finishing the first part of process MacPostFactor asked to reboot (clicked yes)
9. Remembered to hold ALT/Option because you need to choose Second recovery HD that is created by MacPostFactor
10. When booting to recovery HD is finished you will see OSX Yosemite install screen and informations about where it will be installed etc.
11. Clicked install and waitad - a little longer for me it was 20-25 minutes to install (remember that progress bar don't move so you just have to wait, I recommend to leave it as it is and prepare some coffee :) )
12. After successful installation there is a screen with green "checked" mark informing you that Yosemite is installed and you need to reboot.
13. After clicking reboot button remember to hold ALT/Option and choose partition that you have choosen for install.
14. Then after some basic config done, log into Yosemite.
15. Remember that you've downloaded OSX Extractor? Search for it on your hard drive and choose Intel X3100 kext to install on Yosemite via KextUtility.
16. After installing, reboot your mac IN SINGLE USER MODE (Hold Command+S)
17. When you boot into single user mode enter this code:
sudo nvram boot-args="kext-dev-mode=1"

this step is necessary if you want to avoid graphics glitches and overall slowdown because of lacking graphics acceleration-this one help a little but you will still don't have Open GL/QE working because X3100 do not support newest ones.

18.After entering the command reboot to normal Yosemite and voila! Yosemite on your MacBook 4.1 is working!

Hope this little guide will help you, have fun with your new OS :D[/QUOTE


Thank you a lot. I will try tonight or tomorrow. Again thank you!!! :)
 

s4keru

macrumors member
Mar 15, 2016
38
5
No problem, ask if you need help :D

Hey guys I also found alternative for video playback on unsupported mac!

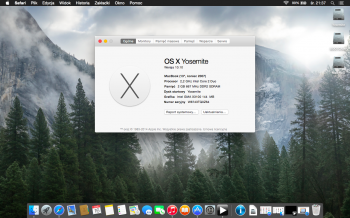
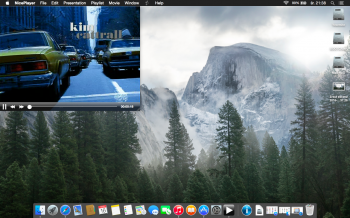
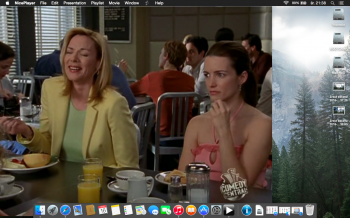
I used a connection of Perian 1.2.3 prefpane with media player called Nice Player and voila! Nice video playback in fullscreen and without fullscreen :D

Link for Perian: http://www.perian.org
Link For NicePlayer: https://github.com/jbtule/NicePlayer/releases

Please, check on your own if this is working for you-for me it's working very nice (I also have perfectly working audio)


EDIT! For people who decide to install Windows 10 on their macbook's
About a year ago, When I was using MacBook 1.1 with Win7 I wanted to play some good old games. But there was a problem - really weak GMA 950. I searched through internet and found this:

http://trixarian.net/forum/archive/index.php?thread-1-1.html

Mirror:

http://hasannawaz.blogspot.com/2015/07/intel-chell-17b.html


This is Intel CHELL 1.7b modded driver for some of GMA's (including MacBook's X3100, i am using this one now under Windows 10). This driver really increase performance of GMA graphics chips under Windows and Windows games. Here you have list of games working with this little mod : http://trixarian.net/gma950_gamelist.txt Install guide and everything is in the first trixarian link. This one cannot do any harm or damage to MacBook from model 1.1 to 4.1 (GMA 950-GMA X3100) I've installed this on several machines and everything working fine, with nice, improved performance. Enjoy :)
 

Attachments

  • Zrzut ekranu 2016-03-16 o 21.37.26.png
    Zrzut ekranu 2016-03-16 o 21.37.26.png
    1.4 MB · Views: 1,033
  • Zrzut ekranu 2016-03-16 o 21.38.00.png
    Zrzut ekranu 2016-03-16 o 21.38.00.png
    1.7 MB · Views: 444
  • Zrzut ekranu 2016-03-16 o 21.38.42.png
    Zrzut ekranu 2016-03-16 o 21.38.42.png
    1.3 MB · Views: 386
  • Zrzut ekranu 2016-03-16 o 21.39.05.png
    Zrzut ekranu 2016-03-16 o 21.39.05.png
    566.8 KB · Views: 386
Last edited:

Sonikkkk

Suspended
Mar 15, 2016
6
1
So. I installed Yosemite on MacBook 3.1 with MacPostFactor with the steps down here:

1. Copied Yosemite.app from supported Mac that I downloaded earlier to my MB 3.1 and placed it in Applications folder
2. Downloaded MacPostFactor from first post
3. Downloaded OSX Extractor for kexts (also from first post)
4. Run MacPostFactor
5. Selected OSX Yosemite (if you have Yosemite app only ML and Mavericks will be grayed out and you will be unable to choose them)
6. Selected partition that i made earlier especially for testing Yosemite (and this is step that I recommend for everyone to do when installing Yosemite) [If you have bootcamp partition - after installing Yosemite you will be unable to boot into that partition and there is a fix in first post in green frame https://discussions.apple.com/thread/6465316?tstart=0 ]
7. Clicked Install and install process began (you will wait about 10-15 minutes, depending on your mac speed)
8. After finishing the first part of process MacPostFactor asked to reboot (clicked yes)
9. Remembered to hold ALT/Option because you need to choose Second recovery HD that is created by MacPostFactor
10. When booting to recovery HD is finished you will see OSX Yosemite install screen and informations about where it will be installed etc.
11. Clicked install and waitad - a little longer for me it was 20-25 minutes to install (remember that progress bar don't move so you just have to wait, I recommend to leave it as it is and prepare some coffee :) )
12. After successful installation there is a screen with green "checked" mark informing you that Yosemite is installed and you need to reboot.
13. After clicking reboot button remember to hold ALT/Option and choose partition that you have choosen for install.
14. Then after some basic config done, log into Yosemite.
15. Remember that you've downloaded OSX Extractor? Search for it on your hard drive and choose Intel X3100 kext to install on Yosemite via KextUtility.
16. After installing, reboot your mac IN SINGLE USER MODE (Hold Command+S)
17. When you boot into single user mode enter this code:
sudo nvram boot-args="kext-dev-mode=1"

this step is necessary if you want to avoid graphics glitches and overall slowdown because of lacking graphics acceleration-this one help a little but you will still don't have Open GL/QE working because X3100 do not support newest ones.

18.After entering the command reboot to normal Yosemite and voila! Yosemite on your MacBook 4.1 is working!

Hope this little guide will help you, have fun with your new OS :D


i'm really lost....tried a lot of different methods and nothing solved. with the method that you posted I can't even install it from Post factor. After few seconds a get the error "Something is gone wrong. Impossible to install Yosemite". no words about which kind of error it is.
 

s4keru

macrumors member
Mar 15, 2016
38
5
You have Install Yosemite.app in applications folder?
Make a partition with disk utility before doing anything with it.
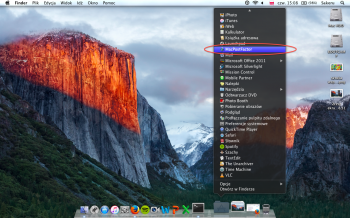
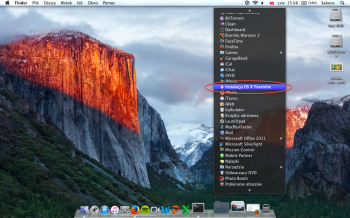
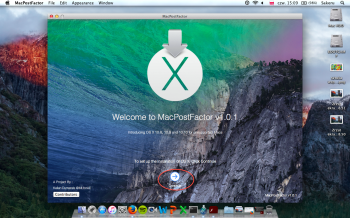
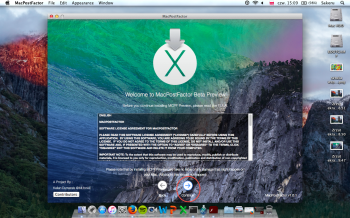
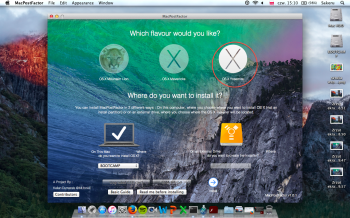
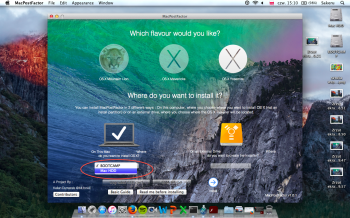
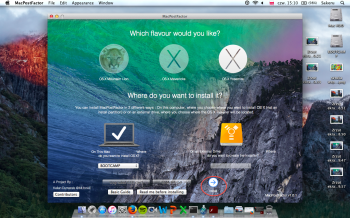
And launch MacPostFactor from applications folder then choose partition that you've created while ago and click on this Yosemite logo up. and then click next. I marked these steps on photos with red circle.
What OSX are you using for MCPF?
 

Attachments

  • Zrzut ekranu 2016-03-17 o 15.08.50.png
    Zrzut ekranu 2016-03-17 o 15.08.50.png
    1.9 MB · Views: 583
  • Zrzut ekranu 2016-03-17 o 15.08.31.png
    Zrzut ekranu 2016-03-17 o 15.08.31.png
    1.9 MB · Views: 519
  • Zrzut ekranu 2016-03-17 o 15.09.47.png
    Zrzut ekranu 2016-03-17 o 15.09.47.png
    2.1 MB · Views: 781
  • Zrzut ekranu 2016-03-17 o 15.09.57.png
    Zrzut ekranu 2016-03-17 o 15.09.57.png
    2.1 MB · Views: 500
  • Zrzut ekranu 2016-03-17 o 15.10.21.png
    Zrzut ekranu 2016-03-17 o 15.10.21.png
    2.1 MB · Views: 731
  • Zrzut ekranu 2016-03-17 o 15.10.34.png
    Zrzut ekranu 2016-03-17 o 15.10.34.png
    2.1 MB · Views: 424
  • Zrzut ekranu 2016-03-17 o 15.10.45.png
    Zrzut ekranu 2016-03-17 o 15.10.45.png
    2.1 MB · Views: 600

Sonikkkk

Suspended
Mar 15, 2016
6
1
You have Install Yosemite.app in applications folder?
Make a partition with disk utility before doing anything with it.
And launch MacPostFactor from applications folder then choose partition that you've created while ago and click on this Yosemite logo up. and then click next. I marked these steps on photos with red circle.
What OSX are you using for MCPF?


Yes I made a partition pf 60 gb in extended journaled os. I have Yosemite installer app in my application folder and launch postfactor located in app folder too. When postfactor starts I can choose Yosemite logo and I can choose also the Hd where to install. I click "next" and Postfactor says "wait for Yosemite installation". then the installation bar starts to fill but, after few seconds , I get the error. Impossible to go over.


I'm doing it in my macbook under Os X Lion. what do you think?
I could try to do a bootable usb with postfactor on my macbook pro running mountain lion.
 

s4keru

macrumors member
Mar 15, 2016
38
5
Yes I made a partition pf 60 gb in extended journaled os. I have Yosemite installer app in my application folder and launch postfactor located in app folder too. When postfactor starts I can choose Yosemite logo and I can choose also the Hd where to install. I click "next" and Postfactor says "wait for Yosemite installation". then the installation bar starts to fill but, after few seconds , I get the error. Impossible to go over.


I'm doing it in my macbook under Os X Lion. what do you think?
I could try to do a bootable usb with postfactor on my macbook pro running mountain lion.

Hmm that's very strange. Maybe you should give your idea a try. Maybe you have corrupted install.app or something. If your idea fails you can also try to install for ex. Mavericks to check if it is problem with installer or sth.
 
Register on MacRumors! This sidebar will go away, and you'll see fewer ads.