Become a MacRumors Supporter for $50/year with no ads, ability to filter front page stories, and private forums.
Status
The first post of this thread is a WikiPost and can be edited by anyone with the appropiate permissions. Your edits will be public.
Upgraded my 2015 MBP 15 inch with a 1TB Inland NVME SSD.

Used this adapter:
https://www.amazon.com/gp/product/B07LGTMCCX/ref=ppx_yo_dt_b_asin_title_o01_s00?ie=UTF8&psc=1


IMG_2255.jpg

Screen Shot 2019-07-11 at 7.07.00 PM.png
 
As an Amazon Associate, MacRumors earns a commission from qualifying purchases made through links in this post.
Hi all!
I changed my SSD on a Macbook pro 15’’ Retina Late 2013, for a Crucial P1 1Tb SSD with an adapter (links below), and actually Im having 2 problems:
  • Longer boot time to the OS load and apple logo show up.
  • Isn't getting resume from sleep when the battery drains.. (Restarted is needed)
I saw in this post that the solution for the hibernation problem its flashing the bootroom.

I have two questions:

1. This will also fix the boot problem?

2. Changing the ssd for an Sabrent 1TB Rocket NVMe PCIe M.2 2280 will solve 2 problems?

Thanks!

https://www.amazon.com/gp/product/B01CWWAENG/ref=ppx_yo_dt_b_asin_title_o02_s00?ie=UTF8&psc=1

https://www.amazon.com/dp/B07J2Q4SWZ/ref=twister_B07J5Q6SDH?_encoding=UTF8&psc=1
another ssd will not change nothing
boot problem can be fixed as well like a wake up problem by modified bootrom

p.s. by mistake before I made mine ssd upgrade I didn't found this topic yet and I just bought the 1st one adapter that I found on bulletin board and it was the one that is not recommended by this topic (on the left) and till today (around 6 month ago) didn't notice any problem not with detection nor with the sleep even no kernel panics etc
 
As an Amazon Associate, MacRumors earns a commission from qualifying purchases made through links in this post.
Hi guys,

Any differences in choosing between Apple's 12+16 pins (OWC) compared to M2.2280 (Samsung EVO) pin connection SSDs?

Will I still get Hibernation/boot/sleep issues if i stick with the recommended OWC/Transcend SSDs?
 
I'm usually very selfish and don't share such things, but this little project took me like two months to pull this off and when I finally got the desired result I just felt obliged to post my success story.

First things first - I have MacbookPro Retina 13-inch Late 2013. I bought a Samsung 970 EVO 1TB from amazon and an adapter from ebay. At that time I didn't know about this topic in the forum and issues I will face.

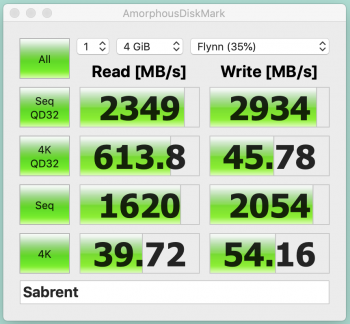
Suspecting nothing I did install the drive in the mac but on the first launch nothing happened. I remember having a gray screen and an icon in the center of the screen and thats it. I did not have the restore partition because I did a clean Windows 10 install on my old drive (without bootcamp). After some trial and error I found the magic keypress which brings up the internet-recovery menu. However I tried basically everything but the EVO drive would not show up. Then I decided to go with a windows 10 usb flash to try to install that on my new shiny EVO drive. The windows installer showed the drive for a brief period but when I had to do the partitioning, the drive would just disappear. That was when I first found this topic and I started to suspect that something is wrong with my NVMe adapter. I didn't order the sintech adapter right away, I wanted to be sure that it's really the adapter. After a lot of different experiments I finally got the drive showing up both in macos installer and windows 10 installer by just resetting the NVRAM (I think it was Option-Command-P-R key combination). I felt that finally the odds have turned in my favor and proceeded with MacOs Mojave installation. It was a success - got it running, had all my apps installed, the speed was also very good (1.3GB/sec) so I was about to close the case ... but ...

Chapter 2. The random restarting issue after closing the lid. I had to like go through 50+ pages from this topic to find out about the NVMe DXE driver issue. That's when it hit me that it's going to be a pain in the ass. I did the pmset command to prevent the laptop from going into hibernation but this was not the result I expected. The battery basically died overnight by using this solution so I wanted a proper fix. Did the research and finally ordered CH341a programmer from Aliexpress. I also bought XTW100 programmer since those to basically cost nothing. That was like my backup plan for the 3.3v voltage issue with CH341a. Also bought the converting board/cable so I can plug the programmer in directly on the motherboard without de-soldering anything. It's actually crazy expensive - the cable is 55USD on ebay. You can find it by searching for "EFI-ROM Converting board for Apple MacBook J6100 SPI-ROM EFI ROM".

Meanwhile I was waiting for tools to arrive, I switched back to original macos drive so I don't have the reboot issues.

Chapter 3. The bootrom upgrade. Finally the tools arrived and I started digging for information how exactly to do the upgrade. Unfortunately the information here is somehow incomplete - most of the guys who did the upgrade did not write the exact steps how they did it. But that did not stop me from my goal. After days of searching for information I finally felt ready to pull this off.

The procedure:
1) First I downloaded the Mojave installer on the macOs. That was a mistake because it did not contain the needed firmware bits. I ended up downloading the full dmg installer (macOSUpd10.14.5.dmg) manually:
https://updates.cdn-apple.com/2019/...4e-4a0a-8f82-7cc90315dbcc/macOSUpd10.14.5.dmg

2) I needed to do a backup of my old bootrom but it wasn't clear how exactly do to this and what is the proper way of doing it. After poking around I found out that the fastest way to do it on the same laptop is by executing in terminal:
/usr/libexec/firmwarecheckers/eficheck --save -b ~/firmware.bin

3) Then I downloaded the latest UEFItool from the github page (version A55 as of today). But I later discovered that this version can't replace the DXE driver because it lacks the write functionality so you actually need the old UEFItool version - 0.25.1

4) Next I opened to instances of the UEFItool - one with my current bootrom firmware (MBP111) and other instance with MBP114. I was not sure which one to use because nobody had stated clearly which one to use .. the only reference I found was that I need to use a firmware for macbooks 2015 or newer. So I went with the same type I had already MBP111->MBP114 ... You will need to find the MBP114.fd file in the macos mojave installer (first mount the dmg file then you need to find FirmwareUpdate.pkg in the installer and extract it with pkgutil --expand command, after that just find MBP114.fd or whatever version you need).

5) Then we use UEFItool to search for text "nvme" and uncheck the Unicode flag. Do that for both instances. You will find a tree with GUID starting with 5111xxxx. I did extract that tree item from the MBP114 and then replaced it in my current firmware. From the first look it seemed that due to larger size it will overwrite the next item as the UEFItool showed multiple actions would be done by the replacement, but after saving the firmware and loading it in the UEFItool again everything seemed to be as it should be.

6) After that I opened the laptop and connected my CH341a with the adapter cable to the onboard plug. I used my desktop computer with windows 10 and used the CH341 v1.34 software for the flashing. The "detect" button showed multiple chip versions and I selected MX25L6405D. Did a test "read" on the chip and compared it with my extracted firmware which I did in step 2 with eficheck and it was a match

7) Then I opened the modified firmware and clicked "auto" (which does basically erase, verify, write operations in sequence). This is were things went south. After the erase was done the Verify action instantly complained that the chip is not erased properly. I tried to just force write it anyway, after that "Verify" also failed. And I had a brick ... the laptop did not boot.

8) Started to look for clues and found that I need to disconnect the battery and also disconnect the magsafe. Did that but still the same results...

9) Eventually I was just trying everything I could possibly imagine - connect the power, erase, disconnect power, verify, write, connect the power ... was trying different combinations but no luck. Then I tried to connect the CH341a to USB2 port instead of USB3. The erase operation somehow managed to clear half of the chip, but the other half was still not erased. Tried to play with the power adapter again... I'm not sure what was the exact combination but suddenly the erase completed and verify action started to go through successfully ... the percentage bar was slowly climbing and eventually hit 100% and reported a success. Then I did a write operation and the verify operation afterwards also completed successfully ... I had the power cord plugged in but I noticed that the power cord led is off ... no green light, no orange light ... just completely off.

10) after that I disconnected the cables and booted the device - it was a success. Did a reset for the pmset so the hibernation is active again and closed the lid ... after 30 min I tried to open the lid and it successfully ran and went to the password prompt in about 5 seconds without any reboot...

I hope this helps someone to troubleshoot issues ...

This deserve its own thread.

Indeed it's a good write-up with some interesting errors and faults that is going to save a lot of hassle for some people. However, reading it, I kept asking myself whether evilworm had found the EFI flashing guide made by Cmd+Q that is linked in the OP. It describes a lot of exactly the same steps and procedures...
Link:
Upgrading 2013/2014 Macbook Pro SSD to M.2 NVMe
 
I would just like to thank all the contributors in creating this guide. I have upgraded a late 2013 MBP with an Intel 660p 512GB M.2 drive with the adapter. All went fine with a fresh install of Mojave from a USB drive. As the MBP is not heavily used, will be difficult to say about actual results. I just needed a larger drive in there (was 256GB). But so far all good.
 
After doing some digging in the Apple supplied EFI tools, I have had a strong suspicion it should be possible to develop a software-based solution to flashing a modified bootrom that should fix the Late 2013 hibernation issues.

Some users reported to have achieved this successfully around November/December 2018, but their guides or information are incomplete or don't deliver the desired results anymore.(https://apple.stackexchange.com/que...use-of-a-sintech-adapter#comment444229_333495)
(https://forums.macrumors.com/thread...ld-efi-after-downgrade-from-yosemite.1803934/)

Modifying the firmware updater is very similar to modifying the extracted bootrom image (through hardware extraction with a CH341A or /usr/libexec/Firmwarecheckers/eficheck/eficheck). The main difference is you're changing an firmware updater file, and not a rom image from the chip. The chip files use rom or .bin.
  1. Extract the latest firmware updater file for your specific MacBook from the a Mac Install.app(Open Contents->Contents->SharedSupport->InstallESD.dmg->Packages->FirmwareUpdate.pkg->Scripts->Scripts->Tools->EFIPayloads). For my Late 2013 it was MBP111.scap
  2. Extract the firmware for the 2015 Macbook. For my 13" Late 2013 I used MBP114.fd
  3. Use UEFITools 0.24 to extract the NVMe driver (GUID
    51116915-C34B-4D8E-86DB-6A70F2E60DAA) as a separate file from the MBP114.fd, I named it DXE NVME2015, and the added extension was .ffs
  4. Execute a "Replace as is" on the NVMe driver in the MBP111.scap and replace it using the DXE NVMe.ffs file
  5. save the firmware updater file, and you could be required to rename the extension back to .scap
  6. Use terminal and execute sudo /usr/libexec/efiupdater -p /Path/To/Folder/Containing/fixed.scap --force-update
  7. This should pre-stage the EFI firmware and write it to the EFI partition with bless -mount / -firmware
  8. According to the users reporting success, if you'd shutdown the Mac, wait a few seconds, and turn it back on, it should go to a grey screen and a progress bar, indicating it is flashing the pre-staged firmware update to the actual bootrom. Actual quote from second link above: "Shut down your mac from menu, wait until it will turn off.
    Wait a bit, then turn on your computer but do NOT hold the power button down. The screen will turn black and remain in that state for up to 40 seconds. A gray screen will appear and a status bar indicates the progress of the update."

Until step 8, everything works and gives good outputs. I can see the changed firmware in the EFI partition. It just doesn't flash it when booting the first time after it. I've tried running the efiupdater from recovery as well, not different results.


For now I'll flash my MacBook tonight with the CH341 and Pomona clip I have waiting at home. But I'm sure someone with a bit more knowledge can fix this method too, and save a lot of people the risk of flashing manually.


=====EDIT=====
After some more testing, I tried to pre-stage/flash an unmodified MBP111.scap to my Late 2013. Same terminal response, but it DID flash it with a visible progress bar when rebooting afterwards.
So:

There is probably some firmware signing taking place, meaning this would never work.... Maybe it's been added since Mojave, leading to some users being successful previously :(
 
Last edited:
After doing some digging in the Apple supplied EFI tools, I have a strong suspicion it should be possible to develop a software-based solution to flashing a modified bootrom that should fix the Late 2013 hibernation issues.

Some users reported to have achieved this successfully around November/December 2018, but their guides or information are incomplete or don't deliver the desired results anymore.(https://apple.stackexchange.com/que...use-of-a-sintech-adapter#comment444229_333495)
(https://forums.macrumors.com/thread...ld-efi-after-downgrade-from-yosemite.1803934/)

Modifying the firmware updater is very similar to modifying the extracted bootrom image (through hardware extraction with a CH341A or /usr/libexec/Firmwarecheckers/eficheck/eficheck). The main difference is you're changing an firmware updater file, and not a rom image from the chip. The chip files use rom or .bin.
  1. Extract the latest firmware updater file for your specific MacBook from the a Mac Install.app(Open Contents->Contents->SharedSupport->InstallESD.dmg->Packages->FirmwareUpdate.pkg->Scripts->Scripts->Tools->EFIPayloads). For my Late 2013 it was MBP111.scap
  2. Extract the firmware for the 2015 Macbook. For my 13" Late 2013 I used MBP114.fd
  3. Use UEFITools 0.24 to extract the NVMe driver (GUID
    51116915-C34B-4D8E-86DB-6A70F2E60DAA) as a separate file from the MBP114.fd, I named it DXE NVME2015, and the added extension was .ffs
  4. Execute a "Replace as is" on the NVMe driver in the MBP111.scap and replace it using the DXE NVMe.ffs file
  5. save the firmware updater file, and you could be required to rename the extension back to .scap
  6. Use terminal and execute sudo /usr/libexec/efiupdater -p /Path/To/Folder/Containing/fixed.scap --force-update
  7. This should pre-stage the EFI firmware and write it to the EFI partition with bless -mount / -firmware
  8. According to the users reporting success, if you'd shutdown the Mac, wait a few seconds, and turn it back on, it should go to a grey screen and a progress bar, indicating it is flashing the pre-staged firmware update to the actual bootrom. Actual quote from second link above: "Shut down your mac from menu, wait until it will turn off.
    Wait a bit, then turn on your computer but do NOT hold the power button down. The screen will turn black and remain in that state for up to 40 seconds. A gray screen will appear and a status bar indicates the progress of the update."

Until step 8, everything works and gives good outputs. I can see the changed firmware in the EFI partition. It just doesn't flash it when booting the first time after it. I've tried running the efiupdater from recovery as well, not different results.


For now I'll flash my MacBook tonight with the CH341 and Pomona clip I have waiting at home. But I'm sure someone with a bit more knowledge can fix this method too, and save a lot of people the risk of flashing manually.


=====EDIT=====
After some more testing, I tried to pre-stage/flash an unmodified MBP111.scap to my Late 2013. Same terminal response, but it DID flash it with a visible progress bar when rebooting afterwards.
So:

There is probably some firmware signing taking place, meaning this would never work.... Maybe it's been added since Mojave, leading to some users being successful previously :(
can you as well please write a guide how you did that with ch341a and Pomona clip so we can have a choice because for now as I see we have only one guide with ch341a and j6100 adapter
 
can you as well please write a guide how you did that with ch341a and Pomona clip so we can have a choice because for now as I see we have only one guide with ch341a and j6100 adapter

Sure no problem, probably just take the board out the case and clip it with the correct orientation in accordance to the datasheet of the bootrom chip, other than that probably not much different from the guide Cmd+Q made.
 
Sure no problem, probably just take the board out the case and clip it with the correct orientation in accordance to the datasheet of the bootrom chip, other than that probably not much different from the guide Cmd+Q made.
which mbp to you have?
on mine chip is located downside on the logic board since I couldn't find it on top side (that you are looking as you open bottom)
so I didn't know yet it is possible to flash chip while motherboard is disassembled?
 
can you as well please write a guide how you did that with ch341a and Pomona clip so we can have a choice because for now as I see we have only one guide with ch341a and j6100 adapter

Hmmm I should’ve paid a bit more attention to the EFI bootrom package and differences between Mac models.

I wrongfully made the assumption that the Retinas had the same SOIC8 chip I was familiar with before as the Unibody models from 2012 etc. A few years ago for a local Apple repair shop I did some research about the EFI, what it would take to remove a firmware lock. Those boards use a SOIC chip and can be flashed with a Pomona clip.

The Retina’s and Airs from the interesting models use a WSON8 8x6mm package, which does not have leads protruding the pomona can clip on. This means you’d really can not do without a EasyFlash JTAG adapter or by removing the bootrom by soldering.

I’m ordering the EasyFlash cause I’m not going to give up now after all this shizzle.
I’m extremely sorry for any hopes I have gotten up...
 
Just out of curiosity, are these read/write speeds consistent with others who have installed the Sabrent Rocket 2tb drive in a mid-2015 MbP? The comparison chart on the first post did appear to show lower read than write speeds for the Sabrent 512GB SSD, but I wasn't sure how the larger drive tests out in real life.

Just to satisfy my own curiosity, does anyone know why these drives tend to have lower read than write speeds?
 

Attachments

  • Screen Shot 2019-07-13 at 8.56.33 AM.png
    Screen Shot 2019-07-13 at 8.56.33 AM.png
    157.8 KB · Views: 184
Upgraded my 2013 MBP before I found this thread.

I used used a RIVO NVME Adaptor from Amazon paired with a Crucial P1 500Gb. I also bought an ORICO NVME to USB adaptor to format the drive before install.

So far everything is working with hibernation turned off. Haven't bothered to flash the EFI yet.

No noticeable change in battery life, but notice a bit of heat from the drive.
 

Attachments

  • Screen Shot 2019-07-14 at 5.10.09 PM.png
    Screen Shot 2019-07-14 at 5.10.09 PM.png
    547.6 KB · Views: 278
Last edited:
  • Like
Reactions: teffers
Just out of curiosity, are these read/write speeds consistent with others who have installed the Sabrent Rocket 2tb drive in a mid-2015 MbP? The comparison chart on the first post did appear to show lower read than write speeds for the Sabrent 512GB SSD, but I wasn't sure how the larger drive tests out in real life.

Just to satisfy my own curiosity, does anyone know why these drives tend to have lower read than write speeds?
everything needs completely ideal circs always it is depends from the hardware to don't cut maximum potential of drive itself, logical that mbp is not 'actual' lets say, if you put more modern hardware than you can come closer to maximum
Hmmm I should’ve paid a bit more attention to the EFI bootrom package and differences between Mac models.

I wrongfully made the assumption that the Retinas had the same SOIC8 chip I was familiar with before as the Unibody models from 2012 etc. A few years ago for a local Apple repair shop I did some research about the EFI, what it would take to remove a firmware lock. Those boards use a SOIC chip and can be flashed with a Pomona clip.

The Retina’s and Airs from the interesting models use a WSON8 8x6mm package, which does not have leads protruding the pomona can clip on. This means you’d really can not do without a EasyFlash JTAG adapter or by removing the bootrom by soldering.

I’m ordering the EasyFlash cause I’m not going to give up now after all this shizzle.
I’m extremely sorry for any hopes I have gotten up...
can I understand it like it is no possible to flash efi chip with this?
some of the guys reporting here that they successfully did that on 15' models where chip is located on the 'closer' side of logic board, is it right?
than if its true can it be successful if I disassemble logic board and do it on chip without desoldering?
I am very interesting to do it without j6100 adapter so any information is necessary for me
 
Last edited:
I have results of my simple test. As I thought same disk, with High Sierra installed, on different MacBooks behave different from EFI BIOS viewpoint.

Kingston KC1000 on rMBP Late 2013 with updated boot ROM: 30s delay + disk colored Orange (automatic boot but sometimes appears blinking folder ?, rebooting from Apple menu)

Kingston KC1000 on rMBP Early 2015 with updated boot ROM: 30s delay + Normal grey boot disk (no blinking folder appeared)

Im having the same orange icon on my MacBook Air 2014 11 inch, I wander it could be the problem that makes me unable to install windows on it
[doublepost=1563114099][/doublepost]
In High-Sierra from BootCamp environment (windows), Boot-Disk can not be selected and can not be shown, it is saying because of APFS, but there is a possibility that setting method of Boot-disk may change, I guess. Orange Disk means external disk, not internal disk, so EFI Boot firm may be searching internal Boot-disk. if so, 15-30sec delay boot time may be internal Boot-disk searching time. The searching is fail and Mac boots at external Boot-disk.

Could you tell me the condition. Are theses Boot-delay time is measured at Boot-disk set to internal disk(SSD)? Dose the delay time change if boot disk set or not?

If we could set internal NVMe SSD as a internal Boot-disk for pre 2014 macs, Macs may boot soon.

I’m having the same orange icon for my internal NVMe drive on boot menu as well on MacBook Air 2014
 
Upgraded my 2015 13 inch Macbook Pro with a 1TB Sabrent Rocket, short green Sintech adapter.
No problems whatsoever, it was plug and play, everything is working as expected.

I did find out that the battery is swollen and I have to replace it, which will be an adventure. When I do that I'll also replace the termal paste on the CPU since I've been reading that helps a lot with the temperatures.

nice to hear that, I was planning to buy one of these to try.
 
Indeed it's a good write-up with some interesting errors and faults that is going to save a lot of hassle for some people. However, reading it, I kept asking myself whether evilworm had found the EFI flashing guide made by Cmd+Q that is linked in the OP. It describes a lot of exactly the same steps and procedures...
Link:
Upgrading 2013/2014 Macbook Pro SSD to M.2 NVMe
It's funny but I actually missed the TXT.rtf file in the zip archive... I opened the first image and just clicked "right" key on my keyboard to traverse the screenshots. Obviously doing this on windows will not show you a preview of rtf so I basically just used the screenshots as a reference point.

p.s.
I'm using nvme adapter I bought from aliexpress for 1.5usd which is like 1/10 of the sintech adapter price. I haven't had any issues with this one using Samsung 970 Evo
https://www.aliexpress.com/item/32873039055.html
 
Okay, so I have a MacBookPro11,5, which has PCIe 3.0x4 lines, indeed I can see it in my link speed is 8.0GT/s, but why my SSD speed is bottlenecked around 1600MB/s? I have an Intel 760P with Sintech long black adapter with correct insulation, which should get me at least over 2000MB/s. Tried reset NVRAM, SMC with no luck.

Anyone experiencing similar issues? Any solutions?


View attachment 843402
Hi, I have the same mbp model as you which is 11.5, the same ssd (760p), and the same R/W Speed : ( . I found that using the 11.4 rmbp can achieve normal speed with same ssd & adapter. I have no idea about the reason. If you have new discoveries,Please tell me , thanks!
 
everything needs completely ideal circs always it is depends from the hardware to don't cut maximum potential of drive itself, logical that mbp is not 'actual' lets say, if you put more modern hardware than you can come closer to maximum

can I understand it like it is no possible to flash efi chip with this?
some of the guys reporting here that they successfully did that on 15' models where chip is located on the 'closer' side of logic board, is it right?
than if its true can it be successful if I disassemble logic board and do it on chip without desoldering?
I am very interesting to do it without j6100 adapter so any information is necessary for me

I'd really need to review what they did, what model of Mac they had etc etc.
 
It's funny but I actually missed the TXT.rtf file in the zip archive... I opened the first image and just clicked "right" key on my keyboard to traverse the screenshots. Obviously doing this on windows will not show you a preview of rtf so I basically just used the screenshots as a reference point.

p.s.
I'm using nvme adapter I bought from aliexpress for 1.5usd which is like 1/10 of the sintech adapter price. I haven't had any issues with this one using Samsung 970 Evo
https://www.aliexpress.com/item/32873039055.html
lol that's a d'oh moment even I could have made.

Since you've flashed your Mac, are you interested in selling the adapter?
 
I'm about to order all the various things to update my rom on my Mac Air:
MACBOOK AIR
11" A1465
Mid 2013, EMC 2631, MacBookAir6,1

The part that has me concerned is everyone seems to be using adapters for their nvme boards. Mine just plugged right in and worked great without an adapter. Aside from the hibernation issue of course...

https://www.amazon.com/gp/product/B07LFP25NK

Is this board going to benefit from the rom upgrade?

Also, I noticed my rom version is 115 if memory serves me correctly. Is there a matrix for current Mac Air rom versions? Do I have the latest already?
 
As an Amazon Associate, MacRumors earns a commission from qualifying purchases made through links in this post.
The part that has me concerned is everyone seems to be using adapters for their nvme boards. Mine just plugged right in and worked great without an adapter. Aside from the hibernation issue of course...

Looking at the picture, your ssd came with the adapter that's why it worked after you just plugged it in.

It's on the expensive side versus buying the ssd and adapter separately. I paid $105 for 1tb Inland Premium and $99.95 1tb Sabrent. Add less that $20 for the adapter and you're good to go..
 
Getting a separate adapter and nvme drive allows the nvme drive to be used in a desktop or Windows laptop in the future.

Even though the adapter is attached, I highly doubt it will support hibernation mode 25.
 
Register on MacRumors! This sidebar will go away, and you'll see fewer ads.