Why update to beta? No sense to me. All the latest bootroms start with 4XX.Thank you Joe987.
I followed Eugene28's directions and made clean install of MacOS Big Sur, re-install all apps (no time machine used) and updated to latest Beta... so, again kernel panics (or whatever else)... always during night, MBP shuts off, and have to turn on next time.
When its on, I get some messages that laptop closed unexpectedly and had to reboot etc. Also, i get a screen that informs me that "increased display contrast is on" and i can not find any such a parameter that i have enabled...
Thing is, that these problems started after last beta updates, i think 4th or 5th so i do not know if it is OS' matter, or ssd's... no problem of this kind till recently for more than a year i had changed my ssd.
Also, my bootrom is stucked at 187.... even when i once updated by re-installng old original apple ssd, but i m not so sure about this, as it was more than a year ago.
Got a tip for us?
Let us know
Become a MacRumors Supporter for $50/year with no ads, ability to filter front page stories, and private forums.
Upgrading 2013-2015 Macbook Pro SSD to M.2 NVMe
- Thread starter maxthackray
- WikiPost WikiPost
- Start date
- Sort by reaction score
You are using an out of date browser. It may not display this or other websites correctly.
You should upgrade or use an alternative browser.
You should upgrade or use an alternative browser.
- Status
- The first post of this thread is a WikiPost and can be edited by anyone with the appropiate permissions. Your edits will be public.
I‘d like to say a big thank you to everyone who contributes to this forum.
Due to all the helpful posts here, I was able to upgrade my macbook air 2014 with a crucial P1 1TB (using an AIRNVME-N02 adapter) without any problem. My mba is running on big sur and everything works like a charm including a boot camp installation.
Due to all the helpful posts here, I was able to upgrade my macbook air 2014 with a crucial P1 1TB (using an AIRNVME-N02 adapter) without any problem. My mba is running on big sur and everything works like a charm including a boot camp installation.
No Kernel Panics for me... I have eventually removed LiLu & NVMeFix as I felt the system to be overall slower and not worth the trade off for reduced power consumption. Overall though, my system has been very stable.Hello @herb2k
I have the same device as you. MBP 13 inch Early 2015. I use BigSur. Are you getting kernel panic error with your current setup? I get this error at least once a week.
Lilu, NVMeFix, SsdPmEnabler installed. All work properly. But the system gives a kernel panic error once a week in BigSur.
I would check into your adapter, make sure it's fully seated and the pins are not making unwanted electrical contact with the Apple SSD connector.
Hy guys, so for what I understood, no chance to update correctly the firmware of our Crucial P2 ssd right? There is really no solution if we are only on Mac? I found the iso firmware file but no luck updating it  This is the file I'm trying to burn ( https://easyupload.io/kmik2z) on my usb stick but rebooting Mac with it lunch me a GRUB thing and that's it
You can temporarily install windows 10 in boot camp and use crucial storage executive to update the p2 firmware.Hy guys, so for what I understood, no chance to update correctly the firmware of our Crucial P2 ssd right? There is really no solution if we are only on Mac? I found the iso firmware file but no luck updating itThis is the file I'm trying to burn ( https://easyupload.io/kmik2z) on my usb stick but rebooting Mac with it lunch me a GRUB thing and that's it
Thank you Joe987.
I followed Eugene28's directions and made clean install of MacOS Big Sur, re-install all apps (no time machine used) and updated to latest Beta... so, again kernel panics (or whatever else)... always during night, MBP shuts off, and have to turn on next time.
Post some kernel panics. This should help identify the cause of your issue. Use links to pastebin.com for the panics.
Panics in the last 30 days are found in /Library/Logs/DiagnosticReports and end in .panic
When its on, I get some messages that laptop closed unexpectedly and had to reboot etc. Also, i get a screen that informs me that "increased display contrast is on" and i can not find any such a parameter that i have enabled...
(so maybe your issues are not SSD related then)
as others say, no need for betasThing is, that these problems started after last beta updates, i think 4th or 5th so i do not know if it is OS' matter, or ssd's... no problem of this kind till recently for more than a year i had changed my ssd.
Also, my bootrom is stucked at 187.... even when i once updated by re-installng old original apple ssd, but i m not so sure about this, as it was more than a year ago.
This is a very old boot rom with known sleep issues. This may be the cause of your issues
Do a full clean install from usb of Mojave/Catlina/Big Sur from a USB onto a blank Apple SSD. Until you are on a 4xx.0.0.0 bootrom not worth looking at much else. After 4xx.0.0.0 your bootrom updates should happen with any aftermarket SSD.
If you still have issues after the bootrom update, upgrade the SSD FW in Window/bootcamp. After that, clean the contacts the SSD and adapter using isopropyl and make sure both are fully seated and centred. If still having issues after all that check for heat issues (high temps) using istat menu.
I have a Late 2013 MBP 15". I know it supports up to a 4 TB upgrade but since there have been firmware updates since the initial post I was wondering whether 8 TB would be supported like the this one https://bit.ly/3dguURu
Thanks
Thanks
Hello AstroZero,Post some kernel panics. This should help identify the cause of your issue. Use links to pastebin.com for the panics.
Panics in the last 30 days are found in /Library/Logs/DiagnosticReports and end in .panic
(so maybe your issues are not SSD related then)
as others say, no need for betas
This is a very old boot rom with known sleep issues. This may be the cause of your issues
Do a full clean install from usb of Mojave/Catlina/Big Sur from a USB onto a blank Apple SSD. Until you are on a 4xx.0.0.0 bootrom not worth looking at much else. After 4xx.0.0.0 your bootrom updates should happen with any aftermarket SSD.
If you still have issues after the bootrom update, upgrade the SSD FW in Window/bootcamp. After that, clean the contacts the SSD and adapter using isopropyl and make sure both are fully seated and centred. If still having issues after all that check for heat issues (high temps) using istat menu.
thank you for your help, i ll try most of what you suggest and let the comunity know if any news.
Till then, an image with latest kernels and some details from them. They look like that...
{"timestamp":"2021-04-10 08:53:08.00 +0200","bug_type":"210","os_version":"macOS 11.3 (20E5229a)","incident_id":"4A3E41E2-B8C1-4B08-888E-0AD920801B40"}
{"macOSProcessedStackshotData":"RGF0ZS9UaW1lOiAgICAgICAgMjAyMS0wNC0xMCAwMzo0MDozOS4wNzUgKzAyMDAKT1MgVmVyc2lvbjogICAgICAgTWFjIE9TIFggMTEuMyAoQnVpbGQgMjBFNTIyOWEpCkFyY2hpdGVjdHVyZTogICAgIHg4Nl82NApSZXBvcnQgVmVyc2lvbjogICAzMgoKRGF0YSBTb3VyY2U6ICA
this from next day report
{"timestamp":"2021-04-11 07:59:45.00 +0200","bug_type":"210","os_version":"macOS 11.3 (20E5229a)","incident_id":"C3AB42F6-0E47-4C47-AA62-42C164B36ECC"}
{"macOSProcessedStackshotData":"RGF0ZS9UaW1lOiAgICAgICAgMjAyMS0wNC0xMSAwMjo0NTo0NC43MzQgKzAyMDAKT1MgVmVyc2lvbjogICAgICAgTWFjIE9TIFggMTEuMyAoQnVpbGQgMjBFNTIyOWEpCkFyY2hpdGVjdHVyZTogICAgIHg4Nl82NApSZXBvcnQgVmVyc2lvbjogICAzMgoKRGF0YSBTb3VyY2U6ICAgICAgU3RhY2tzaG90cwpTaGFyZWQgQ2FjaGU6ICAgICBFRTY4QzcxNC1CNkM5LTNCM0ItOTgyQi1ENkNGNjJEODRFNjEgc2xpZCBiYXNlIGFkZHJlc3MgMHg3ZmZmMjAyNTAwMDAsIHNsaWRlIDB4MjUwMDAwCgpEdXJhdGlvbjogICAgICAgICAwLjAwcwpTdGVwczogICAgICAgICAgICAxCgpUaW1lIEF3YWtlIFNpbmNlIEJvb3Q6IDExNTQ5cwoKCgpQcm9jZXNzOiAgICAgICAgICBhY2NvdW50c2QgWzM2M10KVVVJRDogICAgICAgICAgICAgNDE4M0MxMTAtQTU1OS0zNDk0LTg2MkItNk
I did a search and found that... there is no solution so far "bug type 210"
Attachments
Last edited:
hi no worries, sorry should have been clearer. I cannot read the logs from the info you providedHello AstroZero,
thank you for your help, i ll try most of what you suggest and let the comunity know if any news.
Till then, an image with latest kernels and some details from them. They look like that...
the panic files are in /Library/Logs/DiagnosticReports named something like:
Kernel_2021-04-17-125709_mars.panic (date of panic_machine-name.panic )
I would need to see the full content inside the panic files, it will be text like this:
Code:
Anonymous UUID:       A7C31D85-6317-5343-3599-E326142FC9B8

Sat Apr 17 12:57:09 2021

*** Panic Report ***
panic(cpu 0 caller 0xffffff7f9c81db30): nvme: "Fatal error occurred. CSTS=0xffffffff US[1]=0x0 US[0]=0x47 VID/DID=0x50121987

<...LOTS OF TEXT HERE...>

EOF

System Profile:
Network Service: Apple USB Ethernet Adapter, Ethernet, en3
Network Service: Wi-Fi, AirPort, en0
Boot Volume File System Type: apfs
Memory Module: BANK 0/DIMM0, 4 GB, DDR3, 1600 MHz, 0x80AD, 0x483943434E4E4E384A544D4C41522D4E544D
Memory Module: BANK 1/DIMM0, 4 GB, DDR3, 1600 MHz, 0x80AD, 0x483943434E4E4E384A544D4C41522D4E544D
USB Device: USB 3.0 Bus
USB Device: BRCM20702 Hub
USB Device: Bluetooth USB Host Controller
USB Device: Apple USB Ethernet Adapter
Thunderbolt Bus: MacBook Air, Apple Inc., 27.2
Model: MacBookAir7,2, BootROM 426.0.0.0.0, 2 processors, Intel Core i5, 1.6 GHz, 8 GB, SMC 2.27f2
Graphics: kHW_IntelHDGraphics6000Item, Intel HD Graphics 6000, spdisplays_builtin
AirPort: spairport_wireless_card_type_airport_extreme (0x14E4, 0x117), Broadcom BCM43xx 1.0 (7.77.61.3 AirPortDriverBrcmNIC-1305.11)
Bluetooth: Version 6.0.14d12, 3 services, 27 devices, 1 incoming serial ports
(this is just a snipet the full panic should be 200+ lines longer)
To share this: go to https://pastebin.com/ and enter the content of that file and "create new paste" post that link:

Anonymous UUID: A7C31D85-6317-5343-3599-E326142FC9B8Sat Apr 17 12:57:0 - Pastebin.com
Pastebin.com is the number one paste tool since 2002. Pastebin is a website where you can store text online for a set period of time.
Then I can take a look.
As you can see from he above, my machine still panics although less often (maybe?).
Code:
$ uptime
14:19  up 21 days, 22:32, 3 users, load averages: 5.10 4.68 4.46
I had around 24+ days of uptime before the panic (n.b. including "sleep" time). checking my panic log though, it was only 736,035,360,520,378ns of kernel uptime, so time excluding sleep was 8d 12:27:15.36. Which is not too much, compared to my other logs.
Again the issue happened not too long after waking the laptop from sleep for the first time in a day. I'm not sure temperature has too much effect, but I cannot be sure. It was a warmish 10C day.
My next options are instaling a heatsink on the SSD, then the Pm/lilu kexts, then updating to OSX Catalina/Big Sur, then changing the drive.
Last edited:
good question!I have a Late 2013 MBP 15". I know it supports up to a 4 TB upgrade but since there have been firmware updates since the initial post I was wondering whether 8 TB would be supported like the this one https://bit.ly/3dguURu
Thanks
No way to know until someone tries it! Not many people spending 3x-4x the value of the machine to upgrade the SSD
You might ask the vendor if you can return the drive after testing compatibility.
Hi everyone, I have MBP 13 (E2015) + WD SN550(Last Firmware) + SSDPmEN+NVMeFix/Lilu, adapter NFHK(Green)
Power Saving Settings of Big Sur stay default and have some issues
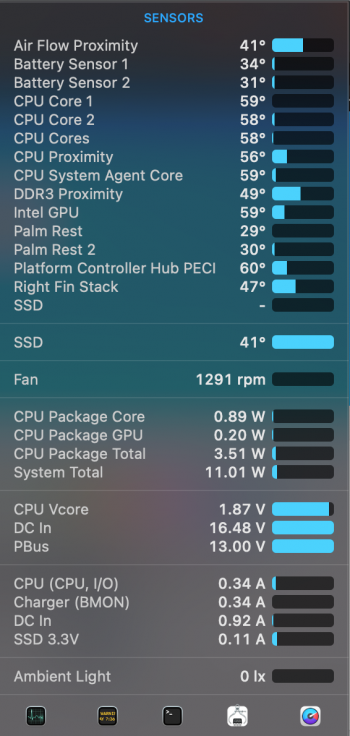
1) MBP didn't sleep at night top is closed but iStat batt shows time working ~7hours
2) When the book can get a deepsleep, when I open the top there is nothing, I click the pwb and then message that your MacBook was restart because of some error some time it shows folder, in OS X I have specs about error that Kernel Panic: IONVMeFamilly
Can someone tell if its normal for that model of ssd, or not, and how I can fix it.
UPD:Wrote whole forum and now changed hibernate mode from 3 to 25 for test
Last edited:
Thanks. I will and tried but when I launch Bootcamp I can't select the win10 iso image... how can I solve this? I red about and maybe it's because our new ssd is considered like an external disc but no solutionYou can temporarily install windows 10 in boot camp and use crucial storage executive to update the p2 firmware.
Hi! I've just managed to update firmware on Crucial P2 using only my Mac (no Windows machine) and without installing Windows using Bootcamp.
I've tried burning the official ISO to CD, and boot from that (extrenal USB optical drive). There was two options:
"Windows": blank screen and no updates, had to reboot by holding power button
"EFI": gave grub prompt, unable to load linux or perform update
Tried to write the ISO using balenaEtcher to USB drive, same results as with CD.
Here's the method that I've got it to work finally:
What you need:
- USB pendrive that can be erased
- grubefiusb-0.02.zip attached to this post: https://forums.macrumors.com/thread...crucial-micron-m550-firmware-updater.1844323/
- FW update ISO from here: https://www.crucial.com/support/ssd-support/p2-support
My setup:
HW: MacBook Pro 11,2 (Retina, 15-inch, Mid 2014)
OS: macOS Mojave 10.14.6
Boot ROM: 430.0.0.0.0
SMC: 2.18f15
SSD: CT1000P2SSD8
SSD FW before: P2CR031
SSD FW after: P2CR033
Your results may differ from mine, especially if your setup is different than mine!
Steps:
1. Download the "Bootable ISO Image" for your drive from Crucial's website.
2. Extract the contents of the ISO file. I've tried to open the image by mounting it into Finder, but it could not read the contents. However I was able to extract it using The Unarchiver, but most archiver utility should be able to extract it.
3. Format your USB drive using "MS-DOS (FAT)" and "Master Boot Record (MBR)" in Disk Utility.
4. Download and extract grubefiusb-0.02.zip
5. Copy the "EFI" folder extracted from grubefiusb-0.02.zip onto the USB drive. At this point there should be 3 files on the drive:
* EFI/boot/unicode.pf2
* EFI/boot/bootx64.efi
* EFI/boot/grub.cfg
6. Copy the "boot" folder extracted from the ISO from Crucial onto the USB drive. Now there should be two folders in the root of the USB drive: EFI and boot
7. Rename boot/corepure64.gz to boot/core.gz and rename boot/vmlinuz64 to boot/vmlinuz
8. Open boot/grub.cfg in a text editor, and replace the section:
with this:
FYI: The only change done to the solution from alex0002 is a change in the name of the entry (first line) and copied the options from the last line of /boot/isolinux/isolinux.cfg into the line starting as "linux /boot/vmlinuz..."
FYI2: It is probably just as good to instead of renaming corepure64.gz and vmlinuz64 in the boot folder to edit the grub entry and change /boot/vmlinuz to /boot/vmlinuz64 and /boot/core.gz to /boot/corepure64.gz It is just the same, but I've renamed the files, because there would have been more places in the grub.cfg file to change, so it was easier for me to only rename the files.
9. Save the updated boot/grub.cfg
10. Shut down Mac, start it while holding ALT, wait for the "EFI" option to appear and select that to boot.
11. Grub selection menu should appear soon. Select the option "Micron Crucial P2 FW update".
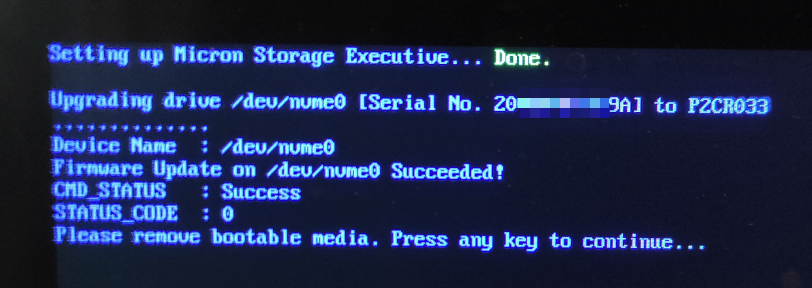
12. The FW updater should start, detect the P2 drive, apply the FW update and show the results. See attached image for example.
13. Press any key to restart, and hopefully your FW will be updated.
Disclaimer:
This post provided AS IS. I'm not affiliated with Micron, Apple or any companies. I'm not recommending anyone to follow these steps, unless willing to take risks including damaging hardware, system or data loss. I'm not responsible for any issues resulting from following these steps. You are on your own. If you are not sure, you shoud rather follow the official recommended ways to update the firmware or just leave it as it is.
Always make backups before making changes! Be safe and good luck!
I've tried burning the official ISO to CD, and boot from that (extrenal USB optical drive). There was two options:
"Windows": blank screen and no updates, had to reboot by holding power button
"EFI": gave grub prompt, unable to load linux or perform update
Tried to write the ISO using balenaEtcher to USB drive, same results as with CD.
Here's the method that I've got it to work finally:
What you need:
- USB pendrive that can be erased
- grubefiusb-0.02.zip attached to this post: https://forums.macrumors.com/thread...crucial-micron-m550-firmware-updater.1844323/
- FW update ISO from here: https://www.crucial.com/support/ssd-support/p2-support
My setup:
HW: MacBook Pro 11,2 (Retina, 15-inch, Mid 2014)
OS: macOS Mojave 10.14.6
Boot ROM: 430.0.0.0.0
SMC: 2.18f15
SSD: CT1000P2SSD8
SSD FW before: P2CR031
SSD FW after: P2CR033
Your results may differ from mine, especially if your setup is different than mine!
Steps:
1. Download the "Bootable ISO Image" for your drive from Crucial's website.
2. Extract the contents of the ISO file. I've tried to open the image by mounting it into Finder, but it could not read the contents. However I was able to extract it using The Unarchiver, but most archiver utility should be able to extract it.
3. Format your USB drive using "MS-DOS (FAT)" and "Master Boot Record (MBR)" in Disk Utility.
4. Download and extract grubefiusb-0.02.zip
5. Copy the "EFI" folder extracted from grubefiusb-0.02.zip onto the USB drive. At this point there should be 3 files on the drive:
* EFI/boot/unicode.pf2
* EFI/boot/bootx64.efi
* EFI/boot/grub.cfg
6. Copy the "boot" folder extracted from the ISO from Crucial onto the USB drive. Now there should be two folders in the root of the USB drive: EFI and boot
7. Rename boot/corepure64.gz to boot/core.gz and rename boot/vmlinuz64 to boot/vmlinuz
8. Open boot/grub.cfg in a text editor, and replace the section:
Code:
menuentry "Micron Storage Director M550 FW update" {
  search --set -f /boot/vmlinuz
  linux /boot/vmlinuz ro quiet base loglevel=3 waitusb=10 superuser rssd-fw-update rssd-fwdir=/opt/firmware rssd-model=M550
  initrd /boot/core.gz
}
with this:
Code:
menuentry "Micron Crucial P2 FW update" {
  search --set -f /boot/vmlinuz
  linux /boot/vmlinuz ro libata.allow_tpm=1 quiet base loglevel=3 waitusb=10 superuser mse-iso rssd-fw-update rssd-fwdir=/opt/firmware
  initrd /boot/core.gz
}
FYI: The only change done to the solution from alex0002 is a change in the name of the entry (first line) and copied the options from the last line of /boot/isolinux/isolinux.cfg into the line starting as "linux /boot/vmlinuz..."
FYI2: It is probably just as good to instead of renaming corepure64.gz and vmlinuz64 in the boot folder to edit the grub entry and change /boot/vmlinuz to /boot/vmlinuz64 and /boot/core.gz to /boot/corepure64.gz It is just the same, but I've renamed the files, because there would have been more places in the grub.cfg file to change, so it was easier for me to only rename the files.
9. Save the updated boot/grub.cfg
10. Shut down Mac, start it while holding ALT, wait for the "EFI" option to appear and select that to boot.
11. Grub selection menu should appear soon. Select the option "Micron Crucial P2 FW update".
12. The FW updater should start, detect the P2 drive, apply the FW update and show the results. See attached image for example.
13. Press any key to restart, and hopefully your FW will be updated.
Disclaimer:
This post provided AS IS. I'm not affiliated with Micron, Apple or any companies. I'm not recommending anyone to follow these steps, unless willing to take risks including damaging hardware, system or data loss. I'm not responsible for any issues resulting from following these steps. You are on your own. If you are not sure, you shoud rather follow the official recommended ways to update the firmware or just leave it as it is.
Always make backups before making changes! Be safe and good luck!
Attachments
Last edited:
hi,
i have an Intel 660p 1TB with Sintech adapter in my MacBook Air 13" 2013. Mojave has been running great on this setup for a year.
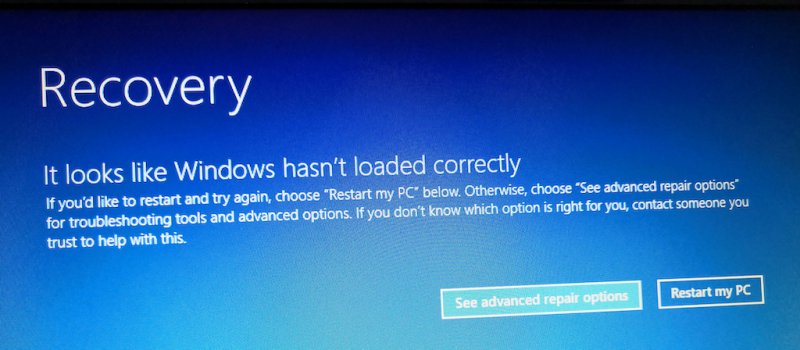
now i am trying to install Windows 10 also. after i run Boot Camp Assistant, boot into the installer, select the partition and let it do its thing, it eventually reboots into the "CRITICAL_PROCESS_DIED" BSOD and the system automatically reboots again. this happens a couple of times until eventually i reach a Recovery screen that says "It looks like Windows hasn't loaded correctly" (image attached).
this seems to be different from the "the computer restarted unexpectedly" error described in the first post, and pressing shift+f10 here does nothing. i tried to go into "See advanced repair options -> Troubleshoot -> Advanced options -> Command Prompt" to launch regedit, but this fails with a message saying "You need to sign in as an administrator to continue, but there aren't any administrator accounts on this PC".
is there something else i could try?
Attachments
Hello,
Due to several Kernel panic on Big Sur(1-2 and more per days on my MBP mid-2014 15', i sent maybe more than 50 times the error report on Apple servers in 3 months :-(.
I tried many things such as disabling the hibernation mode, Shutting down the MBP after each use : at each start i have to hold down the power button and start th MBP again.
I have a PNY CS3030 1 Tb nvme SSD (using phison controller, same as some Rocket nvme SSd)
I decided to rollback to Catalina OS and after reinstalling nvme ssd enabler KEXT . All seems to be fine now(0 kernel panic in 24 hours of use). SSd consumption around 0,8 mA
Let's see for one week if something weird is happening, but it seems that my Mbp is stable now
Last edited:
Thanks for the detailed installation guide. Any noticeable changes after the fw update?Hi! I've just managed to update firmware on Crucial P2 using only my Mac (no Windows machine) and without installing Windows using Bootcamp.
I've tried burning the official ISO to CD, and boot from that (extrenal USB optical drive). There was two options:
"Windows": blank screen and no updates, had to reboot by holding power button
"EFI": gave grub prompt, unable to load linux or perform update
Tried to write the ISO using balenaEtcher to USB drive, same results as with CD.
Here's the method that I've got it to work finally:
What you need:
- USB pendrive that can be erased
- grubefiusb-0.02.zip attached to this post: https://forums.macrumors.com/thread...crucial-micron-m550-firmware-updater.1844323/
- FW update ISO from here: https://www.crucial.com/support/ssd-support/p2-support
My setup:
HW: MacBook Pro 11,2 (Retina, 15-inch, Mid 2014)
OS: macOS Mojave 10.14.6
Boot ROM: 430.0.0.0.0
SMC: 2.18f15
SSD: CT1000P2SSD8
SSD FW before: P2CR031
SSD FW after: P2CR033
Your results may differ from mine, especially if your setup is different than mine!
Steps:
1. Download the "Bootable ISO Image" for your drive from Crucial's website.
2. Extract the contents of the ISO file. I've tried to open the image by mounting it into Finder, but it could not read the contents. However I was able to extract it using The Unarchiver, but most archiver utility should be able to extract it.
3. Format your USB drive using "MS-DOS (FAT)" and "Master Boot Record (MBR)" in Disk Utility.
4. Download and extract grubefiusb-0.02.zip
5. Copy the "EFI" folder extracted from grubefiusb-0.02.zip onto the USB drive. At this point there should be 3 files on the drive:
* EFI/boot/unicode.pf2
* EFI/boot/bootx64.efi
* EFI/boot/grub.cfg
6. Copy the "boot" folder extracted from the ISO from Crucial onto the USB drive. Now there should be two folders in the root of the USB drive: EFI and boot
7. Rename boot/corepure64.gz to boot/core.gz and rename boot/vmlinuz64 to boot/vmlinuz
8. Open boot/grub.cfg in a text editor, and replace the section:
Code:menuentry "Micron Storage Director M550 FW update" { search --set -f /boot/vmlinuz linux /boot/vmlinuz ro quiet base loglevel=3 waitusb=10 superuser rssd-fw-update rssd-fwdir=/opt/firmware rssd-model=M550 initrd /boot/core.gz }
with this:
Code:menuentry "Micron Crucial P2 FW update" { search --set -f /boot/vmlinuz linux /boot/vmlinuz ro libata.allow_tpm=1 quiet base loglevel=3 waitusb=10 superuser mse-iso rssd-fw-update rssd-fwdir=/opt/firmware initrd /boot/core.gz }
FYI: The only change done to the solution from alex0002 is a change in the name of the entry (first line) and copied the options from the last line of /boot/isolinux/isolinux.cfg into the line starting as "linux /boot/vmlinuz..."
FYI2: It is probably just as good to instead of renaming corepure64.gz and vmlinuz64 in the boot folder to edit the grub entry and change /boot/vmlinuz to /boot/vmlinuz64 and /boot/core.gz to /boot/corepure64.gz It is just the same, but I've renamed the files, because there would have been more places in the grub.cfg file to change, so it was easier for me to only rename the files.
9. Save the updated boot/grub.cfg
10. Shut down Mac, start it while holding ALT, wait for the "EFI" option to appear and select that to boot.
11. Grub selection menu should appear soon. Select the option "Micron Crucial P2 FW update".
12. The FW updater should start, detect the P2 drive, apply the FW update and show the results. See attached image for example.
13. Press any key to restart, and hopefully your FW will be updated.
Disclaimer:
This post provided AS IS. I'm not affiliated with Micron, Apple or any companies. I'm not recommending anyone to follow these steps, unless willing to take risks including damaging hardware, system or data loss. I'm not responsible for any issues resulting from following these steps. You are on your own. If you are not sure, you shoud rather follow the official recommended ways to update the firmware or just leave it as it is.
Always make backups before making changes! Be safe and good luck!
I've done this because I've been having Kernel panics like once a week, so it is hard to tell yet, if it has helped. I've also cleaned the contact pins on the adapter and the drive using contact enhancement spray and isopropyl alcohol as suggested by some, so even if my freezes go away it would be non decisive, as I've attempted multiple things at the same time. Not scientific, but I wanted solution more like finding out the reason.Thanks for the detailed installation guide. Any noticeable changes after the fw update?
But anyway, I think the manufacturer felt there was a reason to release updated FW, so I want to make sure I'm not suffering from bugs or bottlenecks which may be fixed by the update, so after all I think it is just psychologically better to have updated SW once learned there was an update...
TL;DR: No meaningfull difference.
Yeah. Just make sure you get the Sintech small adapter! I have same machine as you. See sig. I have the ADATA 8200 2tb. I believe Crucial does better with power consumption and is a bit cheaper. I've been running this for almost 8 months now with NO issues..Hi, is it possible to use a 2 TB Crucial P2 in a MacbookAir7,2 (13", Early 2015)?
Hi, Thanks for all the help.
Finally all the parts has arrived and I can share my experience with you.
Computer:
Macbook Pro Early-2015 13.3' - 2.7 GHz CPU - 8GB RAM - Big Sur
SSD:
Crucial P2 500GB
Adapter:
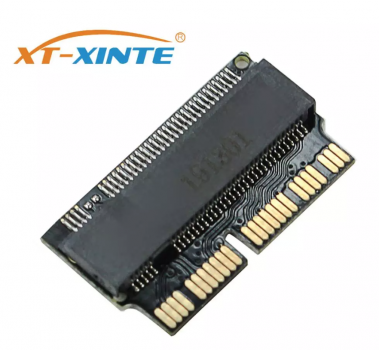
XT-XINTE M2 for NVMe PCIe M.2 for NGFF to SSD Adapter
Result:
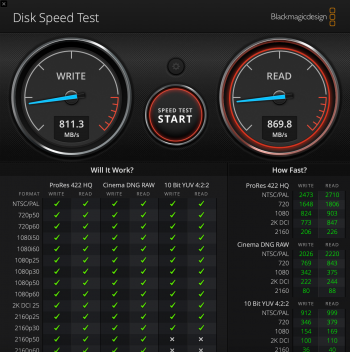
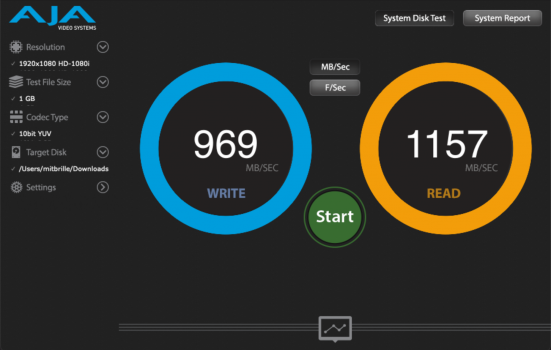
Not impressed with write and read speed.
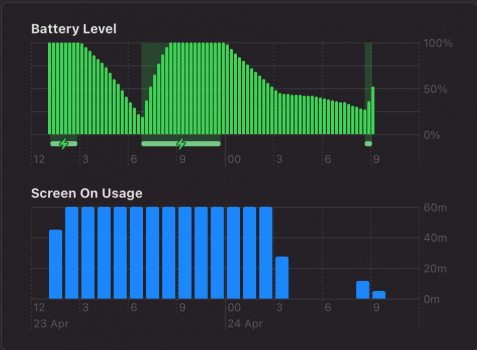
About 20% battery drainage during night. Holly guacamoly.
Question:
What can be done to improve speed results?
What can be done to stop the battery drainage?
Thanks a lot.
Attachments
Last edited:
Thanks thanks thanks thanks my man! Your guide is amazing and finally I updated the firmware on my Mac without any problem!!!!!!Hi! I've just managed to update firmware on Crucial P2 using only my Mac (no Windows machine) and without installing Windows using Bootcamp.
I've tried burning the official ISO to CD, and boot from that (extrenal USB optical drive). There was two options:
"Windows": blank screen and no updates, had to reboot by holding power button
"EFI": gave grub prompt, unable to load linux or perform update
Tried to write the ISO using balenaEtcher to USB drive, same results as with CD.
Here's the method that I've got it to work finally:
What you need:
- USB pendrive that can be erased
- grubefiusb-0.02.zip attached to this post: https://forums.macrumors.com/thread...crucial-micron-m550-firmware-updater.1844323/
- FW update ISO from here: https://www.crucial.com/support/ssd-support/p2-support
My setup:
...
I'm a Windows user myself but my wife uses a Late 2013 MacBook Pro Retina 13 with a 128GB SSD that keeps giving low storage warnings and it takes her a while to figure out what to delete. I thought putting in a larger SSD would give her some relief. She does not need additional performance (not that there is much headroom in that platform any way from what I can tell) and would rather not trade away battery life for performance.
Having read through a lot of the material here, it would appear that the most straightforward solution would be to buy a used Apple branded 256GB SSD for about $50 on Ebay and do a swap. If I'm right, is there any fine print regarding the upgrade process such as having to invest in a gumstick reader that I should be aware of?
Or should I buy something like a Crucial P2 NVMe SSD and an adapter and go through the more involved upgrade process? (I do have a NVMe to USB adapter)
Thanks.
Last edited:
If you get an Apple OEM Drive then you don't need to do anything special. If your wife's machine is backed up with Time Machine then you can simply use a bootable USB/SD card with MacOS on it to reinstall the OS, then restore her data from Time Machine.I'm a Windows user myself but my wife uses a Late 2013 MacBook Pro Retina 13 with a 128GB SSD that keeps giving low storage warnings and it takes her a while to figure out what to delete. I thought putting in a larger SSD would give her some relief. She does not need additional performance (not that there is much headroom in that platform any way from what I can tell) and would rather not trade away battery life for performance.
Having read through a lot of the material here, it would appear that the most straightforward solution would be to buy a used Apple branded 256GB SSD for about $50 on Ebay and do a swap. If I'm right, is there any fine print regarding the upgrade process such as having to invest in a gumstick reader that I should be aware of?
Or should I buy something like a Crucial P2 NVMe SSD and an adapter and go through the more involved upgrade process? (I do have a NVMe to USB adapter)
Thanks.
Register on MacRumors! This sidebar will go away, and you'll see fewer ads.


