Become a MacRumors Supporter for $50/year with no ads, ability to filter front page stories, and private forums.
Status
The first post of this thread is a WikiPost and can be edited by anyone with the appropiate permissions. Your edits will be public.

plexfit

macrumors newbie
May 18, 2018
21
10
Hello,

Can someone direct me to a central list (pretty sure it has been compiled) that confirms that Macbook Pro Mid 2015 retina 15" can be upgraded with Samsung PM981 PCIe NVMe M.2 SSD (1024GB) - with Instructions/requirements for succesful set up.

Many, many thanks for all your research and testing.

(ps.; Please advise if more info is required from me).


Norman
PM981 doesn't work right now, don't waste your time. Your closest choice would be 970 EVO.
 

Cmd+Q

macrumors member
Apr 23, 2018
57
75
Its either a combination of "sudo pmset -a" commands (standby, sleep, hibernatemode), or setting the /var/vm/sleepimage file to read only. My guess to do the latter

The general consensus is to
  • turn off transition from deep sleep to hibernation (standby 0)
  • prevent the system from writing memory to the SSD in the first place (hibernationmode 0), and
  • turn off auto-poweroff (autopoweroff 0)
regardless of being on battery or connected to charger all in one command:
Code:
sudo pmset -a standby 0 hibernatemode 0 autopoweroff 0

I should add this applies to 2013-2014 MacBook Pro and MacBook Air only.
 
Last edited:

Gautamb

macrumors newbie
May 26, 2018
2
1
#4 In OSX, unable to connect to any 2.4ghz wifi network (luckily 5ghz works fine)

2.4ghz wifi networks can be seen in Mac OSX but couldn’t be joined. I see a message in wifi.log "<en0> Failed to associate to Wi-Fi network xxxx, returned error code -3905". I also see a CoreCapture every time I attempt to join a 2.4ghz network. No issues on 5ghz wifi. If I boot to the Mint USB drive, the network adaptor (and 960) is working fine and I can join both 2.4 and 5ghz networks. If I revert to the stock SSD, the network adaptor is also working fine. Clearing SMC and NVRAM made no noticeable difference. However I think this is specific to my MBP as I don't see anyone else reporting this.

Hardware Diagnostics suggests a power management system problem PPN001 when the 960 is installed, but not with the stock SSD. However, this doesn’t seem to cause any issues. Generally battery life seems reduced, but I haven't measured to confirm.

I'm going to persevere with the 960 for the moment, though the lack of 2.4ghz can be a pain. I'm not sure I would recommend a similar upgrade to anyone who doesn't enjoy a challenge.
I'm going to second your experience with 2.4GHz Wifi. I recently replaced the SSD of my mid-2014 13" MBP with a Samsung 950 Pro, and overall everything has been very smooth for me, aside from Wifi. It took me a few days to realize it, but it only connects to 5GHz networks, and always fails with 2.4GHz ones. Other than that, I have no complaints. The battery life is reduced, and the boot time might be slower, but not enough for me to notice.
 
  • Like
Reactions: masw123

aclarubicin

macrumors member
May 27, 2018
76
20
Instead of using a Linux Live USB as the Github page recommends, I've also had success formatting the new drive using Terminal on my macos USB installer. "diskutil partitionDisk /dev/disk0 GPT JHFS+ New 0b" gave me a formatted HFS+ drive, ready for macos install.
(used system: 2015 15inch MBP with a Samsung Evo 960 1TB SSD)
 

plexfit

macrumors newbie
May 18, 2018
21
10
I think some people asked this questions a while back (myself included) but it kept being buried by mountain of posts about what works and what does not work. Gonna ask it again so that we can move forward in traction in this quest. Has anybody figured out how to get LPM or APSM working with 3rd party NVMe SSD. I meant when you check your ssd with smartctl, there are a bunch of power modes, how can we set those modes to save battery life and how can we make sure it stays in that mode ?

Thanks guys.
 

vk2fro

macrumors member
Apr 29, 2015
99
51
Sydney, Australia
diskutil partitionDisk /dev/disk0 GPT JHFS+ New 0b

yes I discovered this too as altho being relativly green in regards to playing with the Terminal, I knew from past experience doing diskutil list and other likemided commands with my hackintosh, it would be fairly trivial to get the SSD discoverable by the installer. There is no need for a linux boot usb to get it to appear. All the tools are available to you once the installer comes up. The Terminal is your friend. Just issue a "diskutil list" command and see if its there. If not you have a seating/mounting issue. Once found, a "diskutil partitionDisk /dev/diskX GPT JHFS+ foo XXXb" command will make it ready for installation where X is your disk number and xxx is its full capacity. foo can be replaced with any name; I used MacNVMe.

This is the exact set of commands I typed once booted into the installer:

diskutil list

(found the disk at device 0)

diskutil partitionDisk GPT JHFS+ MacNVMe 512G

This FORMATS your disk, so make sure its empty or its contents is backed up.

Backing out of terminal (command+q on an apple keyboard) brings you back to the option screen. From there choose "Install Mac OS High Sierra" and away you go.
 
Last edited:

Rev0l2ti0n

macrumors newbie
Aug 21, 2015
7
1
I think some people asked this questions a while back (myself included) but it kept being buried by mountain of posts about what works and what does not work. Gonna ask it again so that we can move forward in traction in this quest. Has anybody figured out how to get LPM or APSM working with 3rd party NVMe SSD. I meant when you check your ssd with smartctl, there are a bunch of power modes, how can we set those modes to save battery life and how can we make sure it stays in that mode ?

Thanks guys.

It seems that this was an issue in Linux as well, a manual patch of the kernel was done by someone (Github) which was then merged into the main version.
 
  • Like
Reactions: BKoh

acgpiano

macrumors newbie
May 28, 2018
1
2
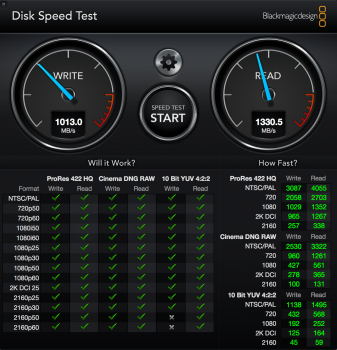
Update:After a week use, every thing works fine, there is no more battery drain and I don't know why, I just use the default settings for pmset.

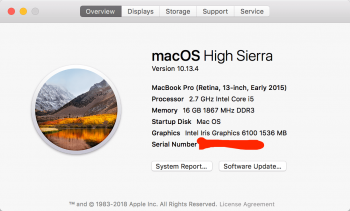
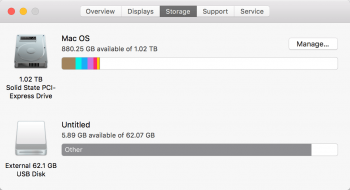
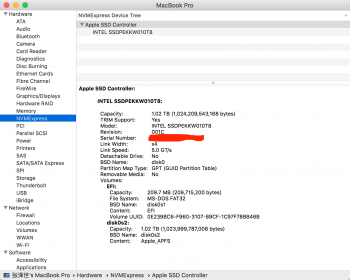
I install a 1TB intel 760p ssd on my 13” rMBP early 2015(MF839 A1502). After 3 days use I found it has a battery drain during normal use but hibernation is ok.The speed is better than the original.
 

Attachments

  • 1.png
    1.png
    72.5 KB · Views: 587
  • 2.png
    2.png
    26.9 KB · Views: 613
  • 3.png
    3.png
    82.1 KB · Views: 665
  • 4.png
    4.png
    401.2 KB · Views: 625
Last edited:
  • Like
Reactions: t0n1 and nephron8

jpm84

macrumors newbie
May 28, 2018
3
1
Ah got it, but for some reasons, I don't think Apple is very aggressive in saving power or setting low power states with the 3rd party nvme ssd. Any chance some genius in this forum can pull up a scripts to aggressively set the drive in lower power states that smartctl returns ?

If you want low power nvme ssd, your best choice right now is the MydigitalSSD SBX, the 600p, or the old WD Black:
https://www.anandtech.com/show/11174/the-western-digital-black-pcie-ssd-512gb-review/9

The old WD Black is quite interesting, it has its own power management and it doesn't count on the OS to provide the APST features.

In their review of the MydigitalSSD SBX, anandtech was a bit negative about power managment :

https://www.anandtech.com/show/12538/the-mydigitalssd-sbx-ssd-review-nvme-on-the-cheap/8

Quote from their conclusion:

Aside from pricing, the most significant and consistent disadvantage NVMe drives have compared to SATA drives is with power consumption: efficiency needs to be sacrificed in order to deliver the highest performance. The MyDigitalSSD SBX is without question the lowest-power NVMe SSD we have tested, but its low performance means that it doesn't provide any real improvements to power efficiency. The low power draw of the SBX means that it is no more susceptible to overheating than SATA drives, but the SBX won't give you the same battery life that a good SATA drive will.

This is especially true when taking into account the difficulties with NVMe power management. Phison-based drives are far from the only NVMe SSDs that have severe power management issues, but the earlier Phison E7 controller platform produced some of the most embarrassing power management quirks we've seen. The Phison E8 controller used by the SBX is a clear improvement, but the firmware still needs work. As tested and currently shipping, the SBX cannot use its deepest idle power state and cannot stay in its intermediate sleep state for more than a few seconds without waking back up. The MyDigitalSSD SBX is a poor choice for battery-powered systems, but this may be fixable with a firmware update.
 

pcuser01

macrumors newbie
Dec 1, 2009
7
4
hi,everyone,I am Eagle from Sintech electronic, one customer's link leads me to this forum.I hope I didn't come to here so late,even my accompany registered this forum in 2009.very excited to read very very long pages,it is cool: 54pages and over 1300 replies.I learned much from this forum,thanks very much for Gilles_Polysoft and all members here.

Recentsly we are producing M.2 nVME SSD to Mac wifi port adapter, I am wondering if we can find more easyway to clone full updated Mac OS from original Mac SSD to M.2 NVME SSD in Mac Wifi port. So my question is if anyone knows best way to do it. I don't know if my idea is good or not and if someone will use it in this way.
 
Last edited:

~rt~

macrumors newbie
May 29, 2018
1
2
Idaho
This has been an interesting thread!

I recently purchased a 1TB Toshiba XG3 drive from eBay along with the Sintech long black adapter for my early 2015 13" MacBook Pro. It took less than 20 minutes to install the drive. I booted from my TimeMachine backup, which recognized the drive and restored to it in a few hours. The system booted right up after that, no issues, and about the same speed or a little faster than the 250 GB Apple drive it replaced. It awakes from overnight sleep, no problem.

It does appear that the battery life has dropped by at least a couple of hours which is disappointing, and also, what people are reporting on this thread is true, Early 2015 MacBook Pro only has PCIe 2.0 (Wikipedia is incorrect), so I am not able to take full advantage of the speed of the drive.

All-in-all this has been a really easy upgrade, and at $350 for the drive, adapter, and screw-drivers, a bargain for 1TB SSD in a retina mac!

Thanks-guys for sharing all of this information!
 

Attachments

  • Screenshot 2018-05-29 07.00.39.png
    Screenshot 2018-05-29 07.00.39.png
    258.7 KB · Views: 416

vk2fro

macrumors member
Apr 29, 2015
99
51
Sydney, Australia
I don't know how this worked, but I tried boot camping windows 7 on the macbook, but it didn't work (couldn't boot windows 7 - should have known as the drive shows up as external at boot time). So I removed the boot camp partition and restored the macbook's disk to the full 512 available to MacOS.

A side effect of doing this somehow eliminated the 10 second delay at boot - she boots right after the chime. CTRL clicking the drive didn't work, setting it from the booted OS in the settings app "Startup Disk" didn't work, but bootcamping it then deleting the bootcamp partition did. Weird!

I guess now its just a matter of time till we get a hacked boot rom in order to fix the sleep issues on the 2013/2014 macbooks and this will be a perfect upgrade. For now shutting down at the end of my computing session works for me :)
 

Jilly Bowman

macrumors member
Feb 2, 2017
53
14
Dubai
I don't know how this worked, but I tried boot camping windows 7 on the macbook, but it didn't work (couldn't boot windows 7 - should have known as the drive shows up as external at boot time). So I removed the boot camp partition and restored the macbook's disk to the full 512 available to MacOS.

A side effect of doing this somehow eliminated the 10 second delay at boot - she boots right after the chime. CTRL clicking the drive didn't work, setting it from the booted OS in the settings app "Startup Disk" didn't work, but bootcamping it then deleting the bootcamp partition did. Weird!

I guess now its just a matter of time till we get a hacked boot rom in order to fix the sleep issues on the 2013/2014 macbooks and this will be a perfect upgrade. For now shutting down at the end of my computing session works for me :)
I had something similar, I formatted a 128GB NVMe drive on a 2013 MBP, installed High Sierra, then moved it to a 2014 MBP. The 10 second boot delay had gone when booted on the 2014, still showed as external though. Then I did an Itunes update on the drive, 10 second delay was back again. I've not been able to repeat this though.
 

plexfit

macrumors newbie
May 18, 2018
21
10
In their review of the MydigitalSSD SBX, anandtech was a bit negative about power managment :

https://www.anandtech.com/show/12538/the-mydigitalssd-sbx-ssd-review-nvme-on-the-cheap/8

Quote from their conclusion:

Aside from pricing, the most significant and consistent disadvantage NVMe drives have compared to SATA drives is with power consumption: efficiency needs to be sacrificed in order to deliver the highest performance. The MyDigitalSSD SBX is without question the lowest-power NVMe SSD we have tested, but its low performance means that it doesn't provide any real improvements to power efficiency. The low power draw of the SBX means that it is no more susceptible to overheating than SATA drives, but the SBX won't give you the same battery life that a good SATA drive will.

This is especially true when taking into account the difficulties with NVMe power management. Phison-based drives are far from the only NVMe SSDs that have severe power management issues, but the earlier Phison E7 controller platform produced some of the most embarrassing power management quirks we've seen. The Phison E8 controller used by the SBX is a clear improvement, but the firmware still needs work. As tested and currently shipping, the SBX cannot use its deepest idle power state and cannot stay in its intermediate sleep state for more than a few seconds without waking back up. The MyDigitalSSD SBX is a poor choice for battery-powered systems, but this may be fixable with a firmware update.

Yeah that's too bad that it has some bugs but if you look at the active power idle consumption (no lpm), it is still the lowest. Until somebody get ASPT working, I think sbx is the undisputed king in term of power consumption.
 

vk2fro

macrumors member
Apr 29, 2015
99
51
Sydney, Australia
I've just finished implementing ROM flashing into my OS X system firmware dumping application. You can now use it to both dump AND flash your system ROM, right from OS X. SIP must be disabled in order to use the program if you're running OS X 10.11 or later. Download the tool here.

Disclaimer: Flash your system ROM AT YOUR OWN RISK! I am not responsible for any bricked machines as a result. This should not happen (I tested on quite a few machines, and it worked every time), but if you have external EEPROM programming hardware, you'll have no issues regardless.

In the mac Pro section of the forums dosdude has built a rom flashing/dumping utility which gets us one step closer to being able to fix the hibernation issues on 2013/14 macbook pro's! Well done dosdude! :)

Following gilles_polysoft's footsteps, I have dumped my macbook pros rom, added the 2015 macbooks pro's NVMe DXE to the rom, but am having a hard time with macIASL doing the final part of putting the driver into the DSDT. How exactly is it done? Is it safe for me to put my NVME, 8 at line 272, as that would match up with gilles_polysofts trick of putting it above the line "Offset (0x12C),"
 
Last edited:
  • Like
Reactions: l_zhang

buchacho

macrumors newbie
Dec 16, 2008
19
1
I tried installing High Sierra on a new M.2 SSD drive with an installer on a USB key (Macbook Air Early 2015). I did not update the old SSD to High Sierra beforehand, it is running Sierra. The new drive was recognized, but sometime during the boot process, I am guessing the machine rebooted, but could not find/boot the drive. Do I have to update my old SSD to High Sierra first?
 

gilles_polysoft

macrumors regular
Jul 7, 2017
244
671
Tours (France)
In the mac Pro section of the forums dosdude has built a rom flashing/dumping utility which gets us one step closer to being able to fix the hibernation issues on 2013/14 macbook pro's! Well done dosdude! :)
Yes, work of dosdue is excellent ! I couldn't imagine that any day would come a so easy way to dump/flash the BootRom, thanks to his work !

Following gilles_polysoft's footsteps, I have dumped my macbook pros rom, added the 2015 macbooks NVMe DXE to the rom, but am having a hard time with macIASL doing the final part of putting the driver into the DSDT. How exactly is it done? Is it safe for me to put my NVME, 8 at line 272, as that would match up with gilles_polysofts trick of putting it above the line "Offset (0x12C),"

In fact, from recents tests I assume you can now ignore the DSDT part of the patch and only update the NVMe DXE driver.

Three days ago I just installed a 2TB 960 Pro for a customer in his late 2013 15" rMBP, and I only made the single update of the NVMe driver, without the DSDT part.
And hibernation works perfectly...

So, just try to update the NVMe driver, it will be suffisent and, to me, it enough for having hibernation perfectly working.
Sorry for the confusion with this unnecessary patching of the DSDT table.


The general consensus is to
  • turn off transition from deep sleep to hibernation (standby 0)
  • prevent the system from writing memory to the SSD in the first place (hibernationmode 0), and
  • turn off auto-poweroff (autopoweroff 0)

Sorry but it is not what gets out of the tests.

The only change to be made with 2013-2014 rMBP and MBA is to set standby mode to 0. Nothing else is necessary.

And with the BootRom mod (= replacing the NVMe DXE driver with the more complete one of the 2015 macs), no more modification is necessary anymore. With the BootRom patch, Standby mode can be set to 1 and hibernation works perfectly (last week I put a full week to sleep a late 2013 rMBP with a NVMe drive and woke it up regularly, and got 94% of battery after 1 week of hibernation).
[doublepost=1527707990][/doublepost]
I don't know how this worked, but I tried boot camping windows 7 on the macbook, but it didn't work (couldn't boot windows 7 - should have known as the drive shows up as external at boot time).
Windows 7 does not natively knows how to boot from NVMe drives... It is an OS from 2009 after all !
You have to manually add NVMe driver to windows 7 but it doesn't always work...

As for the 10s delay it completely disappear once you have updated the BootRom with the full NVMe driver...
 

vk2fro

macrumors member
Apr 29, 2015
99
51
Sydney, Australia
So, the correct mod is:

1. Open the MBP114_0182_B00.fd file with uefi tool
2. Search for (command F) text, non unicode, case sensitive the string "NVMe" (without quotes).
3. two finger click the parent "51116915-C348....." item and Extract as is, give it a sensible name (NVMEDXE114.bin for example).
4. Use dosdude1's bootrom extractor to grab the target machines bootrom. This keeps the ME and Serial intact
5. Open it with UEFItool, and repeat the search outlined in step 2
6. Two finger click the parent item "51116915-C348" and choose Replace as is with the DXE driver extracted in step 3
7. Save the modified rom with a suitable file name, when prompted, select yes to open the revised rom file.
8. Repeat the search in step two, and verify the size of the DXE driver to be 25820 bytes. It should open in UEFItool without any errors.
9. AT YOU OWN RISK, burn the modified code to the target macs bootrom with dosdude1's tool.
10 reset power management to defaults if you have made changes with the pmset command. This is achieved by going to Energy Saver Prefpane and selecting "restore defaults" on both the AC and Battery tabs.

It is best practice to take a triple read of the original rom from the macbook using dosdude1's tool and ensure the md5 sums match, to ensure you get a good backup, and keep it somewhere safe.

Please note that my instructions assume you are using the trackpad on the laptop, or an apple magic trackpad which is what I use on my hack. Two finger click = right click ;)

gilles_polysoft has corrected my use of UEFItool in the above instructions, and I have edited this post to reflect that. This procedure works to eliminate the sleep issue on 2013/2014 MBP's. Of course I take no responsibility for your actions, but these steps are simple enough to follow.
 
Last edited:

gilles_polysoft

macrumors regular
Jul 7, 2017
244
671
Tours (France)
So, the correct mod is:

1. Open the MBP114_0182_B00.fd file with uefi tool
2. Open it with UEFItool, and search non unicode, case sensitive for "NVMe"
3. option click the parent "51116915-C348....." item and Extract Body, give it a sensible name
^^^^^^ no : use "Extract as is" instead. (I have corrected my past post)

4. Use dosdude1's boot room extractor to grab the target machines bootrom. This keeps the ME and Serial intact
Yes, exactly (dosdude1 tool seems to work great, it seems to use the GNU flashrom tool).
By safety, you have to save your extracted Bootrom with a comprehensive name (ex: Gilles_MBPR111_C02XXXXXXXXX_Original.rom)
and you should verify :
- that when opening your saved BootRom with an Hexadecimal editor you can find in it your exact MacBook Pro plain serial number
- that it opens correctly with mac UEFI Tool without any error message
5. Open it with UEFItool, and repeat the search outlined in step 2
6. Replace body of the parent item "51116915-C348" with the DXE driver extracted in step 3
7. Save the modified rom with a suitable file name, when prompted, select yes to open the revised rom file
8. Repeat the search in step two, and verify the size of the DXE driver to be 25820 bytes with data checksum D5h
9. AT YOU OWN RISK, and wait for gilles_polysoft to confirm these instructions are correct, burn the modified code to the target macs bootroom with dosdude1's tool.
10 reset power management to defaults if you have made changes with the pmset command.

If these instructions are correct gilles_polysoft, this is VERY easy to do. However the extract and replace commands have two options. Do I extract/replace "body" or "as is"? Although I have a ISP reprogrammer, I'd like to avoid having to reprogram the rom that way if I get the choices wrong.

It seems correct to me once you use extract "as is".

The whole manipulation is simple BUT as of today, 30 may 2018, and although my experience of NVMe DXE driver replacement was in 3 different cases very simple, straightforward, and working at the first time, I could only recommend to only do the manipulation if you have a backup of your datas, a second backup computer and an SPI programmer with appropriate cables, if anything would go wrong.
I can't do anything else that advising to : Go slowly, verify twice each step, and have a backup.

That said, I would prefer that Apple would include those modification in futures BootRom upgrades, but at present, the DXE NVMe driver seems to be simple, straightforward and effective.
 

vk2fro

macrumors member
Apr 29, 2015
99
51
Sydney, Australia
So extract as is, and replace as is in steps 3 and 6 of the instructions I listed - I'll edit my post.

edit: and with great bravery I forged ahead. Viewing the original and modified firmware in iHex and searching for my macs serial number, it was present in both firmwares.

So I went over to the coffee table where my macbook is, plugged in the usb stick with the modified rom on it, copied it and dosdude1's tool to the desktop, grabbed an additional backup copy of the rom using the tool and placed it on the usb stick, then proceeded to flash the modified firmware.

IT WORKS! haha how easy was that. Thankyou gilles_polysoft and other contributers. Of course this was only a restart/shutdown and boot, but at least the machine boots, now have reset both AC and Battery energy saver prefpanes to their defaults, and have closed the lid to see if the machine will wake without problems. The 10 second boot issue I cannot comment on, as previously stated it went away when I tried to bootcamp windows 7.
 
Last edited:

imax2k2

macrumors regular
Feb 25, 2009
107
9
So extract as is, and replace as is in steps 3 and 6 of the instructions I listed - I'll edit my post.

edit: and with great bravery I forged ahead. Viewing the original and modified firmware in iHex and searching for my macs serial number, it was present in both firmwares.

So I went over to the coffee table where my macbook is, plugged in the usb stick with the modified rom on it, copied it and dosdude1's tool to the desktop, grabbed an additional backup copy of the rom using the tool and placed it on the usb stick, then proceeded to flash the modified firmware.

IT WORKS! haha how easy was that. Thankyou gilles_polysoft and other contributers. Of course this was only a restart/shutdown and boot, but at least the machine boots, now have reset both AC and Battery energy saver prefpanes to their defaults, and have closed the lid to see if the machine will wake without problems. The 10 second boot issue I cannot comment on, as previously stated it went away when I tried to bootcamp windows 7.
Hi guys,

I have the modified bootrom. However I'm not able to put my mbp into the 'firmware programming mode'. The Rom tool tries to update the rom, however it takes like 2 seconds I get the confirmation its successful. But when I redownload the bootrom using the tool, I can still see the older DXE firmware in it. So its not working, how did you put your MBP in the firmware programming mode?

Thanks
 
  • Like
Reactions: Cmd+Q

Cmd+Q

macrumors member
Apr 23, 2018
57
75
But when I redownload the bootrom using the tool, I can still see the older DXE firmware in it. So its not working, how did you put your MBP in the firmware programming mode?

With so many folks trying this (here and parallel threads), I decided to give it a go late last night - and ran into the exact same issue: Dumped the image three times with ROMTool, modified the image in UEFITool, tried to flash the modified image to the system with ROMTool and do a verification read on with ROMTool. The MD5 of the bin file from the last steps matches the backup dumps. So I must have missed a step as well.
 

imax2k2

macrumors regular
Feb 25, 2009
107
9
With so many folks trying this (here and parallel threads), I decided to give it a go late last night - and ran into the exact same issue: Dumped the image three times with ROMTool, modified the image in UEFITool, tried to flash the modified image to the system with ROMTool and do a verification read on with ROMTool. The MD5 of the bin file from the last steps matches the backup dumps. So I must have missed a step as well.

The problem lies where the Rom tool says to put the Mac in the 'programming/firmware update mode'. I have tried what it says i.e. Hold power button continuously after shut down to reboot for more then 15 seconds, my mac refuses to go into that mode, or there is another way to do it, which I don't think is the case. Dosdude1 actually has a video description which talks about this.


Goto the video on youtube and look at the text under it.

This is where apple wants you to do it:

https://support.apple.com/en-gb/HT201692

Turn on the computer and continue holding the Power button. The sleep LED will blink rapidly, then slowly, then rapidly (3 quick blinks, 3 slow blinks, 3 quick blinks).

On Macs that don't have a sleep LED, tones are used instead. Hold down the power button until you hear 3 long tones, then 3 short tones, then 3 long tones.

So thats where our issue is, how did Gilles & vk2pro achieved it, is what I want to know.

EDIT: One thing I'm suspecting is, perhaps it takes so long for the MBP to find the new NVMe drive, that its skipping the button hold event. Maybe if we put the old drive in and then try it might work?
 
  • Like
Reactions: l_zhang
Register on MacRumors! This sidebar will go away, and you'll see fewer ads.